Figure: Secure Peering IPsec Page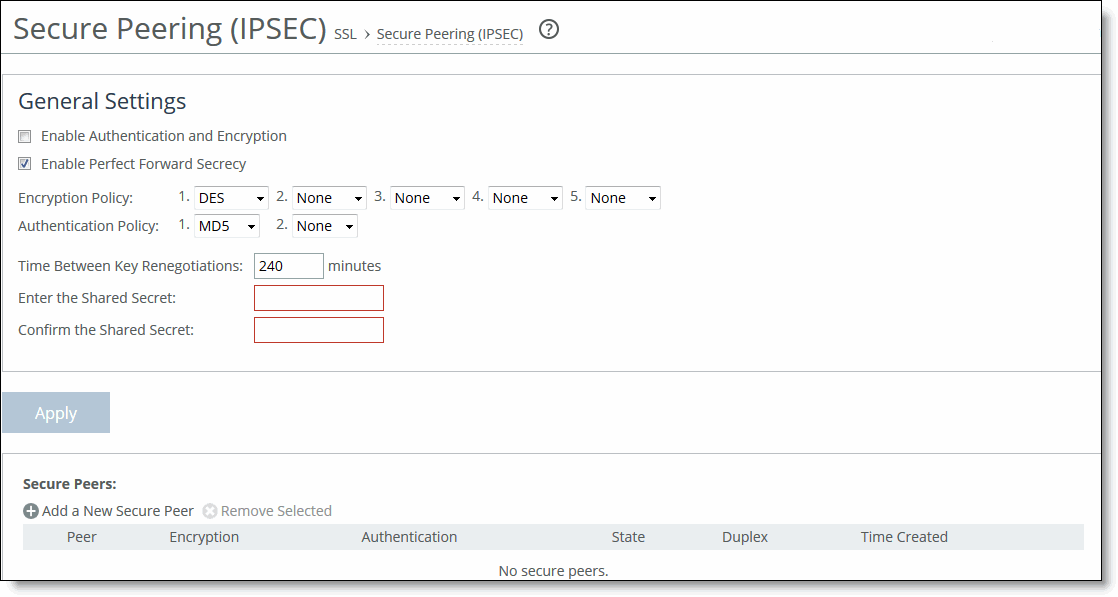
Control | Description |
Enable Authentication and Encryption | Enables authentication between SteelHeads. By default, this option is disabled. |
Enable Perfect Forward Secrecy | Enables additional security by renegotiating keys at specified intervals. If one key is compromised, subsequent keys are secure because they’re not derived from previous keys. By default, this option is enabled. |
Encryption Policy | Select one of these encryption methods from the drop-down list: • DES - Encrypts data using the Data Encryption Standard algorithm. DES is the default value. • NULL - Specifies the null encryption algorithm. • None - Doesn’t apply an encryption policy. • 3DES - Appears when a valid Enhanced Cryptography License Key is installed on the appliance. Encrypts data using the Triple Digital Encryption Standard with a 168-bit key length. This standard is supported for environments where AES has not been approved, but is both slower and less secure than AES. • AES - Appears when a valid Enhanced Cryptography License Key is installed on the appliance. Encrypts data using the Advanced Encryption Standard (AES) cryptographic key length of 128 bits. • AES256 - Appears when a valid Enhanced Cryptography License Key is installed. Encrypts data using the Advanced Encryption Standard (AES) cryptographic key length of 256 bits. Provides the highest security. Optionally, select an algorithm from the method 2, 3, 4, or 5 drop-down lists to create a prioritized list of encryption policies for negotiating between peers. Note: Peer SteelHeads must both have a valid Enhanced Cryptography License Key installed to use 3DES, AES, or AES256. When a SteelHead has the valid Enhanced Cryptography License Key installed and an IPSec encryption level is set to 3DES or AES, and a peer SteelHead doesn’t have a valid Enhanced Cryptography License Key installed, the appliances uses the highest encryption level set on the appliance without the key. |
Authentication Policy | Select one of these authentication methods from the drop-down list: • MD5 - Specifies the Message-Digest 5 algorithm, a widely used cryptographic hash function with a 128-bit hash value. This is the default value. • SHA-1 - Specifies the Secure Hash Algorithm, a set of related cryptographic hash functions. SHA-1 is considered to be the successor to MD5. Optionally, select an algorithm from the method 2 drop-down list to create a secondary policy for negotiating the authentication method to use between peers. If the first authentication policy negotiation fails, the peer SteelHeads use the secondary policy to negotiate authentication. |
Time Between Key Renegotiations | Specify the number of minutes between quick-mode renegotiation of keys using the Internet Key Exchange (IKE) protocol. IKE uses public key cryptography to provide the secure transmission of a secret key to a recipient so that the encrypted data can be decrypted at the other end. The default value is 240 minutes. |
Enter the Shared Secret/Confirm the Shared Secret | Specify and confirm the shared secret. All the SteelHeads in a network for which you want to use IPSec must have the same shared secret. |
Add a New Secure Peer | Displays the controls to add a new secure peer. • Peer IP Address - Specify the IP address for the peer SteelHead (in-path interface) for which you want to make a secure connection. |
Add | Adds the peer specified in the Peer IP Address text box. If a connection has not been established between the two SteelHeads that are configured to use IPSec security, the peers list doesn’t display the peer SteelHead status as mature. Note: Adding a peer causes a short service disruption (3 to 4 seconds) to the peer that is configured to use IPSec security. |
Remove Selected | Select the check box next to the name and click Remove Selected. |