Managing web proxies
You configure web proxy for internet-bound traffic in the Web Proxy page. This section includes these topics:
About web proxies
A single-ended web proxy transparently intercepts all traffic bound to the internet. The web proxy improves performance by providing optimization services such as web object caching and SSL decryption to enable content caching and logging services. The efficient caching algorithm provides a significant advantage for video traffic. The benefit comes in the form of multiple users viewing the same video content, thereby saving significant WAN bandwidth and providing efficient network use. YouTube caching is handled as a special case given its growing popularity in the enterprise.
Web proxy improves HTTP performance and reduces congestion on internet traffic. It also provides performance benefits when you access HTTP(S) servers on the internet directly from a branch office. It provides visibility to all internet activity at any given branch as long as that destined traffic passes through the web proxy. Web proxy is only supported on the SteelHead CX and the xx70.
You enable the web proxy in a single-ended or asymmetric SteelHead deployment; a server-side SteelHead isn’t required. Both physical and virtual in-path deployments are supported.
Web proxy is critically dependent on DNS resolution, specifically Reverse DNS lookups sourced from the Primary interface, for appropriate HTTP/HTTPS proxy services to occur. Because the SteelHead must successfully resolve hostnames to be cached and proxied the Primary interface of the SteelHead must be configured with valid IP address and DNS information. In addition, the interface must be in an active state (even when it isn’t used by your supported deployment model). Make sure that the SteelHead DNS configuration and the Primary interface on the SteelHead are both configured and active.
HTTPS web proxy integrates with the certificate authority (CA) service on the SCC to generate server certificates and decrypt traffic for a predefined whitelist.
Web object caching includes all objects delivered through HTTP(S) that can be cached, including large video objects like static VoDs and YouTube video. The size of objects that can be cached is limited only by the total available cache space, determined by the SteelHead appliance model. The proxy cache is separate from the RiOS data store. When objects for a given website are already present in the cache, the system terminates the connection locally and serves the content from the cache. This saves the connection setup time and also the bytes to be fetched over WAN.
The maximum size of a single object is unlimited. An object remains in the cache for the amount of the time specified in the cache control header. When the time limit expires, the SteelHead evicts the object from the cache. The cache sizes range from 50GB to 800GB.
The proxy cache is separate from the RiOS data store. When objects for a given website are already present in the cache, the system terminates the connection locally and serves the content from the cache. This saves the connection setup time and also reduces the bytes to be fetched over the WAN.
You can view web proxy connections in the SteelHead in the Current Connections report as a new connection type: web proxy. SteelHead log messages display SEPIA_YES if web proxy is successful.
Web proxy supports IPv4 only.
Enabling HTTP web proxy
The HTTP web proxy has these characteristics:
• The cache sizes range from 50 GB to 500 GB on SteelHeads.
• The cache content is persistent after reboots and service restarts.
• There isn’t individual object size limitation.
• The cache storage space has been expanded on SteelHeads. The xx55 models have 50 GB of cache space for Web Proxy storage.
• The request logging format has been expanded to improve visibility, debugging, and diagnostics.
• You can use the Web proxy with virtual in-path deployments such as WCCP and PBR.
The in-path rule table includes a default web proxy rule set to Auto. By default, all traffic not specified in user-configured rules is web proxied for internet-bound traffic. This includes all traffic destined to public IP addresses not included in Request for Comments (RFC) 1918 on port 80 and 443. Only IPv4 is supported for web proxy. SteelHead Cloud Acceleration (SCA) takes priority over web proxy when web proxy is configured as Auto.
If you need a more fine-grained rule for public IP addresses, then you must add a new in-path rule with these options:
• Type: Auto Discover
• Web Proxy: Auto
• Source Subnet: IPv4 address or subnet
• Destination Subnet: IPv4 address or subnet
• Port: No matter what port is specified, only port 80 and 443 traffic is directed to the web proxy
If you need an in-path rule for private or intranet IP addresses, specify these options:
• Type: Pass Through
• Web Proxy: Force
• Port: Any port or port-label specified is proxied. This value results in plain TCP proxying without optimizations if the traffic isn’t detected to be HTTP or HTTPS.
To enable HTTP web proxy
2. Choose Manage > Optimization: Web Proxy to display the Web Proxy page.
3. Select Enable Web Proxy to enable HTTP Web caching.
4. Click Save to save your settings.
Enabling HTTPS web proxy
HTTPS web proxy allows caching content that’s SSL encrypted. HTTPS web proxy is required for YouTube caching. This topic includes:
Server Certificates are autogenerated and autorenewed based on a domain whitelist of the SCC. The decrypting key and certificate are stored on the secure store on the client-side SteelHead.
Prerequisites
These prerequisites are required for HTTPS web proxy:
• Certificate Authority (CA) service must be configured on the SCC.
• CA certificate must be trusted by the clients and browsers.
• CA certificate has a default validity of 365 days.
• CA certificates are automatically renewed when within two days of expiration.
• CA certificate validity checks occur every 24 hours.
• If a CA certificate can’t be renewed, the default behavior is to no longer serve the expired certificate.
• If renewal fails, an error is logged, and traffic isn’t decrypted for that domain.
YouTube caching
YouTube caching is enabled by default. Caching for YouTube uses a heuristic algorithm based on observed traffic flow that automatically learns the key to cache YouTube traffic. Because YouTube traffic is typically encrypted, HTTPS web proxy optimization must be enabled. You must add these domains to the HTTPS domain whitelist:
• *.googlevideo.com
• *.youtube.com
In SCC 9.8, you can view YouTube cache usage statistics. For more information, see
Viewing web proxy reports.YouTube caching is not supported on Firefox and mobile browsers.
In-path pass-through rule
There is a default pass-through rule for all secure ports traffic above the default in-path rule that prevents all traffic to port 443 from being intercepted.
If HTTPS proxying is required, then the pass-through rule must be added above the secure ports rule, to direct SSL traffic to the web proxy with these options:
• Type: Pass Through
• Web Proxy: Force
• Port: Any port or port-label specified is proxied. This value results in plain TCP proxying without optimizations if the traffic isn’t detected to be HTTP or HTTPS.
To enable HTTPS decryption and caching
3. Make sure that all domains defined in the web proxy whitelist have the CA configured on the client browser.
4. Choose Manage > Optimization: Web Proxy to display the Web Proxy page.
5. Select Enable HTTPS Optimization to enable HTTPS caching.
6. Click Save to save your setting permanently.
7. If necessary, define a pass-through rule for port 443 traffic and push it to appliances.
Adding domains to the whitelist for HTTPS
You add a list of domains that you want to decrypt for HTTPS caching. The domain names can either be hostnames (for example, myhost.riverbed.com) or wildcard domain names (for example, *.riverbed.com).
To add domains to the global HTTPs whitelist
1. Choose Manage > Optimization: Web Proxy to display the Web Proxy page.
2. Under Global HTTP Whitelist, click the + Add Domain to display the pop-up window.
3. Specify the domain name and click Add Domain. The domain appears in the global HTTPS whitelist table.
For HTTPS web proxy, before adding domains, make sure that the SCC CA is trusted by all client browsers defined in the domain whitelist.
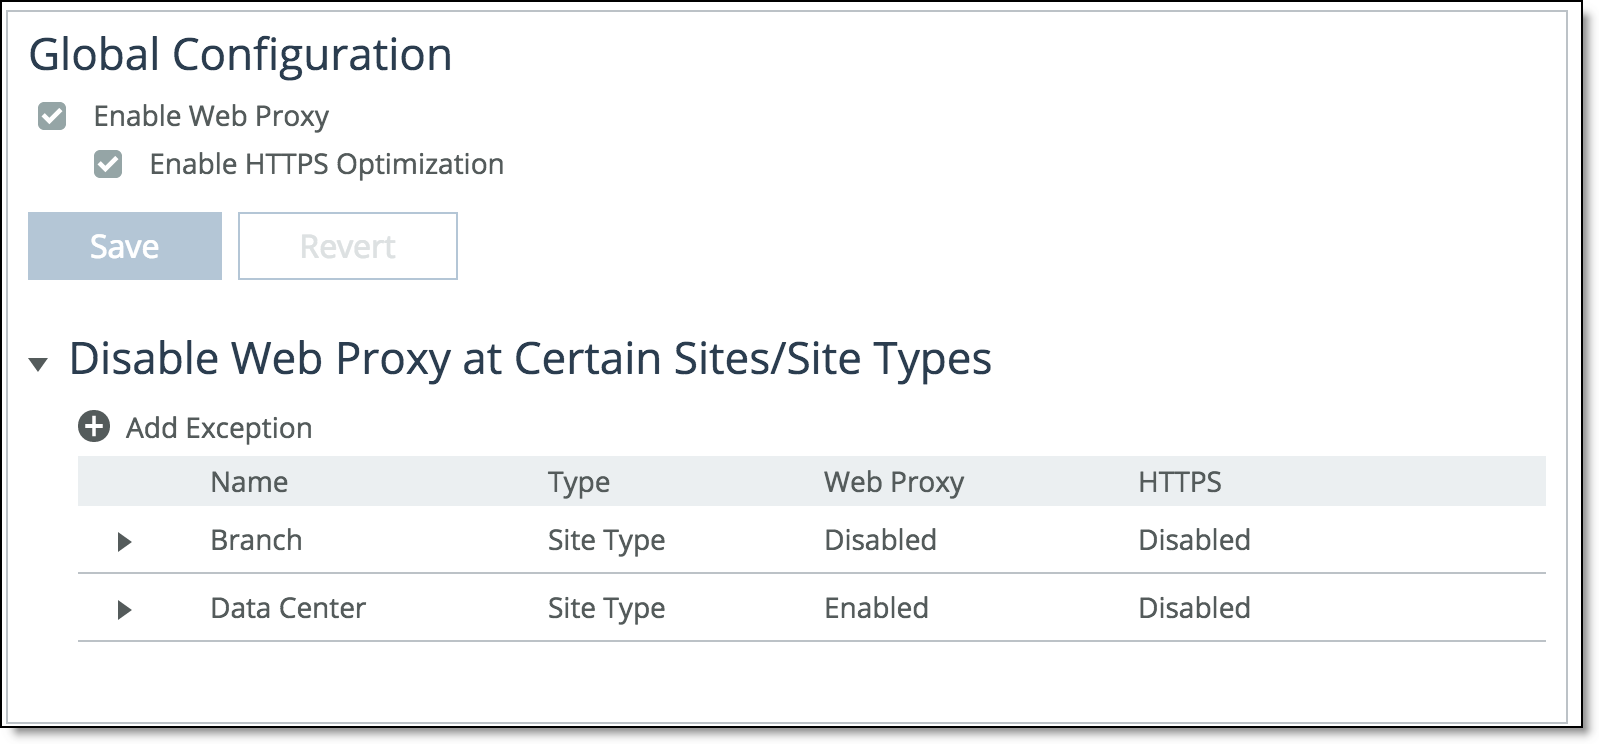
What happens to whitelist exceptions in 9.5 or later?
In SCC 9.5 or later, you can no longer configure exceptions to the whitelist. After an upgrade to 9.5 or later, all exceptions to the whitelist are treated as a separate profile.
Before you upgrade, the whitelist exceptions are listed in the Exceptions list.
Before upgrade exceptions list
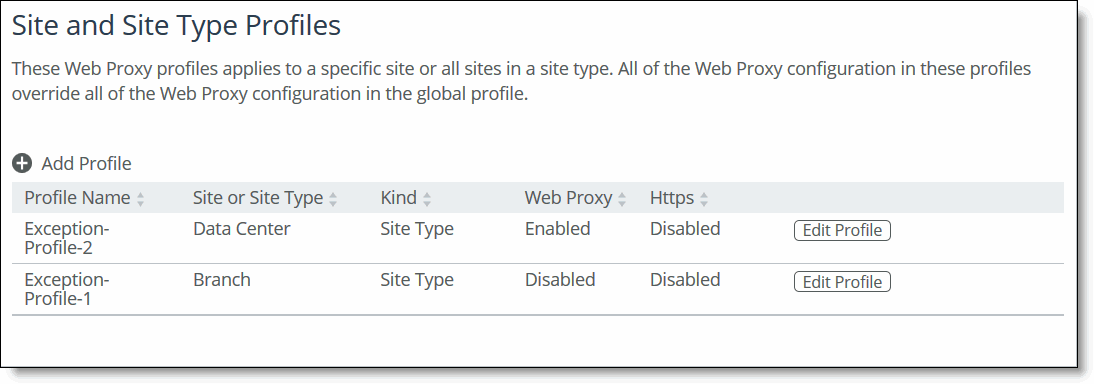
After you upgrade to 9.5 all your whitelist exceptions are listed as such, in the Site and Site Type Profiles list.
After upgrade exceptions listed under profiles
Configuring web proxy profiles
You can create more specific configurations for web proxies based on sites and site types. Each web proxy profile contains all the configurations displayed in the Global Profiles table on the Web Proxy page. A site or site type receives the settings from the Global profile of the Site profile—there is no mixing or matching between the two profiles.
A web proxy profile has to be associated with an existing site or site type. For example, Site1 can’t be deleted from Sites and Networks if Site1 is a part of web proxy profile that only has Site1 as its member. However, Site1 can be deleted from Sites and Networks if Site1 is a part of a web proxy profile that has multiple sites associated with it, for example Site1 and Site2. These rules apply to Site Types as well.
To configure a site or site type profile
1. Under Site of Site Type Profile, click + Add Profile to display pop up window.
2. Complete the configuration as described in this table.
Control | Description |
Profile Name | Specify the name of the web proxy profile so that you can easily distinguish it from others. |
Duplicate Existing Profile | Select one of these options • Create Blank Profile—Creates a new profile. • Duplicate existing profile—Select and click the text box to display the existing profiles from which to choose from. |
Site | Select one of these options • Site - Select and click the text box to display the available sites. • Site Type - Select and click the text box to display the available sites. |
Create Profiles | Creates the site or site type profile. |
Modifying web proxy profiles
You can modify web proxy profiles from the profiles list.
To modify site or site type details
1. Click Edit Profile for the profile that you want to view in the profiles list.
2. Click Edit, to display the Edit Web Proxy Profile pop up window.
3. Type a new profile name.
4. Select Site or Site Type, select the new value, and click Save.
5. Under Web Proxy configuration modify your configuration settings and click Save.
6. Under HTTPS Whitelist click + Add Domain to display the pop-up window.
7. Specify the domain name you want to include and click Save.
Configuring parent proxy chaining
Most enterprise customers have an existing proxy or cloud web security server for caching or security services. The parent proxy chaining feature provides interoperability with a transparent upstream parent proxy or an explicit parent proxy setting to provide a local cache to save bandwidth. Enabling parent proxy reduces additional round trips if content can be served from a cache.
This feature supports these parent proxy modes:
• Off—No parent proxy is configured. This is the default setting.
• Automatic (Explicit)—Clients/browsers are explicitly configured to connect to an upstream proxy. In automatic mode the client/browser has an explicit IP address defined in its advanced network settings that defines how the browser connects to the internet. You must import the Certificate Authority (CA) of the parent proxy on to the client-side SteelHead if the parent proxy is intercepting and decrypting HTTPS connections.
• Manual (Transparent)—Clients/browsers connect transparently to the HTTP/S server. Clients/browsers have no knowledge of the proxy. You must import the Certificate Authority (CA) of the parent proxy on to the client-side SteelHead if the parent proxy is intercepting and decrypting HTTPS connections.
You can only have one mode configured on the SCC.
DNS resolution must succeed on SteelHeads for parent proxy chaining to function properly.
Configuring Manual Mode
In manual mode the web proxy transparently redirects the connection to the selected parent proxy. You can exclude domains so that they are not proxied to the upstream parent.
The parent proxy is selected based on:
• Scheme—Depending on the type of traffic, the first parent proxy listed in the HTTP/HTTPS list is selected as the parent proxy. You can have the same parent proxy listed under HTTP and HTTPS. The same parent proxies can have multiple ports. You can have a maximum of five parent proxies listed. For HTTPS, you must import the CA for the parent proxy onto the client-side SteelHead.
• Mode—The default mode is failover. In failover mode if the first parent proxy listed is down the traffic is routed to the next parent proxy in the list and so forth. If none of the parent proxies are up the connection is black-holed. You can also configure load-balance mode using this CLI command:
web-proxy parent manual mode {[failover] | [load-balance]}
where load-balance selects the parent proxies in a round-robin fashion.
Local caching isn’t affected in manual mode.
When the system doesn’t detect a certificate and the packets are tunneled it will appear in the system logs. You can view top domains and top URLs in the Web Proxy report. For details, see
Viewing web proxy reports.To configure a manual parent proxy
1. Choose Manage > Optimization: Web Proxy to display the Web Proxy page.
2. Under Parent Proxy, click the > to expand the page.
3. Select Manual to transparently redirect connections to the listed parent proxies.
4. Under HTTP Servers and HTTPS Servers enter a comma-separated list of parent proxy servers. You can have a maximum of five servers. You can have the same parent proxies in both HTTP and HTTPS. You can also have multiple ports listed for the same parent proxy.
5. Click Save to save your settings.
6. Optionally, to exclude domains from the parent proxy click + Add Domain to display the Parent Proxy Exceptions pop up window. This traffic will not go through the parent proxy.
7. Specify a domain name and click Save. The domain exceptions appear in the domain exception list.
8. For HTTPS, you must import the CA for the parent proxy onto the client-side SteelHead. For details, see the SteelHead User Guide.
9. Under Push to Appliances on the right-side of the window, specify the site or site types and appliances and click Push to push your settings.
Configuring automatic parent proxy chaining
Configure automatic mode for clients/browsers configured with a proxy auto-config (PAC) file or an explicit proxy defined on the browser. In automatic mode the client opens a connection to a proxy specified on the browser:
• If HTTP, it sends a GET request with the correct host header, for example wikipedia.com.
• IF HTTPS, it sends a CONNECT request followed by a handshake.
The client/browser opens a connection to a specific proxy and uses that particular connection to multiplex all of its requests.
Automatic mode doesn’t cache non SSL traffic.
No traffic is optimized if automatic mode is off and the client/browser has an explicit proxy defined.
To configure automatic parent proxy chaining
1. Choose Manage > Optimization: Web Proxy to display the Web Proxy page.
2. Under Parent Proxy, click the > to expand the page.
3. Select Automatic.
4. Under HTTP Whitelisted Servers, enter a comma-separated list of the IP address or hostname of the trusted parent proxy servers. HTTP cache will be enabled for servers you have listed in this field.
5. Click Save. The traffic is transparently redirected to a proxy explicitly defined in the client/browser.
6. For HTTPS, you must import the CA for the parent proxy onto the client-side SteelHead. For details, see the SteelHead User Guide.
7. Under Push to Appliances on the right-side of the window, specify the site or site types and appliances and click Push to push your settings.
Pushing your settings and viewing push status
You can push your settings to sites or site types from the Policy Push Control on the right side of the page. You can also view push status from the Push Status panel on the right side of the page.
If the SCC and SteelHeads are both running 9.2.0 or later, for the initial configuration the SCC pushes the entire configuration. For SteelHeads and an SCC running 9.2 or later, any changes made after the initial push, the SCC pushes only the modified settings to ensure improved response times and throughput performance. If the SCC and SteelHeads are both running 9.0 or 9.1, when you push configuration changes, whether the initial push or after, the SCC deletes the entire configuration and replaces it with the new configuration settings, which can slow response times and performance.
When you perform a policy push, the SCC is the master configuration; any local changes made on SteelHeads are overwritten.
To push settings
1. Under Policy Push Control on the right side of the page, click Include in Push to expand the page and display the Push to Appliances panel.
To exclude appliances from the push, under Push Control on the right side of the page, click Exclude from Push. (This option only appears if you have clicked Include in Push.)
2. Complete the configuration as described in this table.
Control | Description |
Push to Appliances | Select to push your path selection rules: • Site Types—Click the text box to display site types to choose from. Select the site types one at a time to add them to the text box. After you select the site type, it is displayed in the text box. To remove a site type, click the X. To view what sites make up the site type, click See More. We recommend that you choose site types rather than sites to organize your rules as site types make the management of rules easier. • Sites—Click the text box to display sites to choose from. Select the sites one at a time to add them to the text box. After you select the site, it is displayed in the text box. To remove a site, click the X. To view site details, click See Details. |
Push | Pushes configuration settings to the selected sites or site types. Click Clear to clear your settings. |
Viewing push status
You can view the current status of your pushes on the right side of the page in the Push Status panel.
To view current status of configuration pushes
• Under Push Status on the right side of the page, click More to be directed to the Operation History page.
The current operations (that is, pushes) and status are displayed in the Operations table.