About SSL/TLS Acceleration
In this document, SSL and TLS are used interchangeably.
SteelHead accelerates data transfers that are encrypted using SSL, provided that the SteelHeads are deployed locally to both the client-side and server-side of the network. All of the same accelerated connections that are applied to normal nonencrypted TCP traffic can also can also be applied to encrypted SSL traffic. SteelHeads accomplish this without compromising end-to-end security and the established trust model. Your private keys remain in the data center and are not exposed in the remote branch office location where they might be compromised.
The Riverbed SSL solution starts with SteelHeads that have a configured trust relationship, enabling them to exchange information securely over their own dedicated SSL connection. Each client uses unchanged server addresses and each server uses unchanged client addresses; no application changes or explicit proxy configuration is required. Riverbed uses a unique technique to split the SSL handshake.
The handshake is the sequence of message exchanges at the start of an SSL connection. In an ordinary SSL handshake, the client and server first establish identity using public-key cryptography, and then they negotiate a symmetric session key to use for data transfer. When you accelerate SSL, the initial SSL message exchanges take place between the client application (for example, a web browser) and the server-side SteelHead.
SteelHead provides an SSL handshake strategy called distributed termination, in which initial full handshakes are terminated on the server-side SteelHead, while subsequent reuse handshakes are terminated by the client-side SteelHead.
Distributed termination is enabled by default. The time-out value specifies the amount of time the client can reuse a session with an SSL server after the initial connection ends. The range is 6 minutes to 24 hours. The default value is 10 hours.
Distributed termination improves performance by reducing the CPU load on the server-side SteelHead and shortens the key negotiation process by avoiding WAN round trips to the server. Distributed termination also shortens the key negotiation process by avoiding WAN round trips to the server. You can configure reuse of a client-side session for distributed termination.
Riverbed has worked with large enterprise design partners to ensure that accelerated SSL delivers real world benefits in real-world deployments, specifically:
• sensitive cryptographic information is kept in the secure vault—a separate, encrypted store on the disk.
• built-in support for popular Certificate Authorities (CAs) such as VeriSign, Thawte, Entrust, and GlobalSign. In addition, SteelHeads allow the installation of other commercial or privately operated CAs.
• import of server proxy certificates and keys in PEM, PKCS12, or DER formats. SteelHeads also support the generation of new keys and self-signed certificates. If your certificates and keys are in another format, you must first convert them to a supported format before you can import them into the SteelHead.
• separate control of cipher suites for client connections, server connections, and peer connections.
• bulk export or bulk import server configurations (including keys and certificates) from or to, respectively, the server-side SteelHead.
• use of the SCC to streamline setup of SteelHead trust relationships.
The SteelHead has a secure vault that stores all SSL server settings, other certificates (that is, the CA, peering trusts, and peering certificates), and the peering private key. The secure vault protects your SSL private keys and certificates when the SteelHead is not powered on.
Initially the secure vault is keyed with a default password known only to the SteelHead software. This allows the SteelHead to automatically unlock the vault during system start-up. You can change the password, but the secure vault does not automatically unlock on start-up. To SteelHead SSL connections, the secure vault must be unlocked.
About SSL
Because a complete description of SSL is outside the scope of this guide, this section provides a brief overview of the relevant components of SSL security.
SSL provides a way for client and server applications to communicate securely over a potentially insecure network. It provides authentication and prevents eavesdropping and tampering. In the most common use case, you use can SSL to transport HTTP traffic and provide one-way identification: only the web server authenticates itself to the web browser.
Figure: A simple SSL handshake shows a simplified SSL handshake where the server authenticates itself to the client.
A simple SSL handshake

In response to the Hello message, the server sends back its certificate. The certificate contains the server's public key, some identifying information about the server (such as its name and location), and a digital signature of all this information. This digital signature is issued by an entity called a Certificate Authority (CA) that both the client and the server trust, and it serves as proof that no one has tampered with the certificate.
Upon receiving the certificate, the client verifies that it has not been tampered with and that it does belong to that particular server. The client then generates a random number N, encrypts it with the server's public key, and sends it to the server. At this point, both the client and the server use the same function to derive the session key, ks, from N. In the simplest case, after the initial SSL handshake between the client and the server and the creation of the session keys, the same session keys are used for the duration of the session, without the need to go through another SSL handshake.
About termination of accelerated SSL connections
At a high level, SteelHeads terminate an accelerated SSL connection by making the client think it is communicating to the server and making the server think it is talking to the client. In fact, the client is talking securely to the SteelHeads. You require some special provisioning to accomplish SteelHead that appears transparent to the client.
To enable SSL connection termination, you must configure the server-side SteelHead to include proxy certificates and private keys for the purpose of emulating the server. When the SteelHead poses as the server, there does not need to be any change to either the client or the server. The security model is not compromised; the accelerated SSL connection continues to guarantee server-side authentication and prevent eavesdropping and tampering.
When transferring data over the WAN on behalf of an accelerated SSL connection, the client-side and server-side SteelHeads ensure that their inner connection provides all the security features the original SSL connection would have, had it not been accelerated. SteelHeads accomplish this by establishing their own SSL connection between themselves. To secure the inner SteelHead channel, you must configure each SteelHead with the certificate of the peer SteelHead (secure peering). There are various methods to accomplish a secure inner channel between the SteelHeads. The authentication is mutual, with the client initiating the connections to authenticate the server, and the server authenticates the client.
To securely terminate an SSL connection to an SSL server, the following list is a high-level configuration for the server-side SteelHead:
• A certificate and private key pair for the server. This certificate and private key pair does not have to be the same as the one used by the actual server. In a production environment, it would typically be signed by a CA trusted by the client. You can import a signed server certificate into a SteelHead without a private key if you have used the same SteelHead to generate the certificate signing request for that server certificate.
To avoid confusion in this chapter, the certificate residing on the server-side SteelHead (for the server), is referred to as the proxy certificate. The proxy certificate might or might not be the same as the actual server certificate, but it serves the same function. The one exception is if you use client certificates.
• The certificate of the client-side SteelHead.
The client-side SteelHead has only the server-side SteelHead certificate for secure peering between the client-side and server-side SteelHeads. The client-side SteelHead does not need the certificates or keys of the server. This behavior discourages any tampering at the branch office.
The following list describes distributed termination:
• Full SSL handshakes terminate on the server-side SteelHead.
• The master secret containing information that allows the computation of the session key for reusing the session is transported to the session cache of the client-side SteelHead.
• The subsequent handshakes are reused and terminate on the client-side SteelHead.
Figure: Typical data transfer operations on SSL connections accelerated by SteelHeads shows a high-level view of application data crossing the network from the client to the server. After the SSL connection is terminated, there are only three session keys involved: kc, ks, and kt. The data is encrypted with session key kc; then it is decrypted, accelerated, and reencrypted with session key kt for the SSL secure inner channel between the two SteelHeads:
• kc is the session key between the client initiating the transmission and the server-side SteelHead.
• ks is the session key between the server-side SteelHead and the server.
• kt is the session key between the client-side SteelHead and the server-side SteelHead for the SSL secure inner channel.
Typical data transfer operations on SSL connections accelerated by SteelHeads
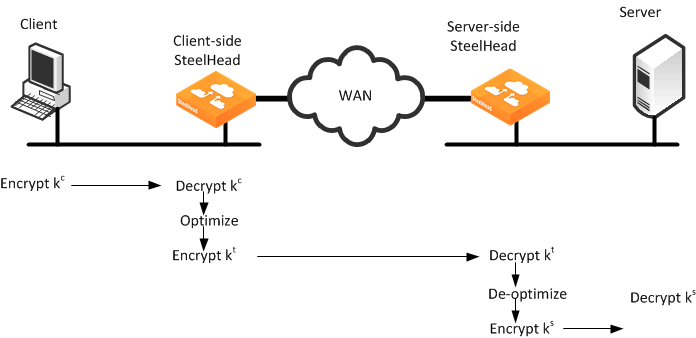
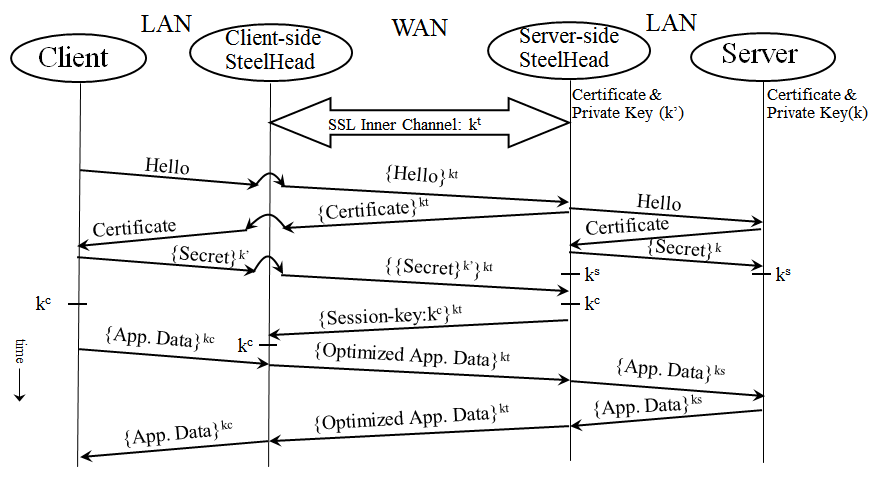
Figure: Time sequence diagram shows in time sequence the complete set of actions to set up an SSL connection.
Time sequence diagram
About required SSL components
This section describes how to configure SteelHeads to accelerate SSL traffic, and it provides common configuration examples. SSL SteelHead required components
You need the following SSL components to deploy SSL on SteelHeads:
Enhanced cryptography license key
U.S. export restrictions require that this license is installed on each SteelHead that has SSL acceleration enabled. You can acquire an enhanced cryptography license key by filling out the online form available at
http://sslcert.riverbed.com.
Proxy certificate and private key
The proxy certificate is the certificate you configure on the server-side SteelHead for the server. Do not confuse this certificate with the certificate used for the secure inner channel or secure peering between the two SteelHeads and, also, the server certificate that is installed on the web and the application server.
To avoid confusion in this chapter, the certificate residing on the server-side SteelHead (for the server), is referred to as the proxy certificate. The proxy certificate might or might not be the same as the actual server certificate, but it serves the same function. The one exception is if you use client certificates.
The proxy certificate can be self-signed, signed by a well-known CA, or signed by your organization's own CA. It can be the same as, or different from, the certificate used by the actual server. The correct type of certificate depends on your deployment.
You can use a single wild card certificate and its private key as the proxy certificate for multiple servers.
For example, you might have three distinct servers using different certificates: sales.riverbed.com, internal.riverbed.com, and marketing.riverbed.com. You can add each of the three server certificates (as the proxy certificates) and their corresponding private keys, or you can add a single wild card certificate (*.riverbed.com) with its private key.
SteelHead simplifies the SSL configuration process because the server-side SteelHead does not need to have a proxy certificate for each server individually. You simply add unique proxy certificates to a certificate pool on the server-side SteelHead. When a client initiates an SSL connection with a server, the SteelHead matches the common name of the certificate on the server with one in its proxy certificate pool. If it finds a match, it adds the server to the list of optimizable servers, and all subsequent connections to that server are accelerated with the same proxy certificate.
If it does not find a match, it adds the server name to the list of bypassed servers and all subsequent connections to that server are not accelerated. The optimizable and bypassed server lists appear on the server-side SteelHead SSL Main Settings page of the Management Console.
If your proxy certificate and private key are in a format other than PEM, PCKS12, or DER, you must convert the certificate and key before you import them. The file extension does not necessarily dictate the encoding, as many common extensions such as .crt, .cer or .key can be either PEM or DER encoded.
To convert a certificate and private key, we recommend using an open source toolkit such as OpenSSL.
For information about converting a Base64 encoded PCKS12 certificate to PEM, go to Knowledge Base article
S13301.
Certificate chain discovery
You can use intermediary certificates instead of signing all certificates with a root level certificate. You can configure the server-side SteelHead to automatically pull down intermediate certificates from the back-end server.
Use the protocol ssl backend server chain-cert cache enable command on the server-side SteelHead to enable certificate chain discovery.
Alternatively, you can use the Management Console to enable certificate chain discovery. By default, this option is disabled.
Certificate authority certificates
Before the server-side SteelHead can establish an SSL connection to the server, it needs to verify the authenticity of the server certificate. This verification is based upon the model of trust relationships established within a public key infrastructure.
In this model, the issuer of the certificate is a third party that is trusted by both the subject (owner) of the certificate and the party (client) relying on the certificate. A certificate authority (CA) is an entity that issues a certificate. A client establishes a trust relationship to the CA first and, subsequently, uses the certificate of the CA to verify the authenticity of a server certificate. A SteelHead establishing an SSL connection acts as a client.
A SteelHead includes a list of commonly used public CA certificates preinstalled. When the certificate of your server is signed by a private CA, you must install that private CA certificate in the server-side SteelHead. This certificate establishes the trust relationship to the private CA and, consequently, the server certificates that this private CA issues.
With SteelHead 9.8 and later, server-side SteelHead appliances can validate SSL certificates returned by the server using the online certificate status protocol (OCSP).
Before adding a CA, you must verify that it is genuine; a malicious CA can compromise network security.
SteelHead 9.12 introduces a new SSL simplification feature that provides a simplified, modular, and automated platform for managing SSL certificates.
Peer certificates
Each SteelHead participating in SSL acceleration requires a peer certificate. The peer certificates allow the client-side and server-side SteelHeads to establish a secure inner channel. You can distribute these certificates several different ways: manual cut-and-paste; using the white, gray, and black peering lists; or through the SCC.
The peer certificates between the SteelHeads can be, and in most cases are, self-signed certificates. The session keys derived between the SteelHeads are used for encrypting data within the secure inner channel. The encrypted data ensures that the SSL session is secure end to end.
We strongly recommend that you use the SCC to centrally configure SteelHead secure peering and manage the peering certificates in a medium-to-large size SteelHead deployment. Using the SCC allows you to simplify SteelHead management and increase your operational efficiency.
Setting simple SSL acceleration
This section describes a simple deployment to help you set up, test, and understand basic SSL acceleration functionality. This simple deployment chooses simplicity over security and installs a self-signed proxy certificate on the server-side SteelHead. You can test this deployment against an operational web server that uses SSL.
This deployment example uses a self-signed certificate. We recommend that you verify with your enterprise IT security officer that the use of self-signed certificates follows your enterprise IT security practices.
To complete this deployment, you need two SteelHeads, a WAN simulator, a LAN connection between the client and client-side SteelHead, and another LAN connection between the server and the server-side SteelHead. This example uses a self-signed certificate; however, the configuration steps remain the same for a CA-signed certificate.
You can enable a Certificate Authority (CA) service in SCC. You can configure the CA service on the SCC as a root CA or an intermediate CA. This CA service enables you to issue trusted CA-signed secure peering certificates and proxy certificates to the SteelHeads that are managed by the SCC.
This deployment assumes that your web server is configured for SSL connections and is running and that the client-side and the server-side SteelHeads can SteelHead non-SSL TCP traffic.
1. In the Management Console, choose Administration > Maintenance: Licenses.
2. Verify that both the client-side and server-side SteelHead have the Enhanced Cryptographic License Key installed to enable SSL acceleration.
3. Set up the client-side SteelHead:
– On the client-side SteelHead, choose Networking > App Definitions: Port Labels.
– Select the secure port label, remove port 443, and click Apply.
– The default in-path rules contain a pass-through rule for all traffic destined to the ports defined in the secure port label. SteelHead intercepts SSL traffic on the well-known TCP port 443. Use an in-path rule with a custom port and preoptimization policy set to SSL to intercept SSL traffic on another TCP port.
4. Enable SSL acceleration on both the client-side and server-side SteelHeads.
– From the Management Console, choose SteelHead > SSL: SSL Main Settings.
– Enable SSL acceleration and click Apply.
– Restart the SteelHead service.
5. Create a proxy certificate on the server-side SteelHead:
– Choose Add a New SSL Certificate.
– Enter a name for the proxy certificate.
– Select Generate Self-Signed Certificate and New Private Key.
– Enter the proxy certificate common name and other details. The common name must match the server certificate common name or one of its subject alternative names.
– Click Add.
6. Configure secure peering (SSL) between the client-side and server-side SteelHeads.
– From the client-side SteelHead, choose SteelHead > SSL: Secure Peering (SSL). The default SSL secure peering settings is SSL Only. This setting instructs the SteelHead to pass all accelerated SSL traffic through the secure inner channel.
– Under Certificate, select PEM, and copy the client-side SteelHead secure peering (SSL) certificate.
– Do not confuse this certificate with the proxy certificate.
– From the server-side SteelHead, add the client-side SteelHead as a trusted peer by selecting Add a New Trusted Entity.
– Select Trust New Certificate.
– Select Cert Text and paste the client-side SteelHead secure peering (SSL) certificate into the text box.
– Click Add.
7. Repeat the procedure to configure the server-side SteelHead as a trusted peer in the client-side SteelHead.
Verifying that SSL acceleration is successful
1. Connect to the secure web server from the client.
2. Choose Reports > Networking: Current Connections report in the Management Console on the server-side SteelHead and verify that the connections are being accelerated without any protocol errors.
If you see any protocol errors, expand the connection and examine the details.
The SteelHeads are capable of automatically detecting and configuring secure peering (SSL) between themselves if they are both using self-signed secure peering certificates. If SSL acceleration is correctly configured on both the client-side and server-side SteelHeads, the self-signed secure peering certificate of the client-side SteelHead automatically populates into the server-side SteelHead self-signed peer gray list and vice versa after an SSL connection is attempted across the SteelHeads. Use the drop-down menu to move the peer SteelHead into either self-signed peer white list or self-signed peer black list.
The client uses the proxy certificate to secure the SSL session instead of the server certificate in a SteelHead accelerated SSL connection. This usage is because of the way the SteelHead terminates an accelerated SSL connection.
Generating the proxy certificate and private key pair
The following table shows the four options available for generating the proxy certificate and its private key. The proxy certificate and its private key are installed in the server-side SteelHead. To SteelHead an SSL session, a proxy certificate for the server is required.
In an accelerated SSL session, the client receives the proxy certificate instead of the server certificate. The proxy certificate might or might not be the same as the server certificate. This scenario is the same for its private key. Nonetheless, the choice of proxy certificate is transparent to the client as the server common name in both certificates is the same, and the connection is secure end-to-end.
Proxy certificate | Private key | Description |
Real server certificate | Real private key | You can reuse the real server certificate and private key pair as the proxy certificate and private key pair. This option is ideal but is not always available. For example, you can connect to a cloud-hosted application over SSL that uses a public certificate. The real server certificate and its private key are not available to you because you do not belong to the organization that owns the application. |
New CA-signed proxy certificate | Real private key | You may reuse the real private key but create a new proxy certificate that is signed by a different CA. The real private key is required in situations where there is a security dependency from the client application, for example, when using client certificates for authentication. Choose this option if you want to administer all of your SteelHead proxy certificates (and secure peering certificates) from a different CA, for example, the SCC CA. You can also have some other requirements that cannot be fulfilled by the real CA, for example, the security requirements preclude server impersonation, the subject alternative names are a problem, you desire a longer validity period than the original certificate, or you want to use a wild card common name that is broader than the original. When using a CA-signed certificate, the CA certificate must be installed in the trusted root certification authorities store of the client machine. |
New CA-signed proxy certificate | New private key | You can generate a new CA-signed proxy certificate and private key pair. This option can be an administratively quick way to obtain a new proxy certificate and private key pair for SteelHead SSL optimization. If your SteelHeads are managed with SCC, you can use the SCC CA to generate the new proxy certificate and private key pair. |
New self-signed proxy certificate | New private key | You can generate a new self-signed proxy certificate and private key pair. A SteelHead is capable of generating a new self-signed certificate and private key pair for its proxy and peering certificates. This is the fastest option available and can be used temporarily to fulfill the requirement. However, for security purposes, some browsers and applications do not accept self-signed certificates. You cannot establish the SSL connection in this case. |
About SteelHead secure peering scenarios
You can use the following methods to configure the peer certificates used for secure peering (SSL) between the client-side and server-side SteelHeads:
You can use peering lists to configure peer certificates. When SSL acceleration is enabled, and an optimizable SSL connection is attempted across the SteelHeads, the remote peer is detected and its peering certificate is automatically populated into the self-signed peer gray list. The connection remains unoptimized because the remote peer is listed in the self-signed peer gray list.
You can examine the peer certificate for authenticity and move any peer from the gray list to either the white list or the black list. If you trust the remote peer, move it into the self-signed peer white list to begin SteelHead the SSL connection. If you do not trust the remote peer, move it into the self-signed peer black list to prevent the SSL connection from being accelerated.
We strongly recommend that you verify the authenticity of the secure peering certificate (and any other certificate in general as a best practice for IT security) before you trust it.
Verify that the SSL connection is successfully accelerated after you have configured secure peering, by viewing the connection Current Connections report.
Secure peering with ca-signed certificates
If you use CA-signed peer certificates, you can configure the SteelHead to trust the CA certificate instead of the peer certificate. The SteelHead implicitly trusts all certificates that the trusted CA issues. Alternatively, you can manually add the peer certificate into the peering trust list.
To add a remote peer SteelHead as a trusted peer using the peering trust list
1. Choose SteelHead > SSL: Secure Peering (SSL).
2. Select Peering Trust > Add a New Trusted Entity.
3. Select either Trust Existing CA or Trust New Certificate.
4. Choose Trust New Certificate, and copy and paste the peer certificate of the remote peer SteelHead into the Cert Text box or import the certificate file.
5. Click Add.
Alternatively, you can choose to trust the CA that issues the peer certificate. The SteelHead then trusts all the certificates that are issued by this trusted CA.
Choose Trust Existing CA, and select the CA from the drop-down list. The list of CAs shown here is configured in SteelHead > SSL: Certificate Authorities.If you have an intermediary CA, you must add them with the root CA. In secure peering, both the client-side and server-side SteelHead functions as an SSL client and server at the same time. For more details, go to Knowledge Base article
S14925.
Managing SteelHead secure peering trusts with an SCC
We recommend that you configure a medium-to-large SteelHead deployment for SSL acceleration with the help of an SCC. The SCC can simplify the configuration of SSL acceleration and secure peering and increase the operational efficiency of a SteelHead deployment through central management thereby enabling the deployment size to easily scale.
The configuration effort required to manage the secure peering certificates and trusts in a SteelHead deployment increases proportionally with the number of SteelHeads deployed. The increase is due to the following reasons:
• Because multiple SteelHeads are involved, there are more secure peering certificates and trust relationships to manage.
• The number of proxy certificates might increase, and the same proxy certificate might be distributed to more than one SteelHead.
• You can reduce the number of proxy certificates by preparing a wild card certificate that is suitably valid, trusted, and matches the names of several target servers rather than generating one for each server.
• You can incorporate other features to increase the security of your SteelHead deployment: for example, you might encrypt the SteelHead data store in selected locations or change the secure vault password. The secure vault stores sensitive information from your SteelHead configuration. The SCC is the only device that can supply the password over a secure channel to automatically unlock the secure vault whenever a SteelHead starts up.
A secure inner channel must be set up between the client-side and server-side SteelHeads in a deployment where SSL traffic or any other secure protocol traffic, such as signed-SMB and encrypted-MAPI, are accelerated. Secure protocol traffic, including SSL traffic, are passed through the secure inner channel to maintain end-to-end data security. SCC incorporates a certificate authority that can be used to centrally issue, distribute, and manage the secure peering certificates and peering trusts, in addition to the proxy certificates for SSL acceleration. Using and trusting only CA-signed certificates increases the security model of an SSL deployment.
Deploying secure peering for all accelerated traffic
In a high-security environment, you might want only known and trusted SteelHeads to peer for accelerated traffic flows. Using SSL secure peering, and forcing all traffic flows to flow through the secure inner channel, you can create an environment of explicit trust—only SteelHeads that can trust its peers can peer and SteelHead traffic flows.
In federated networks, it is common for organizationally separate SteelHeads to be aware of each other. If you use only secure peering, you create an environment of trust between the SteelHeads. If the secure inner channel connection fails, all conversations between the SteelHeads pass through.
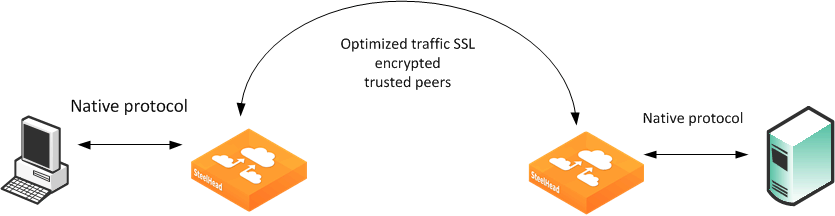
Figure: Trusted peers shows a client connection to a server. The default behavior of the SteelHead is to SteelHead this connection. In an environment in which secure peering is used for all accelerated traffic, the SteelHeads have to trust each other before a secure inner channel can be established to carry the accelerated traffic. Use the following procedure to set up a SteelHead to secure all accelerated traffic and only SteelHead through a secure inner channel.
Trusted peers
Ensuring all accelerated traffic is secure
1. Choose Configure SteelHead > SSL: Secure Peering (SSL) in the Management Console.
2. Select All from the Traffic Type drop-down list.
3. Clear the Fallback to No Encryption check box.
4. Click Apply.
If you select All from the Traffic Type you can cause up to a 10% performance decline in higher-capacity SteelHeads. Take this performance metric into account when sizing a complete secure SteelHead peering environment.
We recommend that you use NTP time synchronization, instead of manually synchronizing the clocks, on both the server-side and client-side SteelHeads. It is critical that the peer SteelHead time is the same for the trust relationship to work. Choose Administration > System Settings > Date/Time. Under Date and Time, select Use NTP Time Synchronization.
About client certificate support
Client certificate support enables SteelHead of SSL traffic to SSL servers that authenticate SSL clients. The SSL server verifies the SSL client certificate. In the client authentication SSL handshake, each client has a unique client certificate and the SSL server, in most cases, maintains the state that is specific to each client when answering the client's requests. The SSL server must receive exactly the same certificate that is originally issued for a client on all the connections between the client and the server. Typically, the client's unique certificate and private key are stored on a smart card, such as a Common Access Card (CAC), or on a similar location that is inaccessible to other devices on the network.
Enabling the client authentication feature allows SteelHeads to compute the encryption key and the SSL server continues to authenticate the original SSL client exactly as it would without the SteelHeads. The server-side SteelHead observes the SSL handshake messages as they go back and forth. With access to the SSL server's private key, the SteelHead computes the session key exactly as the SSL server does. The SSL server continues to perform the actual verification of the client, so any dependencies on the uniqueness of the client certificate for correct operation of the application are met. Because the SteelHead does not modify any of the certificates (or the handshake messages) exchanged between the client and the server, there is no change to their trust model. The client and server continue to trust the same set of CAs as they did without the SteelHeads SteelHead their traffic.
Client authentication is also supported as part of a Client Accelerator deployment.
If the data center has a mixed environment with a few SSL servers that authenticate clients along with those that do not authenticate clients, we recommend enabling client authentication.
There are a few caveats when using client-side certificates:
• Enable client certificate support on the server-side SteelHead.
• The server-side SteelHead must have access to the exact private key used by the SSL server.
• You must configure the SSL server to ask for client certificates.
• The SteelHead must have a compatible cipher chosen by the server.
• SSL sessions that reuse previous sessions that are unknown to the SteelHead cannot be decrypted.
• Client-side certificates with renegotiation handshakes are not supported.
• Client-side certificate supports the RSA key exchange only. It does not support the Diffie-Hellman key exchange.
Enabling client authentication
1. Perform the basic steps to enable SSL acceleration.
2. On the server-side SteelHead, choose SteelHead > SSL: Advanced Settings, select Enable Client Certificate Support, and click Apply.
3. Choose SteelHead> SSL: SSL Main Settings, import the SSL server private key and certificate, and click Save to save the configuration. You do not need to restart the SteelHead service.
4. If the client-side SteelHead is also running Client Accelerator, then you must import the Client Accelerator signing CA into the server-side SteelHead. To complete the task, choose SteelHead > SSL: Secure Peering (SSL) and select Add a new Mobile Entity in the in the Mobile Trust box.
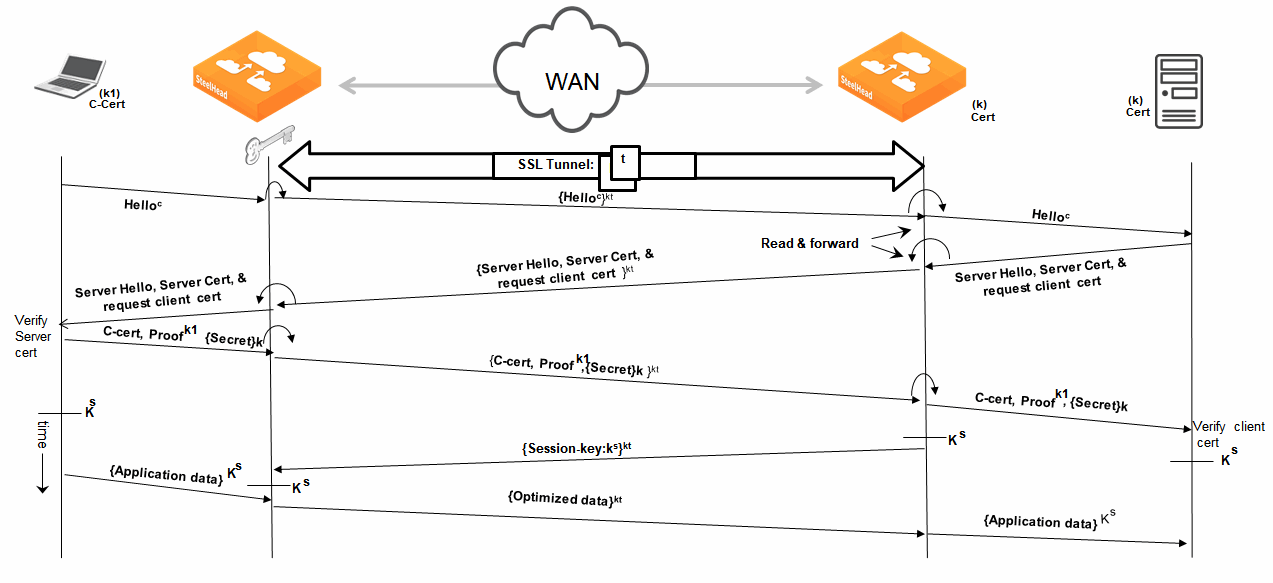
Figure: SSL Server authenticates the SSL client shows the time sequence of actions to set up an SSL connection in which the SSL server authenticates the SSL client.
SSL Server authenticates the SSL client
We recommend that you use strong security ciphers, such as AES. Avoid stream ciphers.
To verify client authentication, on the server-side SteelHead, check the Discovered Server (Optimizable) table on the SSL Main Settings page. Optimizable servers that are using client authentication appear as optimizable streams. For servers that are not using client authentication, the server appears in the Discovered Server (bypassed, not optimizable streams) table with the reason No proxy certificate configured for the server.
About proxy server support
SteelHead includes support for enterprise proxy servers that route web traffic (including secure SSL web traffic) on behalf of clients to a secure SSL server.
About mid-session SSL support
SteelHead supports mid-session SSL support. A normal SSL session starts with an SSL handshake. The rest of the session is encrypted using session keys until the session is torn down. There are some scenarios where the session starts unencrypted but might need to encrypt certain traffic during the session. In these scenarios, an SSL handshake occurs mid-session to secure the specific traffic.
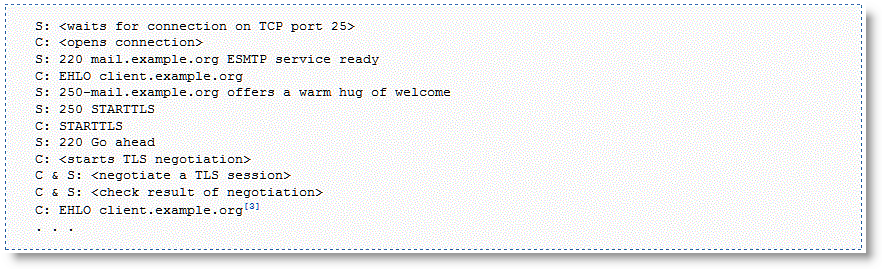
An example mid-session SSL is START Transport Layer Security (TLS) during SMTP sessions. The client starts an unencrypted SMTP session on port 25, to the server. The server accepts the unencrypted session and indicates to the client that it supports STARTTLS. In the middle of session, the client initiates STARTTLS. Normal TLS negotiations resume, and the rest of the conversation is encrypted.
SteelHead supports TLS versions 1.0, 1.1, and 1.2.
Example STARTTLS during SMTP session
Enabling mid-session SSL support
1. Choose SteelHead > SSL: Advanced Settings.
2. Select Enable Midsession SSL.
3. Click Apply.
About server name indication
Server name indication (SNI) is an extension to the TLS protocol (RFC 6066) by which a client indicates which hostname it is attempting to connect to at the start of the TLS handshake process. This extension allows a server that hosts multiple hostnames (also known as name-based virtual hosting) using a single IP address to present the correct SSL/TLS certificate to the client. The hostname is the fully qualified DNS hostname of the server, as understood by the client.
When a client makes an HTTP connection to a server, the hostname is indicated in the HTTP request. However, when a client makes an HTTPS connection, the hostname is not sent until the secure connection is established. SNI allows a client to include the hostname that it is requesting in the TLS Hello message. This message allows the server to determine the correct named virtual host to service the request.
The following is an example from a packet capture illustrating the SNI in the client SSL-Hello message:
Extension: server_name
Type: server_name (0x0000)
Length: 30
Server Name Indications extension
Server Name list length: 28
Server Name Type: host_name (0)
Server Name: length: 25
Server Name: nexus.officeaps.live.com
Without the SNI extension from a client application, the server returns the default certificate that matches the server IP. The challenge is that this certificate might or might not be the hostname that the client has requested. Browsers pop up a warning message when it receives a certificate with a different hostname than that it requested, and client-based applications might disconnect.
You must use client applications (for example, browsers) and servers that have end-to-end support for SNI. You must enable SNI on the server-side SteelHead if you want to intercept every HTTPS/TLS connection to determine the virtual hostname that the client is requesting in the SNI extension. Enabling SNI on the server side ensures that the server-side SteelHead selects and returns an acceptable proxy certificate to the client. No configuration is necessary on the client-side SteelHead.
In SteelHead 9.2 and later, you do not need to enable SNI support for the following dependencies. The SteelHead always:
• forwards the SNI extension server name header from a client application (for example, the browser) to the origin server.
• checks the SNI extension field of client hello before a proxy certificate is returned to client.
For details, go to Knowledge Base article
S17744.
You must enable SNI support on the Management Console to intercept every HTTPS/TLS connection to determine the virtual hostname that the client is requesting in the SNI extension.
To prevent unnecessary intercepts, we recommend that you bypass traffic from nonoptimizable hostnames by IP addresses using an in-path rule because intercepting the HTTPS/TLS connection to determine the virtual hostname consumes a connection count even if the connection is eventually bypassed. This consumption has an impact on the SteelHead licensed connection limit, especially in environments in which only a small percentage of HTTPS/TLS traffic is accelerated and no bypass rules are configured for the rest of the traffic from the unoptimizable hostnames.
About SSL acceleration with Client Accelerator
Client Accelerator supports SSL acceleration similar in function to that of a client-side SteelHead. Client Accelerator relies on the Client Accelerator to configure SSL acceleration policies and secure peering.
Troubleshooting and verifying the configuration
Use these tools to verify that you have configured SSL support correctly:
SSL acceleration
After completing the SSL configuration on both SteelHeads and restarting the SteelHead service, access the secure server from the web browser.
If you specified a self-signed proxy certificate for the server on the server-side SteelHead, a pop-up window appears on the web browser. View the certificate details to ensure that it is the same as the certificate on the server-side SteelHead.
In the Management Console, the Current Connections report lists the new connection as accelerated without a Protocol Error flag.
In the Management Console, the Traffic Summary report displays encrypted traffic (typically, HTTPS).
Verify that the back-end server IP appears in the SSL Discovered Server Table (Optimizable) in the SSL Main Settings page.
Because all the SSL handshake operations are processed by the server-side SteelHead, all the SSL statistics are reported on the server-side SteelHead. No SSL statistics are reported on the client-side SteelHead.
Monitoring SSL connections
On the client web browser, click the Lock icon to obtain certificate details. The certificate must match the proxy certificate installed on server-side SteelHead.
In the Current Connections report, verify the destination IP address, port 443, the Connection Count as Established (three yellow arrows on the left side of the table), SDR Enabled (three cascading yellow squares on the right side of the table), and that there is no Protocol Error (a red triangle on the right side of the table).
In the SSL Statistics report (on the server-side SteelHead only) look for connection requests (established and failed connections), connection establishment rate, and concurrent connections.
Monitoring secure inner channel connections
Use these tools to verify that secure inner channels are in use for the selected application traffic types:
In the Current Connections report, look for the Lock icon and three yellow arrows, which indicate the connection is encrypted and accelerated. If the Lock icon is not visible or is dimmed, click the magnifying glass to view a failure reason that explains why the SteelHead is not using the secure inner channel to encrypt the connection. If there is a red protocol error, click the magnifying glass to view the reason for the error.
Search the client-side and server-side SteelHead logs for ERR and WARN.
Check that both SteelHeads appear in the white peering trust list on the client-side and server-side SteelHeads, indicating that they trust each other.
If you are experiencing issues with your SSL traffic being accelerated, go to Knowledge Base article
S15107.
Interacting with SSL-enabled web servers
SSL is a protocol that enables the underlying application to transmit data securely over an insecure network. At the very foundation of SSL is the assumption that an authenticated party (for example, a web server) has exclusive access to its private key. If any other entity has this private key, it can mount a man-in-the-middle attack on a connection to the authenticated party.
SteelHeads accelerate SSL traffic when you configure the server-side SteelHead with the server's certificate and private key, which enables it to intercept all SSL connections to the server.
Obtaining the Apache certificate and private key
The following procedures explain how to locate the Apache server certificate and private key and import them into the server-side SteelHead.
1. Locate the Apache httpd.conf configuration file.
2. Look through the file for lines beginning with SSLCertificateFile and SSLCertificateKeyFile, for example:
SSLCertificateFile /etc/foo/bar/server.crt
SSLCertificateKeyFile /etc/foo/bar/server.key
The filename following SSLCertificateFile is the server certificate. The filename following SSLCertificateKeyFile is the server private key. After you locate these files, you can import them into the server-side SteelHead configuration.
Importing the Apache certificate and private key
1. On the server-side SteelHead, choose SteelHead > SSL: SSL Main Settings in the Management Console.
2. Select Add a New SSL Certificate.
3. Select Import Existing Private Key and CA-Signed Public Certificate (Two Files in PEM or DER formats).
4. Under Import Private Key, select Local File, click Browse, and go to the certificate key file.
5. Under Import Public Certificate, select Local File, click Browse, and go to the server certificate file.
6. Click Add.
About IIS certificates and private keys
The following procedures explain how obtain the server certificate and private key from an IIS web server and import them into the server-side SteelHead.
Obtaining the IIS certificate and private key
1. From the Windows Start > Run menu, enter mmc to launch the Microsoft Management Console (MMC).
2. Within the IIS snap-in, go through the tree to the web server in question. (If the IIS snap-in does not exist, choose File > Add/Remove Snap-in, select the web server, and click Add.)
3. Right-click the server item and select Properties.
4. Select the Directory Security tab.
5. Select View Certificate.
6. Select the Details tab.
7. Select Copy to File.
8. Select Yes, export private key.
Both the certificate and the private key are now stored in a single file with the filename you specified. The filename ends with the .pfx extension.
Importing the IIS certificate and private key
1. On the server-side SteelHead, choose SteelHead > SSL: SSL Main Settings in the Management Console.
2. Under SSL Server Certificates, select Add a New SSL Certificate.
3. Select Import Existing Private Key and CA-Signed Public Certificate (One File in PEM or PKCS12 formats).
4. Under Import Single File, select Local File, click Browse, and go to the .pfx file. Because the file .pfx file is not scrambled with a password, you can leave the Decryption Password field blank.
5. Click Add.
About self-signed certificates
In certain situations you might not want to, or might not be able to, use the server's real private key. If that is the case, you can generate a self-signed certificate and private key pair for the server and install them on the server-side SteelHead. This certificate is not signed by any real certificate authority, but it is instead signed by the private key itself, and is thus called a self-signed certificate.
During SSL connection establishment, when the server-side SteelHead presents the self-signed certificate to the client (for example, a web browser), the client cannot verify the authenticity of the certificate. From the client's point of view, security might have been compromised, and you are typically alerted with a message to this effect.
Generating self-signed certificates with Apache
A typical SSL-enabled Apache installation comes with a utility called OpenSSL, which you can use to generate the self-signed certificate. Enter the following command:
$ openssl req -new -x509 -nodes -out server.crt -keyout server.key
This command adds two files to the current directory, server.crt and server.key. These files correspond to the certificate and the private key, respectively. The next step is to import the files into the server-side SteelHead configuration.
Generating self-signed certificates with IIS
If you want to generate a self-signed certificate for an IIS-based web server, you have two options:
• Install Cygwin and include the OpenSSL package in the installation. This package gives you access to the OpenSSL utility from X.2.1, which you can use to generate the certificate and private key. To install, go to
http://www.cygwin.com/.
—or—
• Download and install a set of IIS 6.0 Resource Kit Tools from Microsoft.
This package contains a utility called SelfSSL that you can use to generate a self-signed certificate and private key for a web server. SelfSSL also automatically installs the certificate for that web server instance of IIS, so you must follow the steps in X.1.2 to extract the certificate into a file.
SelfSSL replaces an existing certificate for a web server instance.
Importing the self-signed certificate and private key
1. On the server-side SteelHead, SteelHead, choose SteelHead > SSL: SSL Main Settings in the Management Console.
2. Under SSL Server Certificates, select Add a New SSL Certificate.
3. Select Import Existing Private Key and CA-Signed Public Certificate (Two Files in PEM or DER formats). Because the file server.key is not scrambled with a password, you can leave the Decryption Password field blank.
4. Click Add.