Secure SMTP Optimization
In RiOS 7.0 or later, you can securely communicate over the internet with Secure Simple Mail Transfer Protocol (SMTPS). This chapter includes the following sections:
Overview of SMTP and TLS
SMTP is the standard for email transport across the internet and the standard communication method for Microsoft Exchange hub servers in Exchange 2007 to Exchange 2013. Prior to RiOS 7.0, SMTP or SMTPS was sent through the SteelHead as a pass-through connection. Because the SMTP session was set up prior to the encrypted session, you could not determine when to start SSL traffic optimization.
RiOS 7.0 and later support StartTLS for Transport Layer Security (TLS) and Secure Socket Layer (SSL) to determine the start of an SMTPS connection and the early finish that enables the setup of encrypted (TLS or SSL) connection to terminate without disconnecting the SMTP session. This functionality provides more efficient use of the protocol, because it does not perform a handshake on every email sent using SMTPS.
For more information about SSL, see
SSL Deployments. For more information about delayed Start TLS, see
Mid-Session SSL Support.
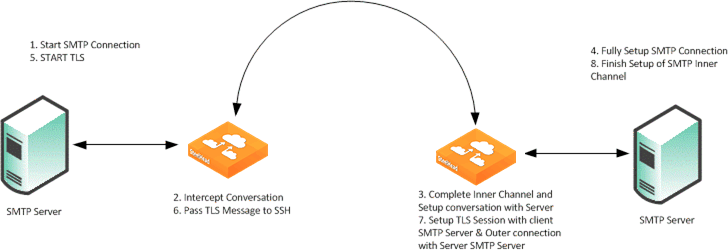
Figure: SMTP Connection

Figure: SMTP Connection shows what happens when the
START-TLS command is issued after the initial SMTP connection is established. Prior to RiOS 7.0, there was no way to determine that an encrypted session had started, so traffic optimization results on the port were low. It was common to enter a pass-through rule for this connection to prevent unnecessary use of RiOS resources.
In RiOS 7.0 or later, support for Secure SMTP enables the SteelHead to intercept the START-TLS message after it is issued, which enables the SteelHead to optimize native Secure SMTP traffic.
Figure: Secure SMTP Connection Setup Using TLS

Figure: Secure SMTP Connection Setup Using TLS shows the setup of an SMTPS session. First, an unencrypted SMTP session is intercepted and optimized through the SteelHead. When the START-TLS is issued, RiOS recognizes that a secure session is imminent and begins the necessary operations to optimize the SSL or TLS session. For more information about SSL optimization, see
SSL Deployments.
Note: Despite having TLS in the name, START-TLS does not mean TLS is necessarily used. Both SSL and TLS are acceptable protocols for securing the communication.
In RiOS 9.2 and later, TLSv1.2 support is enabled by default. A software update from an earlier RiOS version to 9.2 or later automatically enables TLSv1.2 support. To display TLS configuration status for a client or server, use the CLI command show protocol ssl backend. Use the CLI command show secure-peering for peering interface configuration.
Configuring Microsoft Exchange Servers for Secure SMTP
Microsoft Exchange hub servers have additional authentication mechanisms beyond TLS or SSL. Two specific environments require additional configuration on the Exchange hub server to allow the Secure SMTP optimization to function properly:
• Single domain multiple hub servers - All Exchange hub servers are within the same domain. The servers are inherently trusted, no specific SSL client authorization occurs, and the Exchange hub server uses a null client certificate.
• Multiple domain multiple hub servers - Exchange hub servers are in untrusted domains and must be trusted through the Microsoft set-sendconnector command. Complete the following steps on each Exchange hub server:
set-sendconnector -Identity "<send-conn-name>" -DomainSecurityEnabled $True
set-receiveconnector -Identity "<receive-conn-name>" -DomainSecurity Enabled $True
Next, set the secure domains to secure traffic between one another:
set-transportconfig -TLSReceiveDomainSecureList {<remote-domain>}
set-transportconfig -TLSSendDomainSecureList {<remote-domain>}
Some Exchange deployments require a domain trust before mutual authentication will work. Adding a two-way forest trust, preferably with forest-wide authentication, solves this issue.
Configuration with Microsoft Exchange Hub servers requires the following prerequisites:
• You must have an SSL license installed on all SteelHeads participating in SSL or TLS optimization.
• The client-side and server-side SteelHeads must have RiOS 7.0 or later.
• You must generate and import new certificates in the Exchange hub servers.
An Exchange hub server does not allow its private key to be exported. You cannot retrieve either the certificate or the private key from the hub server. For details regarding receive connectors and certificates in an Exchange hub server environment, go to the following websites:
You can generate the new certificates with the tool listed in Microsoft Technote 998327 or with OPENSSL. This is an example with OPENSSL:
linux#openssl req -x509 -newkey 1024 -keyout my.pem -out my.cert -nodes
linux#openssl pkcs12 -export -inkey my.pem -in my.cert -out my.pfx
After you create the new self-signed certificates, you must install them on the remote and local Exchange server—which runs the hub server role—as defined next.
To install a new certificate on the remote and local Exchange server
1. Import the PFX file to the local Exchange server's personal certificate store.
2. Add the SMTP role to the certificate.
Exchange uses roles to identify which certificates to use in various situations. You need to tell the Exchange server that your certificate for encrypted traffic over SMTP.
3. If the Exchange management console (EMC) is not already open, in the search field of the Windows Start menu, search for Exchange management console and open the application.
4. In the left navigation pane, toggle open Microsoft Exchange On-Premises (your server).
5. Click Server Configuration and wait for the Exchange certificates in the work (that is, the middle) pane to populate.
6. To open the Assign Services to Certificate wizard, right click the self-signed certificate and select Assign Services to Certificate.
You can identify your certificate by viewing the Subject and Issuer fields. Your ticket is probably the only one listed that does not have a customized name in the Name field.
7. Select Simple Mail Transfer Protocol (SMTP).
8. Click Assign.
9. After the assignment completes successfully, click Finish.
If you are prompted to overwrite the existing SMTP certificate, select Yes.
10. Add the partner's permission group to the local Exchange server's default receive connector.
11. If the EMC is not already open, in the search field of the Windows Start menu, search for exchange management console and open the application.
12. In the left navigation pane, toggle open the Microsoft Exchange On-Premises (your server).
13. Toggle open the Server Configuration.
14. Click Hub Transport and wait for the receive connectors in the work pane (that is, the middle) to populate.
15. Click the default receive connection (usually named something similar to Default mach101).
16. In the Actions pane, under the section with the default receive connector's name, select Properties. This opens the default receive connector's properties dialog box.
17. Select the Permission Groups tab.
18. Select Partners.
Clear the Anonymous users check box if it is selected.
19. Click OK to accept the changes to the default receive connector's properties.
20. Import the CERT file to the remote Exchange server's Computer Trusted Root Certificate Authorities.
Configuring the SteelHead for START-TLS Support
This section describes how to configure the SteelHead to use START-TLS.
To configure the SteelHead for use with START-TLS
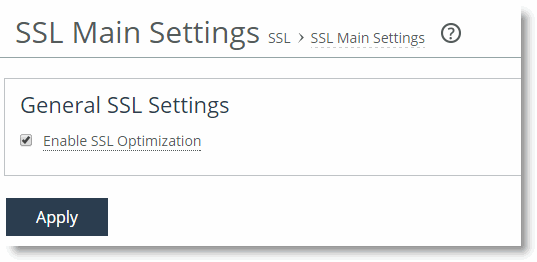
1. Enable SSL on the SteelHead.
• In the Management Console, choose Optimization > SSL: SSL Main Settings, and select Enable SSL Optimization, or use the protocol ssl enable command.
Figure: SSL Main Settings Page

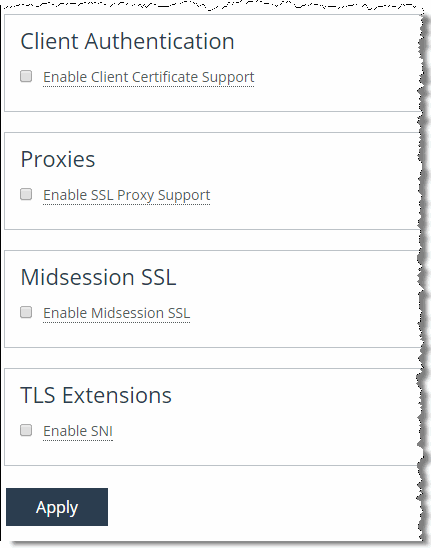
• In the Management Console, choose Optimization > SSL: Advanced Settings and select Enable Client Certificate Support and Enable Midsession SSL, or use the protocol ssl mid-session-ssl and protocol ssl client-cer-auth enable commands.
Figure: SSL Advanced Settings Page

2. Configure an in-path rule.
The in-path rule applies the SSL preoptimization policy to the Secure SMTP traffic.
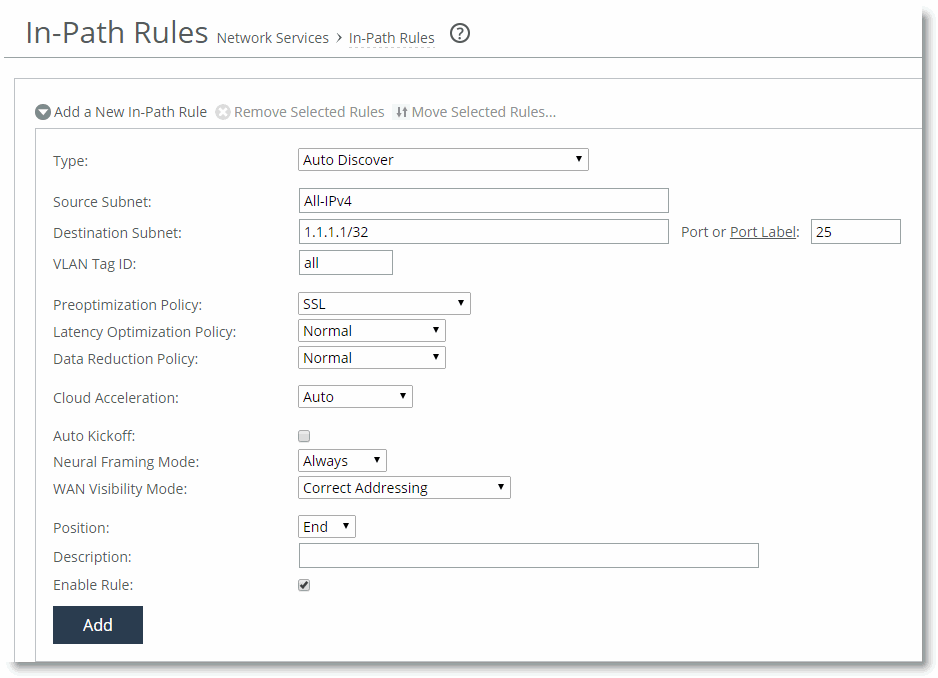
• In the Management Console, choose Optimization > Network Services: In-Path Rules.
• Select Add New In-Path Rule, enter the following parameters, and click Add.
• Or, you can use the in-path rule auto-discover rulenum 4 srcaddr all-ipv4 dstaddr 1.1.1.1/32 dstport 25 preoptimization ssl command.
Rule Setting | Value |
Type | Auto Discover |
Source Subnet | All-IPv4 |
Destination Subnet | IP address of the email server using SMTPS |
Port or Port Labels | SMTP port, typically 25 |
VLAN tag ID | all |
Preoptimization Policy | SSL |
Latency Reduction Policy | Normal |
Data Reduction Policy | Normal |
Auto Kickoff | Clear the check box |
Neural Framing | Always |
WAN Visibility | Correct Addressing, Port Transparency, or Full Transparency are all valid configuration options. |
Position | Prior to any negating rules |
Description | A description of the rules |
Enable Rules | Select the check box |
Figure: In-Path Rules Page


