Defining VLAN Trunk Ports on SteelHead SD
This topic describes how to configure VLAN trunk ports for multiple zones on SteelHead SD. It includes these sections:
These procedures describe how to configure multizone VLAN trunk ports on SteelHead SD 570-SD, 770-SD, and 3070-SD appliances and the SteelConnect SDI-2030 gateway located at the branch. For details on VLANs, see
Zones within a site and
Port overview in the
SteelConnect Manager User Guide.
Overview of multizone VLAN trunk mode on SteelHead SD
Multiple VLANs are very common in Layer 2 (L2) network environments on the LAN side. With this feature, you can configure multiple VLANs on the same LAN port (that is, trunk port functionality). VLANs are used for segmenting networks at L2 and provide basic security for network traffic by limiting broadcast domains and network flooding.
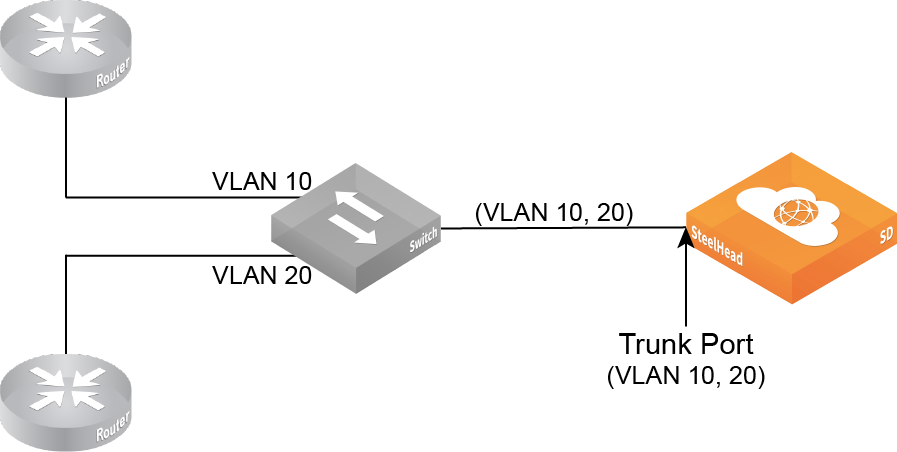
SteelHead SD supports trunk mode VLANs for zones. You can define a trunk port on a zone and configure it with different VLANs. For example, you can have a trunk port on the LAN side with two zones configured with different VLANs.
Multiple zones with different VLANs
Defining trunk mode on ports
To define trunk mode ports
1. Choose Network Design > Zones to create a zone for the SteelHead SD. For details, see
Zones within a site in the
SteelConnect Manager User Guide.
2. Click the VLAN tab.
Creating a VLAN trunk
3. Specify a VLAN tag, if necessary. Every zone has a VLAN tag assigned. If you leave this field empty, the system picks a free VLAN ID from the pool.
4. Click Submit.
5. Choose Appliances > Ports to configure the trunk port.
6. Select the site and appliance from the drop-down list.
7. Click the port for which you want to create the VLAN trunk. For example, LAN0_0.
Creating a LAN trunk port
8. Under Port mode, select Trunk Port from the drop-down list.
For 2030 appliances, if the port has already been set to either Singlezone or Trunk Port, you must first disable the port before making a change to the Port mode. For example, if the port is already set to Singlezone, you must first disable the port, then set the port to Trunk Port.
9. Click Submit.
10. Navigate back to Appliances > Zones to enable VLAN on the configured port.
11. Under Management Zones, click On and Submit to activate multizone (VLAN trunk) connectivity for this zone.
12. Under VLAN Specifications, to enable VLAN click On and Submit to enable VLAN on the trunk port you have configured.
13. Optionally, you can define:
–MTU - The MTU is the largest physical packet size, measured in bytes, that a network can send. The default value is 1500.
–ARP aging timeout - Sets how long, in seconds an ARP entry stays in the cache before the cache refreshes. The default value is 1500.
VLAN enabled on the trunk port for the zone
14. Click Submit.
15. Repeat
Step 1 through
Step 14 to create additional trunk ports with different VLANs.