Configuring AutoVPN on SteelHead SD
This topic describes how to configure AutoVPN on SteelHead SD appliances. It includes these sections:
These procedures describe how to configure AutoVPN on SteelHead SD 570-SD, 770-SD, and 3070-SD appliances and the SteelConnect SDI-2030 gateway located at the branch. For additional information, see the SteelConnect Manager User Guide.
Overview of AutoVPN on SteelHead SD
AutoVPN is a SteelConnect feature that connects multiple sites with a secure, full-mesh virtual private network (VPN) without tedious manual configuration. AutoVPN is a fast way to create a resilient VPN backbone between all your sites; however, SteelConnect also provides SwitchVPN to make a zone available in a remote site and Classic VPN for use with third-party gateways.
AutoVPN links the SteelHead SD appliances and SteelConnect gateways at an organization’s sites. SteelConnect automatically sets up a full-meshed VPN configuration in minutes. By default, AutoVPN is on and includes any zones you configure.
For details on configuring AutoVPN in Leaf mode, RouteVPN, and SwitchVPN, see
Setting up site-to-site VPN in the
SteelConnect Manager User Guide.
You can configure these options for AutoVPN:
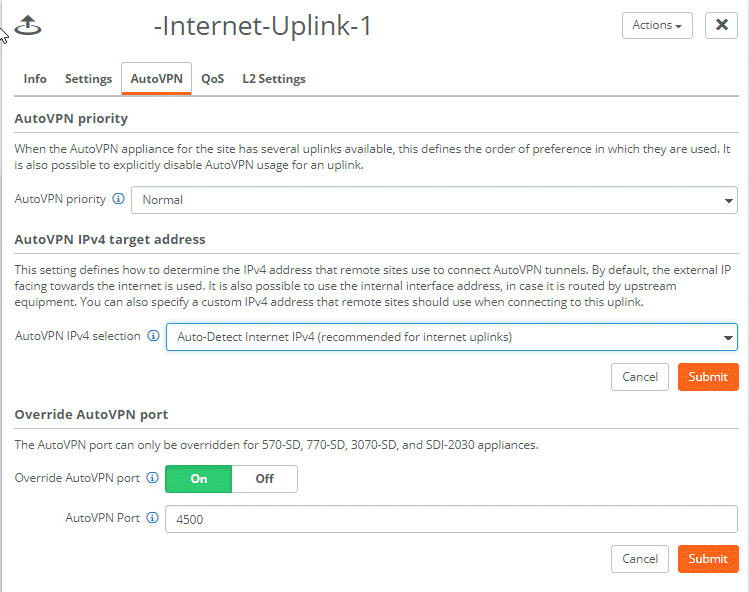
•AutoVPN priority - If there are several uplinks available, the system compares the priority and selects the uplink with the higher priority. It is also possible to explicitly disable AutoVPN usage for an uplink. This setting is available on SteelConnect gateways and SteelHead SD appliances.
•AutoVPN IPv4 target address - This setting defines the IPv4 address that remote sites use to connect AutoVPN tunnels. By default, the external IP facing towards the internet is used. You can specify an internal interface address, in case it is routed by upstream equipment. You can also specify a custom IPv4 address that remote sites should use when connecting to this uplink. This setting is available on SteelConnect gateways and SteelHead SD appliances.
•Override AutoVPN port - Enables a different AutoVPN port for this uplink at the site level. The port is used for the source and target ports for this uplink. The AutoVPN port can only be overridden for SteelHead SD 570-SD, 770-SD, and 3070-SD, and SDI-2030 appliances. A use case for this setting is if you have two high-availability (HA) appliances that have the same public IP. Tunnels with the two HA appliances can’t be established, as they would appear identical. Overriding the AutoVPN port ensures tunnels with the two HA appliances are using different ports and can be established.
Configuring AutoVPN on SteelHead SD
This section describes the procedures for configuring AutoVPN on SteelHead SD.
To configure AutoVPN on SteelHead SD
1. Choose Network Design > Uplinks page and select the appliance.
2. Click the AutoVPN tab.
Configuring the AutoVPN

3. Under AutoVPN priority, select one of these options:
–Don’t use this uplink for AutoVPN - Disables AutoVPN on this uplink.
–Low - Sets the uplink to the lowest priority.
–Normal - Sets the uplink to the normal priority.
–High - Sets the uplink to the high priority.
4. Click Submit.
5. Under AutoVPN IPv4 target address, select one of these options:
–Auto-Detect Internet IPv4 (recommended for internet uplinks) - The system automatically detects the external IP that is facing towards the internet. This is the default setting.
–Internal Interface IPv4 (recommended for private WAN) - Specify an internal IPv4 IP address. Use the internal interface address, if it is routed by upstream equipment.
–Specify custom IPv4 - Specify a custom IPv4 target IP address that remote sites can use when connecting to this uplink.
6. Click Submit.
7. Under Override AutoVPN port, click On to enable a different AutoVPN port for this uplink. The port is used for the source and target ports for this uplink. The default setting is Off.
If you have two high-availability (HA) sites that have the same public IP. You must override the AutoVPN port to ensure tunnels between the two HA sites are established.
8. Specify the port number.
9. Click Submit.


