Installing the Mobile Controller
This chapter describes how to install and configure the Mobile Controller. It includes these sections:
Before using this guide, you should be familiar with installing and configuring networks with deployed SteelHeads. For detailed information about the SteelHead, see the SteelHead Installation and Configuration Guide, the SteelHead Management Console User’s Guide, and the SteelHead Deployment Guide.
Basic steps for deploying the Mobile Controller
This section describes the basic steps required to install and configure the Mobile Controller.
Typically, you install and deploy SteelHead Mobile clients without modifying the default policies that ship with the product. Modify the default policies only if necessary.
If your network environment requires the deployment of multiple packages, create the packages you need before deploying the default package. For details, see the SteelCentral Controller for SteelHead Mobile User’s Guide.
Basic steps for deploying the Mobile Controller
1. Complete the configuration checklist to ensure that you have the necessary information before you begin the configuration process. For details, see
Completing the configuration checklist.
6. Deploy the default package to the endpoints in your network using the deployment tool of your choice (for example, Microsoft SMS). For details, see the SteelCentral Controller for SteelHead Mobile User’s Guide.
7. Verify your endpoint connections in Reports > Endpoints > Endpoint Report on the Mobile Controller. For details, see the SteelCentral Controller for SteelHead Mobile User’s Guide.
Checking your inventory
This section describes the contents of the Mobile Controller appliance shipping carton. Check your shipment to confirm that it contains these items:
• One Mobile Controller appliance
• One CAT-6 straight-through cable (gray or beige)
• One CAT-6 crossover cable (orange)
• One RS-232 serial extension cable
• One power cable
• One mounting kit
• One Phillips screwdriver
The Mobile Controller appliance is completely assembled, with all the equipment parts in place and securely fastened. The Mobile Controller is ready for installation with no further assembly required.
If any items are damaged or missing, notify Riverbed Support at
https://support.riverbed.com for replacement or repair.
Site requirements
This section lists the prerequisites to installation. Your site must meet these requirements:
• A standard electronic environment in which the ambient temperature does not exceed 40ºC (104ºF) and the relative humidity does not exceed 80 percent (noncondensing). For detailed information, see
Environmental specifications.
• An Ethernet connection available within the standard Ethernet limit.
• Space on a two-post or four-post, 19-inch, Telco-type mounting rack. The Mobile Controller requires 1U of rack space. For details about installing the Mobile Controller in a rack, see the Rack Installation Guide or the printed instructions included with your Mobile Controller.
• A clean power source dedicated to computer devices and other electronic devices.
Completing the configuration checklist
The following checklist contains the parameters you specify to complete the initial configuration of the Mobile Controller.
Be prepared to provide values for the parameters listed in the following checklist.
Component | Parameter | Your value |
Mobile Controller | Host Name | |
IP Address | |
Netmask | |
Default Gateway (the WAN gateway) | |
Primary DNS Server (Domain Name Server IP address) | |
Domain Name | |
Administrator Password | |
SteelHead Mobile client | Data Store Size - A minimum size of 256 MB is required for the data store. For PCs, the default value is 10 GB. | |
Maximum Log Size - The default value is 5000 KB. | |
Maximum Number of Log Files - The default value is 2. | |
VPN Port Number - Enter a port number if you’re adding a pass-through rule. | |
Note: Values for Data Store Size, Maximum Log Size, and Maximum Number of Log Files are needed only if you don’t use the default package that ships with the Mobile Controller.
Memory usage
Ensure that there is enough memory on your client computers to run the SteelHead Mobile software. This table provides an example of memory usage per data store size. Your memory usage might vary.
Data store size | Memory usage |
256 MB | 81 MB |
512 MB | 81 MB |
1 GB | 81 MB |
2 GB | 100 MB |
5 GB | 112 MB |
10 GB | 161 MB |
15 GB | 171 MB |
20 GB | 228 MB |
Powering on the Mobile Controller
This section describes how to connect and power on the Mobile Controller.
Powering on the Mobile Controller
1. If your model has a master power switch, make sure that it is in the off position.
2. Plug one end of the AC power cord provided in your shipment into the Mobile Controller.
3. Plug the other end of the AC power cord into an uninterrupted AC outlet.
4. If your model has a master power switch, press it (ON).
Connecting to the Mobile Controller
To access the configuration wizard and the SteelHead CLI, you establish a serial connection using a terminal emulation program.
To connect to the Mobile Controller
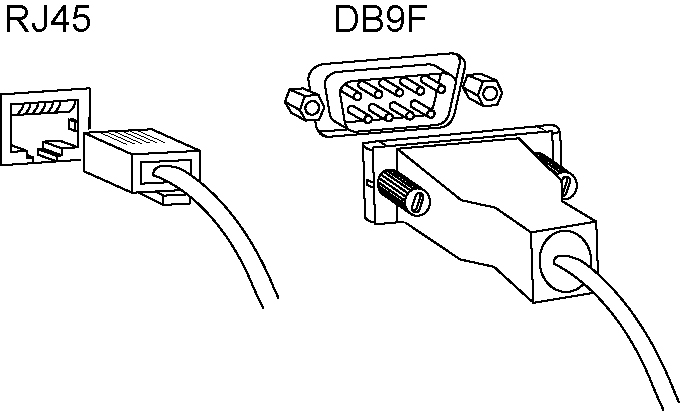
1. Plug the serial cable provided in your shipment into the Console port on the Mobile Controller.
Depending on your model, the Console port is either a DB9F or an RJ45 port. The model 8650 uses the DB9F port, and the model 9000 uses the RJ45 port. The appropriate console cable ships with your model.
Figure: Connecting the Mobile Controller
2. Start a terminal emulation program such as PuTTY or HyperTerminal. The terminal device must have these settings:
• Baud rate: 9600 bps
• Data bits: 8
• Parity: none
• Stop bits: 1
• No flow control
3. Log in as an administrator user (admin) and enter the default password (password):
login as: admin
Sent username "admin"
password: password
The configuration wizard automatically starts.
4. Check the system and disk status lights to see if the lights are illuminated and to see if the system and hard disks are operating normally.
Initial configuration of the Mobile Controller
This section describes how to complete the initial configuration of the Mobile Controller using the configuration wizard.
To configure the Mobile Controller
1. When you log in to the Mobile Controller as an administrator, the system prompts you to start the configuration wizard. Type yes.
Configuration wizard.
Do you want to use the wizard for initial configuration? yes
2. Complete the configuration wizard steps as described in the following table.
Note: Press Enter to enter the default value. Click ? for help. Press Ctrl+B to go back to the previous step.
Wizard prompt | Description | Example |
Step 1: Host Name? | Enter the hostname for the Mobile Controller. | Step 1: Hostname? minna |
Step 2: Use DHCP on primary interface? | You are given the option to enable the DHCP to automatically assign an IP address to the primary interface for the Mobile Controller. We recommend that you don’t set DHCP. The default value is no. | Step 2: Use DHCP on primary interface? no |
Step 3: Primary IP address? | Enter the IP address for the Mobile Controller. | Step 3: Primary IP address? 10.0.0.74 |
Step 4: Netmask? | Enter the netmask for the network on which the Mobile Controller is to reside. | Step 4: Netmask? 255.255.0.0 |
Step 5: Default gateway? | Enter the default gateway for the network on which the Mobile Controller is to reside. | Step 5: Default gateway? 10.0.0.1 |
Step 6: Primary DNS server? | Enter the primary DNS server for the network on which the Mobile Controller is to reside. | Step 6: Primary DNS server? 10.0.0.2 |
Step 7: Domain name? | Enter the domain name for the network on which the Mobile Controller is to reside. If you set a domain name, you don’t need to specify the domain names when you set up remote appliances to be managed by the Mobile Controller. | Step 7: Domain name? example.com |
Step 8: Admin password? | We strongly recommend that you change the default password. The password must be a minimum of six characters. | Step 8: Admin password? xxxyyy |
3. The system confirms your settings:
You have entered the following information:
1. Hostname: minna
2. Use DHCP on primary interface: no
3. Primary IP address: 10.0.0.74
4. Netmask: 255.255.0.0
5. Default gateway: 10.0.0.1
6. Primary DNS server: 10.0.0.2
7. Domain name: example.com
8. Admin password: xxxyyy
To change an answer, enter the step number to return to.
Otherwise hit <enter> to save changes and exit.
The Mobile Controller configuration wizard automatically saves your initial configuration settings.
4. To log out of the system, enter the exit command at the system prompt:
amnesiac> exit
You can always restart the configuration wizard and change your answers by entering configuration jump-start at the system prompt. Using this command can be an easy way to change the primary IP address or other values as configuration requirements change.
Connecting the Mobile Controller to your network
This section describes how to connect the Mobile Controller to your network.
To connect the Mobile Controller to your network
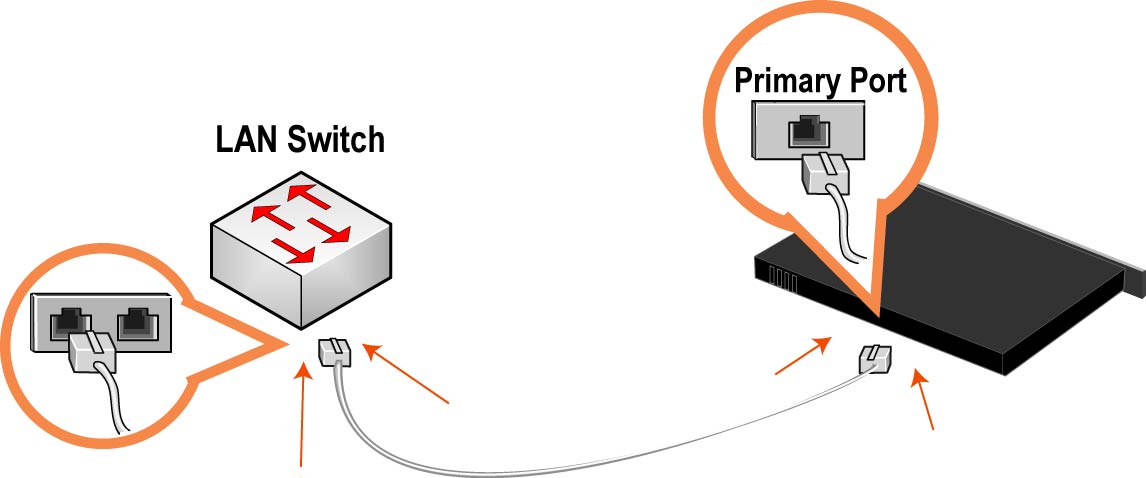
1. Plug the straight-through cable provided in your shipment into the primary port of the Mobile Controller and the LAN switch. The primary part can be any port on your LAN switch that acts as a host.
Figure: Connecting the primary port and LAN switch
2. If your controller has a front bezel, and you removed it previously, put the bezel back in place.
Logging in to the Management Console
This section describes how to log in to the Mobile Controller using the Management Console. Use this front-end, web-based GUI to configure and manage your Mobile Controller deployment.
It is possible to connect to the Mobile Controller Console through any supported web browser. To connect to the Mobile Controller, you must know the hostname, domain name, and administrator password that you entered during the initial setup of the Mobile Controller.
To log in to the Management Console
1. Enter the URL for the Mobile Controller in the address bar of your browser:
<protocol>://<host>.<domain>
<protocol> is HTTP or HTTPS. HTTPS uses SSL protocol to ensure a secure environment. If you use HTTPS to connect, you’re prompted to inspect and verify the SSL key.
<host> is the name that you entered for the Mobile Controller during initial configuration. If your DNS server maps that IP address to a name, you can specify the DNS name.
<domain> is the full domain name for the Mobile Controller.
The Mobile Controller Console GUI appears, displaying the login page.
Figure: Login page
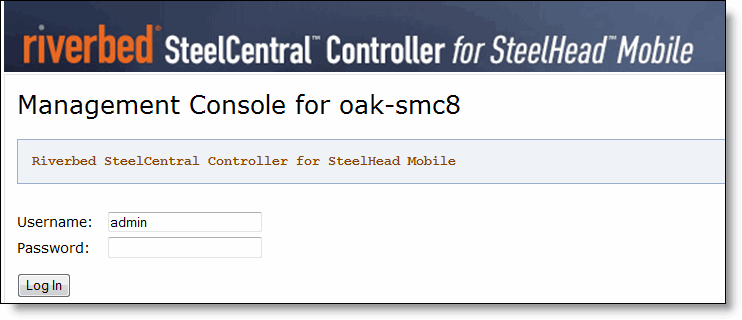
In the Username text box, the default account username admin appears.
You must use the admin account the first time you log in.
Note: Later, you can configure the monitor username, RADIUS users, or TACACS+ users. For detailed information about these options, see the SteelCentral Controller for SteelHead Mobile User’s Guide.
2. In the Password text box, type the password you assigned in the Mobile Controller configuration wizard.
3. Click Log In to log in and display the home page.
After you have logged in to the Mobile Controller, you’re ready to create a package to deploy to your endpoints. For details, see the SteelCentral Controller for SteelHead Mobile User’s Guide.