Azure Cloud Topologies
SteelConnect offers strong integration with Microsoft Azure. You can quickly and easily deploy virtual SteelConnect gateways in Azure to create a secure full-mesh virtual private network (VPN) fabric between your sites and/or VNets anywhere in the world. Connect your Azure account to SCM, and SteelConnect will find all your subnets, in all networks, in all regions. Importing an entire network, or individual subnets, into SCM is as easy as clicking a button. You can then deploy virtual SteelConnect gateways in Azure—with optional SteelHead WAN optimization—onto your SCM-managed subnets to build an interconnected, full-mesh VPN.
Redundancy is currently only available on AWS.
AWS, Azure, and SteelConnect use slightly different terms to refer to similar network concepts. Virtual Private Clouds (AWS) and VNets (Azure) are called sites in SteelConnect, and subnets are referred to as zones in SteelConnect.
Deployment into the Azure cloud
The configuration steps to deploy SteelConnect gateways in the Azure cloud are outlined in the SteelConnect Manager User Guide. The steps to do so are:
1. Subscribe to Riverbed Azure products.
2. Configure your Azure accounts with SteelConnect Manager.
3. Import Azure networks.
4. Deploy SteelConnect gateways to your Azure network.
Azure also offers advanced features, including:
•Azure ExpressRoute to configure a private network connection to your cloud deployments
To integrate your Azure account with SCM for cross-account access, you will also need to follow the steps outlined in this knowledge base article: https://supportkb.riverbed.com/support/index?page=content&id=s29078
Once you have read through the above steps in the SteelConnect Manager User Guide on how to configure your deployment into Azure, read through the example deployment in this chapter as well as the routing notes and SteelHead with Azure notes.
SteelConnect gateway in Azure
This section steps through a sample deployment of SteelConnect gateways in Azure.
This example starts with an on-premises topology for an organization that has a cloud data center network in the Ireland region of Azure.
Azure network sample dashboard
To connect all sites to the Azure cloud
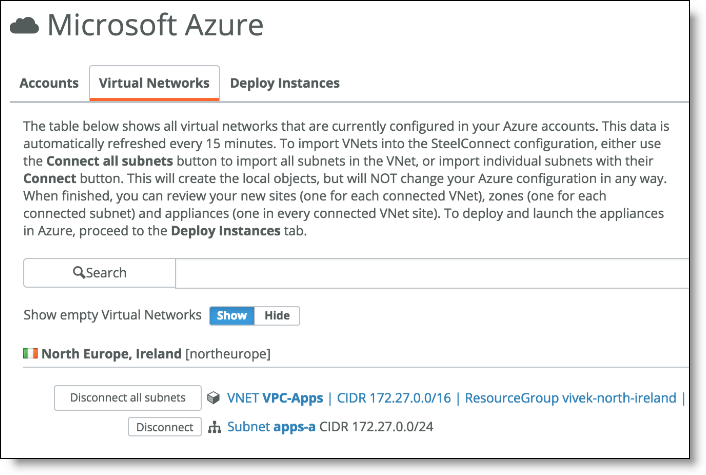
1. Choose Network Design > Azure and then select the Virtual Networks tab. Click Connect All for the North Europe, Ireland region.
Connect all Azure virtual networks
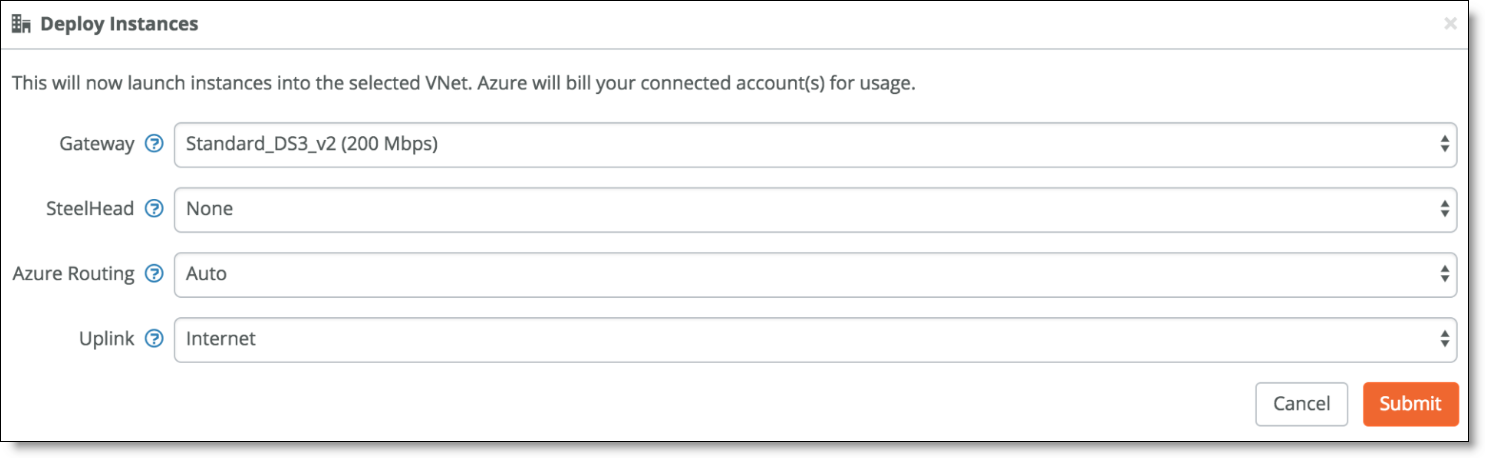
2. Select the Deploy Instances tab and click Deploy next to an instance.
Choose the parameters you want. Note, there is no option to deploy a gateway in Azure in HA mode in SCM version 2.10.
Azure deployment options
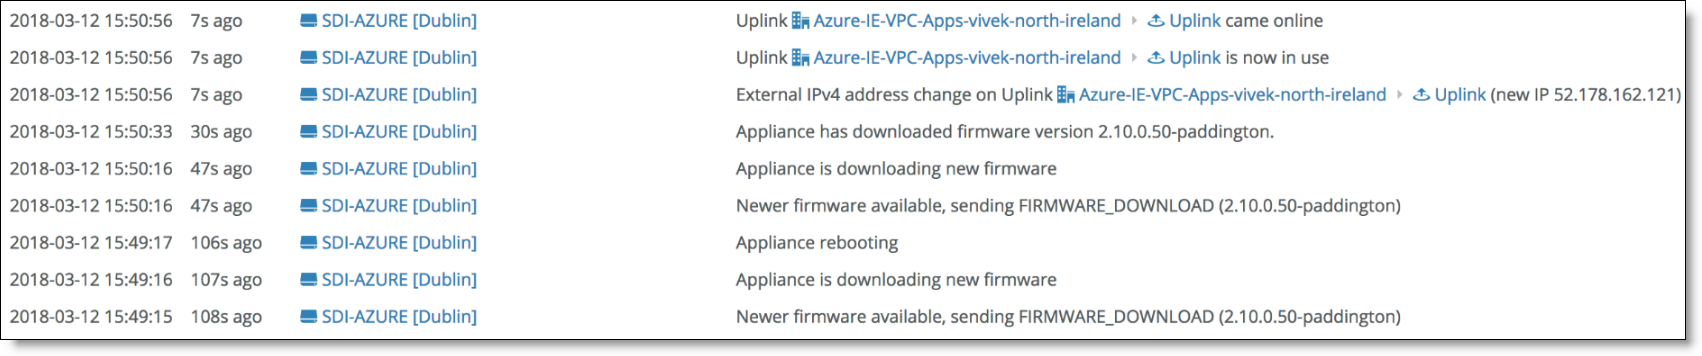
During deployment, log messages detail the status.
Deployment log messages
Azure deployment architecture shows the deployment architecture.
Azure deployment architecture

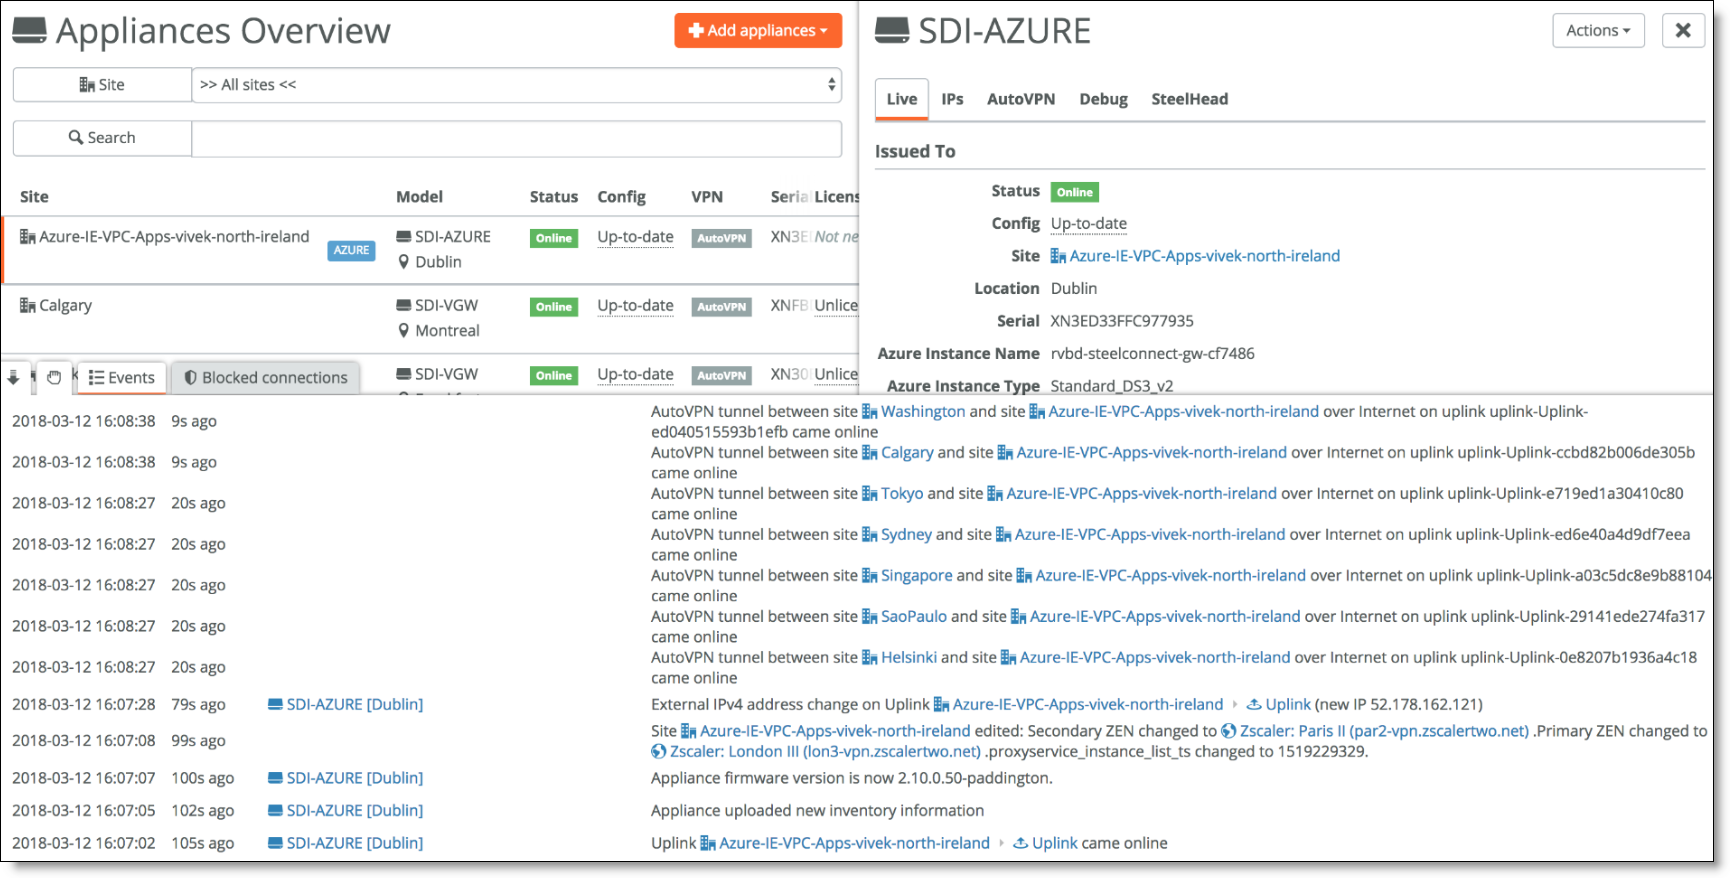
The Azure gateway appears in the Appliances Overview page on SCM.
Azure in Appliances Overview
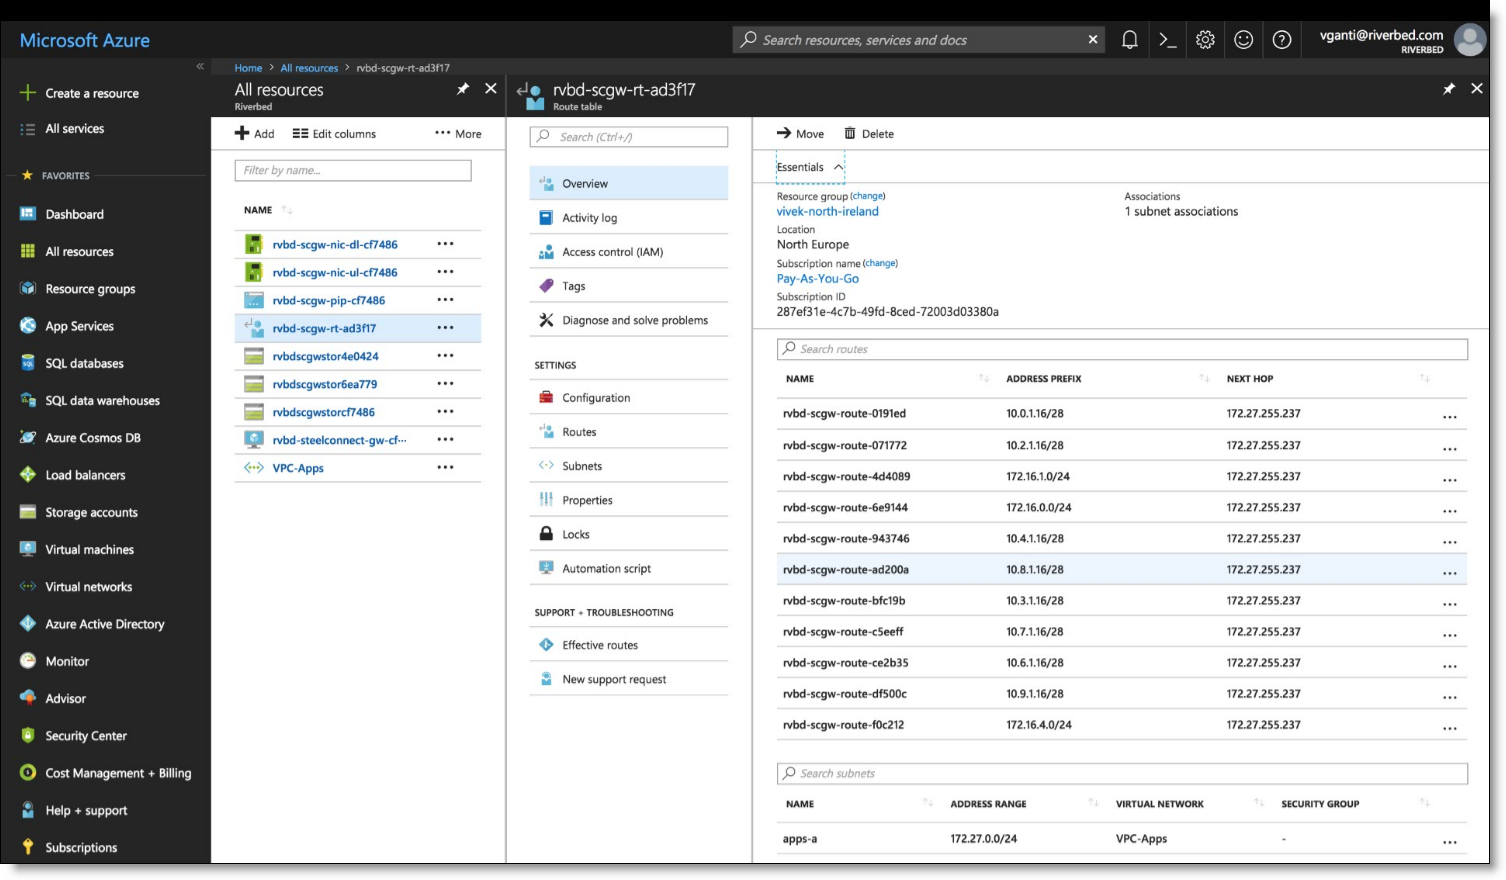
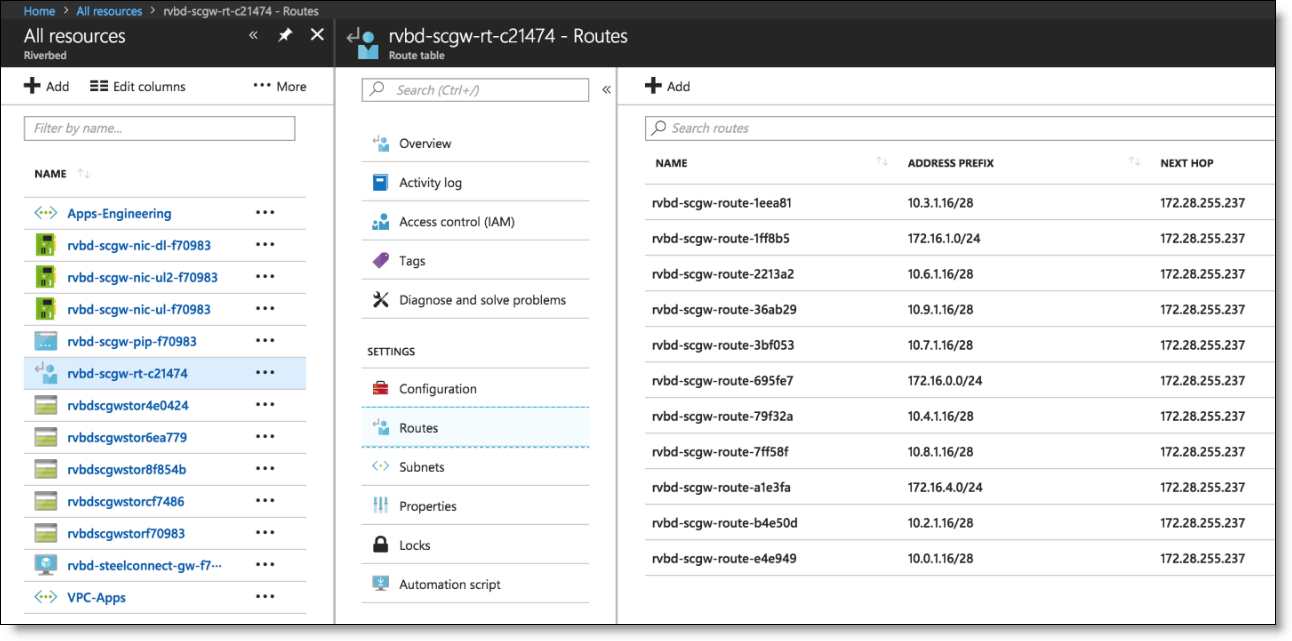
On the Azure portal, you can confirm the deployment of the gateway along with all its associated resources as shown in
Azure portal with routing details. You can see the routing table and review the routes to all your sites in your network.
Azure portal with routing details
With this deployment, there is no default route to the internet. You need to manually add that to your routing table if you want your internal Azure subnet to be able to go out to the internet.
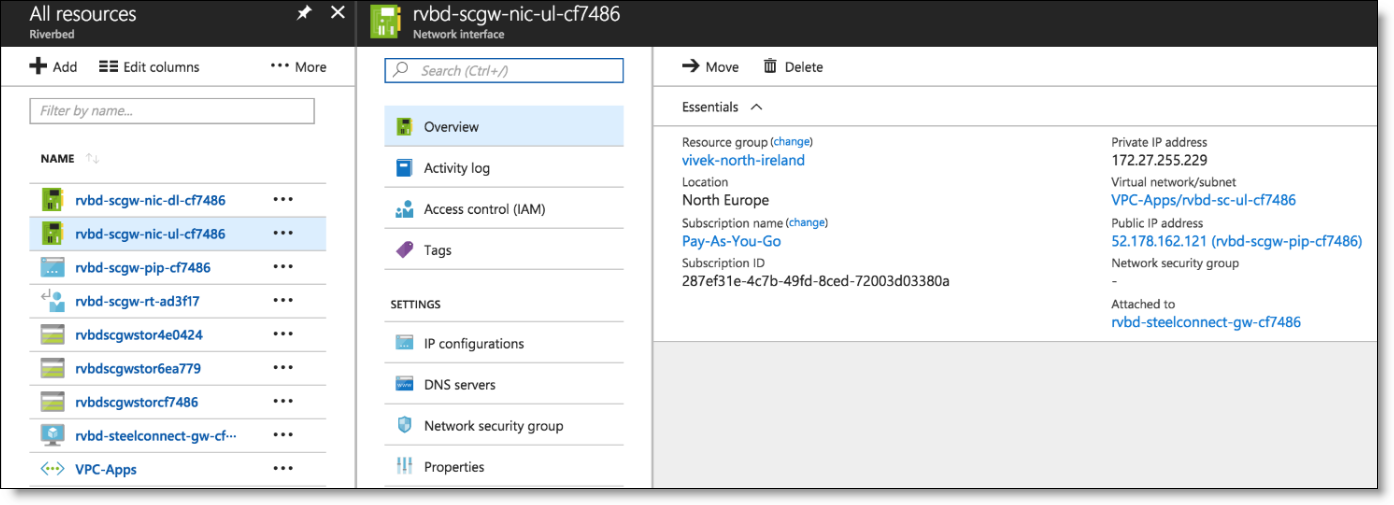
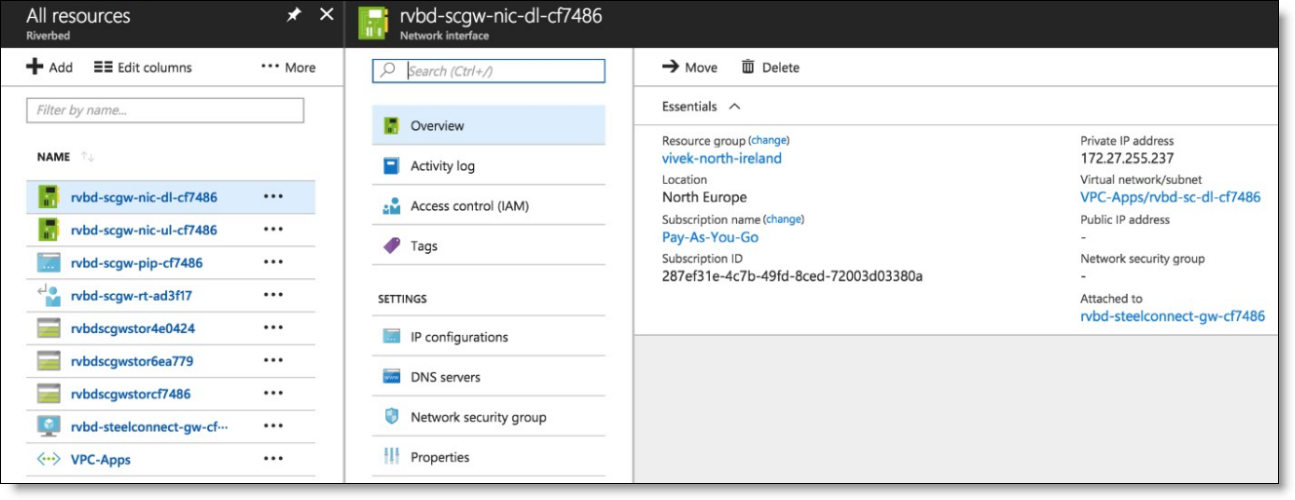
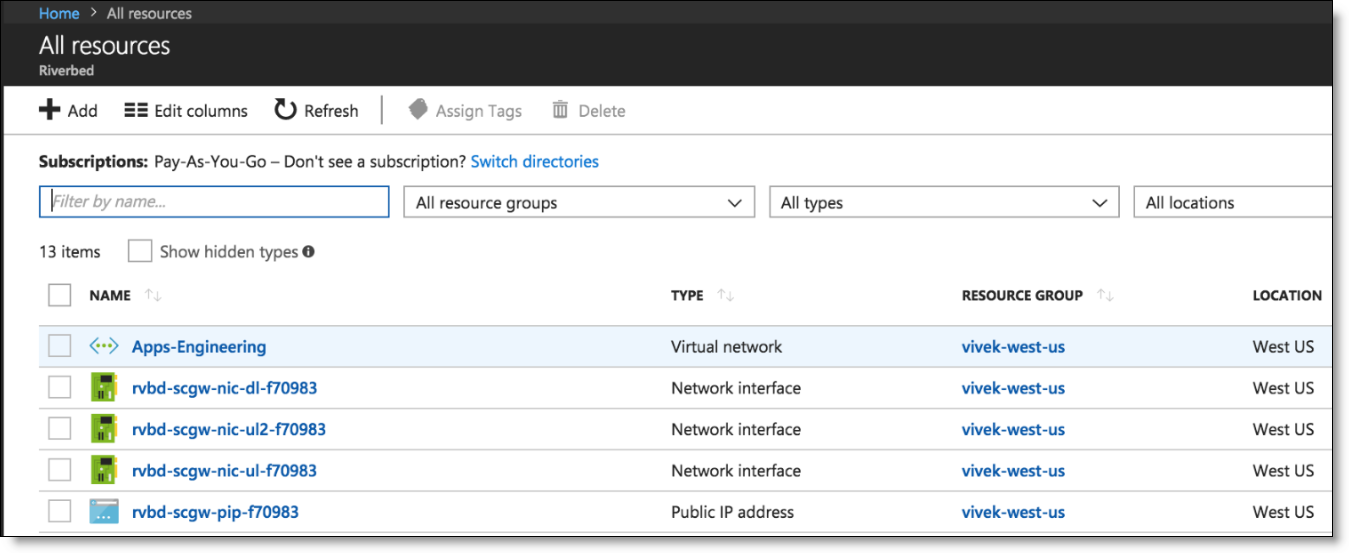
You can review the uplink and downlink interfaces of the gateway under All resources from the Azure portal.
Uplink interface in the Azure console
Downlink interface in the Azure console
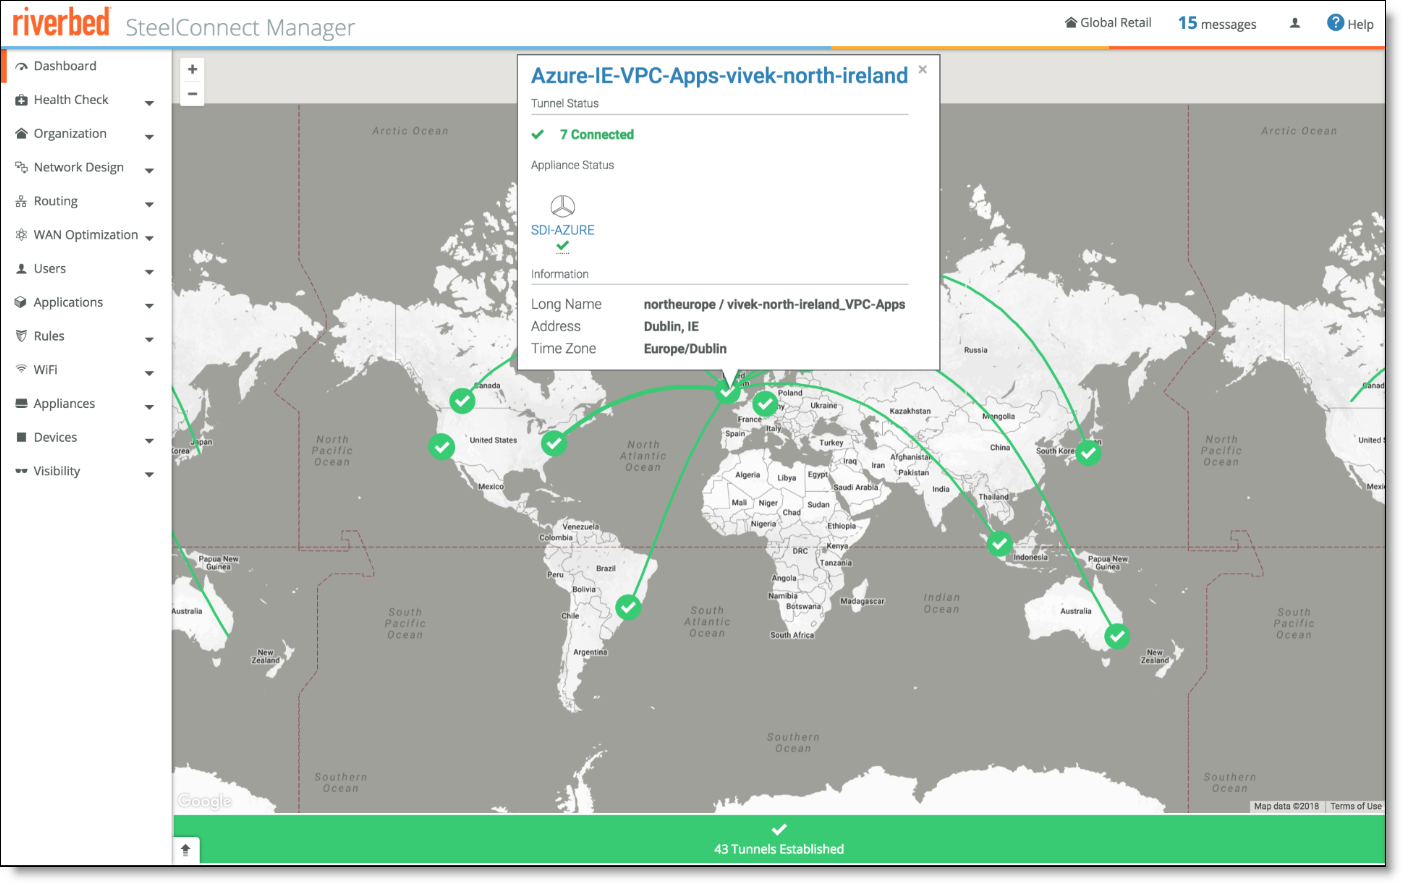
When fully deployed, the gateway appears as online in the Azure region and the tunnels appear from the newly provisioned cloud site to your other sites (cloud or on-premises) depending on your network configuration (leaf mode or full-mesh).
Dashboard with new Azure connections
Deploying SteelConnect gateway in Azure with SteelHead
Similar to the deployment of gateway into AWS, you can also deploy SteelHead in Azure. SteelHead WAN optimization enhances your SteelConnect Infrastructure as a Service (IaaS) deployment by automatically optimizing all TCP traffic to increase speed and reduce bandwidth over the secure VPN links. In addition to interconnecting your cloud infrastructure to your on-premises sites (or bringing the cloud closer by providing a direct path to your IaaS applications from each branch) you can now use SteelHead to boost performance and reduce traffic.
To deploy a SteelConnect gateway in Azure with SteelHead optimization, step through the standard deployment process and specify a specification for the SteelHead deployment. The specifications include throughput limits that indicates the amount of optimized traffic the instance supports.
You can add this feature during initial deployment or at any time.
Adding SteelHead optimization to a gateway in Azure

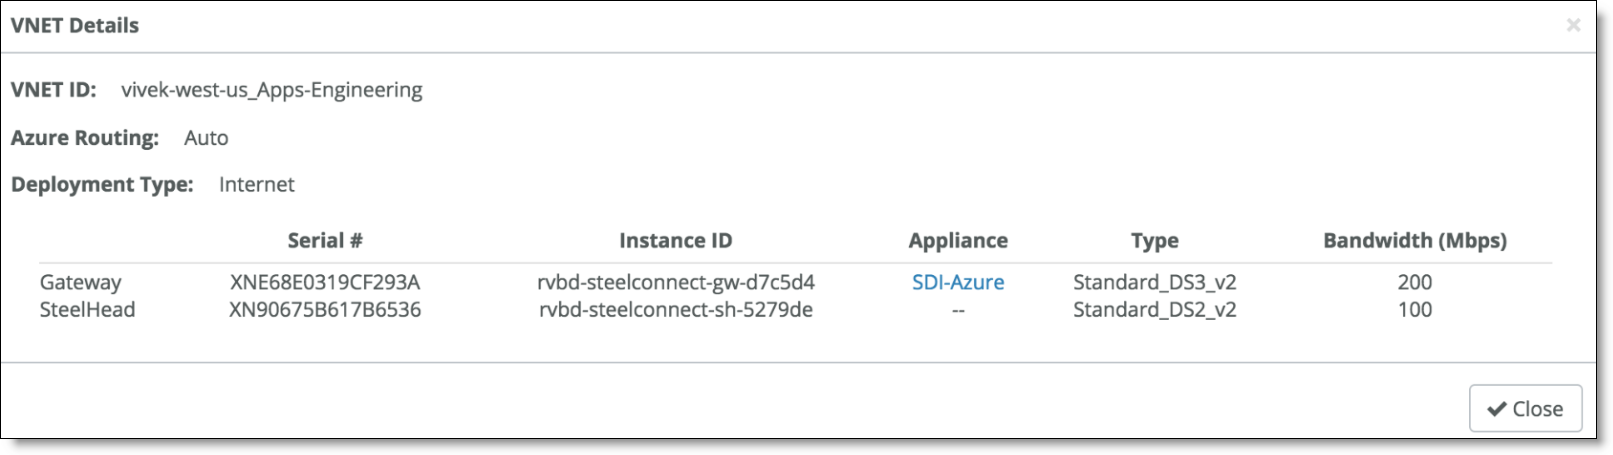
When deployed, the VNET details for appliances appear in SCM.
Gateway and SteelHead appliance in Azure dashboard
The deployed appliances also appear in the Appliances pages of SCM. Select the gateway and click the SteelHead tab to review the details of the deployed SteelHead instance.
SteelHead tab for a gateway

The deployed topology matches that of AWS. The gateway and SteelHead appliances appear in the Azure portal in the Resources section.
Azure portal resources

Deploying over Azure ExpressRoute
You can use Azure ExpressRoute to create private connections between Azure data centers and infrastructure on your premises or in a colocation environment. The ExpressRoute topology and workflow is the same as with AWS Direct Connect.
The SteelConnect Manager User Guide has detailed steps for Azure ExpressRoute configuration.
To deploy Azure ExpressRoute
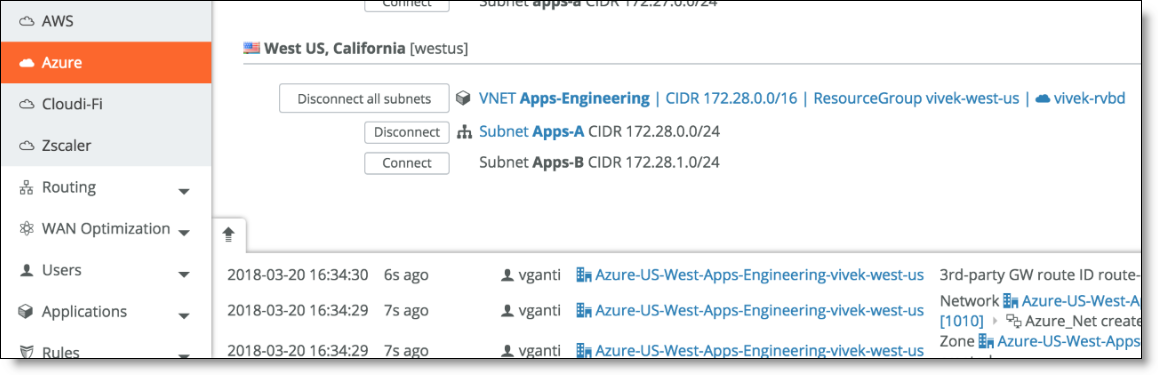
1. Connect to a subnet in an Azure VNET.
Connect a VNET
2. Deploy the gateway and specify the Uplink to be Internet + ExpressRoute.
Setting the gateway uplink type for ExpressRoute

3. In the ExpressRoute WAN field, specify an overlay network.
The ExpressRoute WAN field appears once you specify Internet + ExpressRoute as the Uplink.
SCM only lets you connect to encrypted WANs and only encrypted WANs appear in this field.
In our sample topology, the ExpressRoute connection is over an encrypted MPLS connection.
When you deploy, SCM creates two uplinks for the new AWS site: one over the internet and one over the MPLS WAN.
ExpressRoute uplinks

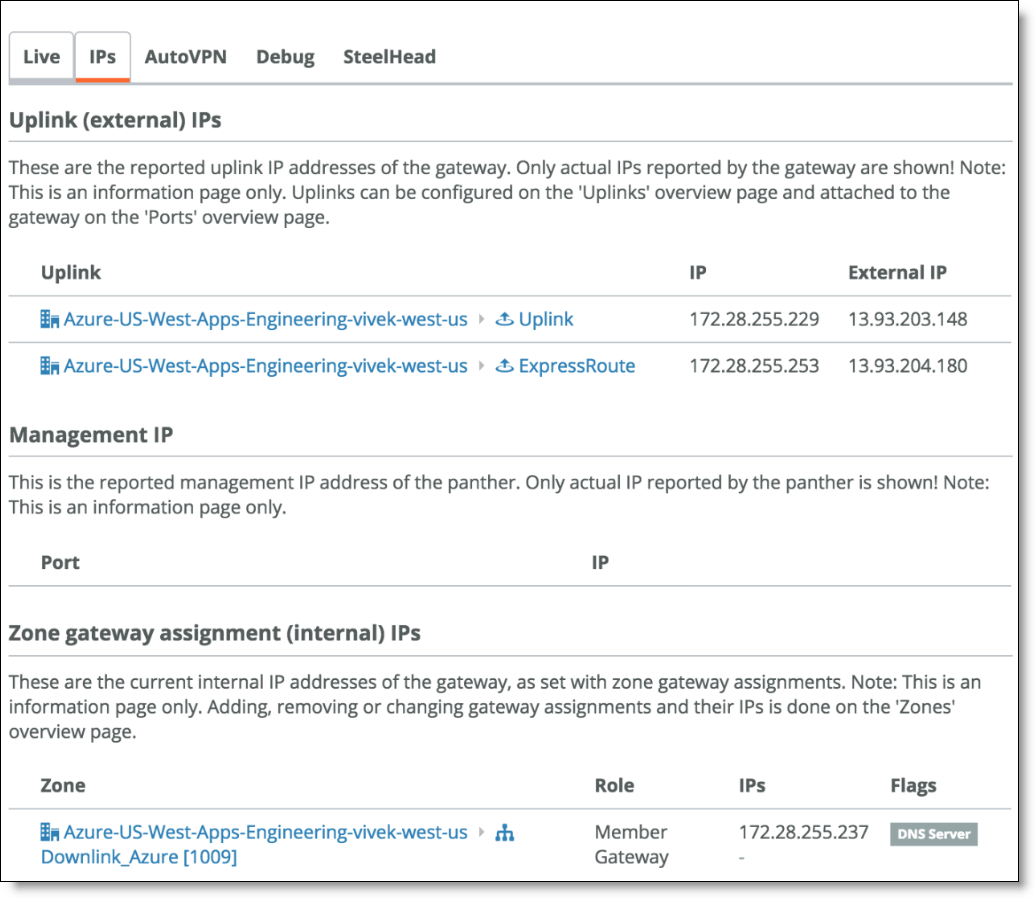
Once deployed, the Azure gateway appears under Appliances. When you click it and view the IPs tab, you will see two IP addresses for the two Uplink connections.
ExpressRoute IP addresses
On the Azure portal, two uplinks for the gateway and one for the downlink appear.
Uplinks and downlink in Azure portal
From the Azure portal, you can also review the route table on Azure populated with routes to all of your sites.
Route table on Azure portal
Route-tables and user-defined routes (UDRs)
When using automatic routing, the connected subnets route table is modified by SCM automatically to control the way traffic is routed to other SteelConnect sites. The SteelHead for SteelConnect automatically uses the SteelConnect Gateway as its upstream exit point, and when present, the routes point to the SteelHead interface that traffic is routed through the SteelHead before being forwarded to the SteelConnect gateway for transit. To allow the network interfaces to receive and forward traffic, SCM enables IP forwarding automatically for the SteelConnect gateway and SteelHead VNets in Azure.
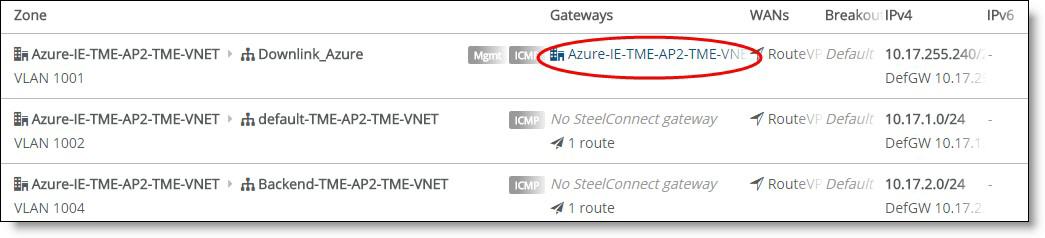
Three separate subnets are created by SteelConnect: the gateway has interfaces in the uplink and downlink subnet while the SteelHead is in a third subnet. The UDR configured on the SteelHead subnet makes sure traffic outbound from the SteelHead is redirected to the gateway. You can see the gateway name assignment in the SCM zones menu (see
The SteelConnect gateway running in Azure is displayed in the SCM zones). The downlink subnet is created in Azure by Riverbed to house SteelConnect instances and infrastructure without interfering with your cloud infrastructure in any way. The downlink subnet is displayed in SCM for clarity. There’s no need to change anything nor should you deploy your own Azure instances in this subnet.
The SteelConnect gateway running in Azure is displayed in the SCM zones
SCM requires a /27 subnet space to create the subnets needed to house the gateway and the SteelHead. SteelConnect subnets are carved out from the overall address space assigned to individual VNets. SCM needs enough space to create these subnets.
For example, if the address space assigned to a particular VNet is configured as 10.10.0.0/16, and there are 255(/24) client subnets ranging from 10.10.1.0/24 through 10.10.254.0/24, SCM can spin /27 downlink, uplink, and SteelHead subnets in the nonallocated address space 10.10.255.0/24. However, if all 256 (/24) subnets are consumed by client subnets, SCM doesn’t have enough space to spin up the uplink and downlink subnets and displays a “No free subnets available” error.
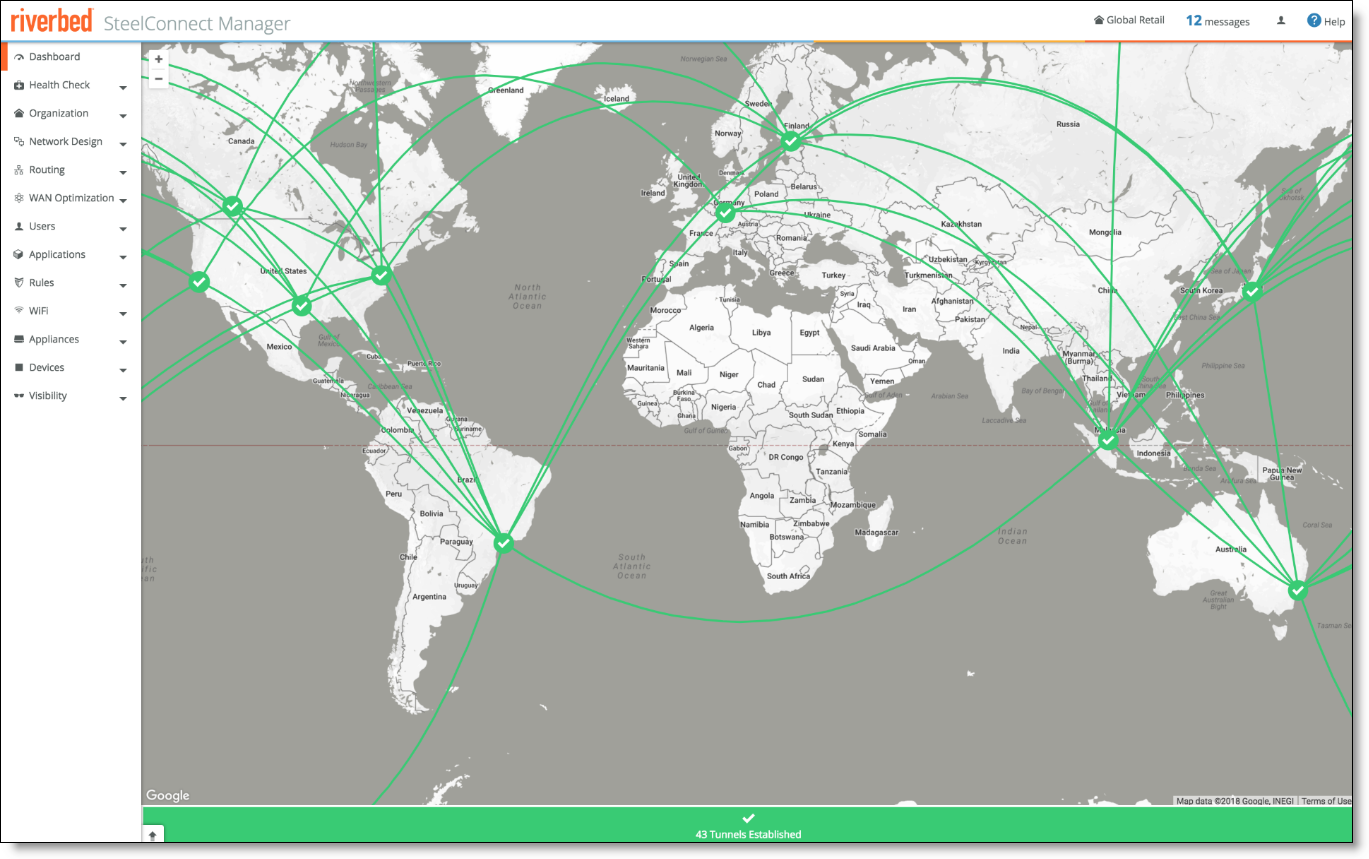
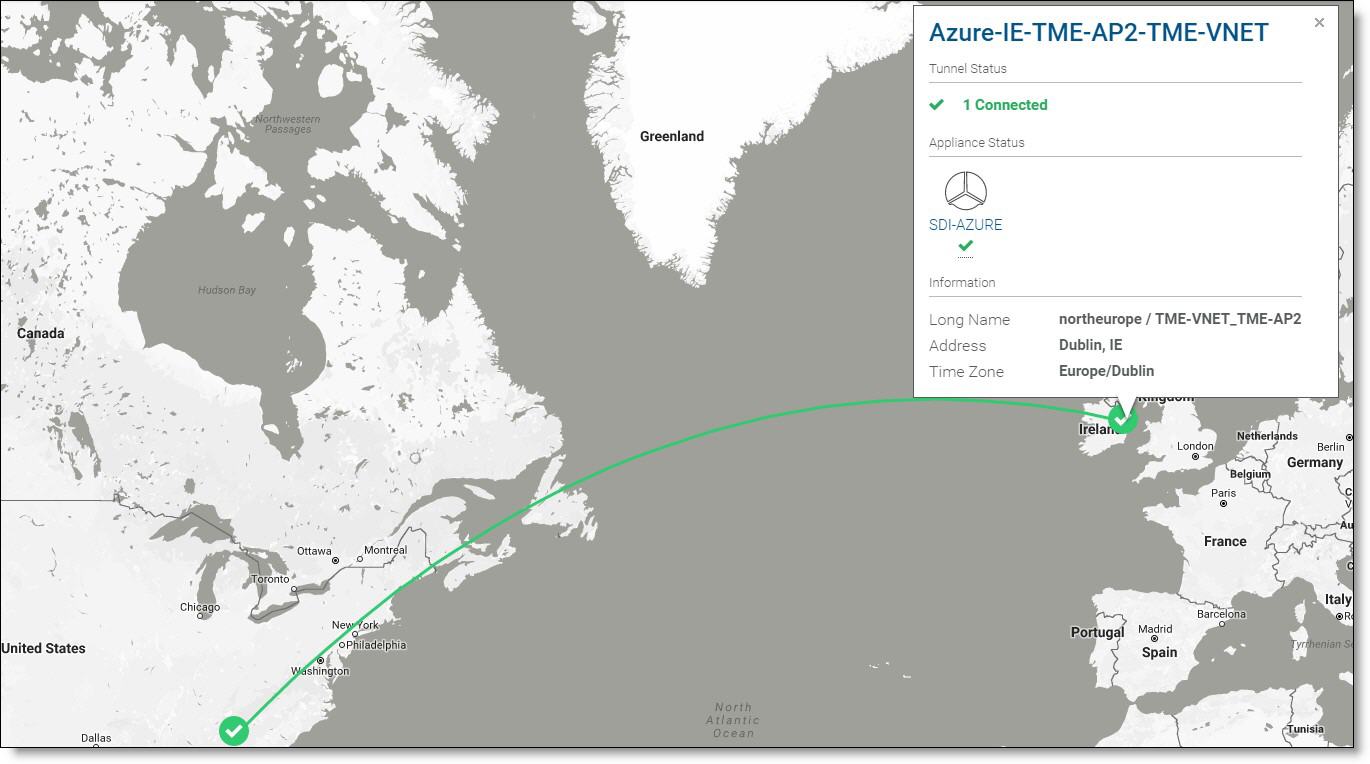
In
Green line indicates VPN tunnel is successfully established, the SCM dashboard shows one other site at Atlanta, Georgia to which the Azure (Dublin) site is connected.
Green line indicates VPN tunnel is successfully established
To handle traffic between your Azure client subnets and the internet, you can create a user-defined route in Azure. When different route types are present in a UDR route table, user-defined routes are preferred over the default system routes. Each subnet can only be associated to a single route table. All VMs and cloud services in a subnet use the route table associated to that subnet. For further details on creating user-defined routes in Azure go to:
In general, when working with gateway subnets, avoid associating a network security group (NSG) to the gateway subnet. Associating an NSG to a gateway subnet might cause your VPN gateway to stop functioning as expected.
Manual routing
When deploying the SteelConnect gateway, the manual routing option can be enabled for a VNET/site by setting the Azure routing to manual. When this option is enabled, the route tables of the connected subnets will not be modified by SCM and you must add the required routes.
Manual routing support is useful for deployments that involve a large number of sites. Because there is a hard limit on the number of routes that can be added to an Azure route table (default limit is 50 routes per route table), SCM will not be able to add all the required routes. In such a case, you can use the manual routing option and manually add the summarized routes to the AWS route tables. This option is also useful if you want to control what gets routed over the SteelConnect AutoVPN with your own scripts and designs.