Installing the SteelHead SD
This chapter describes how to install the SteelHead SD. It includes these sections:
The SteelHead SD appliance consists of the SteelHead WAN optimization service and the SteelConnect SD-WAN service through a gateway.
This chapter describes how to perform the initial installation for the SteelHead SD appliance. It doesn’t provide detailed information about configuring and managing SD-WAN or WAN optimization features. For detailed information, see the SteelConnect Manager User Guide and the SteelHead Management Console User’s Guide.
Configuring SteelHead SD using SteelConnect Manager
You use the SteelConnect cloud-based management system to install, configure, and manage the SteelHead SDs in your network. SteelConnect uses a zero-touch provisioning (ZTP) to install and manage your appliances, enabling you to configure and visualize the appliances in your network before you install and connect the hardware.
Using SteelConnect Manager (SCM), you perform the basic configuration of your network, register and connect the hardware, and configure the WAN optimization in-path settings to bring your SteelHead SD into production. This chapter describes these steps.
Defining an organization
SCM uses these terms to describe the network:
• Organization - A company representing an end customer. You can assign administrative rights to individual administrator accounts per organization. You can also manage appliances and licensing per organization.
• Site - A physical location of one or more office buildings, a hosting center, or a cloud location that make up the organization. A site houses a SteelConnect gateway and uses a permanent DNS alias. Every site requires a local network zone and at least one internet uplink. The zone is automatically created when you create a site.
• Zone - Layer 2 network segments or VLANs within sites that are VLAN-tagged traffic. A zone always has a VLAN tag assigned to it.
SCM is delivered with a default organization and site. You add your company name and basic information for your organization or change and customize this information later. For details about defining an organization, network, sites, zones, and uplinks, see the SteelConnect Manager User Guide.
To log in to SCM
1. Using the SCM URL emailed to you, log in to SCM using the default username admin and the default password pppp.
After a successful log in, you're greeted by the dashboard.
Figure: SCM dashboard
The dashboard map updates dynamically to keep an accurate visual overview of your network. You can always refer to the dashboard map as you define your topology to make sure the deployment is accurate.
To add sites
2. Choose Network Design > Sites.
3. Click New Site to expand the page.
4. Add a site tag: for example, headquarters.
5. Add the site’s location: for example, San Francisco.
6. Type the site’s address, country, and time zone.
7. Click Submit.
8. Repeat the steps for the remaining sites in your network topology.
A zone is automatically created when you create a site. You can modify a zone now or wait until you have completed the installation process. For details, see the SteelConnect Manager User Guide.
Adding shadow appliances
SCM stores all configurations, including your existing and future network plans. This means you can either add an appliance when you physically have it or you can preplan and configure an appliance by adding a shadow appliance and later drop the physical appliance into the topology with no further configuration.
To add shadow appliances
1. Choose Appliances > Gateways.
2. Click Add appliances and select Create Shadow Appliance.
3. Select 570-SD Gateway, 770-SD Gateway, or 3070-SD Gateway from the model drop-down list.
4. Select the site where you want to deploy the shadow appliance from the site drop-down list.
5. Click Submit.
6. Repeat these steps for each of your appliances.
After adding the virtual gateways, SCM automatically connects them using AutoVPN to create secure VPN tunnels. Later, you’ll register the gateways to transform them from shadow appliances to physical appliances.
7. Choose Network Design > Uplinks to see that SCM has automatically assigned uplinks to the new gateways.
Before deploying the hardware, you can configure other SteelConnect features now or wait until later. For details about configuring SteelConnect features, see the SteelConnect Manager User Guide.
Registering appliances
Next, you register the physical devices to transform them from shadow appliances into physical appliances using the SteelConnect gateway serial number.
For SteelHead appliances that are going through the conversion process, the SteelHead SD serial number is available in Riverbed email sent by Riverbed containing the SteelConnect serial number and token.
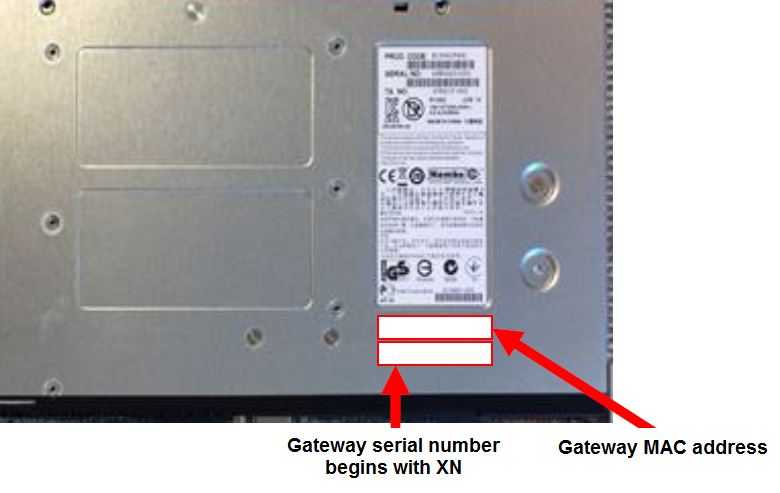
The SteelConnect serial number is also available on the appliance label. The SteelConnect gateway serial number always begins with the prefix XN. Find that serial number and MAC address on the appliance and write them down. (You will use the MAC address later in these procedures.)
The 3070-SD label is located on top of the appliance. The 570-SD and 770-SD labels are located on the side of the appliance.
Figure: 3070 SteelConnect gateway serial number and MAC address
Important: Make sure you register your appliances using the SteelConnect serial number. If you don’t, the SCM won’t autodetect the appliance when you register them.
To register a hardware appliance
1. Choose Appliances > Gateways to view the shadow appliances you just created.
Figure: Example of a shadow appliance

2. Select the shadow appliance to expand the page.
3. Choose Actions > Register hardware.
Figure: Registering appliances
4. Type the serial number. Make sure you use the SteelConnect gateway serial number located on your appliance. The gateway serial number begins with XN.
5. Click Submit.
6. Repeat the steps to register the remaining appliances.
The provisioning server hands off the appliance when it connects into the particular organization and site. It gives the appliance its configuration, brings it online, performs all firmware upgrades, and realizes your design on the appliance in the real world.
Configuring the zone uplink
Next, you verify the ports and configure the LAN zone uplinks. The LAN zone uplink is configured as a single-zone uplink for the SteelHead WAN optimization service.
By default, the LAN port is disabled on the SteelHead SD appliances unless it is explicitly enabled. If you don't enable the LAN zone port of the gateway, SD-WAN won’t see either the SteelHead WAN optimization service or the clients on the LAN side of the network.
To configure the zone uplink
1. Choose Ports and select the site and appliance from the drop-down list. The ports for the appliance are displayed.
2. Click the LAN port you want to configure to expand the page.
Figure: Configuring the zone port
3. Select Singlezone or Multizone for the Port mode.
4. Select the zone from the drop-down list.
5. Click Submit.
Next, you need to obtain the IP addresses for the in-path interface and gateway from SCM so that you can configure WAN optimization on the virtual SteelHead.
Obtaining the in-path interface IP address
You use the LAN-zone network IP address in SCM to configure the in-path interface on the virtual SteelHead.
To obtain the in-path interface IP address
1. In SCM, choose Network Design > Zones and select the device to expand the page.
Figure: Obtaining the LAN IP address for the in-path interface
The LAN zone of the network is displayed under the IP tab. If the network IP address is
172.12.1.0/24, you can assign any IP address from 172.12.1.1 to 172.12.1.254 for the SteelHead in-path interface.
2. Write down the IP address. You will use this address when you configure the inpath0_0 interface for WAN optimization.
Next, you obtain the LAN-zone gateway IP address to configure the in-path gateway on the virtual SteelHead.
Obtaining the in-path gateway IP address
You use the LAN-zone gateway IP address in SCM to configure the in-path gateway on the SteelHead.
To obtain the in-path gateway IP address
1. To obtain the IP address for the default gateway, choose Appliances and select the device to expand the page.
2. Click the IPs tab.
Figure: Obtaining the IP address for the gateway
The in-path gateway IP address for the SteelHead is listed under the Zone gateway.
3. Write down the IP address. You will use address this when you configure the in-path gateway for the inpath0_0 interface for WAN optimization.
Cabling the SteelHead SD appliance
With the SteelHead SD, it is helpful to think of LAN ports as applying to virtual SteelHead optimization and WAN ports as applying to the SteelConnect virtual gateway. This framework will help you as you go forward in configuring the SteelHead SD.
The key task is to connect at least one WAN port to an uplink from a service provider that provides a path to the internet:
• On the 570-SD or 770-SD, use a straight-through cable to connect either the WAN0_0 or WAN0_1 ports a WAN router with an internet uplink or an MPLS uplink for back-hauled internet traffic.
• On the 3070-SD, use a straight-through cable to connect either the WAN3_0 or WAN3_1 port to a WAN router. Internet reachability can be via a local break-out or via a data center over MPLS—whichever you prefer.
You cable the primary port to a DHCP reachable port on the switch.
You cable at least one LAN port (for example, LAN0_0, LAN0_1, and so on) to the LAN port on a switch.
WAN ports require an IP address as they will represent the uplink configuration. The SteelHead in-path interface must have an IP address and VLAN ID for the zone it is on.
Port definitions
Port | Description |
Primary | Preferably the primary port connects to a DHCP reachable port on a switch. The primary port is the management interface that enables you to connect to the SteelHead Management Console. |
AUX | When the AUX port functions as an uplink, it is mapped to the virtual gateway. The AUX port can also be enabled as an additional WAN uplink in SCM for instances where a WAN port goes down. SteelHead services, such as datastore synchronization, aren’t supported on the AUX port. The AUX port can be used for parallel HA deployments, where the AUX port is an HA port. In HA deployments, the port is mapped to virtual SteelHead. |
WANX_X | WAN ports function as uplinks for internet service providers that connect to the internet. Connect the WAN port to a WAN router using a straight-through cable. For 570-SD and 770-SDs, the default internet access port is WAN0_0 or WAN0_1. For 3070-SD, the default internet access port is WAN3_0 or WAN3_1. For details on 3070-SD NIC interface names, see SteelHead SD 3070-SD specifications. |
LANX_X | Connect the LAN port to the LAN switch using a straight-through cable. For 570-SD and 770-SDs, the default port is LAN0_0 and LAN0_1. For 3070-SD, the default port is LAN3_0 or LAN3_1. For details on 3070-SD NIC interface names, see SteelHead SD 3070-SD specifications. |
Console | Connects you to the controller virtual machine (CVM) using a serial cable. the CVM is the runtime management platform that connects you to the hypervisor via SSH. Typically, you should be able to troubleshoot and modify network issues using the SCM, but if necessary, you can troubleshoot the SteelHead and SteelConnect gateway locally. For details, see SteelHead SD In-Field Upgrade Guide. |
Port mappings
For detailed information on port mappings, see
Port MappingsPort mappings 570, 770
SteelHead SD | Interface |
lan0_0 <-> wan0_0 | inpath0_0 |
lan0_1 <-> wan0_1 | inpath1_0 |
Port mappings 3070
The 3070-SDI has three NIC slots. The 3070-SDI ships with the NIC in slot three. If there are no NICs in slot 2, lan3_0 becomes inpath0_0 and the numbering starts from there. The port naming auto-adjusts depending on the interfaces present as the 3070 supports either 2-port or 4-port NICs in slot 2 and slot 3. The in-path naming always starts from inpath0_0.
SteelHead SD | Interface |
lan2_0 <-> wan2_0 | inpath0_0 |
lan2_1 <-> wan2_1 | inpath1_0 |
lan3_0 <-> wan3_0 | inpath2_0 |
lan3_1 <-> wan3_1 | inpath4-0 |
Cabling the appliance
This section describes how to cable the appliance.
To cable the SteelHead SD
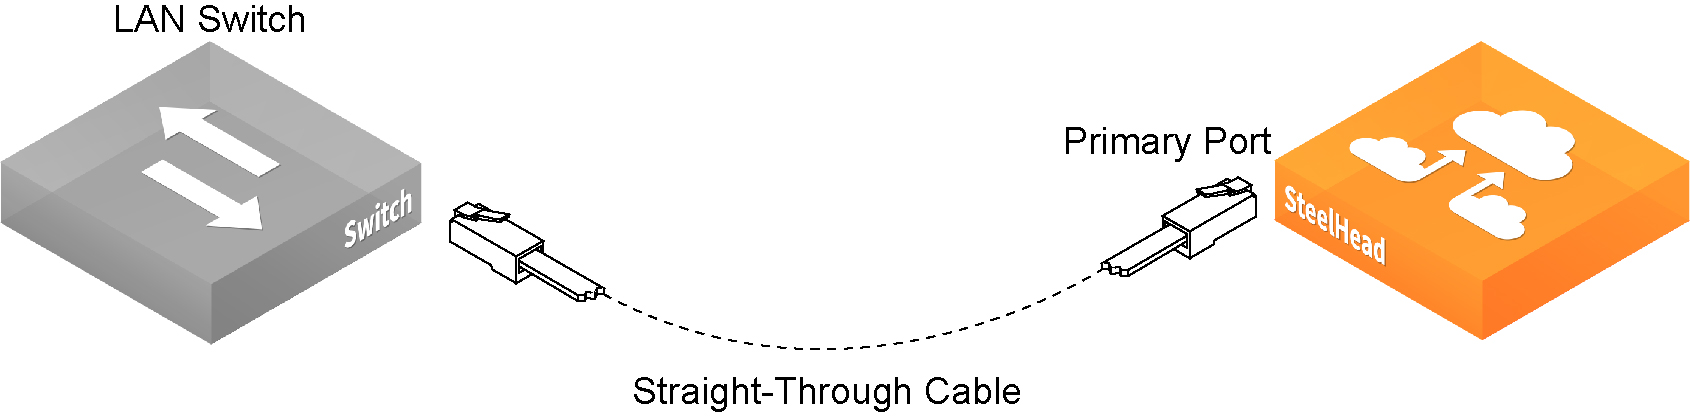
1. Plug the straight-through cable into the primary port to a DHCP reachable port on the switch. This must be a DHCP port that connects to a DHCP server.
Figure: Connecting the Primary port to the LAN switch
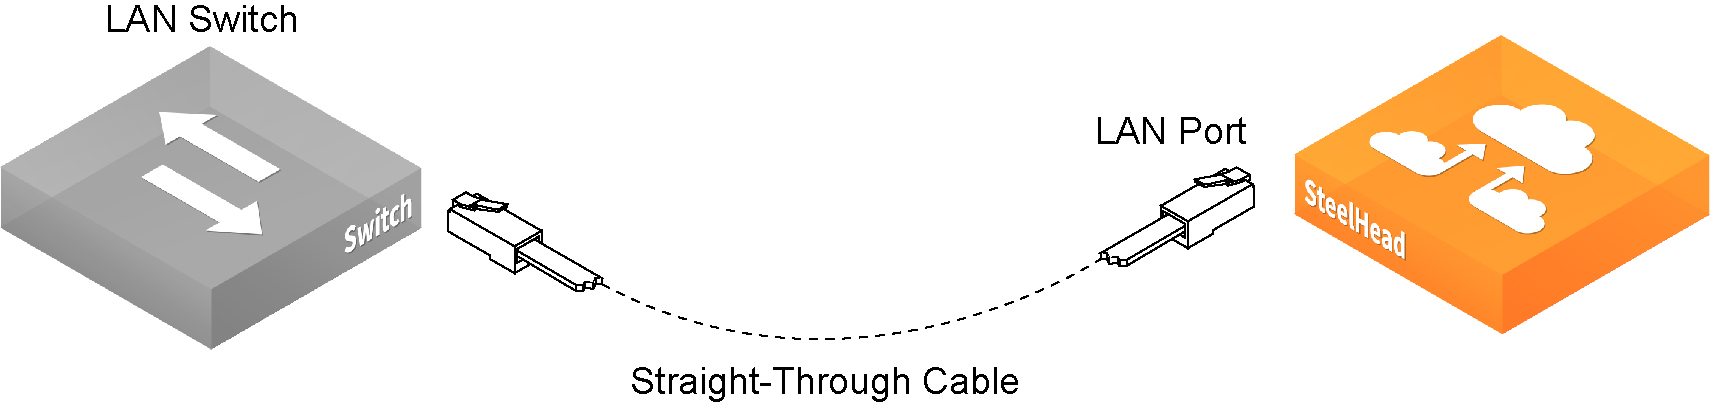
2. Plug the straight-through cable into at least one LAN port (LAN0_0, LAN0_1, and so on) to the LAN port on the switch.
Figure: Connecting the LAN switch to the LAN port
3. Connect at least one WAN port to an uplink from a service provider. For example, on a 570-SD or 770-SD use a straight-through cable to connect the WAN0_0 or WAN0_1 port to an internet uplink or to an MPLS uplink for back-hauled internet traffic. On a 3070-SD connect either the WAN3_0 or WAN3_1 port to a WAN router. Internet reachability can be via a local break-out or via a data center over MPLS.
Figure: Connecting the WAN port to the WAN router

Identifying the primary IP address for the SteelHead
There are three ways to identify the primary IP address of the SteelHead:
• When SteelConnect acts as the DHCP server - You can set the SteelConnect virtual gateway to act as a DHCP server and identify the primary IP address for the SteelHead in the SCM. With no DHCP server, the SteelHead primary IP address gets preserved through the conversion process to be used by the SteelHead SD default uplink to connect to SCM.
• When the SCC is used to manage SteelHeads - If you’re using the SCC to manage the WAN optimization service, you can obtain the primary IP address for each device in your network. SCC automatically registers all SteelHeads it detects in your network and provides the IP address for each in the Appliances page. For details on connecting to SCC, see the SteelCentral Controller for SteelHead User’s Guide.
• When an external server acts as the DHCP server - Obtain the MAC address from the appliance and search for the primary IP address on the DHCP server console. You can find the MAC address on the appliance label (see Figure: 3070 SteelConnect gateway serial number and MAC address) or you can view it in SCM. To view the MAC address in SCM, choose Ports and select the Primary port for the device. The MAC address is listed under the Info-Mode tab. Configuring SteelConnect to act as DHCP server
In this example the SteelHead LAN and primary ports are connected to same switch and the SteelConnect gateway acts as the DHCP server providing the primary IP address to of SteelHead.
To configure SteelConnect to act as a DHCP server
1. When you cable the SteelHead appliance, make sure you connect the LAN port and Primary port to the same switch.
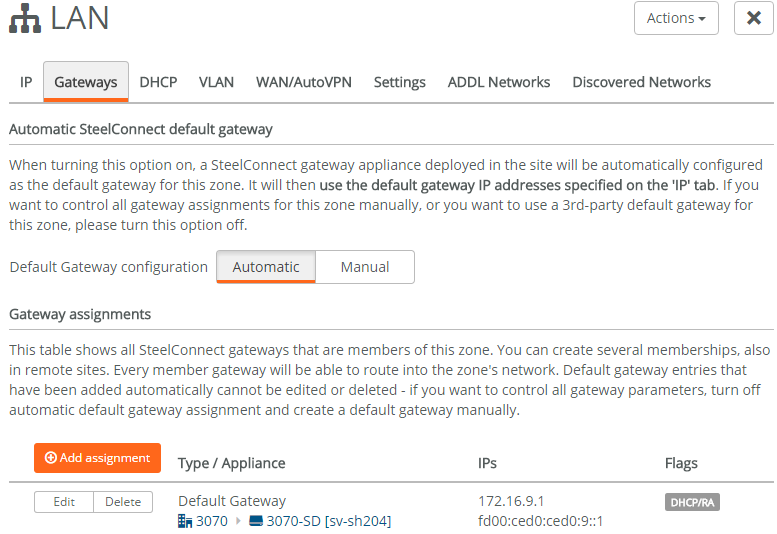
2. To set the gateway to act as a DHCP server, choose Networks Design > Zones and click the Gateways tab.
3. Under Gateway assignments, click Edit. (You can also add a new assignment if necessary.)
Figure: Editing the gateway to act as the DHCP server
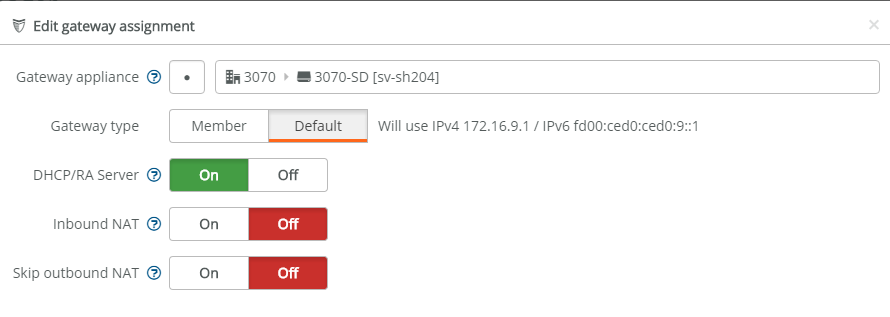
4. Make sure the DHCP/RA Server is on. (It will be green.)
Figure: DHCP/RA server is on
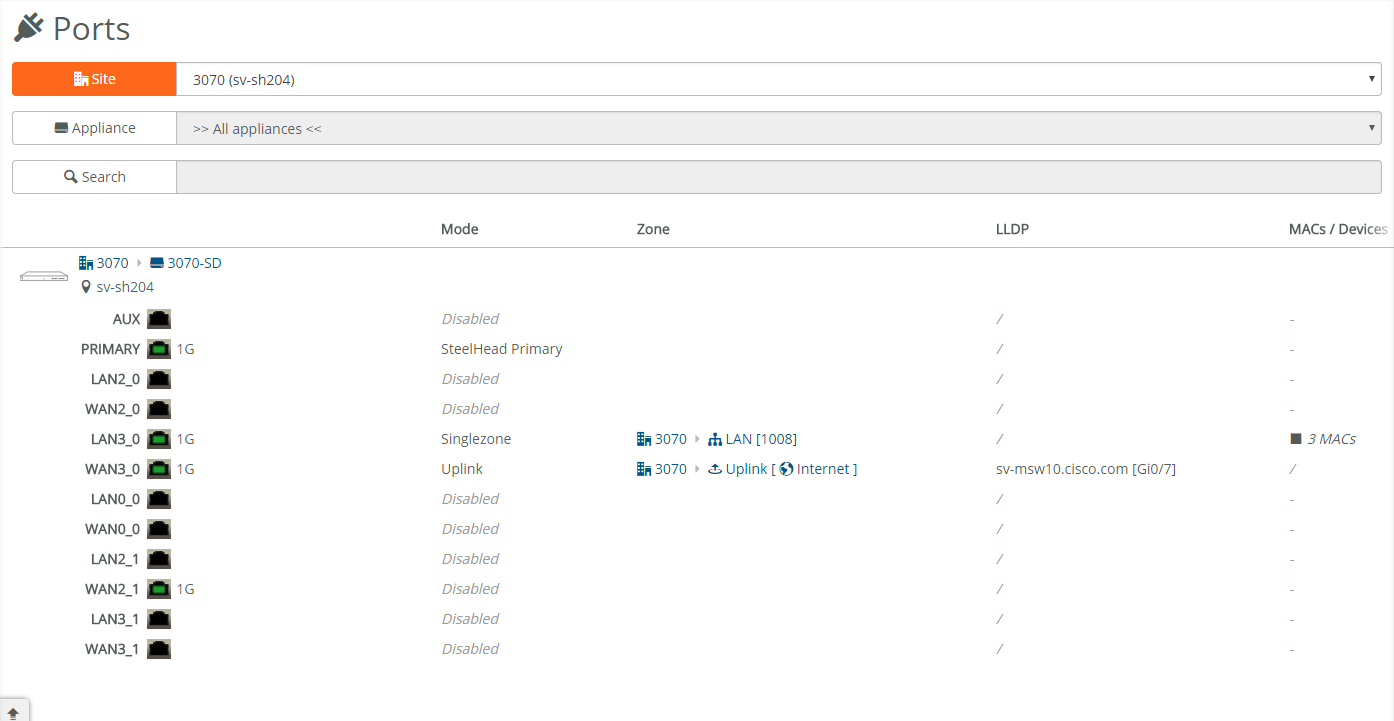
5. Choose Network Design > Ports to associate the LAN port to the appropriate Zone.
Figure: Associating the LAN port
6. There are two ways to connect: one is through the switch and other is back-to-back:
– Through the switch - Connect the LAN port and Primary port to the switch port and configure in the same VLAN.
– Back-Back - Connect the LAN port directly to the Primary port.
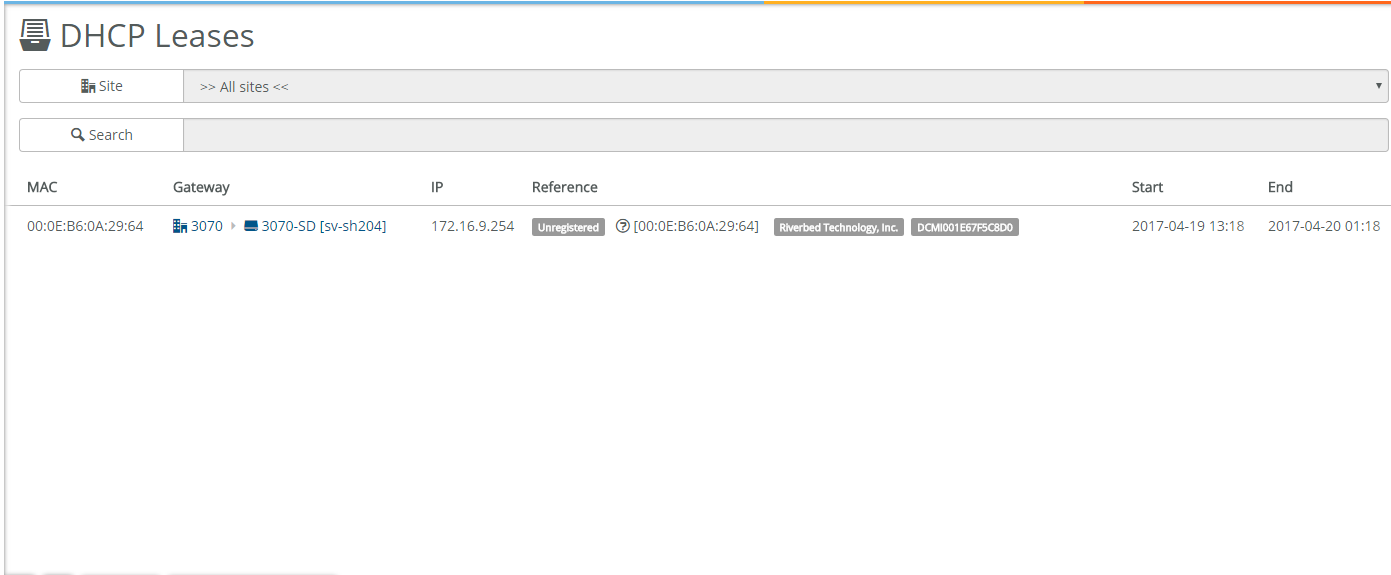
7. To identify the primary IP address for the SteelHead, choose Visibility > DHCP Leases:
– The MAC address/IP address will be available for the Primary port.
– In the figure below, the primary IP address is 172.16.9.254.
Figure: DHCP leases showing the primary IP address
Configuring the WAN optimization service in the SteelHead
Next, you configure the WAN optimization service in the SteelHead. To enable the WAN optimization service in the virtual SteelHead, you need to configure the in-path interface and the default gateway.
You will need the following information to configure the in-path interface and default gateway so that you can optimize traffic:
• MAC address - If you are not using the SteelCentral Controller for SteelHead (SCC) to manage your appliances, you will need the MAC address to find the primary IP address of the SteelHead on a DHCP server.
• SCM zone gateway IP address - The zone gateway for the device provides you with the IP address for the default gateway for the in-path interface. For details, see To obtain the in-path gateway IP address. To configure the in-path interface and the default gateway in the SteelHead
1. Using the Primary IP address you obtained from SCC or the DHCP server, enter it in the location box of your web browser using HTTPS. The sign in page for the SteelHead Management Console is displayed.
2. Specify the default user login (admin) and password (password).
For detailed information about monitor users and role-based management users, see the SteelHead Management Console User’s Guide.
3. Click Sign In to display the Dashboard.
4. Choose Networks > Networking: In-Path Interfaces.
Figure: In-Path Interfaces page

5. Select the interface to expand the page.
Figure: Configuring the in-path interface
7. Type the subnet mask address. The subnet mask on the in-path, must match the subnet mask on the zone (typically, /24, but it can be whatever you specified in the zone settings).
9. Click Apply.
10. You can refine your in-path WAN optimization settings using the SteelHead Management Console. For details, see the SteelHead Management Console User’s Guide.
11. If you have not already done so, return to SCM and complete your gateway configuration. For details, see the SteelConnect Manager User Guide.
Provisioning a SteelHead SD without a DHCP server using a USB drive
Adding SteelHead SD to your network requires the appliance to contact the SteelConnect Manager, which provides the initial configuration. In a scenario where no DHCP server is available in the existing network, you can use offline provisioning.
You can set up the configuration on SCM, even if the SteelHead SD is currently not present at the related site.
You’ll need the serial number of the SteelHead SD to create an offline provisioning configuration file.
To provision a SteelHead SD without a DHCP server
1. Log in to SteelConnect Manager.
2. Choose Network Design > Sites > Add Site(s) > New site.
3. Specify at least the site tag, name, and city.
4. Click Submit.
Figure: Creating a site
5. Choose Network Design > Uplinks and click New Uplink.
6. Select the uplink for the new site to expand the page.
7. Select Type and select Static IP from the drop-down list.
8. Specify the IP address using this format x.x.x.x/xx.
9. Specify a valid gateway address for the static IP uplink.
10. Click Submit. Repeat these steps for additional uplinks.
Figure: Creating a static IP uplink
To assign uplinks to the WAN ports of the appliance
1. Choose Ports > Sites and select the site you just created.
2. Under Appliances, select the SteelHead SD appliance to display the ports.
3. Select the WAN port you want to assign the uplink to. The page expands to display the port information.
4. Under Info/Mode tab, select Port Mode > Uplink and select the Static IP uplink from the drop-down list.
5. Click Submit. The WAN port will display the uplink you assigned to it.
Figure: Assigning the uplink to the WAN port
Now you are ready to download the configuration file (config file). Adhere to these guidelines:
• Wait for at least five minutes before downloading the config file to ensure that you are downloading the updated configuration.
• Do not modify the config filename.
• The USB stick must be in the ext3 or ext4 format, and starting in v2.11 can be in FAT32 format. If your USB has a different format, there are numerous instructions on the internet describing how to format a USB with ext3.
• Make sure you have all the sites and LAN/WAN ports configured with the appropriate sites, zones, and uplinks before you download the config file from the SCM.
To download the config file to the USB stick
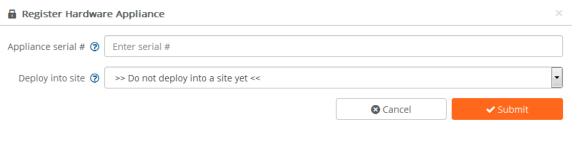
1. Choose Appliances > Add Appliances > Register Hardware Appliance.
2. Enter the serial number of the SteelHead SD and select the site you want to deploy the appliance.
3. Select the new SteelHead SD, and click Actions, and select Download config from the drop-down list.
Figure: Downloading the config file
The system downloads a configuration file (config file) named with the SteelHead SD serial number. The config file is downloaded to your laptop or computer, the default location will be depend on your browser settings.
4. Copy the config file to the root directory of the first partition on a FAT32 or ext3 formatted USB drive. If your USB has a different format, there are numerous instructions on the internet describing how to format a USB.
5. Deploy the SteelHead SD on the site and power on the appliance. Wait at least 30 seconds until the new appliance powers up correctly before plugging in the USB stick.
6. Plug in the USB stick to install the configuration setting in the config file. The SteelHead SD connects to SCM with the configuration.
7. Perform a factory_reset.sh on the hypervisor after putting in the USB drive.
8. Reboot the SteelHead SD.
Next steps
After you have configured and installed the SteelHead SD appliance, refer to the SteelConnect Manager User Guide and the SteelHead Management Console User’s Guide to fine tune your SD-WAN and WAN optimization features.