SteelConnect in the Cloud
Amazon Web Services and Microsoft Azure connectivity
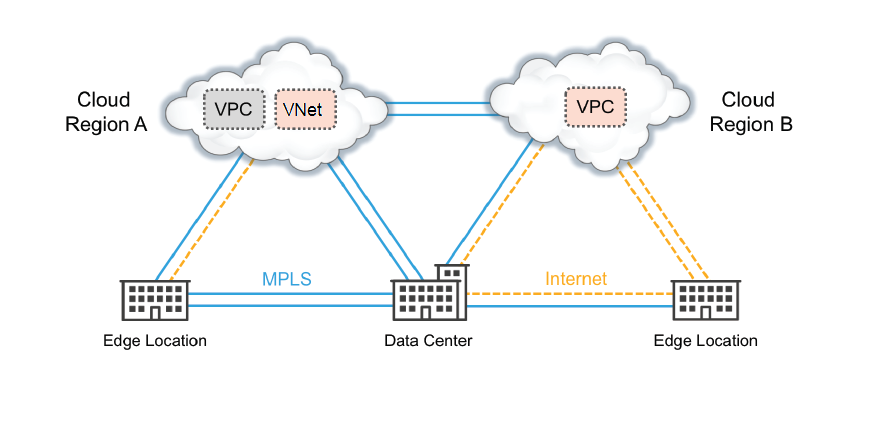
Do you need to connect separate virtual networks? Are you developing a hybrid network? Do you want to connect your IaaS, cloud-hosted networks to your in-house networks and manage them all through a single interface? This topic explains how to easily accomplish these tasks.
SteelConnect offers strong integration with Amazon Web Services (AWS) and Microsoft Azure. Connect your IaaS vendor accounts to SCM, and SteelConnect will find all your subnets, in all networks, in all regions. Importing an entire network, or individual subnets, into SCM is as easy as clicking a button. You can then deploy virtual SteelConnect gateways—with optional SteelHead WAN optimization and redundancy—onto your SCM-managed subnets to build an interconnected, full-mesh virtual private network (VPN).
Redundancy and manual routing are currently only available on AWS.
AWS, Azure, and SteelConnect use slightly different terms to refer to similar network concepts. Virtual Private Clouds (AWS) and VNets (Azure) are called sites in SteelConnect, and subnets are referred to as zones.
Sample organization with applications and services in the cloud
The process is simple and fast, as described in this table.
Step | Details |
1. Go to your IaaS vendor’s marketplace and subscribe to a Riverbed offering. | |
2. Log in to your SteelConnect Manager console and configure your IaaS vendor account on SteelConnect Manager. | |
3. Import networks and connect subnets into SteelConnect. | |
4. Deploy gateways into your virtual network. | |
SteelHead WAN optimization
SteelConnect gateways can be deployed together with SteelConnect SteelHeads for WAN optimization. You also have the option to deploy redundant gateway/WAN optimization stacks. You can add these features at deployment time, or at any later time. See
Managing your deployments.
When you choose WAN optimization, SteelHead images engineered for SteelConnect, are deployed together with your gateways into your virtual network. All routing and licensing is automatic, and the SteelHead is covered by Riverbed support.
Logically, the SteelHead sits between the gateway and the subnets within the virtual network, or data center or branch. SteelHeads use autodiscovery to peer with each other and begin optimizing traffic throughout your SteelConnect-connected network.
Currently, WAN transparency is not enabled by default on SteelHeads in SteelConnect. Effectively, this means that if the gateway is configured with rules that rely on client/server IP addresses, those rules will not apply. However, you can manually configure WAN transparency through the SteelHead management console. See
To manage SteelHead appliances.
Currently, only RiOS 9.2.1 is supported on AWS. Support for upgrades to newer versions will be made available in a future release. RiOS 9.5 and later is supported on Azure.
Redundancy
You can turn on redundancy when you deploy your SteelConnect gateways or at a later time. You can choose redundancy for SteelConnect gateway-only deployments or for SteelConnect gateway with WAN optimization deployments.
Redundancy is currently only available on AWS.
When you choose redundancy, redundant appliances are deployed in different availability zones. The active appliances that are actively routing and optimizing your network traffic are the primary appliances. Standing by are secondary appliances, ready to take over if a primary appliance fails. You can determine whether an appliance is primary or secondary by viewing its role in the appliance details page. See
To view gateway or SteelHead appliance details.
For gateways with optimization, when the primary SteelHead fails, traffic is directly sent to its associated (the master) gateway first, bypassing optimization. If the SteelHead fails to revive within two minutes, traffic is then redirected to the secondary stack and WAN optimization starts again.
Subscribing to Riverbed products
Riverbed offers products in the AWS and Azure marketplaces. After subscribing to a product, you can configure your cloud accounts in SCM and begin deploying appliances. If you don’t already have an SCM, you can get a free trial version.
Subscribing to a Riverbed product does not require the creation of a “dummy” virtual machine instance. However, if you do launch an instance during the subscription process that virtual machine can be disregarded or deleted.
To subscribe to SteelConnect Gateway in AWS
You will be directed to the AWS Marketplace.
2. Click Continue.
3. Select the Manual Launch tab and accept software terms.
To subscribe to SteelConnect Gateway in Azure
You will be directed to the Azure Marketplace.
2. Log in to the Azure Marketplace.
3. Click Want to deploy programmatically? Get started.
4. Click Enable.
5. Click Save.
To subscribe to SteelHead (WAN optimization) in AWS
2. Click Continue.
3. Select the Manual Launch tab and accept software terms.
To subscribe to SteelHead (WAN optimization) in Azure
You will be directed to the Azure Marketplace.
2. Log in to the Azure Marketplace.
3. Click Want to deploy programmatically? Get started.
4. Click Enable.
5. Click Save.
To get a free trial of SCM
Configuring your cloud accounts with SteelConnect Manager
You can add multiple accounts.
For Azure accounts, you will need to create an application and gather some information about it. Log in to the Riverbed Knowledge Base and search for article S29078 for details.
To configure your AWS accounts with SteelConnect Manager
1. Log in to the SteelConnect Manager console.
2. Choose Network Design > AWS.
3. Click Add Account.
The Add AWS Account dialog box appears.
4. Type an account name.
5. Select IAM role as the account type. IAM is preferred because it’s more secure and provides a clear audit trail of activity. Instructions for creating an IAM role for use with SteelConnect appear in the Add AWS Account dialog box. Keep these instructions handy.
6. Copy and save the account ID and the external ID to a location where you can easily access them. You’ll need them later in this procedure.
7. Return to the AWS console and choose Services > Security & Identity > IAM > Roles.
8. Continue by following the instructions in the Add AWS Account dialog box.
9. When you are finished, return to the SteelConnect Manager and click Submit.
To configure your Azure accounts with SteelConnect Manager
1. Log in to the SteelConnect Manager console.
2. Choose Network Design > Azure.
3. Click Add Account.
The Add Azure Account dialog box appears.
4. Type an account name.
6. Click Submit.
To generate Azure credentials for SteelConnect Manager integration
Use one of the following methods to generate Azure credentials:
Method 1
We recommend using this method if you already have azure-cli installed on your local machine, since it takes fewer steps and adds a script for your convenience.
1. Ensure you have azure-cli installed on your local machine from which you will run this script. On that machine, create and save the following script with the name azure_credentials_generate.sh.
#!/bin/bash
azure config mode arm
azure login
if [ -z "$1" ]
then
SubsID=$(azure account show | grep "ID" | grep -v "Tenant ID"|
awk -F ":" '{print $3}' | awk '{print $1}')
echo "Using default Subscription ID: $SubsID"
else
SubsID=$1
echo "Using user provided Subscription ID: $SubsID"
fi
AppName="SteelConnect$RANDOM"
AppSecret="SteelConnect123$RANDOM"
AppID=$(azure ad app create --name $AppName \
--home-page https://www.riverbed.com/$RANDOM \
--password $AppSecret \
--identifier-uris https://www.riverbed.com/$RANDOM |
grep "AppId" | awk -F ":" '{print $3}' | awk '{print $1}')
SPObjID=$(azure ad sp create --applicationId $AppID |
grep "Object Id" | awk -F ":" '{print $3}' | awk '{print $1}')
echo "On Azure Portal, created an application with name: $AppName"
echo "Waiting for changes to propagate to Azure..."
sleep 120
azure role assignment create --objectId $SPObjID -o Owner -c \
/subscriptions/$SubsID/ > /dev/null 2>&1
TenantID=$(azure account show $SubsID | grep "Tenant ID" |
awk -F ":" '{print $3}' | awk '{print $1}')
echo "*******************************************************"
echo "Credentials to enter on SCM:"
echo "Subscription ID: $SubsID"
echo "Application ID: $AppID"
echo "Secret Key: $AppSecret"
echo "Tenant ID: $TenantID"
echo "***************************************************"
2. Run the script from the Azure CLI using the following syntax:
./azure_credentials_generate.sh
Do not use any other syntax to run this command, such as sh azure_credentials_generate.sh.
To use a subscription ID that is different than the one on your system, enter the command in the format
./azure_credentials_generate.sh <b3xxxxx-xxxx-xxxx-xx07>, where b3xxxxx-xxxx-xxxx-xx07 is the preferred subscription ID.
3. Make a note of the subscription ID, application ID, secret key, and tenant ID that is displayed from the command output and enter these credentials on SCM by completing the following steps:
•In SCM, choose Network Design > Azure and click Add account.
•Enter the subscription ID, application ID, secret key, and tenant ID.
•Click Submit.
The entry appears in the Azure account list.
The status changes from Configuring to OK after a short time.
Method 2
Manually obtain and enter a subscription ID, application ID, secret key, and tenant ID from the Azure portal. See article S29078 in the Riverbed Knowledge Base at
https://supportkb.riverbed.com/support/index?page=content&id=s29078.
Importing cloud networks
To import cloud networks
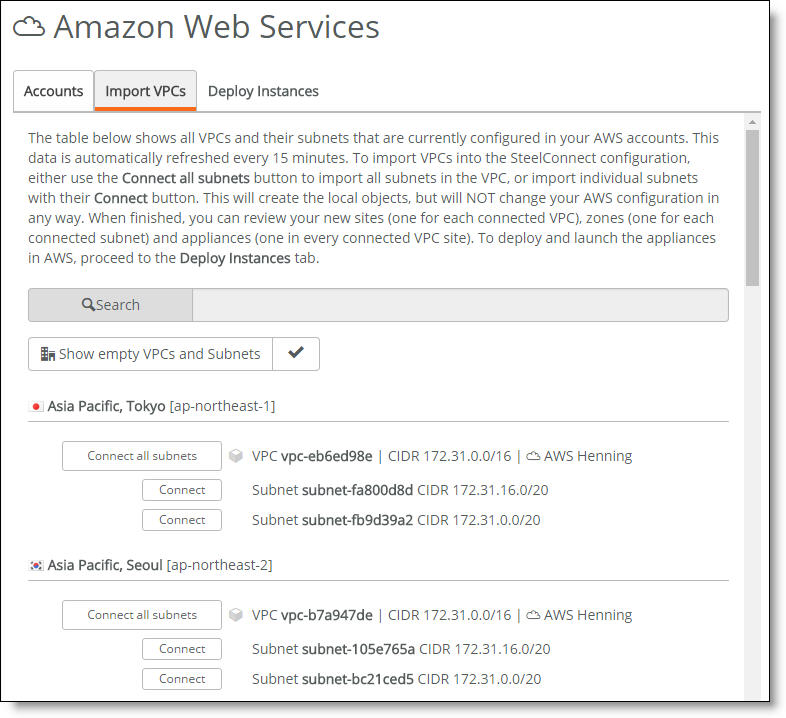
1. In SCM, choose Network Design > AWS or Azure.
2. Select the Import VPCs or Virtual Networks tab.
Your cloud network appears. All networks, and their subnets, in your accounts are displayed. SCM automatically refreshes this list every 15 minutes.
To filter the list, type a search filter in the search box.
This step prepares the necessary updates and configurations locally on SteelConnect Manager, but it does not yet propagate them to your IaaS vendor account.
Importing VPCs and connecting subnets
After importing and connecting, you’re ready to deploy gateways into your SCM-connected network.
Deploying SteelConnect gateways onto cloud networks
Refer to the IaaS vendor’s price list for instance pricing.
To deploy gateways into your virtual network
1. In SCM, choose Network Design > AWS or Azure.
2. Select the Deploy Instances tab.
3. Click Deploy next to a site name.
The Deploy Instances dialog box appears.
4. In the Deploy Instances dialog box, select an instance size for your gateways based on the bandwidth you need.
7. Optionally for AWS only, switch to manual routing if your deployments will exceed the AWS limit on routing table entries (50 maximum) or if you prefer to manage your route tables yourself.
8. Click Submit.
Refer to the IaaS vendor’s price list for instance pricing.
Managing your deployments
To view gateway or SteelHead appliance details
1. Once the deployment completes, in SCM choose Appliances > Gateways.
2. Select a gateway.
The appliance details page appears. Information in this page is organized under several tabs.
3. Select the SteelHead tab to view SteelHead appliance details.
To manage SteelHead appliances
1. Choose Appliances > Gateway.
2. Select a gateway.
3. Select the SteelHead tab.
4. Click the appliance’s IP address.
The SteelHead Management Console appears.
5. Log in to the SteelHead Management Console.
For a first-time login, use admin for the username. In Azure, the password is password. In AWS, the password is the instance ID for the SteelHead. Change these credentials after you log in for the first time and be sure to record your new username and password in a safe location.
See the SteelHead Management Console’s online help for details about using it. All further configuration and management of the SteelHead can be performed directly through the SteelHead Management Console or through a SteelCentral Controller for SteelHead.
To remove the gateway from a site
1. On SCM, choose Network Design > AWS or Azure.
2. Click Undeploy next to a site.
A confirmation dialog box appears.
3. Click Confirm.
The system terminates the gateways and SteelHeads, and removes all traces of SteelConnect from the site.
To remove a subnet or entire site from the full-mesh network
You must undeploy a site before you can remove it or its last remaining subnet. See
To remove the gateway from a site.
•On SCM, choose Network Design > AWS or Azure and select the Import VPCs or the Virtual Networks tab and click Disconnect next to an item.
To change instance size, WAN optimization, redundancy, or routing
1. On SCM, choose Network Design > AWS and select the Deploy Instances tab.
2. Click Manage next to the site.
3. Change settings to your liking and click Submit.