Connecting a Topology Using VPN
Setting up site-to-site VPN
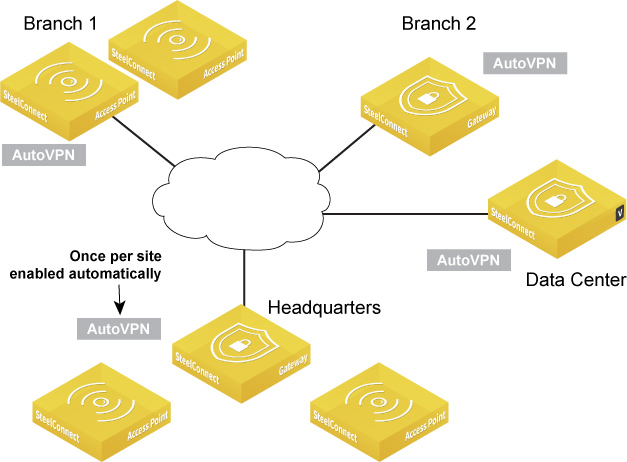
AutoVPN is a SteelConnect feature that connects multiple sites with a secure, full-mesh virtual private network (VPN) without tedious manual configuration. AutoVPN is a fast way to create a resilient VPN backbone between all your sites; however, SteelConnect also provides SwitchVPN to make a zone available in a remote site and Classic VPN for use with third-party gateways.
AutoVPN modes
AutoVPN links the gateways or access points at an organization’s sites.
In most traditional products, to link sites together using a mesh design, you need to create and configure multiple virtual private network (VPN) tunnels to and from each other to carry private network traffic from one endpoint system to another. Further, to create more sites, you have to add more tunnels and hope you enter everything correctly so that the tunnels line up perfectly. Even if you manage to configure the tunnels without mistakes, it can take days of work to scale.
SteelConnect automatically sets up a full-meshed VPN configuration in minutes. By default, AutoVPN is on and includes any zones you configure. The AutoVPN connections use IPSec based on StrongSwan with AES256-SHA1 encryption and IKEv2 where NAT traversal is always active. If you’re interested in alternative ways to configure AutoVPN beyond the default setting, keep reading.
Full-mesh VPN using AutoVPN
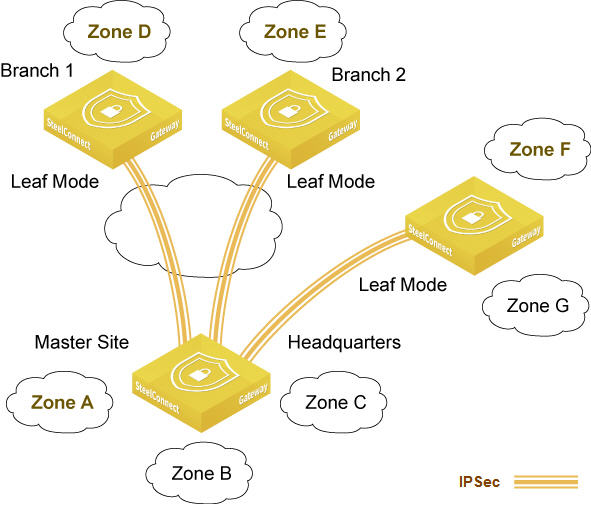
You can configure AutoVPN in these operating modes: Leaf mode, RouteVPN, and SwitchVPN.
Leaf mode
You can configure AutoVPN to work in a hub-and-spoke network. Simply configure a site or a zone to operate in leaf mode and specify whether you want it to connect to a data center or any other site. You can use this method to mix and match which site or zone you want include in the full mesh VPN, or to connect to a site or other zone. You simply turn AutoVPN off for zones that you don’t want to include in the VPN. For details, see
AutoVPN leaf mode.
Hub-and-spoke network using AutoVPN
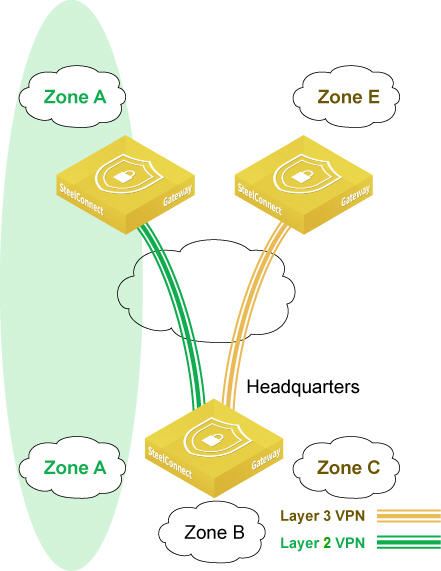
RouteVPN (Layer 3)
RouteVPN is essentially a WAN created over the internet as a result of AutoVPN. SteelConnect routes all IP subnets (IPv4, IPv6, additional networks, third-party routing) of a zone through AutoVPN.
RouteVPN is SteelConnect’s Layer 3 VPN, based on IPSec. It automatically builds the required VPN tunnels between sites if its zones are flagged as reachable from other sites in the same organization. SCM constantly monitors the VPN links, and traffic is included in policy controls.
RouteVPN knows what to send into the tunnels based on the zones that are defined in the ecosystem. When you configure a new zone, the routes are advertised to all gateways. If you chose an internet breakout point, SteelConnect sends all traffic from the source site over the RouteVPN, including internet traffic. This allows central enforcement and policy but gains the advantage of internet at the edge.
Guest zones can’t communicate through the RouteVPN.
SwitchVPN (Layer 2)
SwitchVPN is SteelConnect’s Layer 2 VPN, based on IPSec. It automatically makes a zone available in a remote site when you use the same zone for multiple sites. No manual configuration is necessary.
Zone sharing using SwitchVPN
SwitchVPN use case
Although SwitchVPN allows you to create Layer 2 VPN connectivity across a Layer 3 WAN, we don’t recommend that you use it for Layer 2 VPN connectivity in a production network. Instead, use SwitchVPN to easily create one-off connections for temporary network troubleshooting or network configuration. For example, you could use SwitchVPN to configure short-lived Layer 2 VPN connections that allow a server to be Trivial File Transfer Protocol (TFTP) booted across the WAN.
We don’t recommend SwitchVPN as an approved network design deployed throughout a production network for the creation of Layer 2 point-to-point VPN connections or point-to-multipoint VPN connections.
SwitchVPN limitations
These limitations apply to SwitchVPN deployments:
•Make sure that the connections between the two sides of the zone partition are low bandwidth. We recommend less than 5 Mbps per connection.
•You must deploy fewer than ten devices on either side of the zone partition, because MAC learning and Address Resolution Protocol (ARP) storms on ten or more devices will have a detrimental impact on the performance of the SteelConnect gateways.
•Don’t use significant broadcast domains on either side of the zone partition.
•The SwitchVPN deployment must use less than two percent of all zones in an organization.
•Deploy SwitchVPN only for point-to-point VPN connectivity. Don’t use SwitchVPN for point-to-multipoint VPN connectivity.
AutoVPN leaf mode
SteelConnect automatically uses AutoVPN between the gateways to create a full-mesh overlay and establish communication between the sites. While the full-mesh overlay makes communication easy, you might have deployments that need to scale without using full mesh. For a more traditional point-to-point configuration, you can enable AutoVPN leaf mode.
Leaf mode turns off the mesh for a site and allows you to choose a remote gateway to peer with, as shown in
Hub-and-spoke network using AutoVPN. Instead of peering with everyone, you peer with a designated nonleaf master. The master site sends and receives AutoVPN traffic. Leaf mode still participates in the VPN but only sends internal enterprise traffic to a single site.
AutoVPN leaf mode use case
Suppose a bank with many branches only needs to communicate with the data center and does not need to use AutoVPN connections to all the sites. It simply needs a single tunnel back to the data center. Other sites can still participate in the full mesh across that VPN simultaneously.
You can implement leaf mode across the entire organization or you can configure it site by site.
To enable AutoVPN leaf mode
1. Choose Network Design > Sites.
2. Select the WAN/AutoVPN tab.
Enabling AutoVPN leaf mode
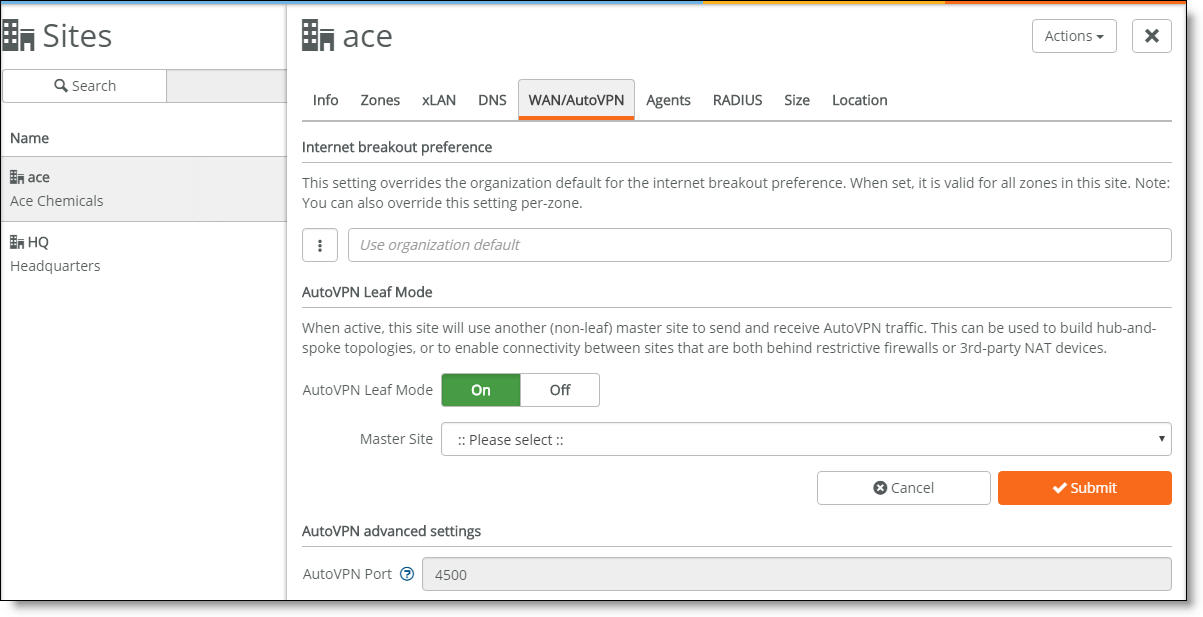
3. Turn AutoVPN leaf mode on.
4. Select a master site. The master site should not be behind the NAT router, and the more bandwidth it has, the better.
5. Click Submit.
To remove a zone from AutoVPN
1. Choose Network Design > Zones.
2. Select the zone to exclude.
3. Select the WAN/AutoVPN tab.
4. Remove the zone from the RouteVPN membership.
Deployment examples
AutoVPN between gateways
AutoVPN shows AutoVPN through an automatically imported remote zone. The headquarters zone was imported automatically by using it in an SSID broadcast in the branch office.
AutoVPN
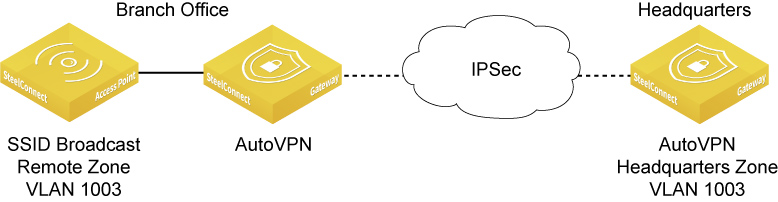
To set up AutoVPN between gateways as shown in
AutoVPN1. Choose WiFi > Broadcasts.
2. Click New Broadcast.
3. Select the Branch Office site from the drop-down list.
4. Select your SSID.
5. Select the default zone Headquarters VLAN 1003.
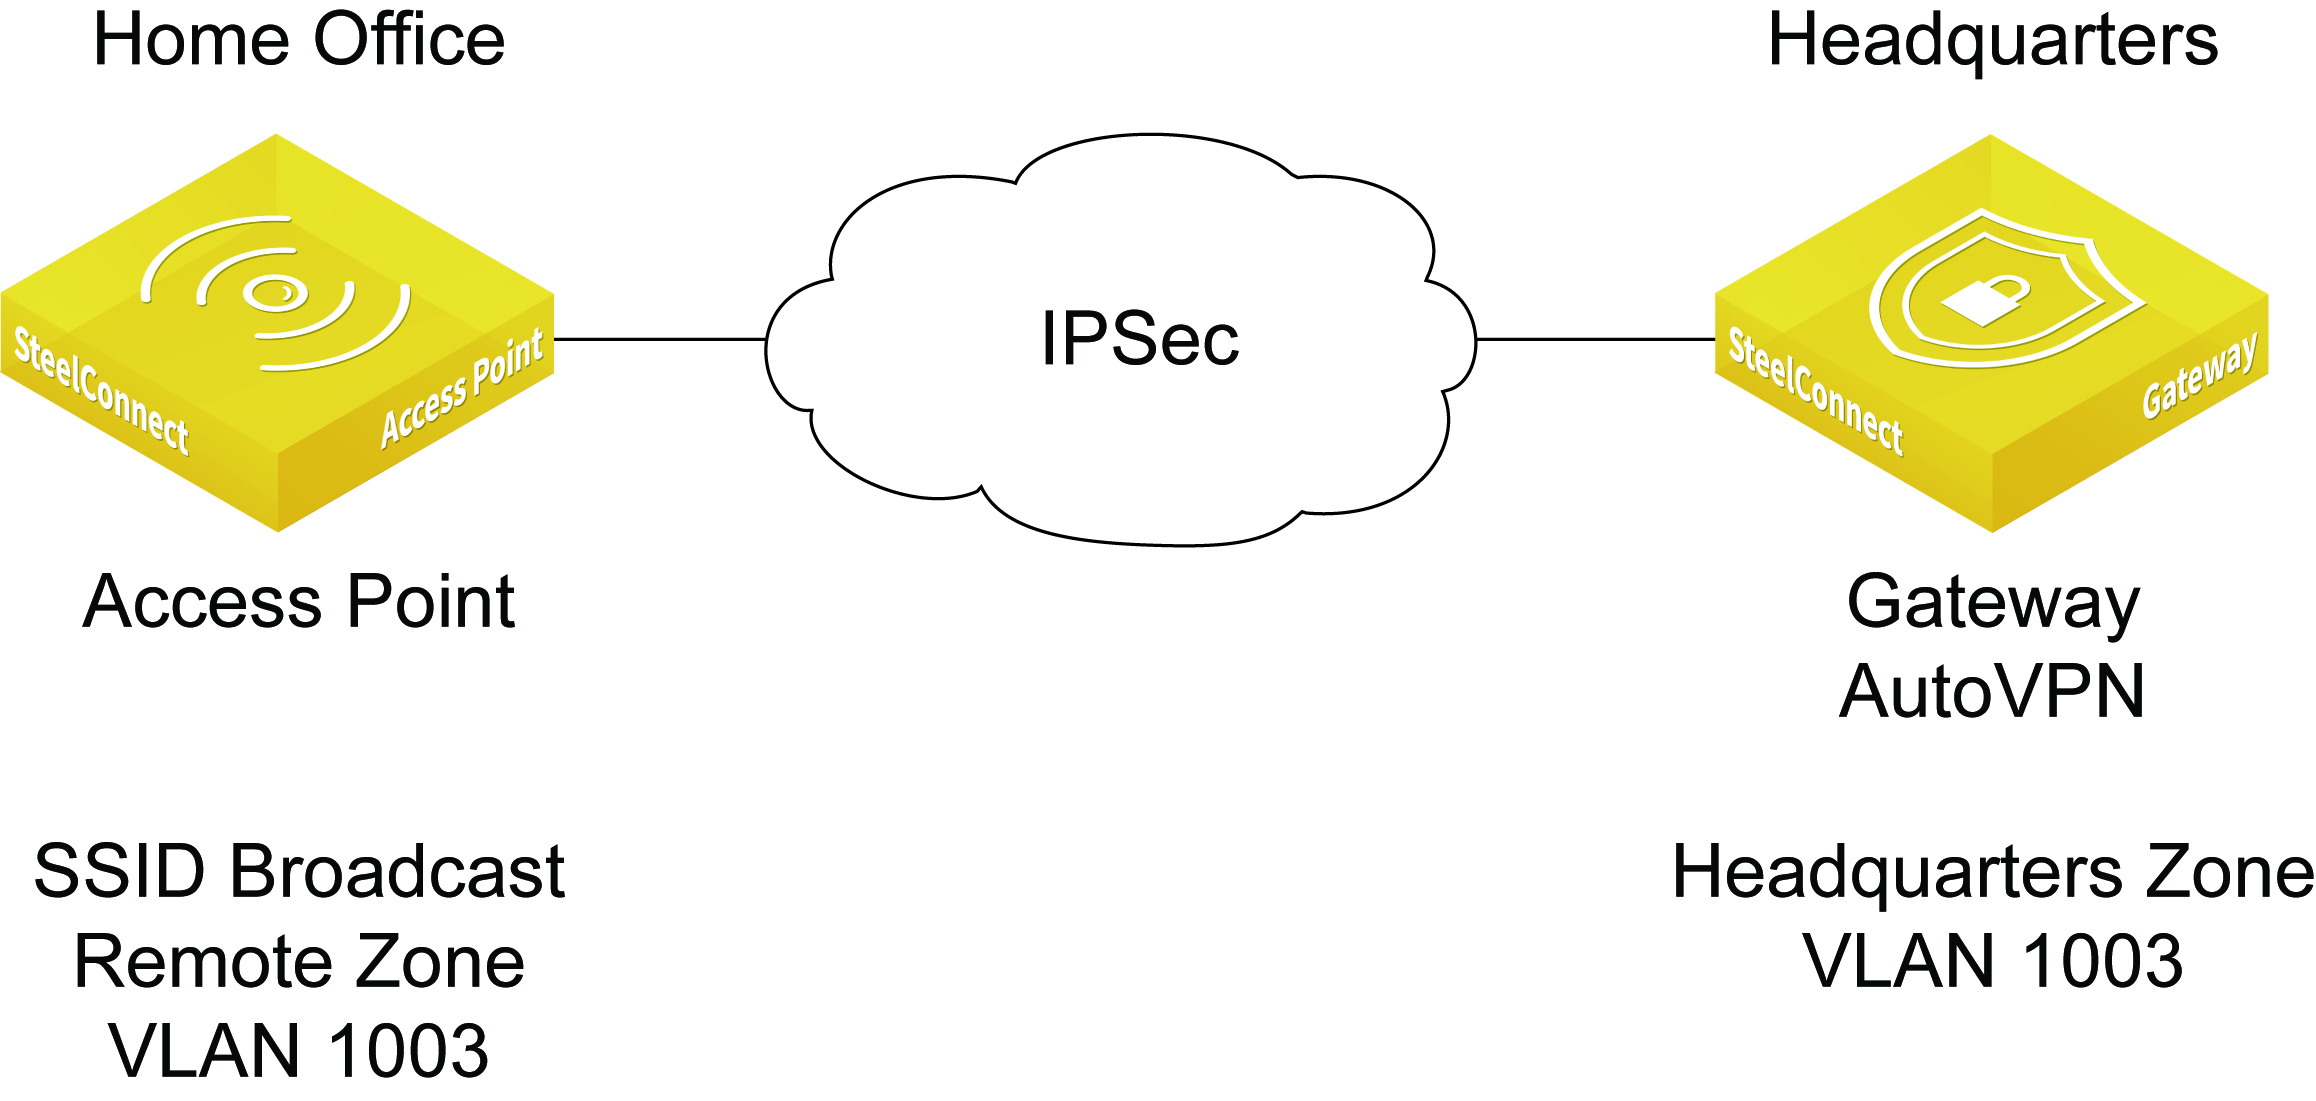
AutoVPN between access point and gateway
For a home office without a SteelConnect gateway, you might want to enable AutoVPN for the access point. In this example, the access point receives the remote zones through the AutoVPN feature.
AutoVPN for a home office without a gateway
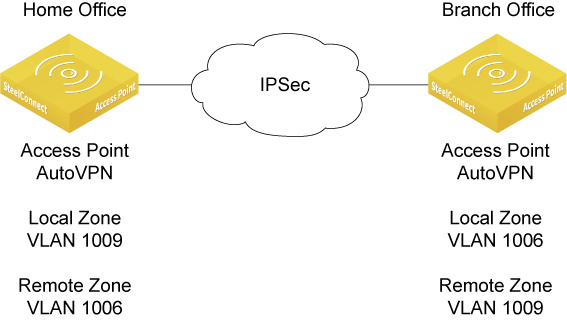
AutoVPN between access points
An access point has the same VPN capabilities as an gateway and access points support fully meshed AutoVPN or leaf mode. A typical use case is two sites without a SteelConnect gateway deployed. In this configuration, you can enable AutoVPN on the access points to access each other’s zones.
AutoVPN for home and branch office without a gateway
To enable AutoVPN on an access point
1. Choose Appliances > Access Points.
2. Select the access point.
3. Select the AutoVPN tab.
4. Click On.
When an access point and the zone of a broadcast are in the same zone site without a gateway, the access point establishes L3 VPN locally.
When an access point and the zone of a broadcast are in different sites, the system establishes a L2 tunnel.
Connecting to a third-party VPN
Some deployments require a SteelConnect gateway connection to an IPSec VPN built by a third-party vendor. You can connect to a third-party VPN using Classic VPN. Classic VPN creates a manual VPN tunnel using the standard IPSec IKEv1 or IKEv2 protocol. A remote gateway is not necessary.
Classic VPN configurations can classify traffic based on TCP/UDP port number, providing a more granular approach to traffic steering.
Classic VPN only supports main mode key exchange.
Classic VPN use cases
Classic VPN is an easy and flexible method to use when:
•connecting to a third-party IPSec VPN gateway, such as a firewall or a Unified Threat Management (UTM) appliance.
•migrating from an existing VPN solution to SteelConnect RouteVPN. You can even use the IP subnets of the remote networks and rules.
•integrating sites with overlapping IPv4 addresses, using one-to-one NAT configuration. When connecting networks through VPN that use the same IP addresses on both sides, it’s impossible to create a simple IPSec tunnel, as routing through the tunnel doesn’t work. Classic VPN uses an integrated NAT layer, in which you can map an overlapping network one-to-one into a virtual network. This means that you can communicate with the remote location using the virtual NAT network, yet prior to entering the tunnel, the system transparently replaces IPv4 addresses with the matching address from the remote side, allowing both networks to remain unchanged.
•using one-to-one NAT configuration for local zones. For example, you can NAT a /xx network behind another /xx network using NETMAP. You can also configure a masquerading NAT for the complete local zone behind one IP address. In this case, the remote VPN peers can’t connect to the local zone/network, but using Classic VPN makes it possible to have many clients connecting from the local zone to the remote zone. The administrator uses a /32 network mask in the 1:1 NAT net field of the local zones in Classic VPN configuration.
•connecting to cloud security services such as ZScaler. You need one tunnel per site.
•connecting two predefined organizations with a tunnel, using mirrored settings. Each organization creates its own key.
To create a Classic VPN connection
1. Choose Network Design > ClassicVPN.
2. Click New Classic VPN Connection.
3. Type a name for the connection, up to 32 characters.
4. Type the remote gateway IP address or a hostname.
5. Type the networks that are served behind the remote gateway. Use this format: a.b.c.d/n
6. Select the gateway initiating the tunnel.
7. If you are connecting to another SteelConnect gateway, select the zones allowed to communicate over the VPN.
8. Click Submit.
SCM shows all VPN configuration details as soon as the system creates the third-party VPN connection.
To edit a Classic VPN connection
1. Choose Network Design > ClassicVPN.
2. Select a Classic VPN connection.
3. Change the network name, remote network, 1:1 NAT network, or add port numbers separated by commas to steer specific traffic to a destination. For example, you could specify 80,443 to steer internet traffic on ports 80/443 to a cloud proxy.
4. Click Submit.
SCM shows all VPN configuration details as soon as the system creates the third-party VPN connection.