Figure: General Security Settings Page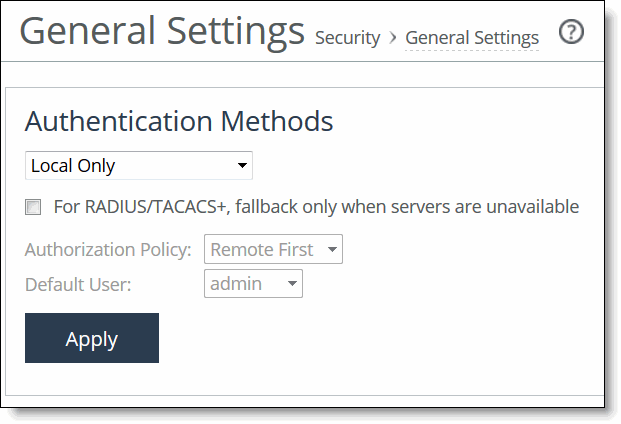
Control | Description |
Authentication Methods | Specify an authentication method from the drop-down list. The methods are listed in the order in which they occur. If authorization fails on the first method, the next method is attempted, and so forth, until all the methods have been attempted. |
For RADIUS/TACACS+, fallback only when servers are unavailable | When checked, indicates fallback to a RADIUS or TACACS+ server only when all of the other servers have not responded. This is the default setting. When this feature is disabled, the SteelHead Interceptor does not fall back to the RADIUS or TACACS+ servers. If it exhausts the other servers and does not get a response, it returns a server failure. |
Authorization Policy | Appears only for some Authentication Methods. Optionally, select one of these policies from the drop-down list: • Remote First - Check the remote server first for an authentication policy, and only check locally if the remote server does not have one set. This is the default behavior. • Remote Only - Only checks the remote server. • Local Only - Only checks the local server. All remote users are mapped to the user specified. Any vendor attributes received by an authentication server are ignored. |
Default User | Appears only for some Authentication Methods. Specify the default user. Select one of these choices (admin or monitor) from the drop-down list. |
Apply | Applies your settings to the running configuration. |

Control | Description |
admin/monitor | Click one of the usernames to manage either the administrator or monitor account password. |
Clear Login Failure Details | Click Clear Login Failure Details to reset the password and unlock the account. When the user logs into their account successfully, RiOS resets the login failure count. The password reset feature is separate from the account lockout feature. |
Change Password | Select the check box to change the password. • New Password - Specify the new password. • New Password Confirm - Confirm the new password. |
Enable Account | Select or clear this option to enable or disable the administrator or monitor account. |
Control | Description |
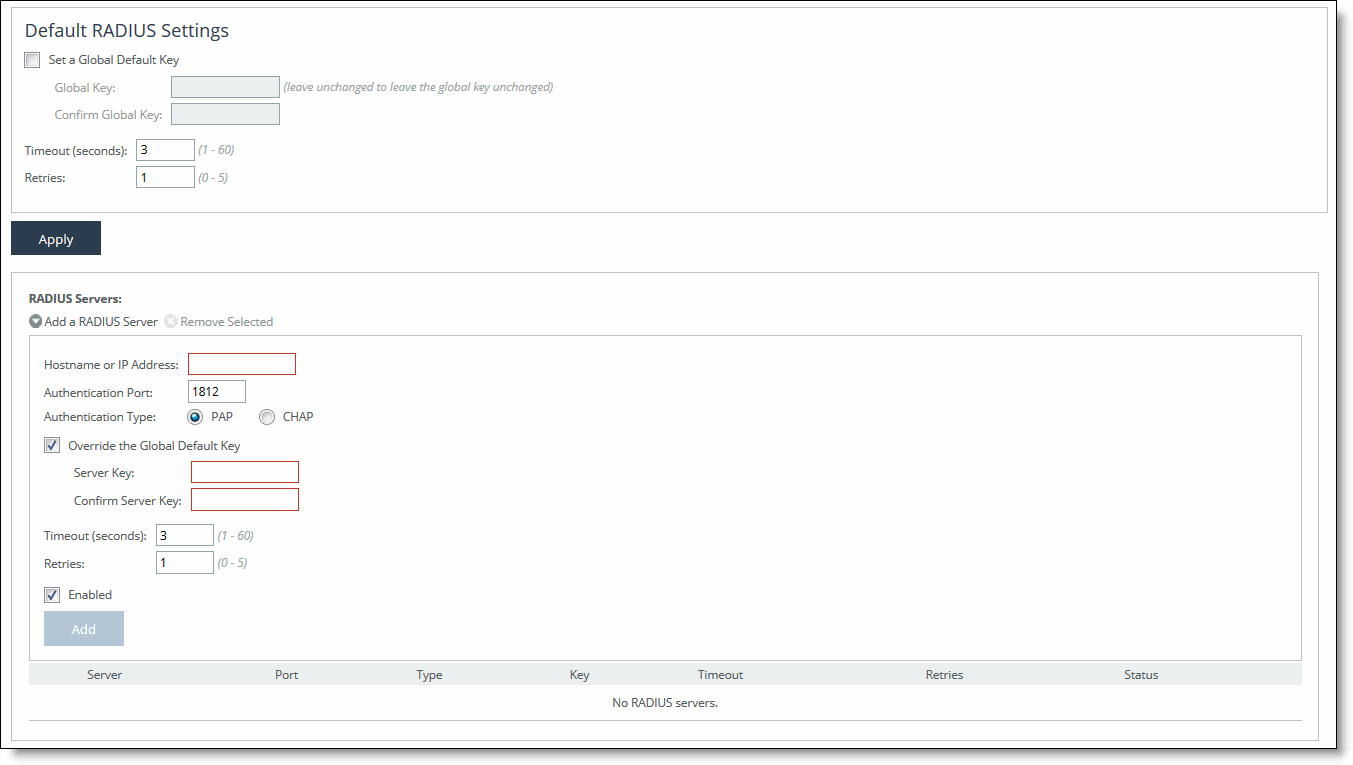
Set a Global Default Key | Enables a global server key for the RADIUS server. |
Global Key | Specify the global server key. |
Confirm Global Key | Confirm the global server key. |
Timeout (seconds) | Specify the time-out period in seconds (1 to 60). The default value is 3. |
Retries | Specify the number of times you want to allow the user to retry authentication (0 to 5). The default value is 1. |
Control | Description |
Add a RADIUS Server | Displays the controls for defining a new RADIUS server. |
Hostname or IP Address | Specify the server IP address. |
Authentication Port | Specify the port for the server. The default value is 1812. |
Authentication Type | Select either PAP or CHAP as the authentication type. |
Override the Global Default Key | Overrides the global server key for the server. |
Server Key - Specify the override server key. | |
Confirm Server Key - Confirm the override server key. | |
Timeout (seconds) | Specify the time-out period in seconds (1 to 60). The default value is 3. |
Retries | Specify the number of times you want to allow the user to retry authentication. Valid values are 0 to 5. The default value is 1. |
Enabled | Enables the new server. |
Add | Adds the RADIUS server to the list. |
Remove Selected | Select the check box next to the name and click Remove Selected. |
Control | Description |
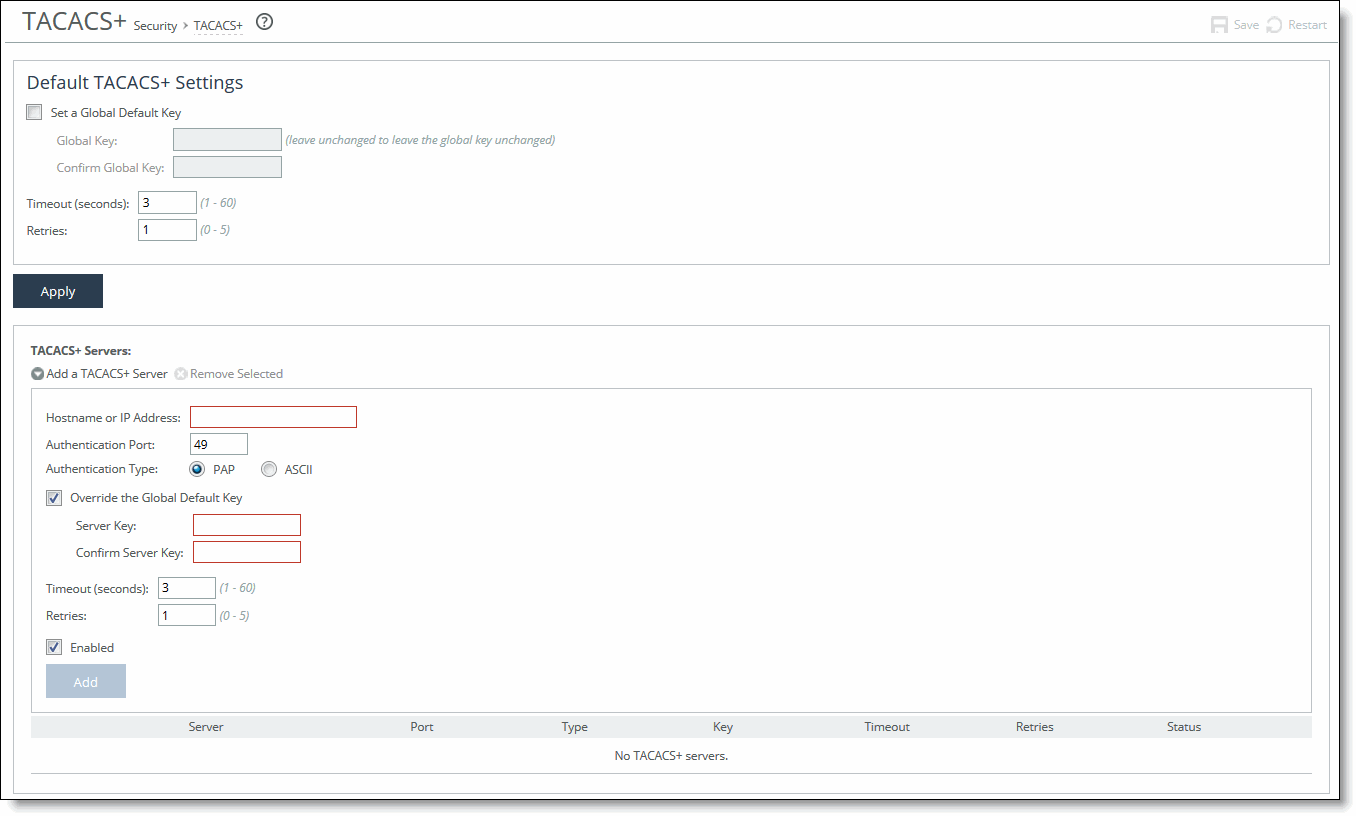
Set a Global Default Key | Specify this option to enable a global server key for the server. |
Global Key | Specify the global server key. |
Confirm Global Key | Confirms the global server key. |
Timeout (seconds) | Specify the time-out period in seconds (1 to 60). The default value is 3. |
Retries | Specify the number of times you want to allow the user to retry authentication. Valid values are 0 to 5. The default is 1. |
Control | Description |
Add a TACACS+ Server | Displays the controls for defining a new TACACS+ server, as described in this table. |
Hostname or IP Address | Specify the server IP address. |
Authentication Port | Specify the port for the server. The default value is 49. |
Authentication Type | Select either PAP or ASCII as the authentication type. |
Override the Global Default Key | Select this option to override the global server key for the server. |
Server Key | Specify the override server key. |
Confirm Server Key | Confirm the override server key. |
Timeout (seconds) | Specify the time-out period in seconds (1 to 60). The default is 3. |
Retries | Specify the number of times you want to allow the user to retry authentication. Valid values are 0 to 5. The default is 1. |
Enabled | Enables the new server. |
Add | Adds the TACACS+ server to the list. |
Remove Selected | Select the check box next to the name and click Remove Selected. |

Control | Description |
Enable Management ACL | Secures access to a SteelHead Interceptor using a management ACL. |
Control | Description |
Add a New Rule | Displays the controls for adding a new rule. |
Action | Select one of the following rule types from the drop-down list: • Allow - Allows a matching packet access to the SteelHead Interceptor. This is the default action. • Deny - Denies access to any matching packets. |
Service | Select All, or select a specific protocol (such as HTTP, HTTPS, SOAP, SNMP, SSH or Telnet) from the drop-down list. When a specific protocol is selected, the Protocol and Destination Port fields are unavailable. |
Protocol | (Appears only when Service is set to All.) Select All, TCP, UDP, or ICMP from the drop-down list. The default setting is All. When set to All or ICMP, the Destination Port is unavailable. |
Destination Port | (Appears only when the Protocol is set to UDP or TCP.) Specify the destination port of the inbound packet, either a single port value or a port range of port1-port2, where port1 must be less than port2. Leave it blank to specify all ports. |
Source Network | Optionally, specify the source subnet of the inbound packet; for example, 1.2.3.0/24. |
Interface | Optionally, select an interface type from the drop-down list. Select All to specify all interfaces. |
Description | Optionally, describe the rule to facilitate administration. |
Rule Number | Optionally, select a rule number from the drop-down list (Start, 1, or End). By default, the rule goes to the end of the table (just above the default rule). SteelHeads evaluate rules in numerical order starting with rule 1. If the conditions set in the rule match, then the rule is applied, and the system moves on to the next packet. If the conditions set in the rule do not match, the system consults the next rule; for example, if the conditions of rule 1 do not match, rule 2 is consulted. If rule 2 matches the conditions, it is applied, and no further rules are consulted. Note: The default rule, Allow, which allows all remaining traffic from everywhere that has not been selected by another rule, cannot be removed and is always listed last. |
Log Packets | Tracks denied packets in the log. By default, packet logging is enabled. |
Add | Adds the rule to the list. The Management Console displays the Rules table and applies your modifications to the running configuration, which is stored in memory. |
Remove Selected | Select the check box next to the name and click Remove Selected. |
Move Selected | Moves the selected rules. Click the arrow next to the desired rule position; the rule moves to the new position. |
Control | Description |
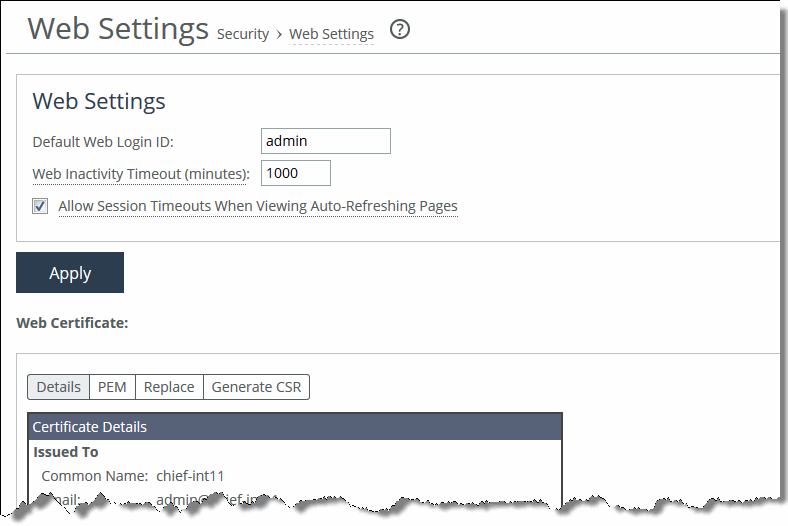
Default Web Login ID | Specify the username that appears on the authentication page. The default value is admin. |
Web Inactivity Timeout (minutes) | Specify the number of idle minutes before the session times out. The default value is 15. A value of 0 disables this feature. |
Allow Session Timeouts When Viewing Auto-Refreshing Pages | By default, session time-out is enabled, which stops the automatic updating of the report pages when the session times out. Clear this box to disable the session time-out, remain logged-in indefinitely, and automatically refresh the report pages. Caution: Disabling this feature poses a security risk. |
Detail | Description |
Issued To/Issued By | Common Name - Displays the common name of the certificate authority. Email - Displays the email of the appliance administrator. Organization - Displays the organization name (for example, the company). Locality - Displays the city. State - Displays the state. Country - Displays the country. |
Validity | Issued On - Displays the date the certificate was issued. Expires On - Displays the date the certificate expires. |
Fingerprint | Displays the SSL fingerprint. |
Key | Type - Displays the key type. Size - Displays the size in bytes. |
Control | Description |
Import Certificate and Private Key | Select this option if the CA-signed certificate and the existing private key and are located in two files. Under Certificate, use the controls to browse to the certificate (in PKCS-12, PEM, or DER formats) or use the text box to copy and paste the certificate (PEM format only). Under Private Key, select one of the following options: • The Private Key is in a separate file (see below) - you can either upload it or copy and paste it. • This file includes the Certificate and Private Key • The Private Key for this Certificate was created with a CSR generated on this appliance |
Separate Private Key - (Available only if the private key is in a separate file.) Use the controls to browse to and upload the private key (PEM or DER formats only) or use the text box to copy and paste the private key (PEM format only). | |
Decryption Password - (Available only if you are importing a CA-signed certificate and private key). Enter the decryption password. The password is required for PKCS-12 files. | |
Import Certificate And Key - Imports certificate and key. | |
Generate Self-Signed Certificate and New Private Key | Select this option to generate a self-signed certificate and a new private key. |
Under Self-Signed Certificate, enter the following information: • Organization Name - Specify the organization name (for example, the company). • Organization Unit Name - Specify the organization unit name (for example, the section or department). • Locality - Specify the city. • State - Specify the state. • Country - Specify the country (two-letter code). • Email Address - Specify the email address of the contact person. • Validity Period (Days) - Specify how many days the certificate is valid. The range is from 60 to 3650 days. The default value is 730. | |
Private Key - Specify the cipher bits for the private key. | |
Generate Certificate And Key - Generates the certificate and private key. |
Control | Description |
Common Name | Specify the common name (hostname). |
Organization Name | Specify the organization name (for example, the company). |
Organization Unit Name | Specify the organization unit name (for example, the section or department). |
Locality | Specify the city. |
State | Specify the state. Do not abbreviate. |
Country | Specify the country (two-letter code). |
Email Address | Specify the email address of the contact person. |
Generate CSR | Generates the Certificate Signing Request. |