Connecting an Edge to a Core
You connect an Edge to a Core in the Storage > Storage Edge Configuration page. You can also optionally connect the Edge as a standby peer for high availability.
SteelFusion is a dual-ended system with the Core at the data center and a SteelFusion Edge-enabled appliance at the branch. The Edge virtually presents one or more NFS exports in the branch that can be used by services and systems running both within the hypervisor as well as externally to the SteelFusion Edge. SteelFusion Edge features an on-disk local cache that mirrors the complete persistent NFS export of the Core-side backend NFS storage array.
The Core must be running version 5.0 or later. After pairing an Edge with a Core, you must make all configuration changes on the Core.
To enable Edge high availability, you configure one Edge appliance to connect to the Core appliance. The Edge appliance works as a single-edge configuration. You configure another Edge appliance as a peer to the Edge appliance already connected to the Core. This results in the first Edge appliance becoming the active Edge, and the second Edge appliance acts as the failover peer. For details, see
“Configuring Edge high availability” on page 94.
To configure connectivity to SteelFusion Core
• Choose Storage > Storage Edge Configuration to display the Storage Edge Configuration page.
The page display depends on the current device configuration.
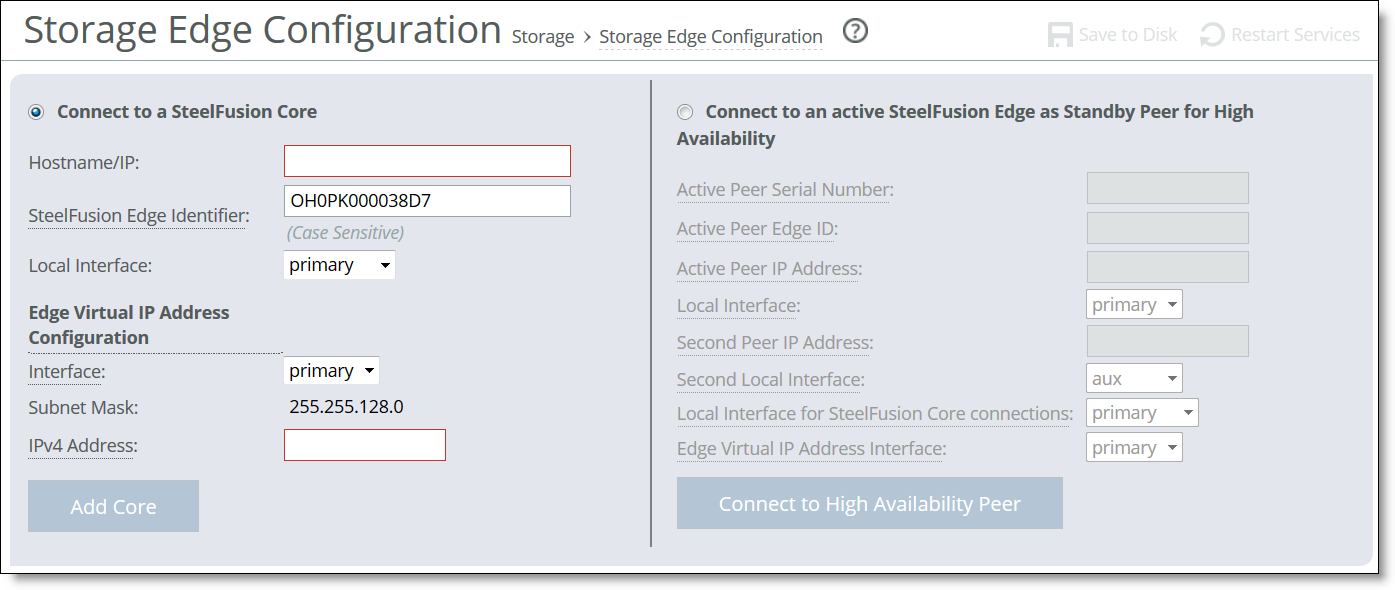
Figure: Storage Edge Configuration page without any configuration
To connect the SteelFusion Edge to a SteelFusion Core appliance
1. Select Connect to a SteelFusion Core.
You cannot connect a Core while the Hypervisor Installer is running.
2. Complete the configuration as described in this table.
Control | Description |
Hostname/IP | Specify the hostname or IP address of the SteelFusion Core appliance. |
SteelFusion Edge Identifier | Specify a value by which SteelFusion Core can recognize the current appliance. You can use any value: for example, the hostname of the device. The Edge identifier is case sensitive and is limited to these characters: 0 through 9, a through z, A through Z, . , and - . Both peer appliances in a high-availability pair must use the same self-identifier. In this case, you can specify a value that represents the pair of appliances. By default, the Edge serial number appears in this field. |
Local Interface | Select the local interface for the current appliance to use when connecting with the Core. For details, see “To configure connectivity to SteelFusion Core” on page 91. |
Edge Virtual IP Address Configuration | The Edge Virtual IP (VIP) address is an underlying IP address used by branch clients connected to the Edge to access the NFS exports mapped to the Edge. The Edge VIP must be associated with a physical interface on the Edge that is reachable by the clients requiring access to storage on that Edge. Interface - Specify the interface the clients will use to connect to the Edge. There is no internal access to the Edge VIP; you can only use configured and activated data or base interface names. The aux interface is disabled by default. If you are using the aux interface, you must first configure an IP address on the same IP subnet you intend to use. If the interface you want to use does not appear in the drop-down list, verify whether it is enabled. New interfaces must be configured and activated on the Networking > Networking: Data Interfaces page. For details, see “Modifying RiOS data interfaces” on page 87 and “Modifying base interfaces” on page 73. Subnet Mask - The subnet mask for the Virtual IP interface is associated with the interface you specify. IPv4 Address - Specify the IPv4 address to use for the virtual interface. To update the interface or IPv4 address on the active Edge, click edit next to Edge Virtual IP Address Configuration. Make the change and click Update to confirm. On the standby Edge, click edit to change the interface. Note: Any changes to the Edge VIP address will cause a disruption in the storage service. If you change the Edge VIP address, you will need to unmount and mount the datastores being used by the hypervisor connected to this Edge to make them accessible. You will also need to ensure that at least one interface on the hypervisor(s) associated with the Edge is able to reach the Edge VIP address. To do this, you may need to manually add a network route on the Edge. |
Add Core | Click to complete the Core appliance configuration. |
Adding the Core when there are no local exports configured on the Edge takes a minute or so to complete and the storage service restarts. When the Edge has local exports configured, it takes longer to complete because the system synchronizes the local exports and any ACLs configured on Edge to the Core.
When the storage service restarts, the page displays the export information and confirms that the Core is connected to the Edge.
After the Core is connected to the Edge, all export configuration is managed using the Core.
To troubleshoot, see the system logs and the alarm status.
To disconnect the Core from the Edge
1. From the Core Management Console, choose Configure > NFS: Exports and disconnect and offline all remote exports associated with the Edge that require removal from the Core. Local exports can remain online and the local Edge will take them over (they can no longer be reformatted or resized, though, because the Edge can only create or reformat a single local export).
2. From the Edge Management Console, choose Storage > Storage Edge Configuration to display the Storage Edge Configuration page.
3. Click Remove Core.
You cannot remove a Core while the Hypervisor Installer is running.
The system prompts you to confirm the Core disconnection and asks whether you want to preserve the local storage configuration.
4. Click Preserve local storage configuration to keep the local exports used by the hypervisor.
Otherwise, the local exports will be deleted.
5. From the Core Management Console, choose Configure > NFS: Exports. Delete any Edge Local exports that were previously associated with the Edge where the Core was removed.
Note: Do not perform this step before the Core is removed from the Edge Management Console.
6. Remove the Edge from the Core. For details, see SteelFusion Core Management Console User’s Guide.
After configuring Core, the page displays useful information about your Core configuration. For details, see
“Viewing configuration information” on page 99. For details about the Core deployment components, see the
SteelFusion Core Management Console User’s Guide.
Configuring Edge high availability
This section describes how to configure high availability for SteelFusion Core-enabled Edges. Edge high availability enables you to configure two Edge appliances so that either one can fail without disrupting the service of any of the exports provided by the Core.
For more information regarding HA deployments and port configuration, see
“HA deployment considerations” on page 66.
To enable Edge high availability, you configure a pair of Edges: one as an active peer and the other as a standby peer. The active Edge in the pair connects to the Core and serves storage data. The active peer contains the authoritative copy of the NFS file system and configuration data. The standby Edge is passive and does not service client requests but is ready to take over from the active peer immediately.
As the system writes new data to the active peer, it reflects the data to the standby peer, which stores a copy of the data in its local blockstore. The two appliances maintain a heartbeat protocol between them, so that if the active peer goes down, the standby peer can take over servicing the exports. If the standby peer goes down, the active peer continues servicing the exports, after raising a high-availability alarm indicating that the system is now in a degraded state.
After a failed peer resumes, it resynchronizes with the other peer in the HA pair to receive any data that was written since the time of the failure. When the peer catches up by receiving all the written data, the system resumes Edge high availability, reflects future writes to both peers, and clears the alarm.
Edge high availability with Core high availability
Edge high availability requires a Core; however, it is not a prerequisite to have Cores in a high-availability configuration. If Core high availability is configured, the active Edge in an HA pair can be added to either Core. The details for the Core you choose must be added to the Edge. After you configure Core high availability on the Core, the system automatically relays and stores information about the peer Core to the Edge. Go to the Storage > Storage Edge Configuration page to view information about configured Core peers. For details about configuring Core high availability, see the SteelFusion Core Management Console User’s Guide and the SteelFusion Design Guide.
To configure a SteelFusion Edge for high availability
1. On the Edge you want to use as the standby peer, choose Storage > Storage Edge Configuration to display the Storage Edge Configuration page.
The standby peer must be the same appliance model as the active peer. Both peer appliances must be running Edge 4.x/5.x and must be configured for NFS/file mode. The peer appliance cannot have any local exports configured.
2. Select Connect to an active SteelFusion Edge as Standby Peer for High Availability.
3. Complete the configuration as described in this table.
You can obtain the information required to complete this step by logging in to the Management Console of the Edge.
Control | Description |
Active Peer Serial Number | Specify the serial number of the active peer. To find the serial number, choose Help on the active peer to display the Help page. The serial number appears under Appliance Details. |
Active Peer Edge ID | Specify the self-identifier for the active peer. To find the Edge ID, choose Storage > Storage Edge Configuration on the active peer. The Edge identifier appears under Settings. This value is case sensitive and limited to these characters: 0 through 9, a through z, A through Z, . , and - . Both peer appliances must use the same self-identifier. In this case, you can use a value that represents the group of appliances. |
Active Peer IP Address | Specify the IP address of the Edge active peer. The active peer must not already be in an HA configuration with another Edge. |
Local Interface | Specify the local interface for the standby peer to connect to the active peer IP address. The Edge on-disk local cache synchronization happens through two local network interfaces for shared bandwidth and scalability. The first local interface transfers data until it reaches maximum throughput, and then the second local interface transfers the remainder of the data. For example, if the local interfaces are 1 GB and 10 GB, and you expect the 10 GB interface to transfer the bulk of the data, specify the 10 GB link as your first local interface. Both the local and second local interfaces participate in load-balancing. When more than one interface is transmitting data, the total bandwidth is increased or decreased dynamically (the links are not utilized evenly). When all preferred paths are transmitting data, the data is queued. |
Second Peer IP Address | Specify the IP address of the active peer, which is different from the first peer IP address. |
Second Local Interface | Select the local interface for the standby peer to connect to the second peer IP address. |
Local Interface for SteelFusion Core Connections | Select the local interface for the current appliance to use when connecting with the Core appliance. |
Edge Virtual IP Address Interface | Select the physical interface on which the Edge VIP of the active Edge can be reached. Both the active and standby Edges require the Edge VIP address to have an underlying interface configured with an IP address on the same subnet. |
Connect to High Availability Peer | Click to complete the configuration and connect to the active peer appliance. |
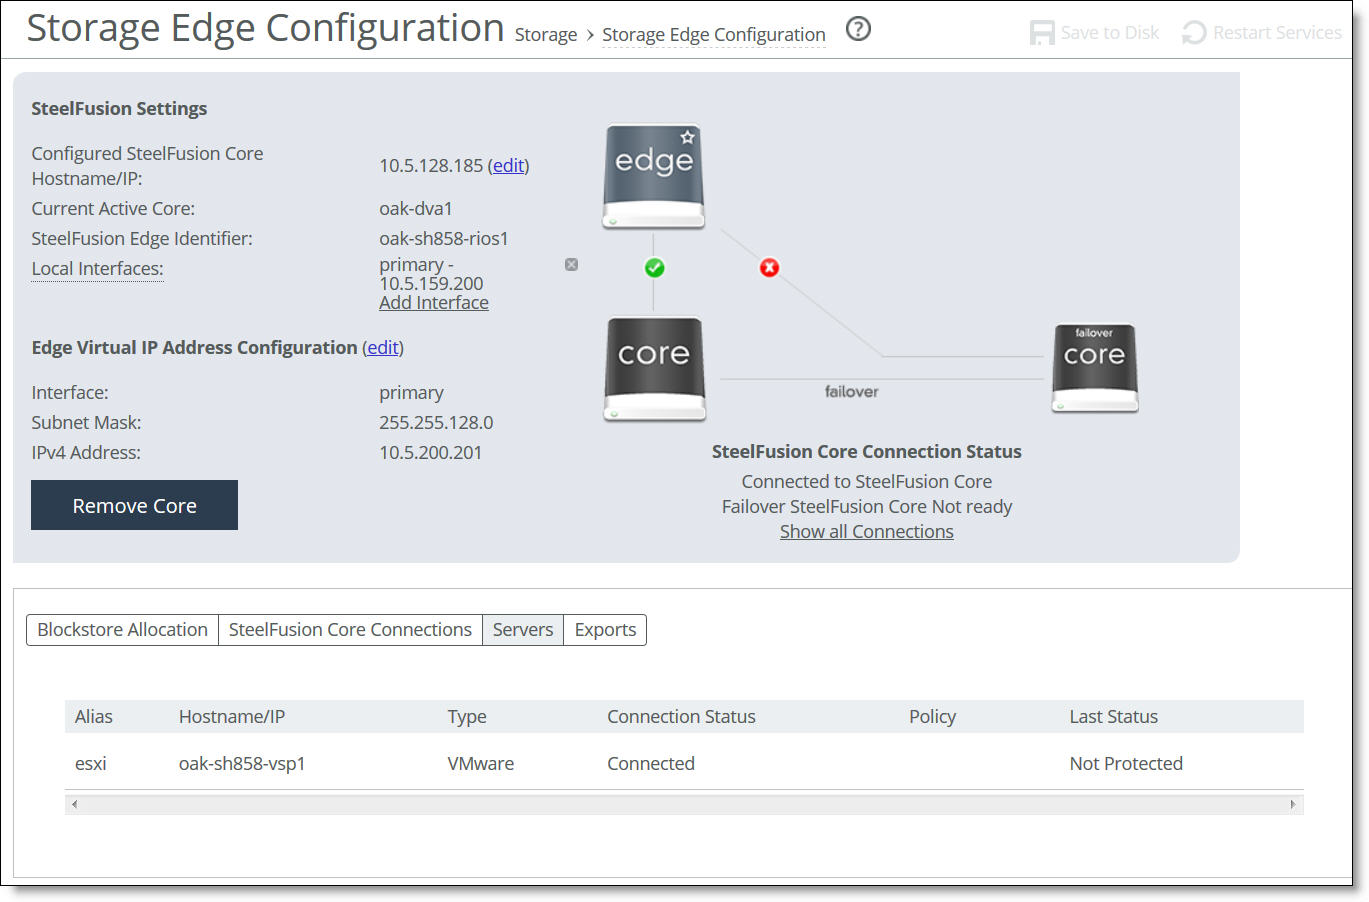
After configuring SteelFusion, the page displays the current settings and status, and it provides access to additional settings and information. If you have configured Edge high availability, the page displays the peer self-identifier and whether it is assuming the standby or active role.
Figure: SteelFusion Edge configured for Edge high availability
To reconfigure SteelFusion Edge
• Modify the settings as described in this table.
Control | Description |
Primary SteelFusion Core Hostname/IP | To update the Core hostname or IP address, click edit next to Hostname, change the hostname or IP address, and click Update Hostname to confirm. |
Local Interfaces | Enables a local interface on the Edge to use for data and management connections. Click Add Interface, select a local interface from the drop-down menu, and click Add Interface to confirm. |
Edge Virtual IP Address Configuration | The Edge Virtual IP (VIP) address is used by clients connected to the Edge to access the NFS exports mapped to the Edge. The Edge VIP address must be associated with a physical interface on the Edge that is reachable by the clients requiring access to storage on that Edge. To modify the Virtual IP address You can modify the IPv4 address on the active Edge of an HA configuration (or a single Edge connected to a Core). Click edit next to Edge Virtual IP Address Configuration. Make the change and click Update to confirm. Note: Any changes to the VIP address will cause a disruption in the storage service. If you make a change, you must unmount and mount the datastores being used by the hypervisor connected to this Edge to make them accessible. You must also ensure that at least one interface on the hypervisor(s) associated with the Edge is able to reach the Edge VIP. To do this, you may need to manually add a network route on the Edge. To modify the Virtual IP interface You can modify the Edge VIP interface on the active or standby Edge of an HA configuration (or a single Edge connected to a Core). Click edit next to Edge Virtual IP Address Configuration. Make the change and click Update to confirm. When the VIP interface is changed, you must ensure that the hypervisor and any other clients associated with the Edge can still reach the VIP address. You may have to modify the network routes added. Note: You can only use configured and activated interface names. The aux interface is disabled by default. If you are using the aux interface, you must first configure an IP address on the subnet you intend to use. If the interface you want to use does not appear in the drop-down list, verify whether it is enabled. New interfaces must be configured and activated on the Networking > Networking: Data Interfaces page. For details, see “Modifying RiOS data interfaces” on page 87. |
Remove Core | Click to disconnect the Edge from the Core; then click Remove Core to confirm. |
Clear High Availability Peer | (Appears when a peer is configured for Edge high availability.) Disconnects the peer from its appliance buddy. On the standby peer, click to remove the HA peer appliance; then click Clear Peer to confirm. The Management Console displays the Storage Edge Configuration page after removing the peer. The standby peer must be in either the Standby Rebuild or Standby Sync state before you clear it. When the system disconnects the standby peer, its configuration is reset and the active peer enters a degraded health state. To clear both peers, repeat this procedure on the active peer. The active peer must be in the Active Degraded state before you clear it. When the system disconnects the active peer, it remains connected to the Core and continues servicing exports. |
Viewing configuration information
The Storage > Storage Edge Configuration page contains useful information about your SteelFusion Edge configuration.
Viewing high-availability status
The Edge high-availability status on the Storage Edge Configuration page displays status for active peers serving NFS exports and standby peers accepting updates from the active peer. Each status is color coded: green indicates a working state such as synchronized and current, red indicates a degraded or critical state such as a peer down, and orange indicates an intermediate or transitory state such as rebuilding the NFS file system.
• Active Sync - The Edge serves client requests; the standby peer is synchronized with the current state of the active peer.
• Active Degraded - The Edge serves client requests, but the peer appliance is down.
• Active Rebuild - The Edge is updating the standby peer with updates that were missed during an outage.
• Standby Rebuild - The Edge passively accepts updates from the active peer, but its blockstore is not yet current with the state of the active peer.
• Standby Sync - The Edge passively accepts updates from the active peer and is synchronized with the current state of the system.
• Base - The Edge is starting up. The node stays in Base state when no Core appliance is configured for it and it is not connected to an HA peer.
• Dead - The Edge experienced an error from which it could not recover. The node cannot serve configuration information and its heartbeat connections are shut down.
Note: After a persistent Edge failure, when the failed Edge rejoins the high-availability pair, its blockstore will not be active until it is synchronized with its active Edge datastore. Synchronization can take a significant amount of time, depending on the amount of data it has to synchronize. During synchronization, ESXi might mark the paths to the Edge as dead. To clear the error, manually rescan the ESXi storage after the Edge blockstore becomes active.
For details, see https://supportkb.riverbed.com/support/index?page=content&id=S26446&actp=search. Viewing Blockstore Allocation
Select the Blockstore Allocation tab to display information about the Edge blockstore. It includes information about the exports: the amount of bytes currently free, the bytes cached in the blockstore, and an estimate of the number of bytes that can be written to the cache before the cache is at maximum capacity. This tab also shows the amount of space in the blockstore used for pinned exports.
Move the pointer over a section of the chart to display details. Click a category on the right to focus the display for that type of data.
Note: Data classified as Unevictable is surrounded by uncommitted data but has been skipped over and does not itself need to be committed. When Edge is writing new data, it may skip over some older data that might be read again later. Preserving this data allows Edge to serve more data locally without going over the WAN. After all pending data has been committed, the value will return to 0.
Figure: Blockstore Allocation information
Viewing connected servers
Select the Servers tab on the Storage Edge Configuration page to display information about the connected VMware ESXi servers, including alias, hostname/IP address, type, connection status, backup policy name, and last status (Triggered, Edge Processing, Core Processing, Proxy Mounting, Proxy Mounted, Not Protected, Protect Failed).
If you have configured server-level backups, a manual backup for any server that is added to a backup policy must be triggered from the Servers tab. Once the policy is triggered, the Last Status will change accordingly and the backup will appear in the Reports> Data Protection: Backups page in Core. If the Edges are in a high-availability configuration, you can only trigger backups on protected servers on the active Edge. For details on server-level backups, see the SteelFusion Core Management Console User’s Guide.
Note: If you are using the server-level backups feature (available as of version 4.6), you can trigger backups from the Servers tab.
Figure: Storage Edge Configuration page - Servers tab
Viewing NFS exports
Select the Exports tab on the Storage Edge Configuration page to verify which NFS exports have been exported to the Edge appliance. Each Edge requires a dedicated export in the data center storage configuration. The page displays the export path, type, status, size, and whether it is pinned. Click the export to perform any of these actions related to that export:
• View the export access list and snapshot history.
• Take a snapshot of the export.
• Activate a deactivated export.
• View the snapshot schedule for the export.
For details on snapshots and backups, see the SteelFusion Core Management Console User’s Guide.
Figure: Storage Edge Configuration page - Exports tab