Installing NICs in xx80 and 9800 Appliances
This chapter describes how to install network interface cards (NICs) in SteelHead CX xx80, SteelCentral xx80, and Interceptor 9800 appliances. It includes these sections:
This chapter assumes you have installed and configured the appliance. For details, see the installation and configuration guide for your product.
Before you begin
During installation, make sure you follow proper ESD procedures when you handle the NIC:
• Wear properly grounded ESD straps.
• If an ESD strap isn’t available, touch a properly grounded metallic surface prior to handling the NIC.
• Don’t touch the electronic components on the NIC.
Before you install a NIC, ensure the card meets the software and appliance requirements described in the following sections.
Appliances included in this chapter
This chapter describes how to install NICs in these 1U and 2U appliances:
• SteelHead CX 3080, CX 5080, and CX 7080
• SteelHead Interceptor 9800
• SteelCentral AppResponse 2180, 4180, and 8180
• SteelCentral Flow Gateway 2280
• SteelCentral NetProfiler 4280, 4280-DP, and 4280-EXP
Supported NICs for 1U xx80 appliances
This section describes the software requirements and compatible NICs that you can install in 1U SteelHead CX and SteelCentral xx80 appliances.
All the NICs for the SteelHead appliances support fail-to-block mode. For details, see
About Fail-to-Block Mode.The following tables summarize the add-on cards and software requirements for the 1U xx80 appliances.
SteelHead CX 3080 supported NICs
Network add-on cards | Size (**) | Manufacturing part no. | Riverbed orderable part no. | Required software |
Four-Port 10-GbE Fiber SR* | FH7.6” | 410-00191-01 | NIC-1-010G-4SR-BP | 9.9.1 or later |
Four-Port 10-GbE Fiber LR* | FH7.6” | 410-00190-01 | NIC-1-010G-4LR-BP | 9.9.1 or later |
Four-Port 10-GbE DAC | FH7.6” | 410-00197-01 | NIC-1-010G-DAC-BP | 9.9.1 or later |
Four-Port 1-GbE Copper Base-T | HHHL | 410-00115-01*** | NIC-1-001G-4TX-BP | 9.9.1 or later |
Four-Port 1-GbE Fiber SX | FHHL | 410-00122-01 | NIC-1-001G-4SX-BP | 9.9.1 or later |
Four-Port 1-GbE Fiber LX | FHHL | 410-00123-01 | NIC-1-001G-4LX-BP | 9.9.1 or later |
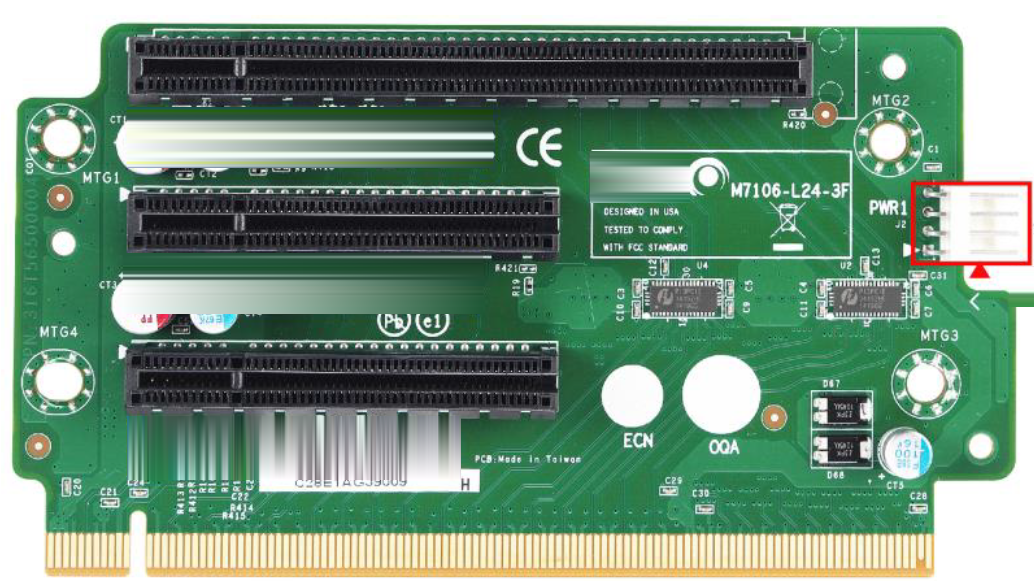
*These NICs have a power connector cable attached that is not used in the Riverbed SteelHead platforms. The SteelHead systems are designed to fully power these NICs through the interface bus.
**HHHL = Half Height, Half Length; FHHL = Full Height, Half Length; FH7.6 = Full Height, Length 7.6”
***You might receive a card with the part number 410-00115-11. The -11 denotes a different manufacturing location. The 410-00115-11 card is the same card as the 410-00115-01 card.
In-path traffic might slow or fail with the Two-Port 40-GbE SR QSFP+ Fiber (410-00193-01) card and the Four-Port 10-GbE SR Fiber (410-00191-01) card. For a workaround, go to Knowledge Base article
S33925.
SFP | Manufacturing part no. | Riverbed orderable part no. |
SFP+ 10-GbE DAC | 410-00142-01 | TRC-1-SFPP-DAC |
The Four-Port 10-GbE DAC card requires a cable for the SFP+ 10-GbE DAC.
SteelCentral NetProfiler 4280, 4280-DP, 4280-EXP
Network add-on cards | Size (*) | Manufacturing part no. | Riverbed orderable part no. | Required software |
Two-Port 10-GbE Fiber SFP+ (4280-DP only) | HHHL | 410-00036-02 | NIC-1-010G-2SFPP | 10.16 or later |
Two-Port 4/8/16-GbE Fiber Channel HBA (SAN) (4280, 4280-EXP only) | HHHL | 410-00158-01 | NIC-1-HBA-2FC | 10.16 or later |
* HHHL = Half Height, Half Length
SFP | Manufacturing part no. | Riverbed orderable part no. |
SFP+ 10-GbE SR | 410-00143-01 | TRC-1-SFPP-SR |
SFP+ 10-GbE LR | 410-00144-01 | TRC-1-SFPP-LR |
SFP+ 10-GbE DAC | 410-00142-01 | TRC-1-SFPP-DAC |
SteelCentral AppResponse 2180, 4180, 8180
Network add-on cards | Size (*) | Manufacturing part no. | Riverbed orderable part no. | Required software |
Four-Port 1-GbE Fiber SFP | HHHL | 410-00124-01 | NIC-1-001G-4SFP | 11.6.5 or later |
Four-Port 1-GbE Copper Base-T | HHHL | 410-00116-01 | NIC-1-001G-4TX | 11.6.5 or later |
Two-Port 10-GbE Fiber SFP+ | HHHL | 410-00036-02 | NIC-1-010G-2SFPP | 11.6.5 or later |
Four-Port 10-GbE Fiber SFP+ | HHHL | 410-00108-01 | NIC-1-010G-4SFPP | 11.6.5 or later |
Two-Port 40-GbE Time Stamp (supported only on the 8180) | FHHL | 410-00214-01 | NIC-1-040G-2QSFP-TS | 11.6.5 or later |
Two-Port 100-GbE QSPF+ Time Stamp (supported on 8180 only) | FHFL | 410-00239-01 | NIC-1-100G-2QSFP-TS | 11.6.5 or later |
*HHHL = Half Height, Half Length; FHHL = Full Height, Half Length; FHFL = Full Height, Full Length.
SFP | Manufacturing part no. | Riverbed orderable part no. |
SFP 1-GbE SX | 410-00139-01 | TRC-1-SFP-SX |
SFP 1-GbE LX | 410-00140-01 | TRC-1-SFP-LX |
SFP+ 10-GbE DAC | 410-00142-01 | TRC-1-SFPP-DAC |
SFP+ 10-GbE SR | 410-00143-01 | TRC-1-SFPP-SR |
SFP+ 10-GbE LR | 410-00144-01 | TRC-1-SFPP-LR |
QSFP+ 40-GbE SR | 410-00147-01 | TRC-1-QSFP-SR4 |
QSFP+ 40-GbE LR | 410-00148-01 | TRC-1-QSFP-LR4 |
QSFP+ 100-GbE SR4 | 410-00242-01 | TRC-1-QSFP28-SR4 |
QSFP+ 100-GbE LR4 | 410-00243-01 | TRC-1-QSFP28-LR4 |
QSFP+ 40-GbE LM4 | 410-00245-01 | TRC-1-QSFP-LM4 |
SteelCentral Flow Gateway 2280
Network add-on cards | Size (*) | Manufacturing part no. | Riverbed orderable part no. | Required software |
Two-Port 10-GbE Fiber SFP+ | HHHL | 410-00036-02 | NIC-1-010G-2SFPP | 10.16 or later |
SFP | Manufacturing part no. | Riverbed orderable part no. |
SFP+ 10-GbE SR | 410-00143-01 | TRC-1-SFPP-SR |
SFP+ 10-GbE LR | 410-00144-01 | TRC-1-SFPP-LR |
SFP+ 10-GbE DAC | 410-00142-01 | TRC-1-SFPP-DAC |
Installing NICs in 1U xx80 appliances
This section describes how to install NICs in the following 1U appliances: SteelHead CX 3080, SteelCentral AppResponse 2180, SteelCentral Flow Gateway 2280, and SteelCentral NetProfiler 4280-DP appliances. It includes these sections:
Installing NICs in the CX 3080 appliance
This section describes how to install or replace NICs in 1U CX 3080 appliances.
To install or replace a NIC
1. Power down the appliance.
2. Remove the power supply cord.
3. Remove the cables connected to the appliance.
4. Remove the appliance from the mounting rack.
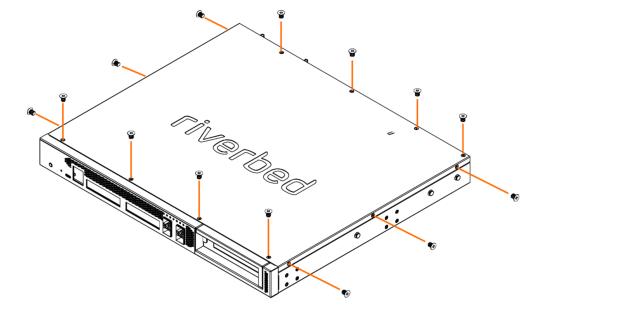
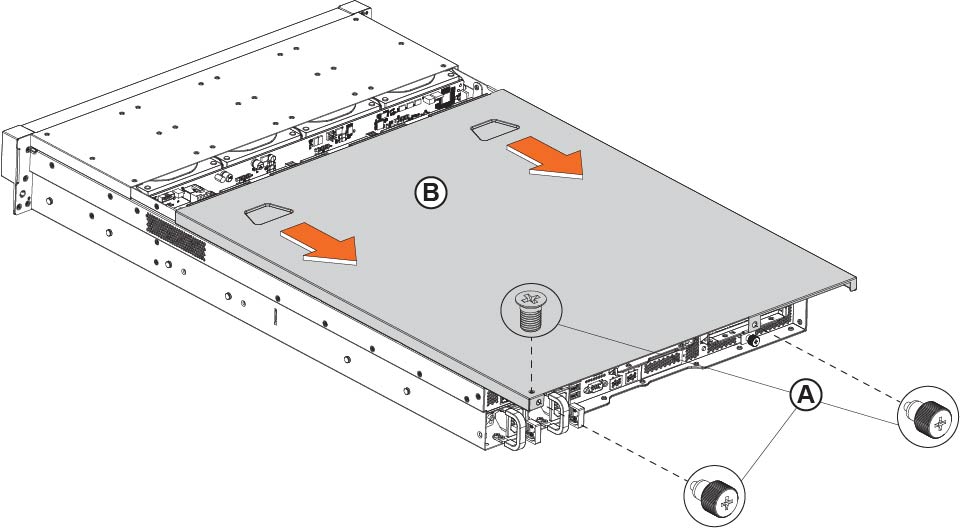
5. Remove the four screws on the front and back of the cover and the three screws on each side. There are a total of 14 screws.
Removing the screws on the SteelHead CX 3080 appliance
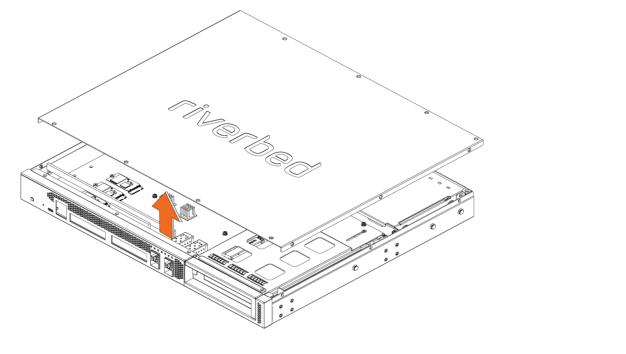
6. Lift the chassis cover straight up.
Removing the chassis cover on the SteelHead CX 3080 appliance
Removing the screws from the NIC riser bracket
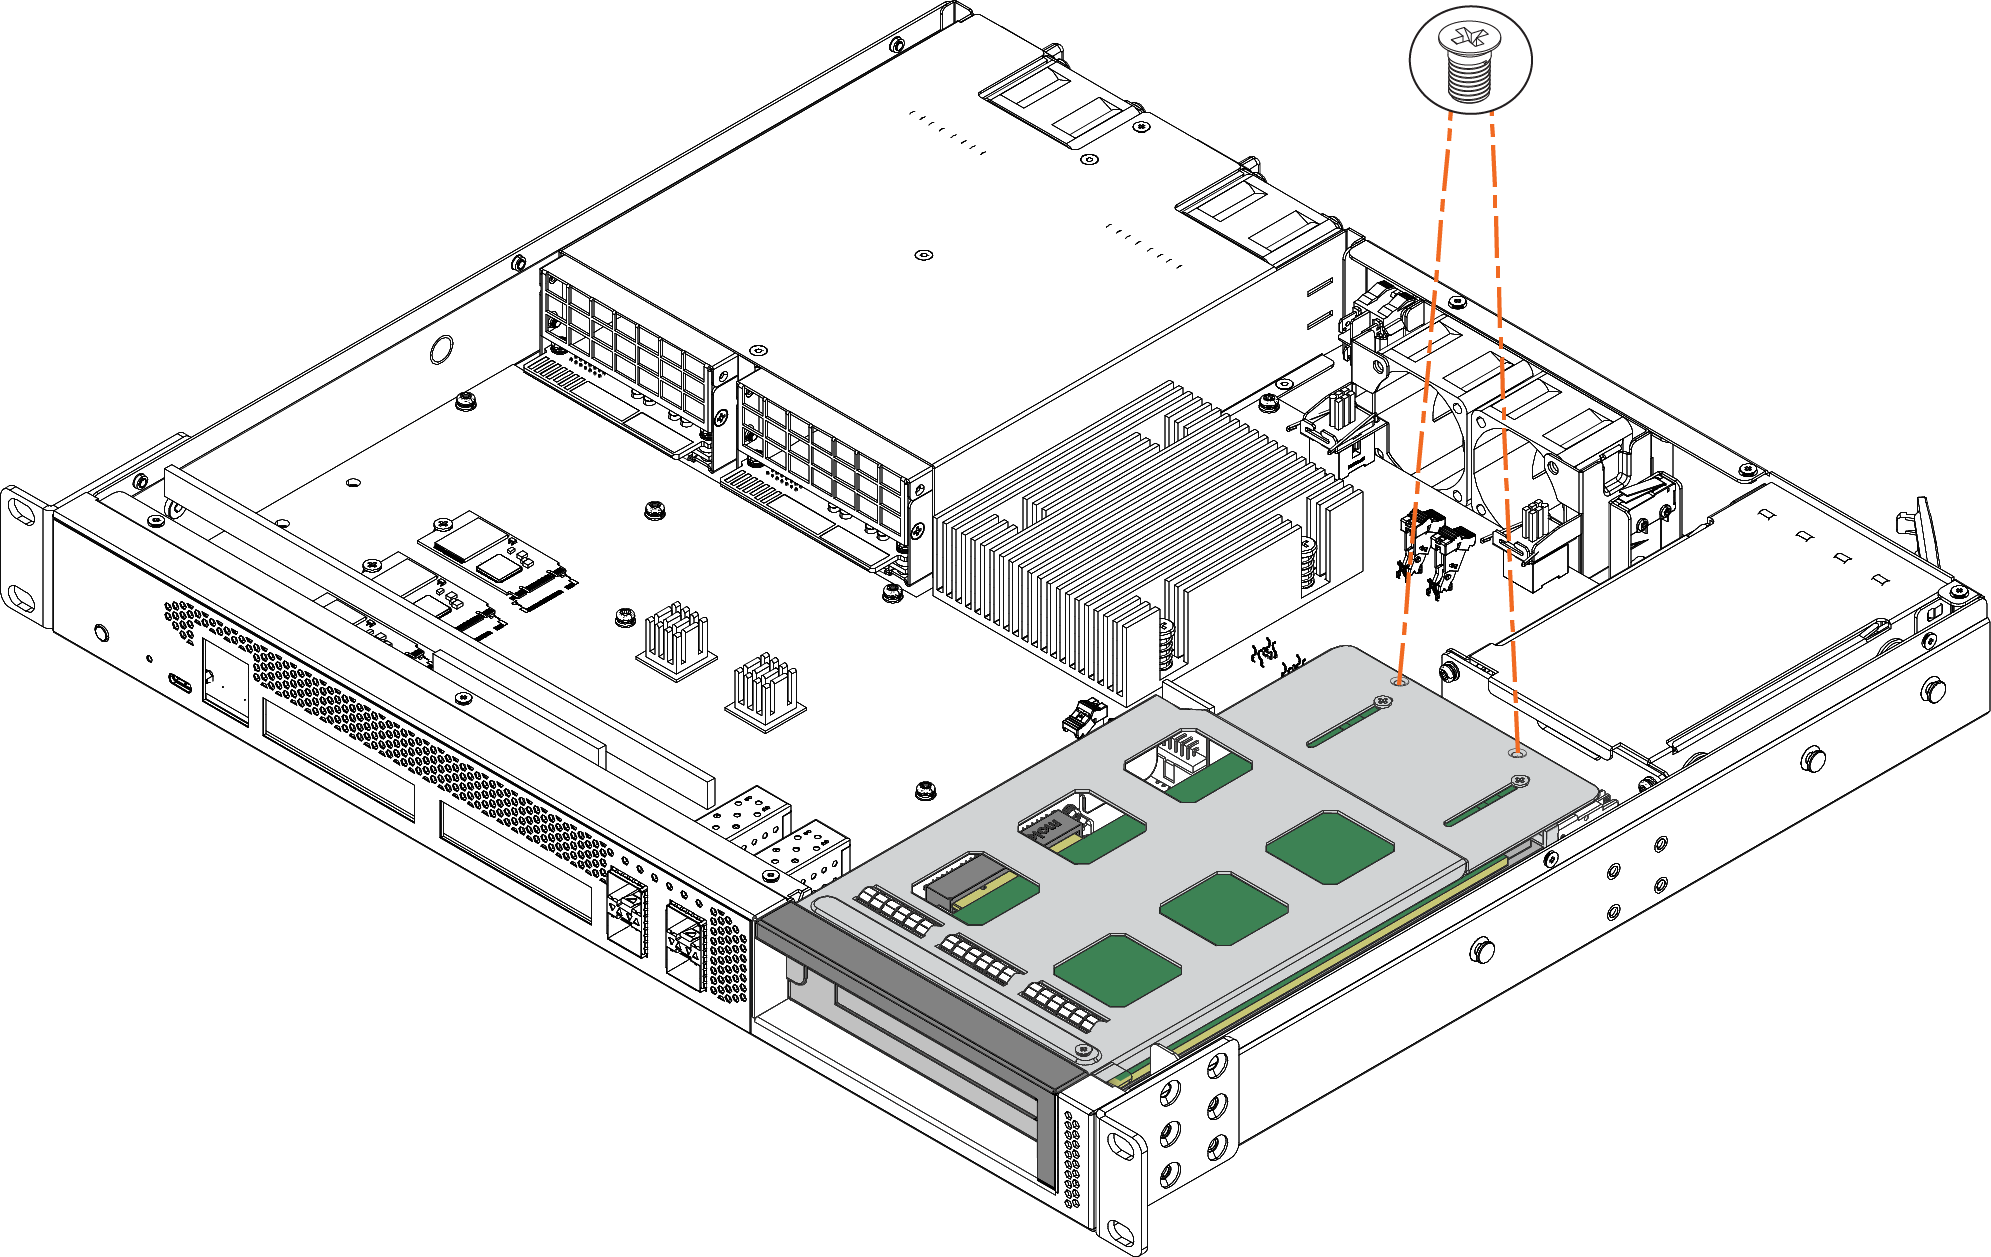
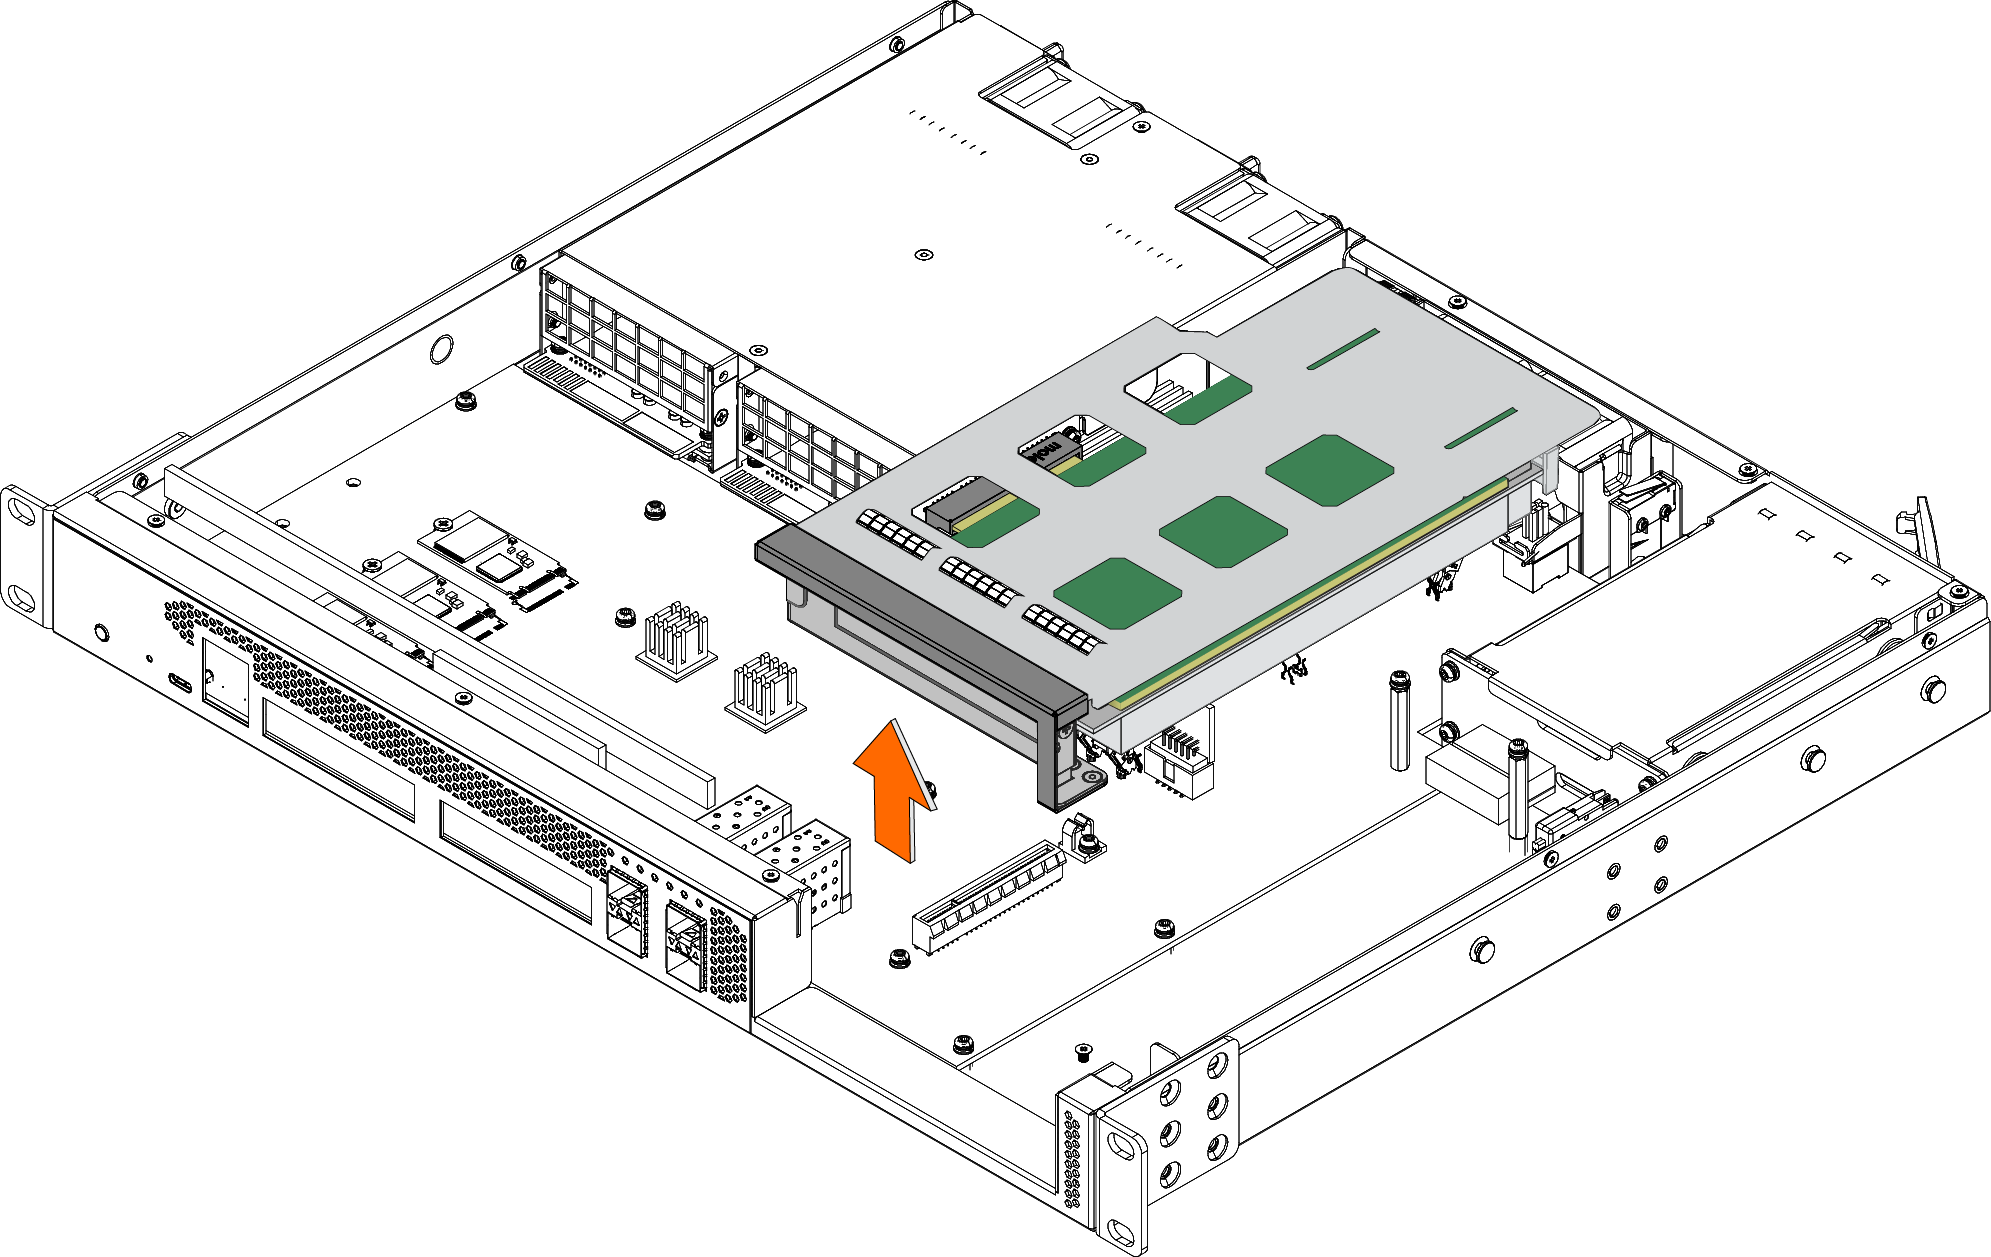
8. Lift the NIC riser bracket straight up to disconnect it from the motherboard.
Removing the NIC riser bracket
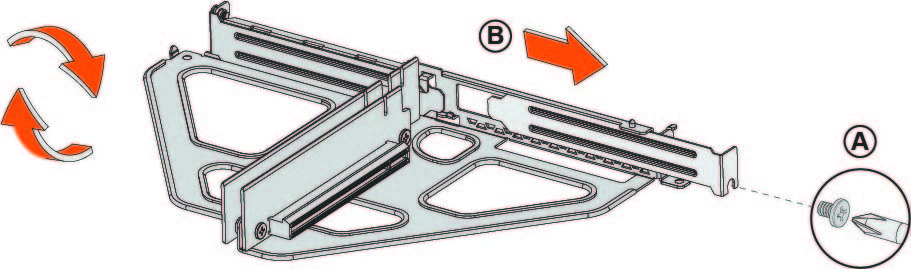
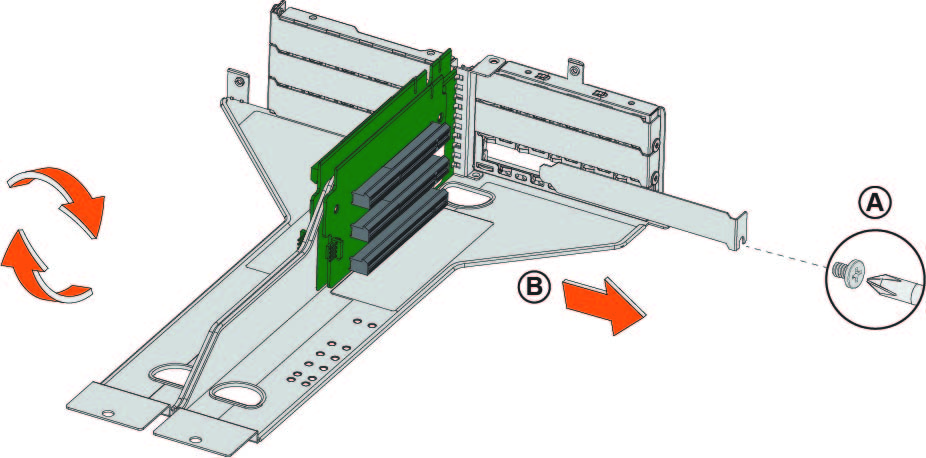
9. Turn over the NIC riser bracket.
Turning over the NIC riser bracket
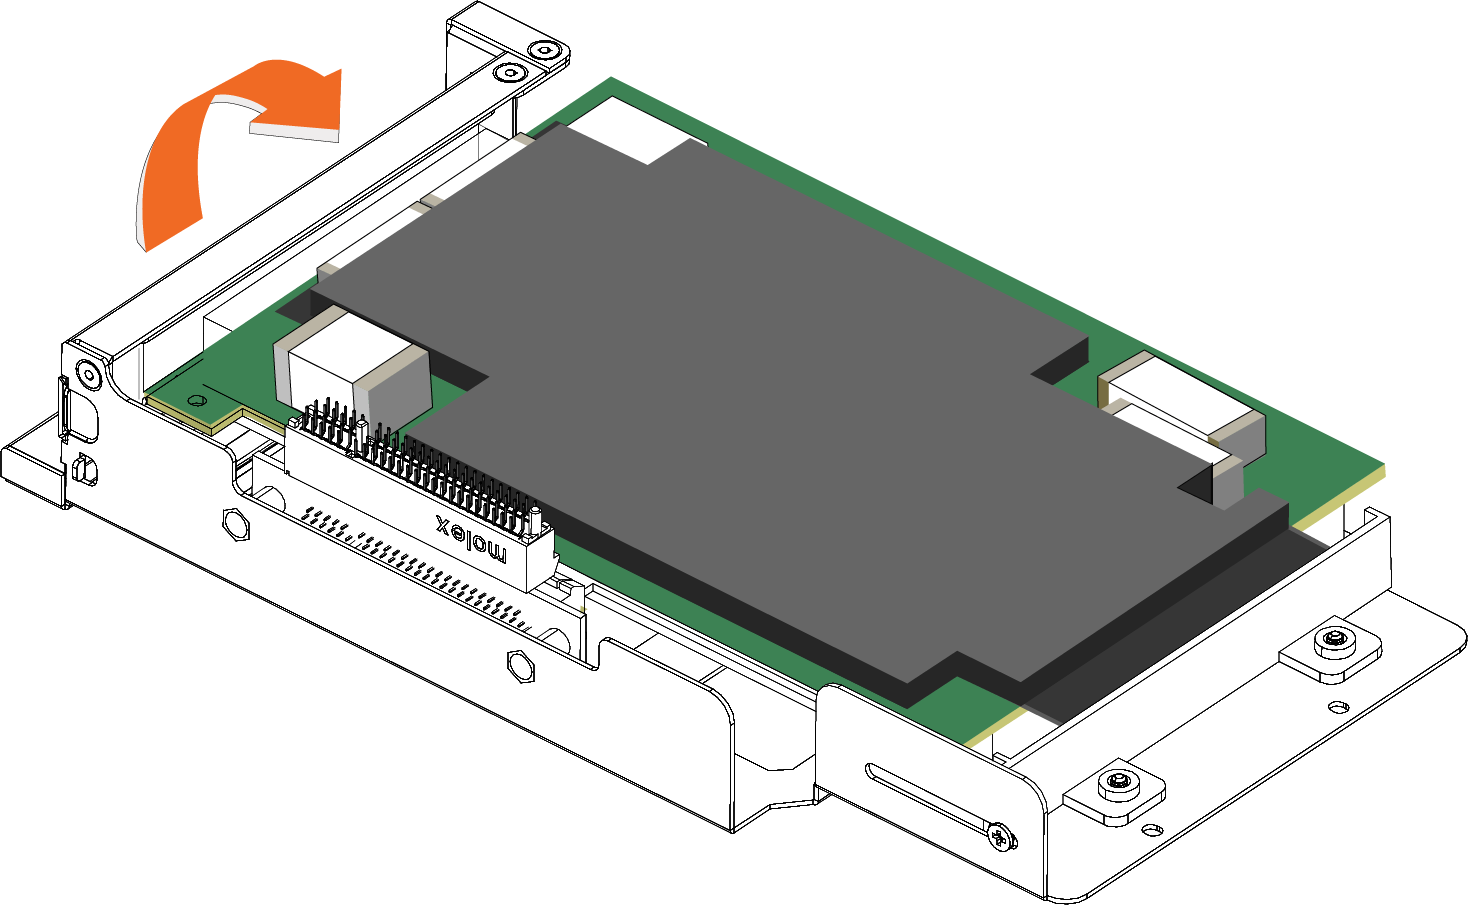
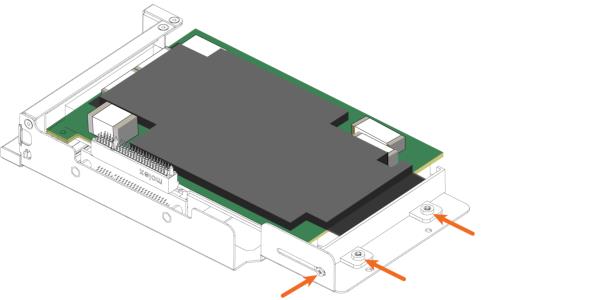
10. To replace an existing NIC, loosen the three screws that secure the card and press the bracket toward you.
Loosen the three screws and press the bracket toward you
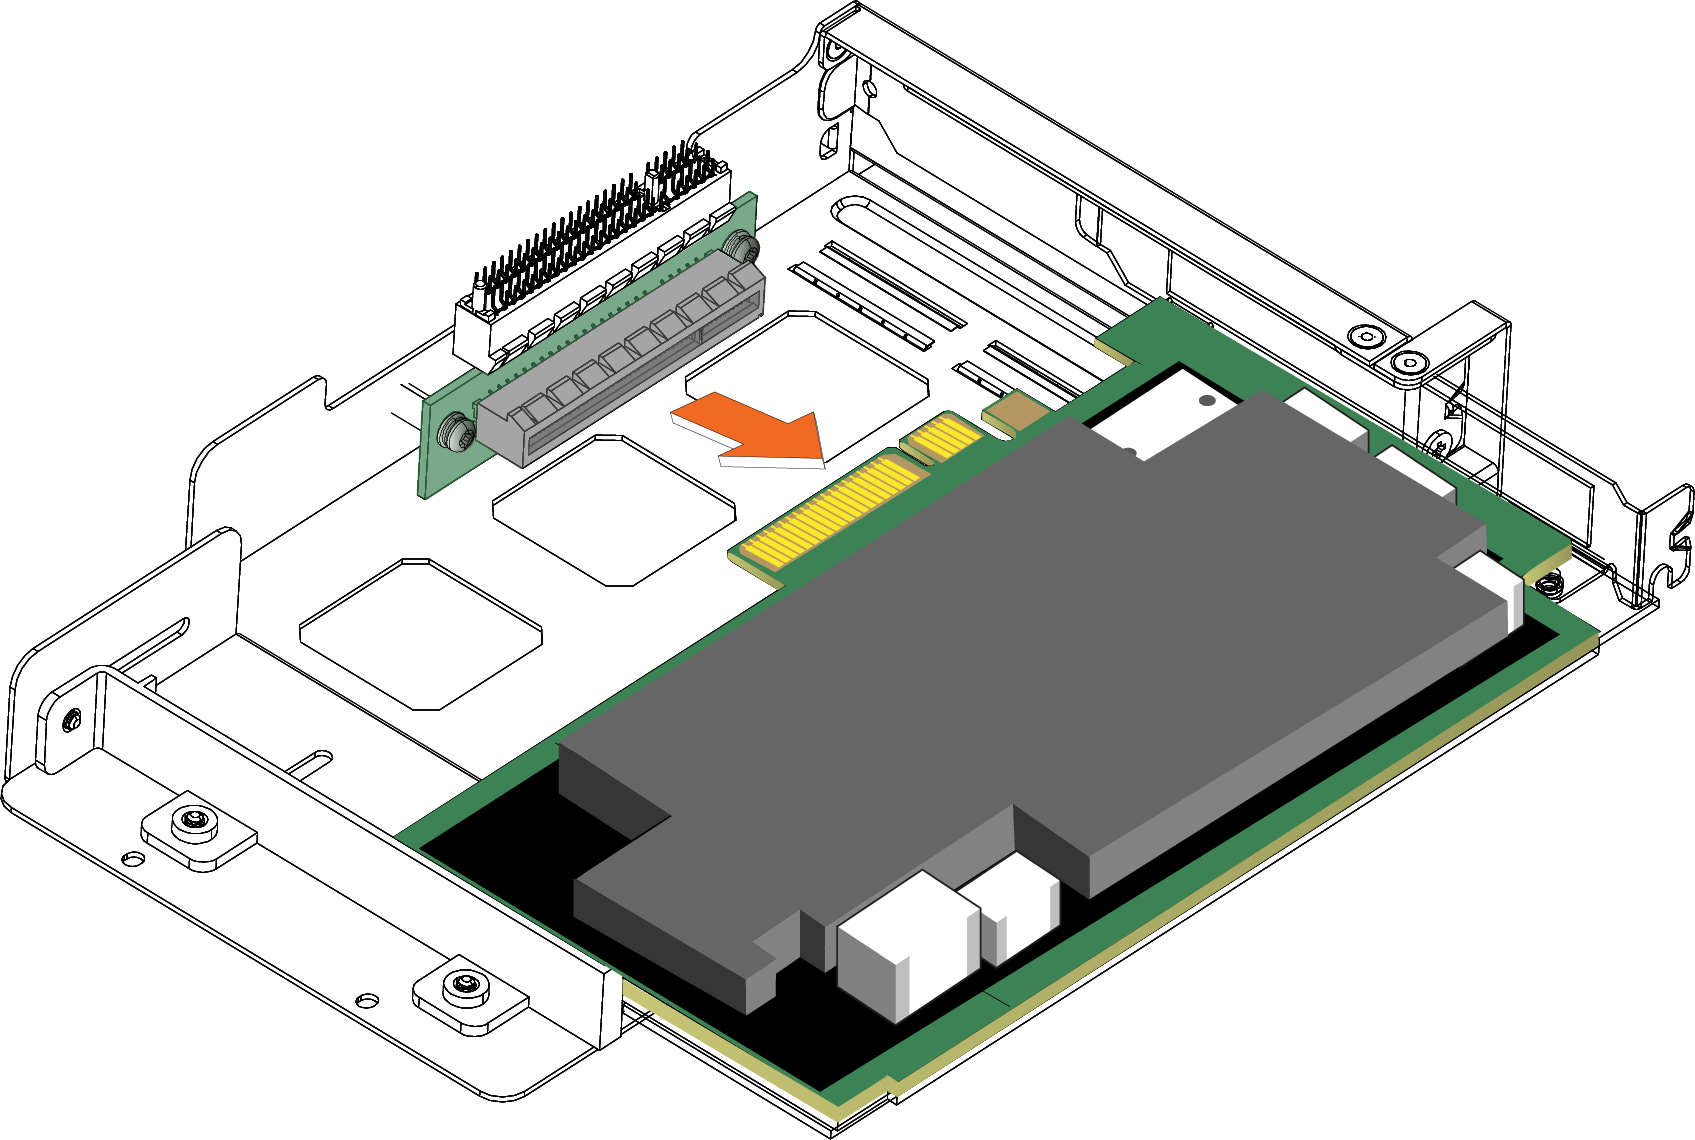
11. Slide the NIC out of the pin connector and gently lift and pull the card away from the front of the card holder to remove it.
Removing the card from the pin connector
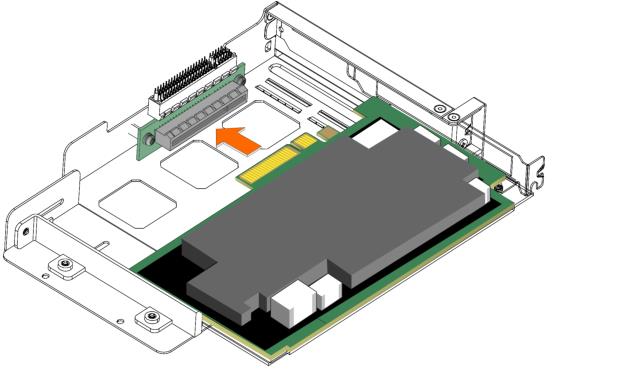
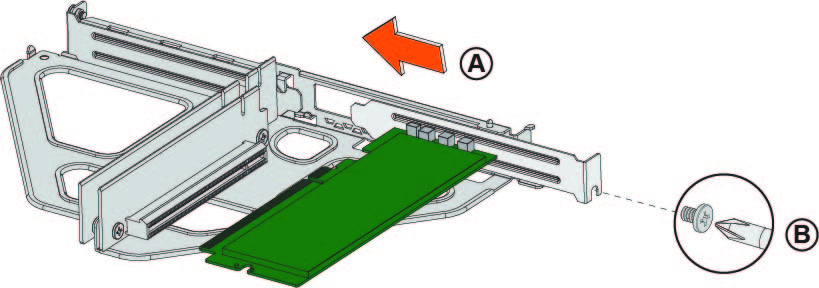
12. Hold the new NIC between the front bezel and the rear of the card to avoid ESD damage.
13. Slide the NIC into the card holder.
Installing the new NIC
14. Screw the faceplate into the holder to secure the add-on card.
Securing the faceplate
Make sure the NIC is seated properly in the pin connector. If it isn’t seated properly, the card won’t function properly.
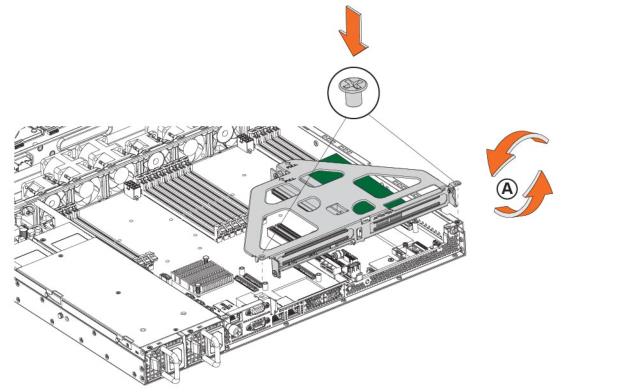
15. Press the bracket on the right side of the card holder toward you to position the card in the holder.
16. Turn the card holder over.
17. Press the card cover straight down into the motherboard pin connector. Make sure the card is completely inserted into the motherboard.
Inserting the PCIe card holder into the motherboard

18. Secure the NIC riser bracket with the two screws.
Securing the NIC riser bracket
19. Replace the cover on the chassis. For details, see
Step 5.
20. Connect the power cords.
21. Connect the cables.
22. Power up the appliance and check the status lights.
To test NICs
1. Connect to the SteelHead CLI.
For detailed information, see the Riverbed Command-Line Interface Reference Manual.
2. Enter enable mode. At the system prompt, enter the following command:
amnesiac > enable
amnesiac #
3. Verify that the NIC is correctly installed.
For example, to verify the add-on cards on a SteelHead, at the system prompt enter the following command:
amnesiac # show hardware all
Run the in-path reset-iface command in configuration mode to reset the main interface and recognize all ports.
Installing NICs in 1U SteelCentral xx80 appliances
This section describes how to install NICs in the 1U SteelCentral AppResponse 2180, SteelCentral Flow Gateway 2280, and SteelCentral NetProfiler 4280-DP appliances.
Figure: Slot locations for SteelCentral 1U xx80 appliances identifies the slot locations.
Slot locations for SteelCentral 1U xx80 appliances

SteelCentral Flow Gateway 2280 and SteelCentral AppResponse 2180 only support one NIC, installed in slot 2.
To install or replace a NIC
1. Power down the appliance.
2. Remove the power supply cord.
3. Remove the cables connected to the appliance.
4. Remove the appliance from the mounting rack, if necessary.
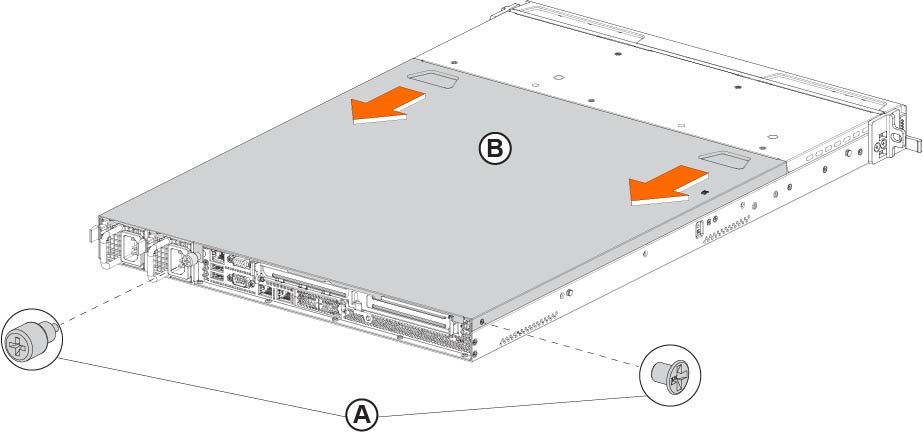
Removing the cover on the SteelCentral xx80 appliance
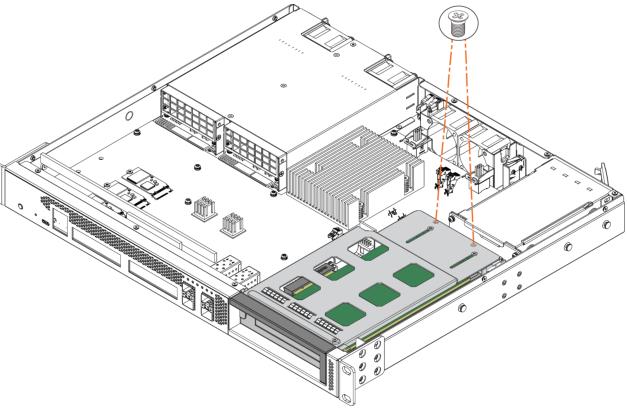
6. Unscrew the two screws securing the riser to the chassis.
Removing the NIC riser
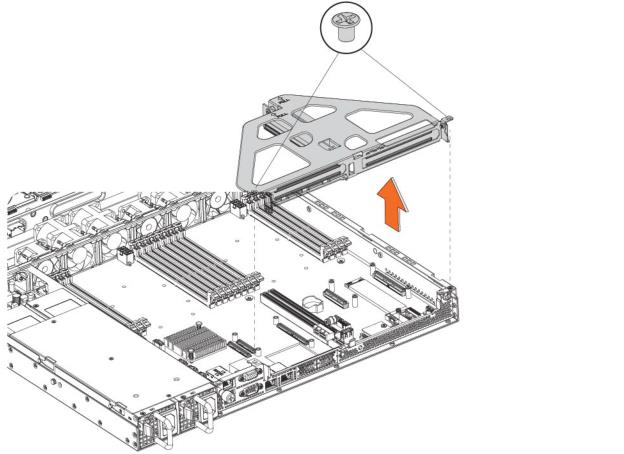
7. Lift up to remove the riser from the chassis.
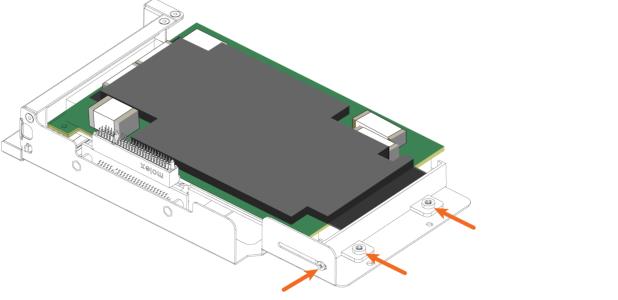
8. If you are replacing an existing card, carefully remove the screw and pull the card from the riser.
Removing the dummy bracket
10. Hold the new card between the front bezel and the rear of the card to avoid ESD damage.
Inserting the card into the riser card bracket
Make sure all NICs are seated properly in the riser. If they aren’t seated properly, the cards don’t function.
Inserting the riser card bracket into the chassis
13. Replace the cover on the chassis.
Do not secure the rear side screw; it will prevent you from opening the cover when the appliance is installed in a rack.
14. Connect the power cords.
15. Connect the cables.
16. Power up the appliance and check the status lights.
Enabling 10-GbE NICs in the 4280-DP and 2280 appliances
For the Two-Port 10-GbE NIC to function correctly in the NetProfiler 4280-DP and SteelCentral Flow Gateway 2280 appliances, you must disable the 1-GbE Primary and AUX ports and enable the 10-GbE NIC Primary and AUX interfaces.
These instructions apply only to the Two-Port 10-GbE Fiber SFP+ NIC (NIC-1-010G-2SFPP) installed in the NetProfiler 4280-DP and Flow Gateway 2280 appliances.
To enable the 10-GbE NIC interfaces on the NetProfiler 4280-DP and Flow Gateway 2280 appliance
2. Connect to the appliance using the console port. (Since you are modifying the appliance interfaces, we recommend you connect via the console port rather than SSH.)
3. Log in to the appliance as user mazu, using the password set for the device.
4. To verify that the 1-GbE NIC is present but not enabled, run this command:
sudo mazu-reconfig --get --use-addon-nic
The system returns:
found=true, enabled=false
5. If bonding of the 1-GbE interfaces is currently enabled, run the following command, otherwise, go to
Step 6.
sudo mazu-reconfig --set --bond-dp-interfaces false
Do not perform this step if you are enabling the 10-GbE NIC interface in the Flow Gateway 2280 appliance.
6. To enable the 10-GbE NIC interfaces, run this command:
sudo mazu-reconfig --set --use-addon-nic true
7. Reboot the appliance.
The 10-GbE NIC interfaces are now enabled and configurable as Primary and AUX in the web UI or the CLI. The 1-GbE NIC Primary and AUX ports are disabled by this process.
Supported NICs for 2U xx80 and 9800 appliances
This section describes the software requirements, slot restrictions, and compatible NICs that you can install in the SteelHead CX 5080 and CX 7080, Interceptor 9800, SteelCentral AppResponse 4180 and 8180, and SteelCentral NetProfiler 4280 and 4280-EXP appliances.
All the NICs for the SteelHead appliances support fail-to-block mode. For details, see
About Fail-to-Block Mode.The following tables summarize the add-on cards and software requirements for 2U xx80 and 9800 appliances.
SteelHead CX 5080 supported NICs
Network add-on cards | Size (**) | Manufacturing part no. | Riverbed orderable part no. | Required SteelHead software |
Four-Port 1-GbE Copper Base-T | HHHL | 410-00115-01*** | NIC-1-001G-4TX-BP | 9.9.0 or later |
Four-Port 1-GbE Fiber SX | FHHL | 410-00122-01 | NIC-1-001G-4SX-BP | 9.9.0 or later |
Four-Port 1-GbE Fiber LX | FHHL | 410-00123-01 | NIC-1-001G-4LX-BP | 9.9.0 or later |
Four-Port 10-GbE Fiber SR* | FH7.6” | 410-00191-01 | NIC-1-010G-4SR-BP | 9.9.09.9.0 or later |
Four-Port 10-GbE Fiber LR* | FH7.6” | 410-00190-01 | NIC-1-010G-4LR-BP | 9.9.0 or later |
Two-Port 40-GbE Fiber SR4* | FH9.5” | 410-00193-01 | NIC-1-040G-2SR4-BP | 9.9.0 or later |
Two-Port 40-GbE Fiber LR4* | FH9.5” | 410-00194-01 | NIC-1-040G-2LR4-BP | 9.9.0 or later |
Four-Port 10-GbE Copper | FH9.5” | 410-00195-01 | NIC-1-010G-4TX-BP | 9.10 or later |
Four-Port 10-GbE DAC | FH7.6” | 410-00197-01 | NIC-1-010G-DAC-BP | 9.10 or later |
*These NICs have an attached power connector cable that is not used in the Riverbed SteelHead platforms. The SteelHead systems are designed to fully power these NICs through the interface bus.
**HHHL = Half Height, Half Length; FHHL = Full Height, Half Length; FH7.6 = Full Height, Length 7.6”; FH9.5 = Full Height, Length 9.5”.
***You might receive a card with the part number 410-00115-11. The -11 denotes a different manufacturing location. The 410-00115-11 card is the same card as the 410-00115-01 card.
In-path traffic might slow or fail with the Two-Port 40-GbE SR QSFP+ Fiber (410-00193-01) card and the Four-Port 10-GbE SR Fiber (410-00191-01) card. For a workaround, go to Knowledge Base article
S33925.
SFP | Manufacturing part no. | Riverbed orderable part no. |
SFP+ 10-GbE DAC | 410-00142-01 | TRC-1-SFPP-DAC |
The Four-Port 10-GbE DAC card requires a cable for the SFP+ 10-GbE DAC.
SteelHead CX 7080 supported NICs
Network add-on cards | Size (**) | Manufacturing part no. | Riverbed orderable part no. | Required SteelHead software |
Four-Port 1-GbE Copper Base-T Bypass | HHHL | 410-00115-01**** | NIC-1-001G-4TX-BP | 9.9.0 or later |
Four-Port 1-GbE Fiber SX Bypass | FHHL | 410-00122-01 | NIC-1-001G-4SX-BP | 9.9.0 or later |
Four-Port 1-GbE Fiber LX Bypass | FHHL | 410-00123-01 | NIC-1-001G-4LX-BP | 9.9.0 or later |
Four-Port 10-GbE Fiber SR Bypass* | FH7.6” | 410-00191-01 | NIC-1-010G-4SR-BP | 9.9.0 or later |
Four-Port 10-GbE Fiber LR Bypass* | FH7.6” | 410-00190-01 | NIC-1-010G-4LR-BP | 9.9.0 or later |
Two-Port 40-GbE Fiber SR4 Bypass* | FH9.5” | 410-00193-01 | NIC-1-040G-2SR4-BP | 9.9.0 or later |
Two-Port 40-GbE Fiber LR4 Bypass* | FH9.5” | 410-00194-01 | NIC-1-040G-2LR4-BP | 9.9.0 or later |
QuickAssist Technology (QAT) Compression/Acceleration card*** | HHHL | 410-00246-01 | QAT-COMP-SP | 9.9.2 or later |
Four-Port 10-GbE Copper | FH9.5” | 410-00195-01 | NIC-1-010G-4TX-BP | 9.10.0 or later |
Four-Port 10-GbE DAC | FH7.6” | 410-00197-01 | NIC-1-010G-DAC-BP | 9.10.0 or later |
*These NICs have an attached power connector cable that is not used in Riverbed appliances. Riverbed appliances are designed to fully power these NICs through the interface bus.
**HHHL = Half Height, Half Length; FHHL = Full Height, Half Length; FH7.6 = Full Height, Length 7.6”; FH9.5 = Full Height, Length 9.5”.
*** The QAT Compression/Acceleration card can only be installed in slot 6 of the CX 7080-B030 appliance.
****You might receive a card with the part number 410-00115-11. The -11 denotes a different manufacturing location. The 410-00115-11 card is the same card as the 410-00115-01 card.
In-path traffic might slow or fail with the Two-Port 40-GbE SR QSFP+ Fiber (410-00193-01) card and the Four-Port 10-GbE SR Fiber (410-00191-01) card. For a workaround, go to Knowledge Base article
S33925.
SFP | Manufacturing part no. | Riverbed orderable part no. |
SFP+ 10-GbE DAC | 410-00142-01 | TRC-1-SFPP-DAC |
The Four-Port 10-GbE DAC card requires a cable for the SFP+ 10-GbE DAC.
SteelHead CX 5080 and 7080 supported slots
SteelHead CX 5080 and 7080 supported NICs | Quantity | Supported slots |
1 GbE | 6 | 1-6. If a QAT Compression/Acceleration card is installed in slot 6 the maximum number of cards is 5. |
10 GbE | 4 | 1, 2, 4, 5 (hardware restriction in slot 3 and slot 6.) You lose slot 1 if you install a 40-GbE card in slot 2 and you lose slot 5 if you install a 40-GbE in slot 4. |
40 GbE | 2 | 2, 4 (Two-Port 40-GbE cards are only supported in slot 2 and 4 due to their larger size.) You lose slot 1 if a 40-GbE card is installed in slot 2. You lose slot 5 if a 40-GbE is installed in slot 4. |
QAT Compression/Acceleration | 1 | 6 only. The QAT Compression/Acceleration card can only be installed in the CX 7080-B030 appliance. |
SteelHead CX 5080 and CX 7080 slot restrictions
The slot restrictions based on height and length of NICs are described in these tables.
Figure: Right riser slots shows the right riser card slots.
Right riser slots
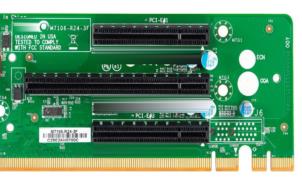
Slot no. | Bus width | Height | Length | Notes |
Slot 1 | x8 | FH (Full-Height) | FL (Full-Length) | When a x16 card is in slot 2, slot 1 can’t be used. |
Slot 2 | x16 or x8 | FH (Full-Height) | FL (Full-Length) | When a x16 card is in slot 2, slot 1 can’t be used. Two-Port 40-GbE Fiber SR4/LR4 cards require x16 bus width slots and are only supported in slots 2 and 4. |
Slot 3 | x8 | FH (Full-Height) | HL (Half-Length <= 6.6 in.) | SteelHead CX 5080 and CX 7080 appliances ship with a Four-Port 1-GbE Copper Bypass card installed in slot 3. |
Figure: Left riser slots shows the left riser card slots.
Left riser slots
Slot no. | Bus width | Height | Length | Notes |
Slot 4 | x16 or x8 | FH (Full-Height) | FL (Full-Length) | When a x16 card is in slot 4, slot 5 can’t be used. Two-Port 40-GbE Fiber cards are only supported in slot 2 and 4 due to their larger size. |
Slot 5 | x8 | FH (Full-Height) | FL (Full-Length) | When a x16 card is in slot 4, slot 5 can’t be used. |
Slot 6 | x8 | See notes. | HL (Half-Length <= 6.6 in.) | Half-Height: CX 7080 ships with a 3008-8i HBA mezzanine card preinstalled. The CX 7080 requires this mezzanine card for internal PCIe and IO expansion. The CX 5080 doesn’t require a mezzanine card. Full-Height: The CX 5080 is full-height NIC compatible when a mezzanine card isn’t installed. The QAT Compression/Acceleration card can be installed in the CX 7080-B030 in slot 6. Two Mini-SAS-HD cables connect the 3008-8i HBA mezzanine card and the backplane connectors. If these cables are bad or loose, the SSDs won’t function properly. If the 3008-8i HBA mezzanine card fails, the SSDs won’t be recognized. |
Interceptor 9800 supported NICs
Network add-on cards | Size (**) | Manufacturing part no. | Riverbed orderable part no. | Required software |
Two-Port 100-GbE Fiber SR4 Bypass* | FH9.5” | 410-00247-01 | NIC-1-100G-2SR4-BP | 8.1 or later |
Two-Port 100-GbE Fiber LR4 Bypass* | FH9.5” | 410-00248-01 | NIC-1-100G-2LR4-BP | 8.1 or later |
Two-Port 40-GbE Fiber SR4 Bypass* | FH9.5” | 410-00193-01 | NIC-1-040G-2SR4-BP | 8.0 or later |
Two-Port 40-GbE Fiber LR4 Bypass* | FH9.5” | 410-00194-01 | NIC-1-040G-2LR4-BP | 8.0 or later |
Four-Port 10-GbE Fiber SR Bypass* | FH7.6” | 410-00191-01 | NIC-1-010G-4SR-BP | 8.0 or later |
Four-Port 10-GbE Fiber LR Bypass* | FH7.6” | 410-00190-01 | NIC-1-010G-4LR-BP | 8.0 or later |
Four-Port 1-GbE Multimode Fiber SX | FHHL | 410-00122-01 | NIC-1-001G-4SX-BP | 8.1 or later |
*These NICs have an attached power connector cable that is not used in Riverbed appliances. Riverbed appliances are designed to fully power these NICs through the interface bus.
Interceptor 9800 supported slots
Interceptor 9800 supported NICs | Quantity | Supported slots |
100 GbE | 2 | 2, 4 (Two-Port 100-GbE cards are only supported in slot 2 and 4 due to their larger size.) When a 100-GbE card is installed in slot 2, slot 1 is unusable.
When a 100-GbE card is installed in slot 4, slot 5 is unusable. |
40 GbE | 2 | 2, 4 (Two-Port 40-GbE cards are only supported in slot 2 and 4 due to their larger size.) When a 40-GbE card is installed in slot 2, slot 1 is unusable.
When a 40-GbE card is installed in slot 4, slot 5 is unusable. |
10 GbE | 4 | 1, 2, 4, 5 (hardware restriction in slot 3 and slot 6). |
1 GbE SX | 4 | 1, 2, 3, 4, 5, 6 No slot restrictions. |
Interceptor 9800 supported NIC combinations and slot restrictions
Interceptor 9800 appliances support a maximum of four NICs (occupying slots 1, 2, 4, and/or 5) in the following combinations:
• 2 x 100-GbE NICs in slots 2 and 4. In this combination, slots 1 and 5 must be empty.
• 2 x 40-GbE NICs in slots 2 and 4. In this combination, slots 1 and 5 must be empty.
• 1 x 40-GbE NIC + 1 x 10-GbE NIC:
– 40-GbE NIC in slot 4 (slot 5 should be empty), then 10-GbE NIC can occupy either slot 1 or slot 2.
or
– 40-GbE NIC in slot 2 (slot 1 should be empty), then 10-GbE NIC can occupy either slot 4 or slot 5.
• 1 x 40-GbE NIC + 2 x 10-GbE NIC:
– 40-GbE NIC in slot 4 (slot 5 must be empty), then 2 x 10-GbE NIC can occupy slots 1 and 2.
or
– 40-GbE NIC in slot 2 (slot 1 should be empty), then 2 x 10-GbE NIC can occupy slots 4 and 5.
• 4 x 10-GbE NICs; slots 1, 2, 4, and 5.
• 3 x 10-GbE NICs; can occupy any three of slots 1, 2, 4, or 5.
• 2 x 10-GbE NICs; can occupy any two of slots 1, 2, 4, or 5.
• 1 x 10-GbE NIC; can occupy any one of slots 1, 2, 4, or 5.
• Multiple 1-GbE SX NICs can occupy any of slots 1, 2, 3, 4, 5, or 6 and be used in combination with all other NICS supported on the Interceptor 9800.
SteelCentral 4180, 8180, 4280, 8280, and 2280 slot restrictions
SteelCentral product | Slot restrictions |
SteelCentral AppResponse 4180 | Only install NICs in slots 2 and 3, populating slot 2 first. The appliance is equipped with preinstalled RAID cards. Do not move or remove the RAID cards located in slots 4, 5, and 6. |
SteelCentral AppResponse 8180 | You can install 1-GbE and 10-GbE NICs in slots 2 and 3, populating slot 2 first. For 40-GbE and 100-GbE NICs, the NIC must be installed in slot 2. Slot 3 can only be populated with a 1-GbE or 10-GbE NIC. The appliance is equipped with preinstalled RAID cards. Do not move or remove the RAID cards located in slots 4, 5, and 6. |
SteelCentral NetProfiler 4280 | The Two-Port Fiber Channel HBA (SAN) 4/8/16-GbE card must be installed in slot 2. |
SteelCentral NetProfiler 8280 EXP | The Two-Port Fiber Channel HBA (SAN) 4/8/16-GbE card must be installed in slot 2. |
SteelCentral Flow Gateway 2280 | You can install an additional two-port 10-GbE card in slots 2. |
Installing NICs in 2U xx80 and 9800 appliances
This section describes how to install NICs in SteelHead CX 5080 and CX 7080, Interceptor 9800, SteelCentral AppResponse 4180 and 8180, and SteelCentral NetProfiler 4280 and 4280-EXP appliances.
2U xx80 and 9800 slot and port numbering
On 2U xx80, and 9800 appliances, the NIC riser assembly attaches to the motherboard between the two columns of slots. When facing the rear of the chassis:
• slots 1 to 3 are on the left, the port numbering for these cards ascends from right to left.
• slots 4 to 6 are on the right, the port numbering for these cards ascends from left to right.
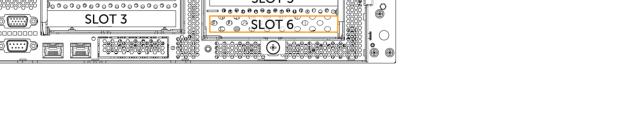
The slot and port numbering for xx80 and 9800 appliances is shown in
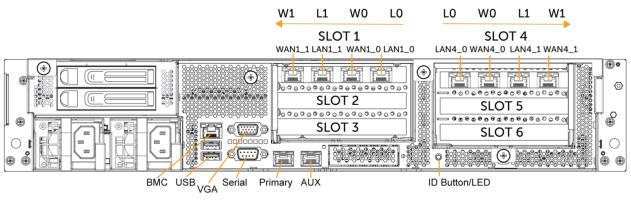
Figure: Slot locations and port numbering for 2U xx80 and 9800 appliances. The interface names are a combination of slot and port number. For example, the interface names for slot 4, from left to right, are LAN4_0, WAN4_0, LAN4_1, WAN4_1.
Slot locations and port numbering for 2U xx80 and 9800 appliances
Installing NICs in 2U xx80 and 9800 appliances
This section describes how to install NICs in SteelHead CX 2U xx80, SteelCentral 2U xx80, and Interceptor 9800 appliances.
To install or replace a NIC
1. Power down the appliance.
2. Remove the power supply cord.
3. Remove the cables connected to the appliance.
For appliances with storage units attached (that is, the SteelCentral AppResponse 8180), disconnect the SAS cables to the RAID cards and note the location of the cards.
4. Remove the appliance from the mounting rack, if necessary.
Removing the cover on the 2U appliance
Lifting the riser brackets out of the chassis

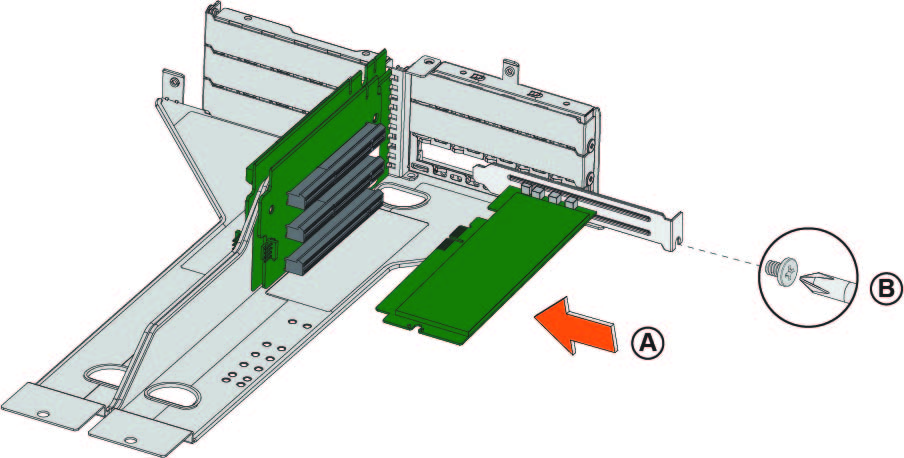
Removing the dummy bracket
10. Hold the new card between the front bezel and the rear of the card to avoid ESD damage.
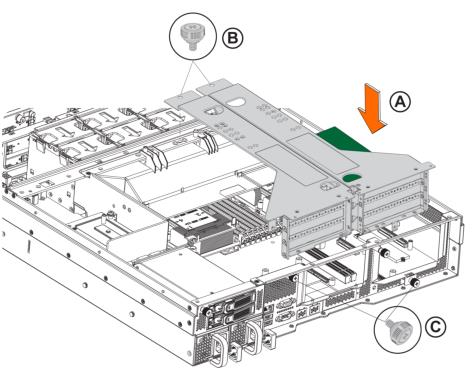
Installing the PCI riser assembly
Replacing the riser bracket in the chassis
15. Connect the cables.
For appliances with storage units attached (that is, the SteelCentral AppResponse 8180), reconnect the SAS cables to the same RAID cards prior to replacement.
16. Connect the power cords.
17. Power up the appliance and check the status lights.
To verify SteelHead NICs
1. Connect to the SteelHead CLI.
For detailed information, see the Riverbed Command-Line Interface Reference Manual.
2. Enter enable mode. At the system prompt, enter the following command:
amnesiac > enable
amnesiac #
3. Verify that the add-on card is correctly installed.
For example, to verify the add-on cards on a SteelHead, at the system prompt enter the following command:
amnesiac # show hardware all
Enter the in-path reset-iface command in configuration mode in the CLI to reset the main interface and recognize all ports.
Installing QAT Compression/Acceleration cards in CX 7080-B030 appliances
SteelHead 9.9.2 or later supports QAT Compression/Acceleration cards in slot 6 on CX 7080-B030 appliances.
Before you install the QAT card, make sure you are running the correct BIOS (v34) and BMC (v20) versions on your appliance. If you aren’t running the correct BIOS and BMC versions a kernel crash might occur.
To upgrade the BIOS and BMC, you connect to the appliance CLI in configuration mode and run the RFUT utility contained within the SteelHead 9.9.2 software image.
To upgrade BIOS and BMC on the CX 7080-B030
1. Upgrade your SteelHead CX 7080-B030 appliance to version 9.9.2. For details, see the SteelHead Installation Guide.
2. Connect to the SteelHead CLI in configuration mode. For details, see Riverbed Command-Line Interface Reference Manual
3. Run the following commands:
hidden-mode
hardware enable rfut
reload
The RFUT utility reloads the appliance, upgrades the BMC on the next initialization and then automatically reboots the appliance. It upgrades the BIOS on the next initialization and automatically reboots the system again. The progress is displayed on the serial console. After the system has completed all of the necessary upgrades, the SteelHead Management Console or CLI is available.
To install the QAT card in CX 7080-B030 appliances
1. Shut down the appliance using the SteelHead Management Console. Choose Administration > Reboot/Shutdown > Shutdown.
2. Power off the appliance.
3. Remove power cords and other cables connected to the appliance.
4. Remove the appliance cover. For details, see
Step 5.
6. Hold the QAT card between the front bezel and the rear of the card to avoid ESD damage.
7. Align and insert the QAT card into the riser connector in slot 6 and secure the bracket screw.
8. Reinstall the riser back to the unit and secure all the screws. For details, see
Step 12.
9. Install the cover and secure all the screws. For details, see
Step 5.
The QAT card installed in slot 6
10. Restore the power connection and other cabling.
11. Power on the appliance.
12. Connect to the SteelHead CLI in enable mode to verify the card.
13. At the system prompt, enter the following command:
amnesiac # show hardware all
Slot 6: .......... Intel QAT Accelerator Card, 410-00246-01
Identifying interface names
The interface names for the NICs vary according to the product.
Product | Interface names |
SteelHead and Interceptor | In the product UI and the CLI, the interface names are a combination of the slot number and the port pairs: (lan<slot>_<pair>, wan<slot>_<pair>). See
Figure: The interface names for the NICs vary according to the product. for 2U card labeling and numbering. |
SteelCentral AppResponse | The interface name is a combination of the slot number and the port number within the slot: monNN_MM. Where NN is the slot number and MM is the port number within the slot. The port number is named from left to right, starting with 0. For example, mon2_0 is the left-most interface of a NIC installed in slot 2. |
SteelCentral NetProfiler | The SCNP-04280 and SCNP-04280-EXP appliances do not have interface names. |
SteelCentral Flow Gateway | You can install an additional two-port 10-GbE card in the SCFG-02280 appliance. The two ports are named, from left-to-right: primary and aux. These ports replace the on-board ports with the same name. |
SteelCentral NetExpress | The interface names are a combination of the slot number and the port pair (mon<slot>_<pair>). |