Upgrading the SteelHead Software
This chapter describes how to install the software image to upgrade your SteelHead appliance to a SteelHead SD appliance. It includes these sections:
Requirements and prerequisite tasks prior to upgrading
Make sure you follow these requirements before you begin the in-field upgrade process:
•Downgrading from a SteelHead SD to a SteelHead isn’t supported. The SteelHead SD installer removes all the existing partitions and installs a new SteelHead SD product image.
•Only SteelHead SD CX570, CX770, and CX3070 appliances are qualified for in-field upgrades.
•Upgrading from SteelHead to SteelHead SD requires the RiOS 9.8.1-sd1 virtual SteelHead (vSH) image. The 9.8.1-sd1 vSH image is contained within the SteelConnect 2.12 image. The supported SteelHead to SteelHead SD upgrade paths are summarized in this table.
My SteelConnect Manager is running | In-field upgrade I must use | My SteelHead must start at | My SCC must be running |
2.11.x | 9.7.1a-sd2-in-field-upgrade1 (2.11.0 with SteelHead 9.7.1a) | 9.6.1, 9.6.2, 9.6.2a, 9.7.1 | 9.7.1 or 9.9.0 and later |
2.12.x | 9.8.1-in-field-upgrade1 (2.12.0 with SteelHead 9.8.1-sd1) | 9.6.1, 9.6.3
9.7.1, 9.7.1b
9.8.0, 9.8.1 | 9.9.0 and later |
•We strongly recommend you use the SCC for in-field upgrades. If you aren’t currently running an SCC to manage your network, consider purchasing the SCC or obtaining an SCC evaluation before you begin the upgrade process. The SCC must be running version 9.9.0.
My SteelHead is running | My SCC must be running |
9.7.1a | 9.7.1, 9.8.0, 9.9.0 and later |
9.8.1-sd1 | 9.8.0, 9.9.0 and later |
9.9.0 and later | 9.9.0 and later |
•If the SCC isn’t an option and you use the SteelHead Management Console to download the image, you can’t download the image from a local file due to image size limitations. We recommend you use the secure copy protocol (SCP) to download the image. It can take up to 3.5 hours to download the image to a client on the LAN using SCP. For details on downloading the image using SCP, see
To install the image using the SteelHead Management Console.
•You can also use the SteelHead CLI to download and install the image for individual SteelHead appliances. If you use the CLI, you can download the image, save it, and install it later. If you use the SteelHead Management Console GUI to download and install the image, you don’t have the option to install the image later—the download and installation can’t be interrupted. For details on downloading and installing images using the CLI, see
To install the image using the CLI.
•Any interim firewalls must be configured to allow traffic on ports 80 and 443 so that the software installation and SCM operations aren’t blocked. (Also any additional firewall configurations must allow traffic to and from the SteelHead appliance that is being upgraded.)
•In addition to the SteelHead serial number, SteelHead SD requires the SteelConnect serial number. The SteelConnect serial number always begins with the prefix XN. The serial numbers are in the email from Riverbed that you received when your sales order was confirmed. For details, see
SteelConnect SD-WAN service licensing.
•Your SteelHead configuration must be backed up or saved and copied to an external machine, preferably using the SteelCentral Controller for SteelHead (SCC), prior to starting the upgrade process. The in-field upgrade process reimages the appliance and saves static network uplink settings, the SteelHead serial number, and secure vault settings. The SCC resets the admin user password to the default value, the secure-vault password is retained, and other user permission and passwords can be restored by the SCC. For details, see
Backing up your SteelHead configuration.
•Prior to performing the software upgrade, make sure the SteelHead hardware has been upgraded with the additional required memory. For details regarding upgrading the hardware, see
Upgrading the appliance memory.
•Perform the installation during off-peak hours or a maintenance window so that the entire upgrade process can complete. The upgrade image is 2.5 GB. This can take up to 3.5 hours depending on latency.
•If you have low-bandwidth or a high-latency connection to the SteelHead during the SCC image push, increase the timeout period from the default of three hours. (During SCC image pushes, RiOS is still running so you can make CLI changes.) You can override the timeout on the SCC CLI using this command:
cmc upgrade timeout <timeout-in-seconds>
Bandwidth (kbps) | Latency (ms) | Time to download | Recommended timeout |
10000 | 40 | 45 minutes | Default |
5000 | 40 | 1 hour 10 minutes | Default |
2000 | 40 | 2 hours 45 minutes | 4 hours |
1500 | 40 | 3 hours 35 minutes | 5 hours |
•Upgrades aren’t supported via an upstream proxy. An alternate network solution to bypass any intermediate proxies is required.
•Cloud Accelerator (SaaS) settings aren’t restored from the SCC backup configuration after upgrading the software. You must manually reenable SaaS cloud acceleration manually and reconfigure all settings using SCC CLI pushes as described in comments or manually reconfigure the settings on each SteelHead appliance after you have completed the upgrade process. For details, see
Restoring Service Cloud Accelerator registration and application settings.
•After upgrading, SteelHead SD appliances will be set to the default admin password (password). You must reconfigure the admin password for the virtual SteelHead and update the stored password on the SCC.
DHCP versus static IP
If you are using DHCP for uplink IP addresses, no additional configuration is needed. SteelConnect will use DHCP to obtain the system primary IP address. After the new image is downloaded and reflashed, the appliance reboots and acquires a temporary WAN IP address via DHCP for communication over the internet. It then contacts SCM and the Riverbed licensing servers to download certificates and complete the installation as a SteelHead SD appliance.
DHCP communication

For a non-DHCP site, the software saves and reuses the SteelHead in-path interface IP address. After the new image is downloaded and reflashed, the appliance reboots and uses this saved IP address for communication over the internet.
Prior to upgrading, you must have at least one SteelHead in-path interface that has an IP address that can reach the internet. You must also preconfigure the default gateway and DNS server on the SteelHead and in SCM before beginning the software upgrade process. In addition, at least one uplink interface (that is, WAN0_0, WAN0_1, WAN3_0, WAN3_1) must have internet connectivity. For details, see
Preconfiguring the SteelHead if you are using a static IP address.
If your network uplinks use DHCP, choose the DHCP option; it is the easiest. The preconfiguration settings aren’t necessary if you use DHCP and the SCC to upgrade and manage your SteelHead SD appliances.
Network design prerequisites
Make sure that you understand that the conversion transforms the SteelHead appliance from a Layer 2 WAN optimization device to a SteelHead SD Layer 3 device. For details, see
Transforming your SteelHead network.
Keep in mind that you shouldn’t make any router changes prior to completing the in-field upgrade process. If you have a CE router in your network, it must stay in place until the full software upgrade is completed. The SCM and SCC must communicate with the SteelHead during the upgrade process as well as obtain configuration settings and restore the configuration after the conversion. Basically, there are two approaches to conversion:
•Convert SteelHead to SteelHead SD with no changes to ensure successful conversion occurs and the network working.
•Optionally, remove the CE router from your network and put the SteelHead SD at the edge and use it as a CE router. If you choose this option, it involves SCM changes and a cable change. For details, consult with your Riverbed sales engineer or Riverbed Professional Services at
http://www.riverbed.com/services/index.html.
Network example #1
This is the ideal conversion scenario in that it allows you to keep the innermost LAN client systems untouched (that is, the LAN clients and LAN router is kept on same subnet) and it doesn’t involve disruptions to the CE router or the WAN-side of the network.
Network example #1

1. You change the subnet between the LAN router and the SteelHead SD before the upgrade process, otherwise, you won’t be able to reach the LAN router.
2. Before completing the in-field upgrade process, you configure the virtual SteelHead inpath0_0 interface using the SteelHead Management Console or the SCC to be within the new small subnet created between the LAN router and the converted SteelHead SD appliance. For details, see “Configuring WAN optimization on the virtual SteelHead” in the SteelHead SD Installation Guide.
3. After completing the in-field upgrade, you must make a LAN router change that can be performed remotely that is minimally disruptive and low risk. For details, consult with your Riverbed sales engineer or Riverbed Professional Services at http://www.riverbed.com/services/index.html.
Network example #2
In this scenario, the clients, SteelHead SD, and router all share the same network where the SteelHead SD acts as a Layer 2 bridge between the clients and the router.
Network example #2

1. After completing the in-field upgrade, SteelHead transitions to SteelHead SD by changing the client LAN subnet. You configure the SteelHead SD LAN zone subnet in SCM. There are no changes on the CE router. For details on configuring the LAN zone, see the SteelHead SD Installation Guide.
2. After you complete the in-field upgrade, you manually configure an inpath0_0 interface and default gateway to match the new LAN subnet in the SteelHead Management Console or the SCC. For details, see “Configuring WAN optimization on the virtual SteelHead” in the SteelHead SD Installation Guide.
3. Optionally, the SteelHead SD can become the DHCP server for the LAN-side of the network. For example, you might have a preexisting DHCP server you want to keep using. You can also remove the DHCP service from some other device (for example, the CE router or another stand-alone server) and configure SteelHead SD to handle this role.
Backing up your SteelHead configuration
Your SteelHead configuration must be backed up (or saved and copied) to an external machine, prior to starting the upgrade process.
We recommend you do not use the SteelHead Management Console to upgrade your software. The in-field upgrade process reimages the appliance and saves static network uplink settings, the SteelHead serial number, and secure vault settings. Only the SCC resets the admin user password to the default value, the secure-vault password is retained, and other user permission and passwords can be restored by the SCC.
To back up your configuration using the SCC
•To back up your system and SteelHead appliances from the SCC, choose Manage > Operations: Backup/Restore to back up your configuration. For details, see the SteelCentral Controller for SteelHead User Guide.
The backup/restore process in the SCC doesn’t automatically restore the license keys. To ensure you have a backup of your license keys, you can create a SCC policy that contains the backed-up license keys prior to the upgrade and then push the policy after upgrade. The virtual SteelHead should perform autolicensing after the upgrade, if it doesn’t either push the policy you created or go to the Riverbed Licensing Portal at https://licensing.riverbed.com/ and follow the instructions for retrieving your licenses.
To save your configuration using the SteelHead Management Console
•To save your SteelHead configurations from the SteelHead Management Console, choose Administration > System Settings to save and copy your configuration to a local machine. For details, see “Managing configuration files” in the SteelHead User Guide.
Upgrading software using the SCC
To perform the in-field software upgrade using the SCC, you must be running SCC 9.9.0 or later.
My SteelHead is running | My SCC must be running |
9.7.1a | 9.7.1, 9.8.0, 9.9.0 and later |
9.8.1-sd1 | 9.8.0, 9.9.0 and later |
9.9.0 and later | 9.9.0 and later |
The SteelHead must be entitled before you begin the software upgrade to SteelHead SD. An entitled SteelHead is an appliance that is eligible for an in-field software upgrade using the SCC wizard. You must have already purchased the SteelHead to SteelHead SD license and have received the serial number that begins with XN for the appliance. The SCC will verify whether an appliance is eligible or ineligible when you select appliances in the wizard based on the model, the amount of memory in the appliance, and its entitlement status.
The only SteelHead models that can be upgraded are the Low/Medium/High versions of CX570, CX770, or CX3070 appliances. Make sure you have added additional memory before you begin the in-field software upgrade. For details, see
Upgrading the appliance memory.
You must have a DNS record for riverbedcmc in the DNS server used by the SteelHead appliance during conversion. The riverbedcmc DNS entry points to the IP address of the SCC that is handling the SteelHead SD upgrade process. This DNS entry is required for the SCC in-field upgrade wizard to restore your SteelHead configuration back to the new SteelHead SD virtual SteelHead (vSH) after the software upgrade is complete. If that DNS name doesn’t resolve, it must be configured manually via the CLI on the primary IP address.
How does the upgrade work on multiple SteelHeads
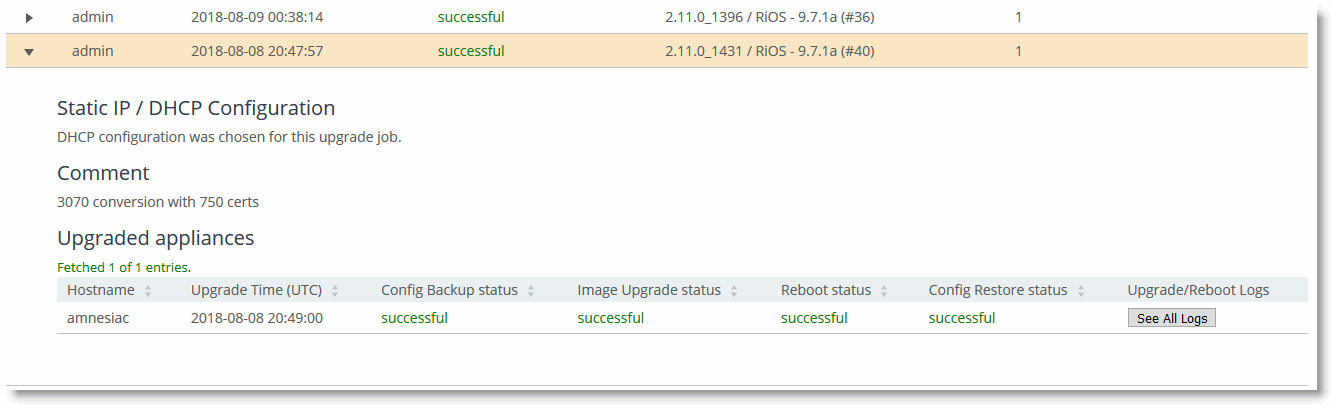
If there are multiple appliances being upgraded in the same job, they are run in parallel. If one fails, the remaining in-field upgrades continue to run. If a single task within a specific appliance upgrade fails, subsequent tasks don’t run. For example, if you are upgrading SteelHead1 and SteelHead2 in a single job, both start with the Config Backup task. If the backup fails for SteelHead1, its remaining tasks (Image Upgrade, Reboot, Config Restore) abort, but SteelHead2 continues on to the Image Upgrade task after its Config Backup task completes successfully.
For details on backing up your configuration, see
Backing up your SteelHead configuration.
To install your software using the SCC
1. Choose Manage > Upgrades > In-Field Upgrades to display the Upgrade SteelHead to SteelHead SD page.
Upgrade SteelHead to SteelHead SD page

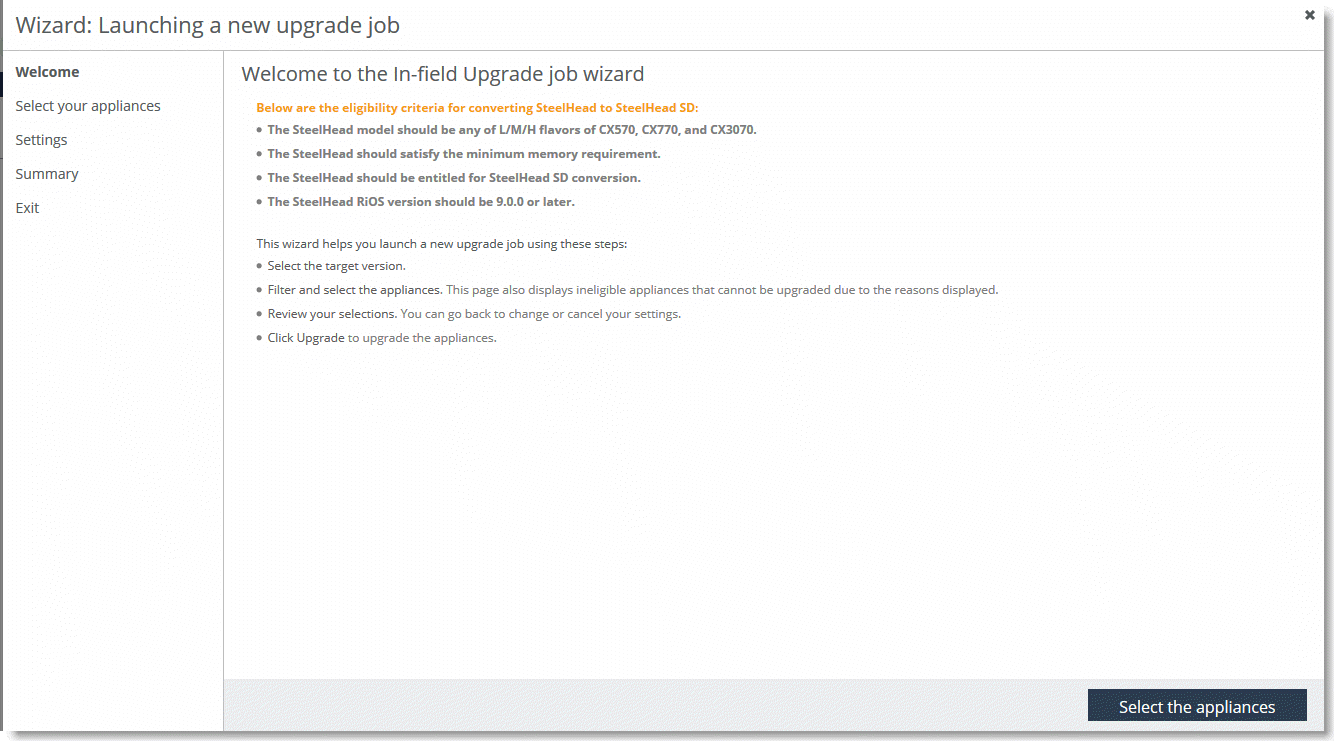
2. Click Launch new in-field Upgrade job to display the welcome page of the wizard.
Welcome page
3. Click Select the appliances to display the Launching SteelHead SD upgrade job page.
Selecting the target version and appliances
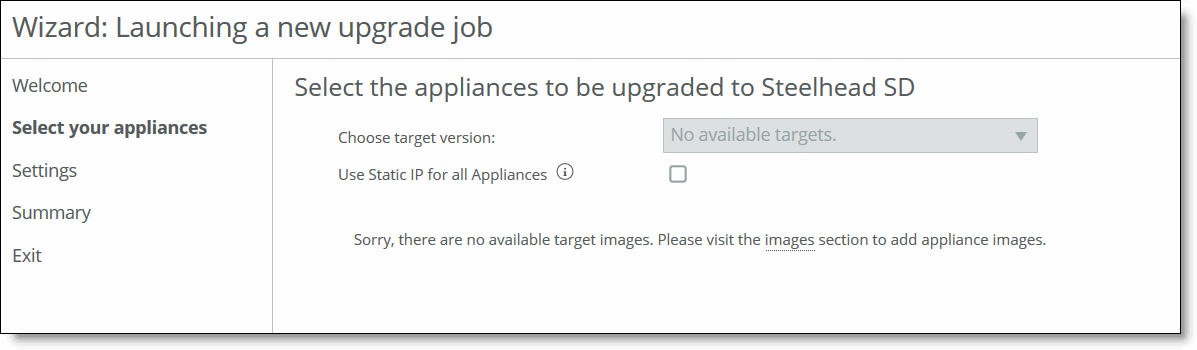
4. Choose the SteelHead SD target image from the drop-down list. If there are no target images available, you are directed to the Local Images page to install the software image. You can select all appliances or you can filter appliances by:
–Hostname
–Current version
–Group
–IP address
–Model
–Serial number
5. In the drop-down list, select View Selected Appliances to display the filtered appliances. Select Return to eligible appliances to display the eligible appliances again.
6. Select the Use Static IP for all Appliances check box to use a static IP address for the selected appliances in networks where a DHCP server isn’t available.
We recommend you use the DHCP server when you are upgrading SteelHeads to SteelHead SD. With a network running a DHCP server, you don’t have to preconfigure the SteelHeads or SCM. If your network isn’t running a DHCP server, you can use a static IP address, but you must preconfigure these in-path IP addresses, gateways, and DNS servers on the SteelHead appliances and in SCM before beginning the in-field upgrade process. At least one WAN uplink interface (for example, WAN0_0, WAN0_1, WAN3_0, WAN3_1) must have internet connectivity.
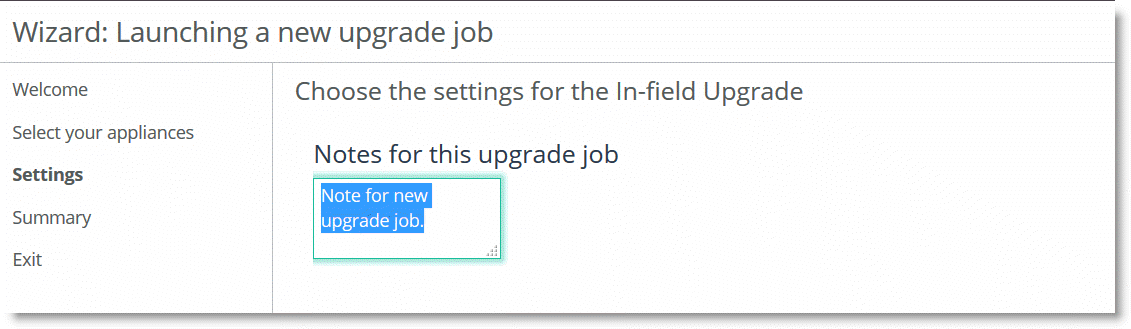
7. Click Configure Settings to display the Settings page. You can provide upgrade notes for the upgrade appliances to assist you in tracking the in-field upgrade job.
Notes for upgrade job
8. Click Summary to display the upgrade summary page.
Displaying summary information

9. Click Upgrade to begin the upgrade operation and display the Exit page, which displays exit information including the time for the upgrade process.
Launching the upgrade job
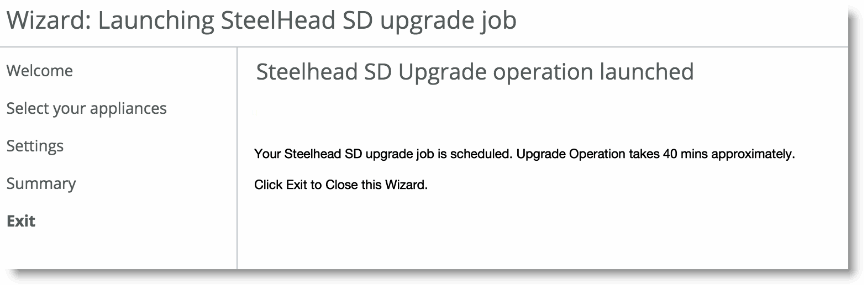
10. Click Exit to close the wizard.
After the image downloads and installs, the appliance reboots. After reboot, the appliance goes through the install steps referenced earlier. When the appliance is up and the virtual SteelHead service is started, it connects to the SCC again and restores its previous configuration, minus its IP address information.
Successful upgrade
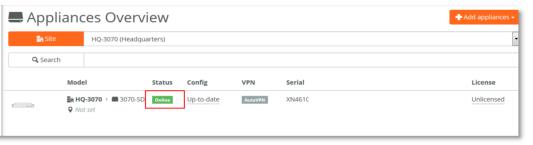
11. After installing the software, connect to SCM and choose Appliances > Overview. You will see the new SteelHead SD listed with status Firmware Upgrade. After the system finishes the upgrade process, the status changes to Online.
Appliance online

After you the firmware has updated and is online, you must complete the steps to enable WAN optimization in both SCM and on the virtual SteelHead. For details, see
What’s next.
Restoring Service Cloud Accelerator registration and application settings
Service Cloud Accelerator (SCA) settings aren’t restored from the SCC backup configuration after upgrading the software. You must reenable cloud acceleration manually and reconfigure all settings using SCC CLI pushes.
You can’t push the CLI commands from a single policy push. You must individually push each of these CLI commands:
•To register with SCA:
service cloud-accel register
•To enable SCA:
service cloud-accel register
•To enable application control:
service cloud-accel platforms appid <appname> enable
For details on creating policies, see the SteelCentral Controller for SteelHead User Guide.
Upgrading software using the SteelHead Management Console
We strongly recommend that you use the SCC to manage the WAN optimization features in your SteelHead SD appliances. Although you can use the SteelHead Management Console or the CLI to configure individual SteelHead SD appliances, managing complex network deployments without the SCC is strongly discouraged.
My SteelConnect Manager is running | In-field upgrade I must use | My SteelHead must start at | My SCC must be running |
2.11.x | 9.7.1a-sd2-in-field-upgrade1 (2.11.0 with SteelHead 9.7.1a) | 9.6.1, 9.6.2, 9.6.2a, 9.7.1 | 9.7.1 or 9.9.0 and later |
2.12.x | 9.8.1-in-field-upgrade1 (2.12.0 with SteelHead 9.8.1-sd1) | 9.6.1, 9.6.3
9.7.1, 9.7.1b
9.8.0, 9.8.1 | 9.9.0 and later |
My SteelHead is running | My SCC must be running |
9.7.1a | 9.7.1, 9.8.0, 9.9.0 and later |
9.8.1-sd1 | 9.8.0, 9.9.0 and later |
9.9.0 and later | 9.9.0 and later |
You can lose all your configuration settings during the upgrade process if you use the SteelHead Management Console to upgrade your software. You must save and copy the SteelHead configuration prior to upgrading the software. For details, see
Backing up your SteelHead configuration.
If you use the SteelHead CLI to download and install the image, you can download the image, save it, and install it later. If you use the SteelHead Management Console GUI to download and install the image, we recommend you install the image using the secure copy protocol (SCP). The download and installation can’t be interrupted. In slow internet environments, it can take up to 3.5 hours to install the image using SCP.
During the upgrade process using the SteelHead Management Console, a timeout can occur due to the length of time it takes for the image to download and install compared to a regular RiOS upgrade. The message "Image install of 'image.img' is in progress" appears, indicating that you can’t initiate another upgrade action while the current upgrade is in progress. For details on extending the timeout period, see
Requirements and prerequisite tasks prior to upgrading.
Preconfiguring the SteelHead if you are using a static IP address
If you are using the SteelHead Management Console to install the image, prior to upgrading, you must have at least one SteelHead in-path interface that has an IP address that can reach the internet. You must also preconfigure the default gateway and DNS server on the SteelHead and in SCM before beginning the software upgrade process. In addition, at least one uplink interface (for example, WAN0_0, WAN0_1, WAN3_0, WAN3_1) must have internet connectivity.
Configuring the SteelHead MOTD
You must set the message of the day (MOTD) to SHSD_STATIC before you configure the DNS settings, inpath0_0 interface, and the default gateway. If you don’t set the MOTD to SHSD_STATIC the in-field upgrade process will not complete properly.
To configure the MOTD
1. Connect to the SteelHead Management Console. For details, see the SteelHead User Guide.
2. Choose Administration > System Settings: Announcements.
3. Type SHSD_STATIC in the MOTD text box and click Apply.
Adding a string to the MOTD
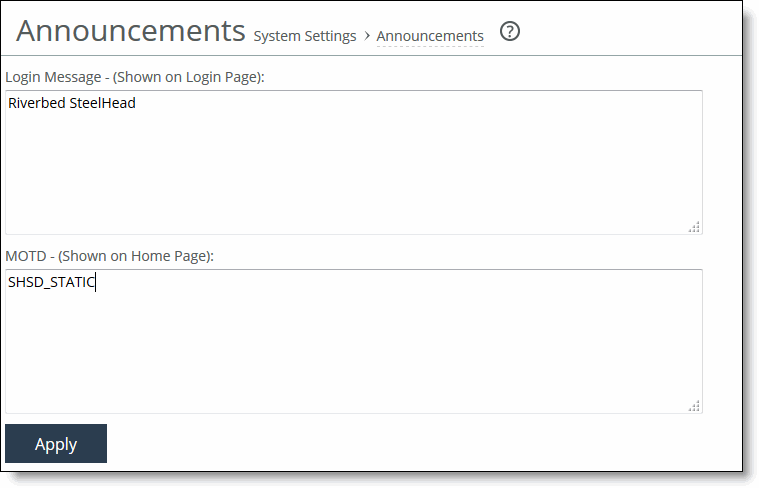
4. Click Apply to apply your changes to the running configuration.
5. Click Save to Disk to save your settings permanently.
Configuring the DNS name server to reach SCM
On the SteelHead, you must ensure the DNS server resolves to an internet IP address that is internet reachable via the LAN uplink set in SCM.
To configure the DNS name server to reach SCM
1. Connect to the SteelHead Management Console. For details, see the SteelHead User Guide.
2. To configure the DNS name server, choose Networking > Networking: Host Settings.
Configuring DNS
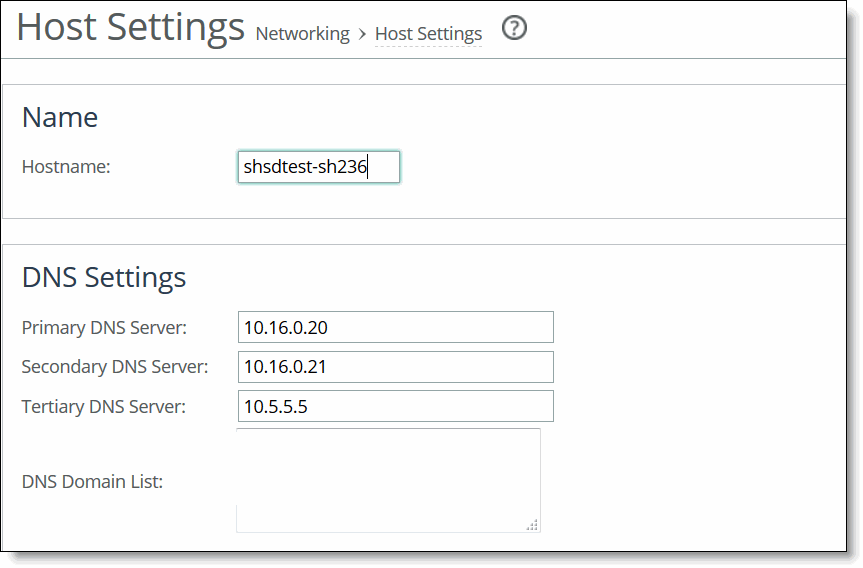
3. Under DNS Settings, complete the configuration as described in this table.
Control | Description |
Primary DNS Server | Specify the IP address for the primary DNS name server. The DNS server must resolve to and internet IP address that is internet reachable via the LAN uplink set in SCM. Starting with RiOS 9.5, IPv6 addresses are allowed. |
Secondary DNS Server | Optionally, specify the IP address for the secondary name server. Starting with RiOS 9.5, IPv6 addresses are allowed. |
Tertiary DNS Server | Optionally, specify the IP address for the tertiary name server. Starting with RiOS 9.5, IPv6 addresses are allowed. |
DNS Domain List | Specify an ordered list of domain names. If you specify domains, the system automatically finds the appropriate domain for each of the hosts that you specify in the system. |
4. Click Apply to apply your changes to the running configuration.
5. Click Save to Disk to save your settings permanently.
Configuring the inpath0_0 interface and default gateway on the SteelHead
You configure the in-path interface and the default gateway with the static IP address that you will use for uplinks (for example, inpath0_0 for WAN0_0 uplink, inpath0_1 for WAN0_1 uplink, and so forth).
•You configure the inpath0_0 interface to point to the WAN uplink you configured in SteelConnect (for example, WAN0_0 uplink or WAN0_1 uplink).
•You configure the in-path default gateway to point to the zone gateway IP address in SteelConnect.
An in-path interface that isn’t configured will result in the corresponding uplink being configured as DHCP in SCM.
To configure the inpath0_0 interface and default gateway on the SteelHead
1. Connect to the SteelHead Management Console. For details, see the SteelHead User Guide.
2. Choose Networking > Networking: In-Path Interfaces to display the In-Path Interfaces page.
Configuring in-path interfaces
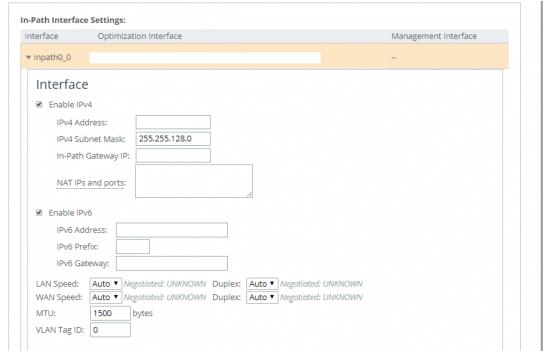
3. Under In-Path Interface Settings, select the inpath0_0 interface name.
4. Complete the configuration as described in this table (depending on the IP version).
Control | Description |
Enable IPv4 | Select this check box to assign an IPv4 address. You can only assign one IPv4 address per in-path interface. Note: The primary and in-path interfaces can share the same subnet. The primary and auxiliary interfaces can’t share the same network subnet. To remove an IPv4 address, clear this check box and click Apply. |
IPv4 Address | Specify an IP address. This IP address is the in-path address for the WAN uplink on SteelConnect. |
IPv4 Subnet Mask | Specify the subnet mask. |
In-Path Gateway IP | Specify the IP address for the in-path default gateway. This is the in-path default gateway to point to the zone gateway IP address in SteelConnect. |
5. Click Apply to apply your changes to the running configuration.
6. Click Save to Disk to save your settings permanently.
Installing the image using the SteelHead Management Console
If you are using the SteelHead Management Console to install the image, we recommend you install the image using SCP. The download and installation can’t be interrupted. In slow internet environments, it can take up to 3.5 hours to install the image using SCP. You can also use HTTP or FTP to download the image to the appliance if the upgrade image is hosted on a local server.
These instructions describe how to install the image using SCP.
To install the image using the SteelHead Management Console
1. Prior to installing the image, we recommend you set up a free an SCP server, using one of these options:
–For Windows: https://winscp.net/eng/docs/guide_windows_openssh_server
–For Linux: https://help.ubuntu.com/lts/serverguide/openssh-server.html
2. Connect to the SteelHead Management Console. For details, see the SteelHead User Guide.
3. Choose Administration > Maintenance: Software Upgrade.
4. Type the SCP URL in the From URL text box in the format scp://username:password@host/path. You must use SCP to download the image. The download can take up to 3.5 hours.
Installing the image via a URL

5. Click Install.
The software image is downloaded and installed on the other partition with RiOS still running on the appliance. The installer doesn’t reboot the appliance. Thus, you can stop the upgrade process at this step and retain your original SteelHead image and configuration settings.
6. Choose Administration > Maintenance > Reboot/Shutdown.
7. Click Reboot. The appliance will reboot into the SteelHead SD installer to install the product image. The installation takes approximately 20 minutes.
Tip: To view the progress of the installation, connect the serial port to a terminal server (baud rate: 9600 bps; login: admin; password: riverbedAlmanor).
8. After installing the software, connect to SCM and choose Appliances > Overview. You will see the new SteelHead SD listed with status Firmware Upgrade. After the system finishes the upgrade process, the status changes to Online.
Appliance online
9. After the firmware has updated and is online, you must complete the steps to enable WAN optimization in both SCM and on the virtual SteelHead. For details, see
What’s next To install the image using the CLI
1. Log in to the CLI. For details, see the Riverbed Command-Line Interface Reference Manual.
2. Enter configuration mode. For details, see the Riverbed Command-Line Interface Reference Manual.
hostname (config) #
3. To fetch the image using SCP, run these commands:
hostname (config) # image fetch ?
<http, ftp, or scp URL (e.g. scp://username:password@host/path)>
hostname (config) # image fetch scp://username:password@host/path
4. To upgrade the image, run this command:
hostname (config) # image upgrade <image filename>
What’s next
The next tasks for configuring your SteelHead SD are outlined in “Installing SteelHead SD,” in the SteelHead SD Installation Guide:
These tasks are required for the SteelHead SD to contact SCM for the first time and for WAN optimization to function properly:
•Configuring the primary and LAN ports.
•Configuring the in-path interface.
•Identifying the in-path gateway IP address.
•Identifying the primary IP address of the SteelHead.
•Configuring SteelConnect to act as DHCP server.
•Enabling WAN optimization in SCM.
•Configuring WAN optimization on the virtual SteelHead.
Troubleshooting
This section describes some basic troubleshooting procedures.
Insufficient memory or unsupported model
An error is displayed stating that the upgrade isn’t supported if the appliance doesn’t have enough system memory, the memory upgrade hasn’t been performed, or the image is installed on a nonsupported SteelHead model. This error can also occur if the memory isn’t seated properly in the appliance. If so, open the appliance and make sure that each memory module is seated firmly in the slots and that the white ejector tabs are in the upright locked position.
Firmware upgrade error
If you have multiple site level DNS addresses configured at the site level, the firmware download might fail on SteelHead SD appliances. We recommend that you have only one DNS IP address defined when you configure a site in SCM. A single-site level DNS configuration resolves both SCM and the upgrade image hostname. If you encounter this error, make these configuration changes in SCM and retry firmware upgrade. If the upgrade continues to fail, contact Riverbed Support at https://support.riverbed.com.
Downgrade check
If a software downgrade is attempted or when the upgrade image version is lower than the currently running RiOS version, an error is displayed. For details on supported upgrade paths, see
Requirements and prerequisite tasks prior to upgrading.
Image download or installation failure
If a failure occurs during the image download or installation (prior to reboot), the download can be reattempted.
SteelHead SD installer failure
If a failure happens after the system has already booted to the SteelHead SD installer and the partitioning has been done, the appliance will have to be USB remanufactured. Contact Riverbed Support at https://support.riverbed.com.
Can’t generate config error
Typically, this error occurs when assignments are missing in SteelConnect. For example in SCM, make sure the uplinks are assigned and the ports are enabled for the appliance.
DNS error
If a DNS for the URL is displayed, the uplink interface might be in the process of changing or updating the configuration; wait two or three minutes and retry.
Upgrade failed
1. If the appliance appears in SCM, but it says “upgrade failed,” wait a few minutes, then choose Appliances > Overview.
2. Select the appliance and Actions > Retry Upgrade. This action triggers a download of the upgrade firmware and possible a reboot, if necessary. It typically clears the error.
If the appliance doesn’t come online
Perform the following tasks:
1. Check network cabling.
2. Connect to the appliance via the console port using a serial cable (baud rate: 9600 bps). Log in as administrator user (admin) and enter the default password (riverbedAlmanor). Select the Troubleshooting menu option and view the boot status in cloud-init and console messages.
3. Verify network connectivity to transition IP addresses (static IP or DHCP) for uplink interfaces.
4. Reboot or restart using the setupd command.
License server errors
•If there is an error connecting to the license server or the license server returns an HTTP error status, make sure you have connectivity to the internet. If you have internet connectivity and automatic licensing continues to fail, go to the Riverbed Licensing Portal at https://licensing.riverbed.com/ and follow the instructions for retrieving your licenses.
•If you have a successful HTTP status but an error is returned in the serial number query. This error means that the appliance isn’t entitled for a SteelHead SD in-field upgrade because the SCC checks for entitlement status prior to the upgrade process. Typically, you only get into this state if you manually upgrade the software using the SteelHead Management Console. Contact Riverbed Support at https://support.riverbed.com.
The certificate from license server doesn’t match the private key
If an error is displayed stating that there is no valid certificate. This means that the appliance entitlement certificate is out of date and the certificate on the license server needs to be validated. Contact Riverbed Support at https://support.riverbed.com.
Cannot log in after converting the appliances
After upgrading, SteelHead SD appliances will be set to the default admin password (password). You must reconfigure the admin password for the virtual SteelHead and update the stored password on the SCC.