Installing SteelHead-v on Cisco ENCS
SteelHead-v is supported on the Cisco Enterprise Network Compute System (ENCS) hypervisor. See Third-party software dependencies for details. For detailed information about ENCS, see the Cisco ENCS documentation.
Cisco Enterprise Network Compute System (ENCS) is a line of compute appliances designed for the Cisco SD-Branch and Enterprise Network Functions Virtualization (ENFV) solution. Cisco SD-Branch is a hosting platform designed for the enterprise branch edge. The platform provides a virtual environment that enables the automated deployment of virtual network services consisting of multiple virtualized network functions (VNFs). Using the platform, administrators can leverage the flexibility of software- defined networking (SDN) capabilities to service chain VNFs in a variety of ways. Cisco SD-Branch is comprised of these components:
• ENCS physical x86 hardware that provides compute resources to back the virtual layers.
• Network Function Virtual Infrastructure Software (NFVIS) platform that facilitates the deployment and operation of VNFs and hardware components.
• An orchestration environment to allow easy automation of the deployment of virtualized network services, consisting of multiple VNFs.
In this context, SteelHead-v serves as a VNF running as virtual appliance on NFVIS. In-path deployments and out-of- path deployments using WCCP and PBR are supported. While SteelHead-v can be deployed in different locations in a topology depending on your needs, the procedures in this chapter focus on an in-path deployment. After you understand the underlaying concepts, you will be able to design and execute different kinds of deployments.
SteelHead-v supports paravirtualized device drivers and Single Root Input/Output Virtualization (SR-IOV). See Appendix: SteelHead-v and SR-IOV. However, the Cisco 5000 series ENCS does not support SR-IOV ports in promiscuous mode. The virtual switches that connect the physical host’s ports to the SteelHead-v LAN and WAN interfaces must be configured to use promiscuous mode to ensure all traffic reaches the SteelHead-v. Therefore, the SteelHead-v LAN and WAN interfaces cannot leverage SR-IOV. Additionally, SR-IOV cannot be used for in-box service chaining on Cisco 5000 series ENCS; only virtio interfaces may be used.
This chapter describes how to install and configure a SteelHead-v for ENCS virtual appliance. It includes these sections:
Basic steps for deploying SteelHead-v on Cisco ENCS
This section provides an overview of the basic steps to install and configure SteelHead-v for ENCS. Detailed procedures are provided in the sections that follow.
Task | Reference |
1. Verify that your ENCS host system meets the installation prerequisites. | |
2. Download a Next Generation SteelHead-v VCX (KVM) software image from the Riverbed support site to a Linux system. You will prepare the software image for use on Cisco 5000 series ENCS on the Linux system. | |
3. Prepare your SteelHead-v software package for upload to NFVIS | |
4. Upload the SteelHead-v software package to your NFVIS system. -or- (Manually prepared images) Import the prepared SteelHead-v image files into NFVIS. Package the imported files and register the resulting package for use on any NFVIS system. |
|
5. Deploy the SteelHead-v on the Cisco 5000 series ENCS. | |
6. Verify the deployment | |
Prerequisites for deploying SteelHead-v on ENCS
Ensure that you have these items in place before deployment:
• Your ENCS and NFVIS components are running the most current software from Cisco.
• The host system has at least four network interfaces.
• The LAN and WAN interfaces are on separate networks or bridges.
• The Linux system where you plan to prepare the software image has QEMU installed.
• The host meets the minimum standards for the SteelHead-v model you want to run on it. See Third-party software dependencies and SteelHead-v models.
Obtaining the SteelHead-v for ENCS software package
Access to software downloads requires registration. You can register for access to the Riverbed Support site here:
Download the package to a system running any supported Linux operating system. You will prepare the software image for use on Cisco 5000 series ENCS on there. See Third-party software dependencies.
To download the software package from the Riverbed Support site
2. Choose Software & Documentation > SteelHead > SteelHead CX/GX.
3. Select the Software tab.
4. Select a major software version from the Display Version menu. Selecting a minor update release (for example, 9.8.0a) will not display all options.
5. Click the Software link in the row for Next Generation Virtual SteelHead VCX Software Image (KVM).
The software package is downloaded to your local system. The package is a tar archive file (.tgz) that contains these files:
– install.sh - Installation script that creates the RiOS data store disk image and generates an XML specification file, domain.xml, for the SteelHead-v instance.
– riverbed_encs_package_gen.py - Helper script that will generate a tar.gz image file that can be directly uploaded to the Cisco 5000 series ENCS system by using the NFVIS console. This script can accept arguments to specify the desired SteelHead-v model and, optionally, the data store disk size and web proxy disk size. Example:
./riverbed_encs_package_gen.py <vcx-model> <web-proxy-cache-size> <data-store-size>
– mgmt.qcow2 - Management disk file in qcow2 format.
– riverbed_model_tmp - Metadata file that contains the specifications for supported SteelHead-v models and that charts the virtual hardware requirements for supported SteelHead-v models.
– all_bypass_pci - File used by Riverbed scripts for bypass cards. Do not alter or delete this file.
Preparing your SteelHead-v image for NFVIS
This section describes how to prepare the SteelHead-v image to be uploaded, or imported, into NFVIS.
You can use the Riverbed provided helper script—together with Cisco helper files—to create an image file that can be immediately uploaded to NFVIS and deployed. This method provides some flexibility in setting the attributes of the virtual machine and automates much of the process. See
Preparing SteelHead-v images using scripts.You can also manually prepare the image. This method requires more steps but provides the most flexibility in configuring virtual machine attributes. See
Preparing SteelHead-v images without using scripts.After you add an image to the NFVIS image repository and register it, you can use the image on any Cisco NFVIS system.
Preparing SteelHead-v images using scripts
Follow this procedure if you want to use the image preparation helper script provided with the Riverbed software download. The script helps to automate the image preparation and packaging process while allowing you some flexibility in setting virtual machine properties. The script generates a .tar.gz image file to your specifications that you can immediately upload and deploy.
The Riverbed script requires two additional files that you obtain from Cisco. You must place these files in the same location as the riverbed_encs_package_gen.py file:
– image_properties_template.xml
– the nfvpt.py
To prepare your SteelHead-v image using scripts
2. Log in to your account on NFVIS.
3. Choose VM Life Cycle > Image Repository > Browse Datastore > Data > intdatastore > Uploads > vmpackagingutility > nfvisvmpackagingtool.tar.
4. Download the nfvisvmpackagingtool.tar file to your local system.
5. Upack the nfvisvmpackagingtool.tar file and locate these files: image_properties_template.xml and nfvpt.py.
6. Place the two files from
Step 5 in the same location where you placed the Riverbed helper script, riverbed_encs_package_gen.py.
7. Run the Riverbed helper script and follow the prompts.
A .tar.gz file that is suitable for upload to the NFVIS image repository is created.
8. In the NFVIS console, choose VM Life Cycle > Image Repository: Image Registration.
9. Upload the .tar.gz file from
Step 7 to the repository and then register it.
Preparing SteelHead-v images without using scripts
Follow this procedure if you want more flexibility in setting virtual machine attributes. This process involves these tasks:
• Extract the contents of the downloaded SteelHead-v installation package.
• Modify the mgmt.qcow2 file, if necessary, so that the management disk is appropriately sized. The default size is 20 GB. Some SteelHead-v models require a larger management disk.
• Create a second qcow2 file for the RiOS data store disk.
Order is important when creating, uploading, and connecting virtual disks. Always work with the management disk first and then the data store disk.
After you have prepared these files, you can import them into NFVIS using the Image Packaging section of the NFVIS console. There you can package the uploaded files into an image (.tar.gz file) suitable for use on any Cisco 5000 series ENCS. After packaging, register the image in the repository.
To prepare your SteelHead-v image without scripts
2. Find the mgmt.qcow2 file in the extracted contents of the SteelHead-v installation package.
3. If necessary, modify the mgmt.qcow2 file so that the management disk image is appropriately sized. The default size if 20 GB. See the
SteelHead Product Specifications Sheet for details about model specifications and requirements.
– Log in to a Linux or Macintosh system that has QEMU/Libvirt installed.
– Place the mgmt.qcow2 file at an accessible location on the Linux or Macintosh system.
– Run the qemu-img resize mgmt.qcow2 +<amount-of-additional-space> command to increase the management disk size.
4. On the Linux or Macintosh system, create an additional empty qcow2 disk image for the
RiOS data store.
qemu-img create -f qcow2 segstore.400G.qcow2 400G
Uploading the SteelHead-v image to the NFVIS image repository
If you have used scripts to prepare and package your SteelHead-v image, upload the resulting SteelHead-v image and deploy it.
If you prepared the image without using scripts, you must follow the procedure described in this section
Importing, packaging, and registering the SteelHead-v image on NFVIS before you can deploy it.
To upload an image to the NFVIS image repository
1. Log in to your account on NFVIS.
2. Choose VM Life Cycle > Image Repository: Image Registration tab.
3. Click the upload icon and then upload your image.
Importing, packaging, and registering the SteelHead-v image on NFVIS
This section describes how to import, package, and register the SteelHead-v image in the NFVIS image repository. Perform these actions if you have prepared your image without using scripts. See
Preparing SteelHead-v images without using scripts.1. Log in to your account on NFVIS.
2. Choose VM Life Cycle > Image Repository, and select the Image Packaging tab.
Figure 5‑1. The Cisco NFVIS console with the Image Packaging tab of the Image Repository selected
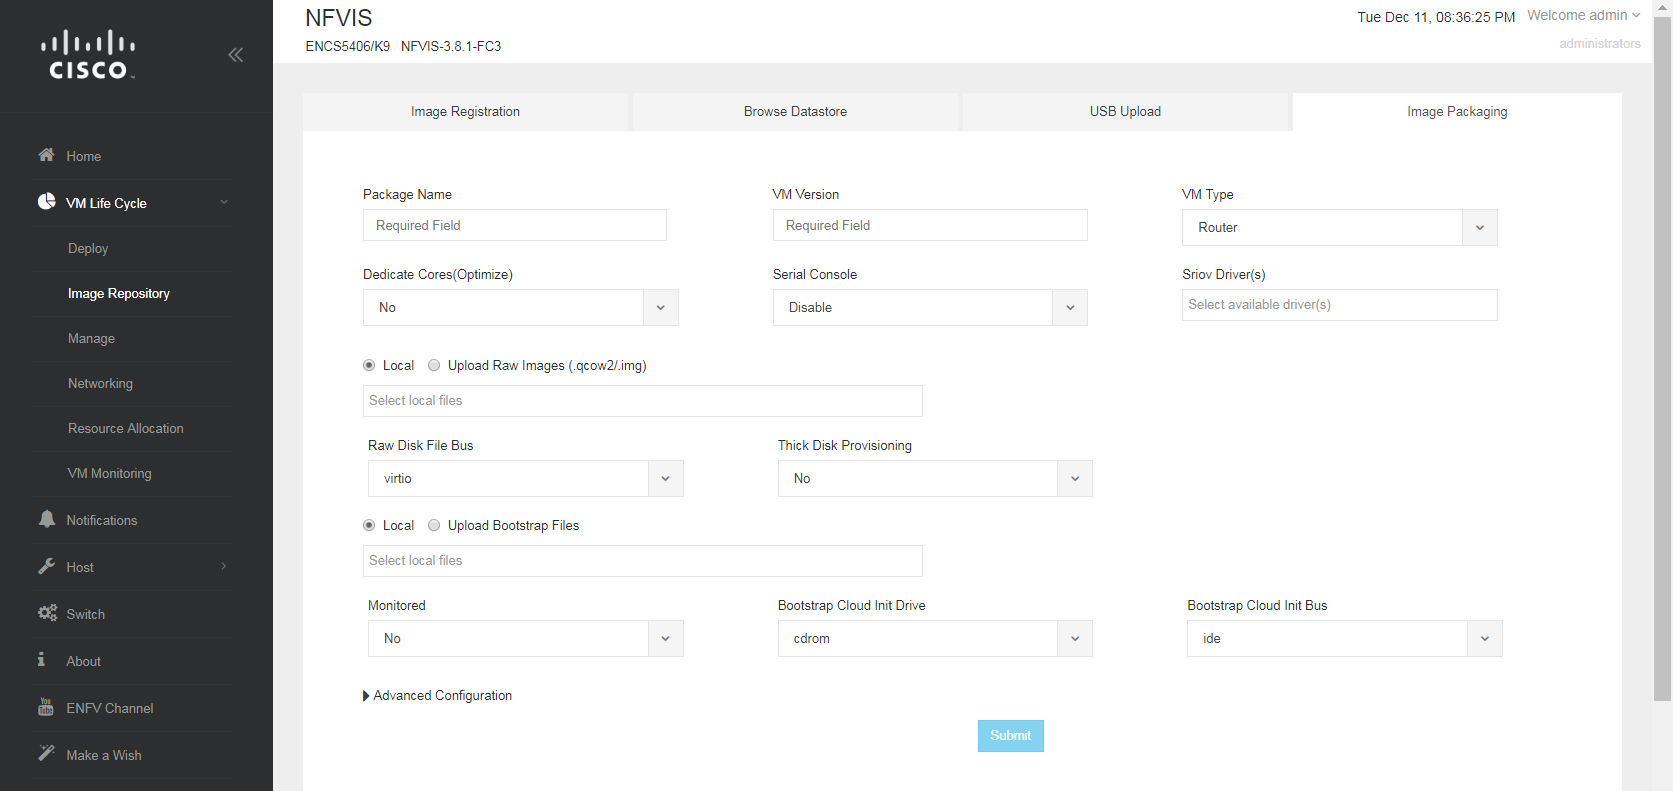
3. Click the icon next to VM Packages.
4. Enter values for these fields:
– Package Name - Enter a name for this instance of the SteelHead-v package.
– VM Version - Enter a version for this instance of the SteelHead-v package.
– VM Type - Select Other from the drop-down menu. You must select Other.
– Dedicated Cores (Optimize) - Select Yes from the drop-down menu.
– Serial Console - Select Enable from the drop-down menu.
– Sriov Driver(s) - Select all available options if you plan to use SR-IOV on the primary and auxiliary interfaces.
– Raw Disk File Bus - Select Virtio from the drop-down menu.
– Thick Disk Provisioning - Select Yes if you are deploying to a production environment.
– Accept the default values for items in the bootstrap section.
5. Select Raw Images (.qcow2/.img).
The order is important; you must upload the files in this order.
Figure 5‑2. Uploading image files to the Cisco NFVIS system

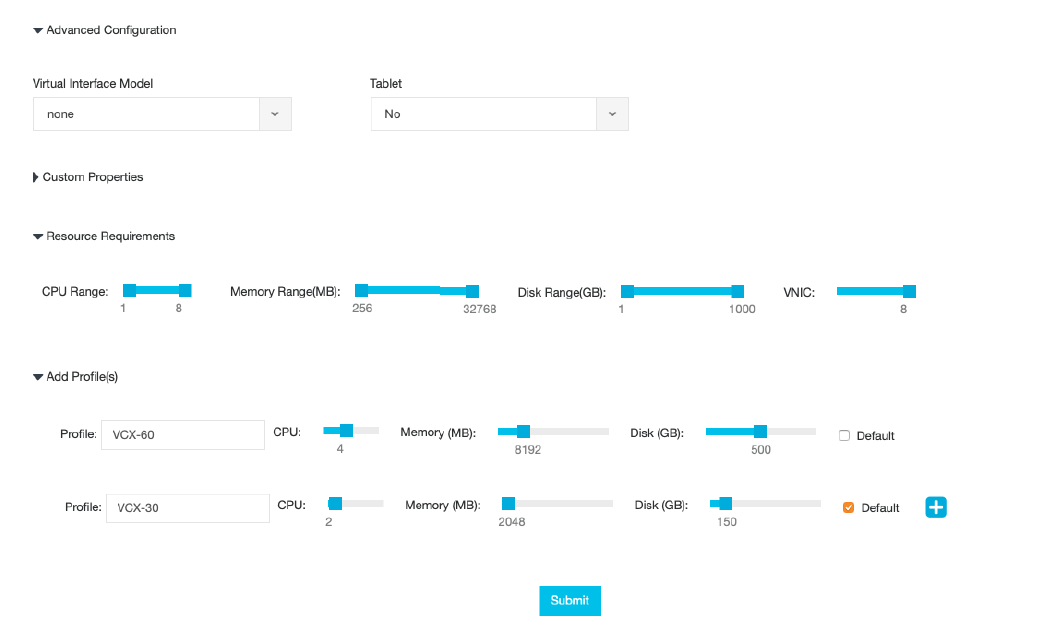
7. (Optional) You can create preconfigured deployment profiles using the Advanced Configuration settings. Here is an example:
Figure 5‑3. Creating deployment profiles in the Cisco NFVIS system
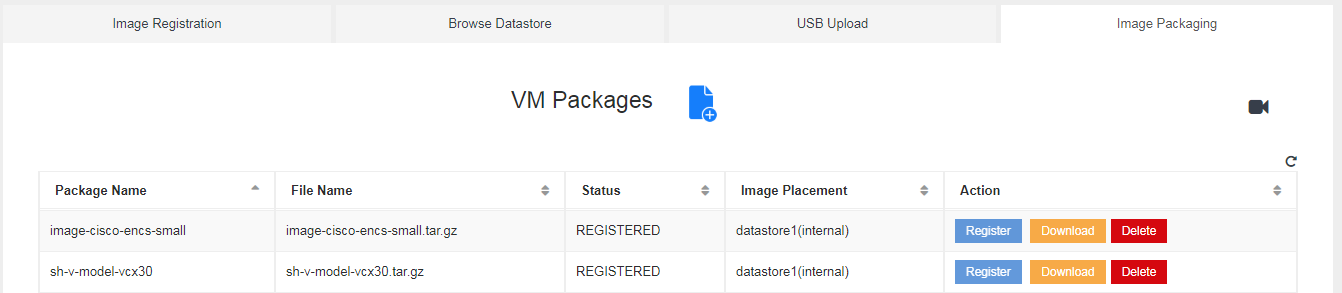
8. After the qcow2 files are uploaded, click Submit.
The uploaded files are packaged into a tar.gz file, and then the tar.gz file is added to the list of packages at the bottom of the Image Packaging tab.
9. Click Register to register the new package.
Figure 5‑4. Registering a package in the Cisco NFVIS system
The image is registered on the system and added to the list of registered images under the Images section in the Image Registration tab on the VM Life Cycles > Image Repository page.
Figure 5‑5. Registered images in the Cisco NFVIS system
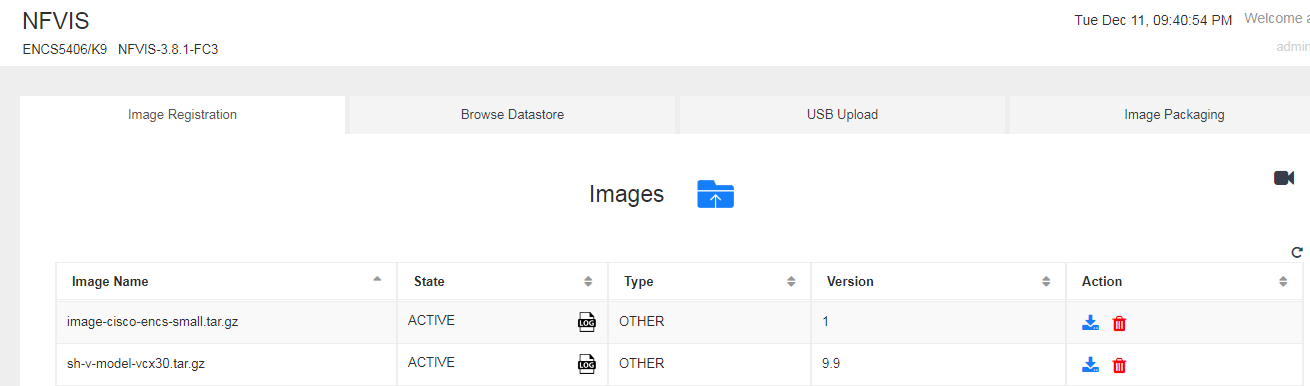
Registered images can be used on any NFVIS system.
Deploying SteelHead-v on the Cisco 5100 series ENCS
Before you deploy the SteelHead-v, you must have the following virtual environment in place:
• A representation of the physical host ports GEO-0 through GEO-3
• Two SR-IOV interfaces on each GEO port that are available for virtual machines
• A WAN virtual switch (default name is wan-net) connected to the GEO-0 port
• A LAN virtual switch (default name is lan-net) connected to the GEO-2 and GEO-3 ports
• A virtual switch (default name is service-net) that connects to a virtual router
• A virtual router connecting the service-net virtual switch and the wan-net virtual switch
Figure 5‑6. The VM Life Cycle > Deploy page of the Cisco NFVIS console
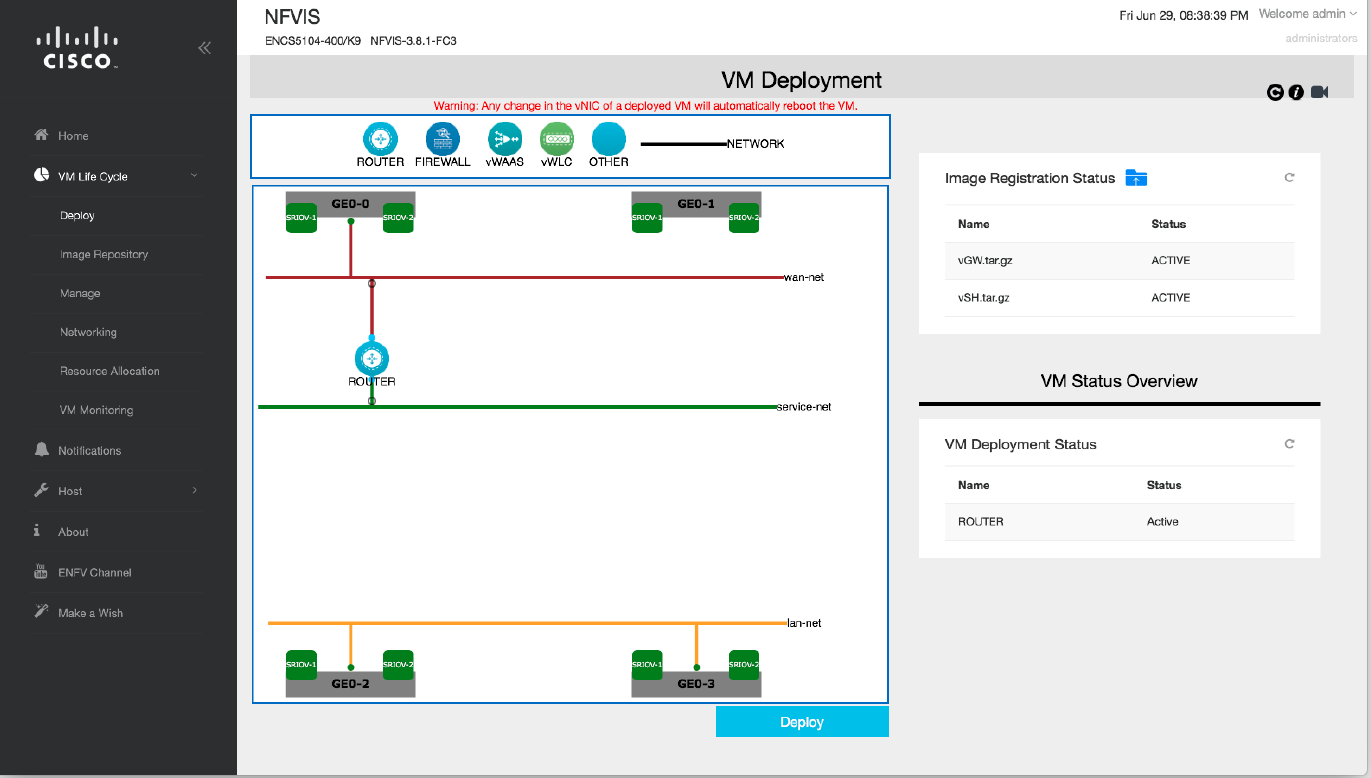
Some elements are created for you by the system using default values, but you will need to manually create the router and service-net virtual switch. You create virtual environments in the VM Life Cycle > Deploy page.
After your virtual environment is in place, you can create the SteelHead-v, assign interfaces, and then deploy the environment including the SteelHead-v.
Order is important when creating and connecting virtual interfaces. Virtual interfaces must be created and connected in this order: primary, auxiliary, LAN, and WAN.
Order | SteelHead-v interface | Assign to | Type |
1 | primary | LAN-side vswitch | virtio |
2 | auxiliary | GEO-1 | virtio |
3 | LAN_0 | GEO-3 | virtio |
4 | WAN_0 | WAN-side router | virtio |
To deploy SteelHead-v on the Cisco 5100 series ENCS
1. Remove the connection between the GEO-3 port from the lan-net virtual switch.
– Choose VM Life Cycle > Networking.
– In the Networks & Bridges section, find the row for the lan-net virtual switch and click the edit icon (blue pencil).
– In the lan-net virtual switch details page, find the Interfaces field and remove GEO-3.
– Click Submit.
Figure 5‑7. Removing an interface from a virtual switch in the Cisco NFVIS console on the Cisco 5100 series ENCS

2. Choose VM Life Cycle > Deploy.
3. Drag and drop an Other icon from the palette at the top of the VM Deployment page to an open space in the canvas below.
4. Ensure the Other icon on the canvas is selected, and then under VM Details specify these items:
– VM Name - Enter a name for the SteelHead-v.
– Deployment Disk - Select Internal. For the Cisco 5100 series ENCS, this item must be set to Internal.
5. Drag and drop a NETWORK icon onto the canvas and connect one end to the SteelHead-v and the other end to the lan-net virtual switch.
6. Ensure that the network you just placed on the canvas is selected, and then ensure that vNIC ID under vNIC Details is set to 0.
7. Drag and drop a second NETWORK icon onto the canvas and connect one end to the SteelHead-v and the other end to the GEO-1 port.
8. Ensure that the vNIC ID is set to 1.
9. Drag and drop a third NETWORK icon onto the canvas and connect one end to the SteelHead-v and the other end to the GEO-3 port.
10. Ensure that the vNIC ID is set to 2. This will be the LAN_0 interface.
11. Drag and drop a fourth NETWORK icon onto the canvas and connect one end to the SteelHead-v and the other end to the service-net virtual switch.
12. Ensure the vNIC ID is set to 3. This will be the WAN_0 interface.
13. Click Deploy.
Deployment is complete when the status of the SteelHead-v virtual machine changes from Deploying to Active.
14. Double-click the SteelHead-v icon.
A VGA console appears and displays the virtual machine’s startup progress. Startup is complete when the console displays a login prompt.
You can log in and follow the setup wizard to configure the SteelHead-v.
Verifying the deployment
Use this procedure after deployment is complete to verify that all interfaces are properly connected and working.
To verify the deployment
1. After the deployment is complete, open a QEMU/VNC console window to the SteelHead-v by double-clicking its icon on the canvas.
You should see the SteelHead-v virtual machine starting up. When it is finished, you should see a prompt to log in to the SteelHead-v.
2. Log in to the SteelHead-v.
3. At the prompt asking if you want to auto-configure using SCC, enter No.
4. At the prompt asking if you want to use the wizard for initial configuration, enter No.
5. Enter enable mode so that you can run commands:
amnesiac > enable
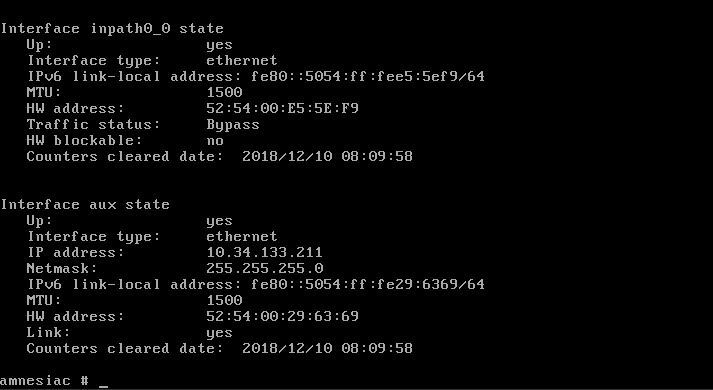
6. Verify that the SteelHead-v can access all interfaces by entering the show interfaces brief command.
amnesiac # show interfaces brief
Figure 5‑8. Command line interface showing the primary, WAN0_0, and LAN0 interfaces

Figure 5‑9. Command line interface showing the inpath0_0 and aux interfaces
7. Open a browser and navigate to the SteelHead-v management console.
8. License the SteelHead-v by following the instructions in the email that includes your customer key.
9. Choose Networking > In-Path Interfaces.
10. Select inpath0_0.
11. Select Enable IPv4.
12. Enter addresses for these items:
– IPv4 Address
– IPv4 Subnet Mask
– In-Path Gateway IP
13. Enter 1500 for MTU.