Defining an Organization
This topic describes how to define an organization in SteelConnect. It includes these sections:
Organization overview
An organization is a company representing an end customer. It contains the customer details, sites, devices, zones associated with the devices, the uplinks, and so on.
You can assign administrative rights to individual administrator accounts per organization. You can also manage appliances and licensing per organization.
Defining an organization
SCM uses these terms to describe your company:
•Organization - A company representing an end customer. You can assign administrative rights to individual administrator accounts per organization. You can also manage appliances and licensing per organization.
•Site - A physical location of one or more office buildings, a hosting center, or a cloud location that make up the organization. A site houses a SteelConnect gateway and uses a permanent DNS alias. Every site requires a local network zone and at least one internet uplink. When you create a site, the zone is automatically created and an uplink is automatically created for the internet path.
•Zone - Layer 2 network segments or VLANs within sites that are VLAN-tagged traffic. A zone always has a VLAN tag assigned to it.
To create an organization
1. Choose Organization.
2. Click New.
3. Type a short and log name for the organization.
4. Type a city, and street address,
5. Click the search selector and select a country.
6. Click the search selector and select a time zone.
7. Click Submit.
To edit an organization
SCM ships with a default organization. This section explains the default settings and how to create a new site within an organization.
After adding the company name, you’ll add basic information. You can always change and customize this information later.
You can change settings associated with an organization using the tabs on the Organization page.
The Organization page contains important global settings for internet breakout, NTP, numbering for VLANs, and default subnet IPs, social media integration, firmware upgrade schedules, and more.
Defining an organization
Deleting an Organization
To delete an organization
1. Choose Organization.
2. From the Actions menu, choose Delete this Organization.
If the organization is connected to XMS-Cloud, a message tells you that you can’t delete it. After disconnecting the organization from XMS-Cloud, repeat this procedure. For details, see
WiFi Manager.
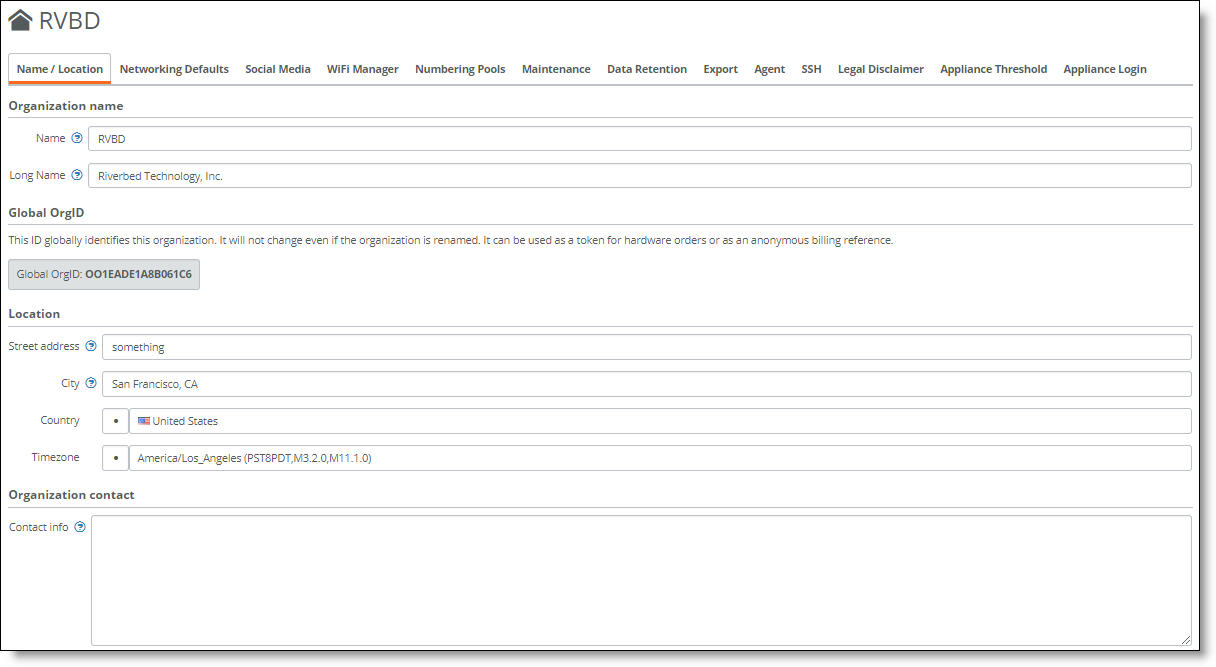
Name/Location
This tab provides a place to set the name referenced on various SCM pages and the reports. This tab also displays the global organization ID generated by SCM that uniquely identifies the organization system wide. You can also define the location and the contact information for the entire organization.
Networking defaults
This tab provides a place to set important global preferences for an organization.
To select the networking defaults
1. Choose Organization and select the Networking defaults tab.
2. Specify your preference for these items:
•Internet breakout preference - Determines how you want internet traffic to flow for each site that you deploy throughout the organization. When sending traffic to the internet, the default is to send internet bound traffic directly out the local connection. You can also use RouteVPN or WANs as alternative breakouts. When including RouteVPN in your preference list, specify the default site that will handle the breakout. For details, see
Local internet breakout or backhaul.
This setting is global and affects the entire organization if you don’t override the settings by sites and zones.
Moving the internet breakout location to a central location forces all internet traffic to that location regardless of the presence of a local internet breakout.
•WAN usage preference - If using more than one WAN, select the preferred path. For example, if you have two paths to reach your corporate headquarters, you can select an MPLS as the preferred path. For the WAN paths, overlays are preferred and traffic is sent on the underlay (if there is reachability on the underlay for a given destination) only when no overlay paths are available.
•Fall back to all available uplinks - Provides uplink failover to route internet-bound traffic using all other available uplinks when a configured WAN uplink becomes unavailable and an internet breakout preference or path is not explicitly configured. However, we recommend that you configure specific internet breakout preferences, backup uplinks, WAN preferences, and so on according to your needs instead of enabling the Traffic fall back setting.
Consider a branch site deployment with two WANs (internet and MPLS) and two uplinks (internet and MPLS). When you configure the branch to use the internet WAN for internet traffic and enable Traffic fall back, the branch will use the MPLS uplink to fall back to the MPLS WAN when the internet uplink is not available and no alternate path or uplink has been configured.
By default, this setting is disabled.
When this setting is disabled and no alternate path, internet breakout, or backup uplink is configured, traffic is dropped when the internet is unavailable.
To enable traffic fall back
1. Choose Network Design > WANs.
2. Select a WAN (MPLS in the example).
3. Click On next to Internet Breakout. Do not select a breakout site.
4. Click Submit.
5. Choose Organization and select the organization.
6. Select the Networking Defaults tab.
7. Click On next to Traffic fall back.
•NTP settings - Specify the local Network Time Protocol (NTP) servers of your choice, one per line. We recommend that you configure your own internal NTP servers; however, you can leave the field blank to use these default Riverbed-provided NTP servers:
0.ocedo.pool.ntp.org
1.ocedo.pool.ntp.org
2.ocedo.pool.ntp.org
3.ocedo.pool.ntp.org
Social Media
This tab provides a place for an administrator to configure guest access using a social media app. For details, see
Registering guest devices using social media without XMS-Cloud.
Configuring Access Points
This section describes how to integrate the XMS-Cloud management system for wireless access points with SCM.
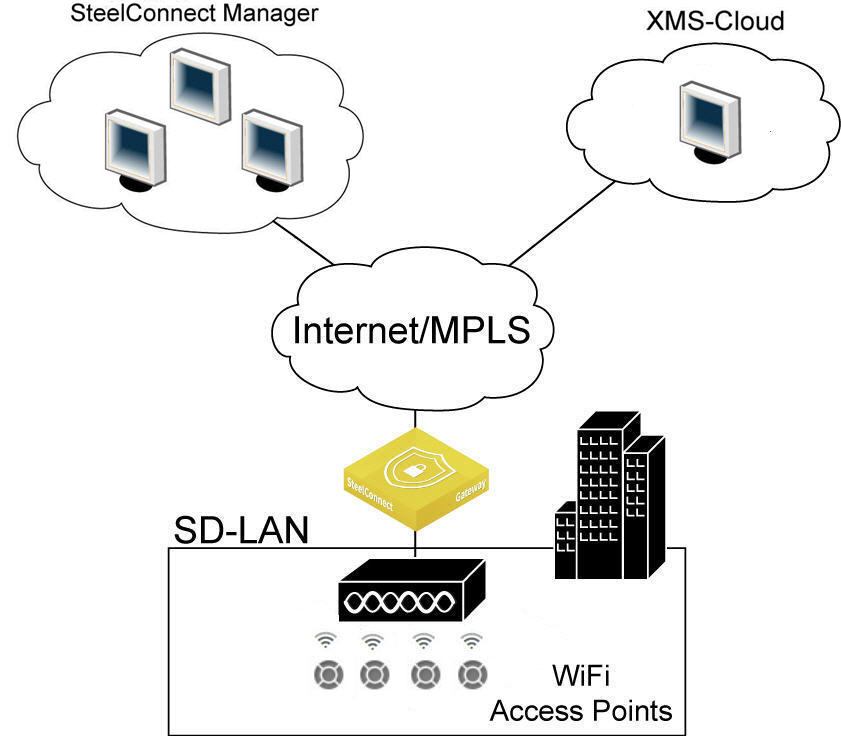
WiFi Manager
This tab provides a place to enable or disable XMS-Cloud, the management system for wireless access points. XMS-Cloud provides zero-touch activation and automated software upgrades for newly deployed access points. Advanced management includes features such as reporting, upgrades, configuration management, network status, guest and employee or student access, and control of application use at the network edge.
Xirrus XMS-Cloud and SCM work together to manage access points
Each SCM organization needs to be mapped to an XMS-Cloud domain before you can manage the access points through the SCM for an organization. A domain is the XMS-Cloud equivalent of an SCM organization. A dialog is presented after you log in to XMS-Cloud that provides a way to associate an XMS-Cloud domain with an SCM organization.
For more details on domains, see the XMS-Cloud online help.
Before accessing XMS-Cloud, you’ll need XMS account credentials to log in.
To log in to XMS-Cloud through SCM
1. Choose Organization and select an organization.
2. Select the WiFi Manager tab.
3. Click WiFi Manager.
4. Type your XMS credentials required to administer the XMS domain: username and password.
5. Click Log In.
After logging in, you’re presented with a dialog to link the SCM organization to an XMS-Cloud domain. The dialog displays all XMS domains you are administering outside of SCM using XMS-Cloud. Associating an SCM organization with an XMS domain is as simple as connecting to the domain.
Connecting an SCM organization with the Riverbed XMS-Cloud Manager will give you integrated manageability for Riverbed SD-WAN products and the Xirrus WiFi access points from SCM. Riverbed AP models SDI-AP3, SDI-AP5, SDI-AP5r and the integrated AP in the SDI-130W cannot be managed concurrently with the Xirrus APs. After the connection between SCM and XMS is made, all configuration for legacy SDI APs will be lost. Proceed ONLY when you have deployed the new Riverbed Xirrus access points and no longer require management for the legacy access point models. Until then, continue to manage Xirrus APs through XMS-Cloud without connecting to SCM.
6. In the Link Domain dialog, select an XMS domain to link to the SCM organization.
7. Click Submit.
SCM discovers all of the access points that are part of the XMS domain and are now linked to the SCM organization. It adds the access points to the organization.
8. Repeat
Step 1 through
Step 7 for each organization you want to link to an XMS-Cloud domain.
To view the access points
•Choose Appliances > Overview.
The XMS access points appear along with all other appliances in the organization.
To assign an access point to a site
1. Choose Appliances > Overview.
2. Select the access point.
3. Select the Location tab.
4. Select a site from the drop-down list.
5. Specify a detailed location for the access point using the Location field. Setting the location associates the access point with its location wherever it is referenced on various SCM pages.
6. Click Submit.
To return to XMS-Cloud, click WiFi Manager. In XMS-Cloud, you can view a guided tour to get started and view online help.
To access the XMS-Cloud online help
•In XMS-Cloud, click the question mark (?) icon in the upper-right corner.
To disconnect from XMS-Cloud
1. Choose Organization and select an organization.
2. Select the WiFi Manager tab.
3. Click WiFi Manager.
4. Click Disconnect.
A dialog tells you that disconnecting the domain link will delete any WiFi Manager appliances and portals in this organization.
5. Click Confirm.
6. Type your XMS credentials: username and password.
7. Click Submit.
Numbering Pools
When SCM creates new zones, it uses the default zone numbering specified on the Numbering Pools tab for VLANs, IPv4, and IPv6 addressing. These are global pool settings used as the base identifiers throughout the organization. Optionally, you can manually configure the numbering for each zone. A simple method is to assign a 10.x.0.0/16 network such as 10.1.0.0/16, which every zone created will then pull an IP address from.
The default numbers are:
•VLAN pool base: 1000
•IPv4 network pool: 172.16.0.0/12
•IPv6 ULA network pool: fd00:ced0:ced0::/48
Both IPv4 and IPv6 addresses come from finite pools of numbers. Don’t create a zone with a subnet the size of the full IP address pool, because doing so can exhaust the pool. After the pool is exhausted, SteelConnect is unable to create the zones with the allocated subnets.
To manually configure the numbering pools
1. Choose Organization and select the Numbering Pools tab.
2. Change the default IP addresses or VLAN pool base.
3. Click Submit.
You can also configure the pool settings when you create a zone. For details, see
Zones within a site.
Maintenance
This tab controls the firmware upgrade process for an organization. A Riverbed appliance simply needs to be connected and registered, and the upgrade happens automatically when a new version of the firmware is available (unless you reschedule the upgrade or an upgrade schedule is customized for an organization within the realm). For details, see
Upgrade overview.
An organization’s maintenance policy overrides the realm’s maintenance policy.
Data Retention
This tab is where you specify how long SCM retains its traffic data history and unregistered device information for an organization. The maximum number of days is 366. The default setting for traffic history is 14 days and the default setting for unregistered devices is 7 days.
To change the amount of time SCM retains data
1. Choose Organization.
2. Select the Data Retention tab.
3. Change the number of days for traffic history, unregistered devices, or both.
4. Click Submit.
Export Settings
This tab is where you configure an SCM appliance to send SNMP data directly to a network management system (NMS) and export syslog messages to an external syslog server. When you configure these settings at the organization level, you override the global realm settings. For details on enabling SNMP and configuring direct reporting or remote logging at the realm level, see
Enabling SNMP reporting and logging. For a list of SNMP events, see
SNMP traps.
Sending SNMP data directly to your network management system
When direct SNMP reporting is enabled, all gateways in an organization send SNMP data directly to your network management system. You can also enable direct SNMP reporting for all gateways in a realm.
To enable direct SNMP reporting
1. Choose Organization.
2. Select the organization.
3. Select the Export Settings tab.
4. Under Direct SNMP reporting, click On.
5. Type your NMS IPv4 address.
6. Type the NMS server port number. The default port is 162.
7. Type a string to authenticate and identify the read-only community: for example, public. The maximum number of characters is 30.
8. Click Submit.
SCM forwards the configuration to the SteelConnect gateways, and the gateways use this configuration to set up the SNMP agent daemon. The SNMP agent services the GET and WALK requests from the NMS and also generates traps and sends them to the NMS.
Configuring the NMS
To enable SNMP operations (such as SNMP GET and WALK requests or asynchronous traps) from a SteelConnect appliance, you need to provide the NMS interface IP address through which the appliance is reachable.
Exporting syslog messages to an external syslog server
For mid to large enterprises that require log exporting to a central server while keeping security, compliance, and audit requirements intact, SCM provides remote logging. With remote logging, all system logs from different appliances can be aggregated and stored in a single remote server located within the same enterprise network.
After all logs are aggregated on one server, using third-party monitoring tools such as Splunk can make log analysis and reporting simpler. This log aggregation is also useful for archiving logs. You can also forward real-time system messages from appliances to the remote server.
To send syslog data to a remote server
1. Choose Organization.
2. Select the organization.
3. Select the Export Settings tab.
4. Under Remote Logging, click On. Clicking On enables all remote logging configuration fields.
5. Type the remote syslog server’s IPv4 address. The remote server must be running the standard syslogd utility.
6. Type the syslog server port number on which to send syslog messages: for example, 514 for UDP. Use the same port number on the firewall and the syslog server.
7. Select the protocol to use to transfer the log to the syslog server: TCP or UDP. You can use TCP for guaranteed log forwarding or UDP when speed is desirable and error correction isn’t necessary. The default setting is UDP.
8. Type a text string to use as a prefix on messages sent by the log source. The string prefix is added to each syslog entry being forwarded. When you prefix a syslog entry, you can then easily search for a specific log entry based on the prefix.
9. Select the minimum severity level for the log messages. The log contains all messages with this severity level or higher. Select a level from the drop-down list:
•Emergency - Critical alerts, errors, and security events; the system is unusable.
•Alert - Action must be taken immediately.
•Critical - Conditions that affect the functionality of the gateway.
•Error - Conditions that probably affect the functionality of the gateway.
•Warning - Conditions that could affect the functionality of the gateway, such as authentication failures.
•Notice - Normal but significant conditions, such as a configuration change.
•Info - Informational messages that provide general information about system operations. This is the default setting.
•Debug - Debugging messages that provide general information about system operations.
10. Click Submit.
SCM pushes the configuration data to the SteelConnect appliances, and the appliances use this configuration to transport syslog messages to the remote syslog server.
Agent
A SteelConnect agent is a software VPN client that you can download and install on your laptop. The agent provides remote access to company applications automatically, when employees travel or work from home. The SteelConnect agent is available for Windows and Mac.
Remote access using an agent
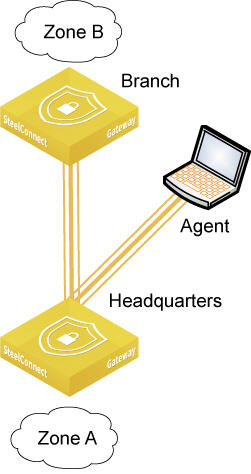
The inbound VPN agent uses UDP port 4500 to connect to a single gateway for an organization. The agent detects the gateway automatically, so there isn’t an IPsec tunnel for the user’s client if the user connects to the LAN side of a gateway.
After installing and registering the agent, you need to make sure that the users associated with the agent can be authenticated using their email address or mobile phone number to log in and gain access to inbound VPN from those sites. You will also have to define policy rules to allow traffic from the agent.
You need to install and register the agent once. After installation, whenever the computer is online, the agent connects to the organization and establishes a tunnel automatically.
An on-premises SCM, which is locally hosted, does not support the agent.
Where do I find the agent software?
As the SteelConnect agent is branded for each organization, you’ll download it from SCM, as described in the following procedures.
Installing the Windows agent
To install the Windows agent
1. In the Windows Control Panel, select Programs and Features, and uninstall any previous versions of the agent.
2. Choose Organization > Organization.
3. Select the Agent tab.
4. Click Download Agent for Windows.
5. Double-click the Agent-acme.exe file to install the agent.
6. Verify your organization information, agree to the end-user license agreement, and click Install.
7. Register your agent installation with the corresponding SteelConnect Manager.
The Windows task bar displays the agent status:
•Onsite - Indicates that the agent has recognized that the device is already located behind a Riverbed appliance of its organization. The agent doesn’t negotiate a dedicated IPsec tunnel.
•Offsite - Indicates that the agent has recognized that the device is not located behind a Riverbed appliance of its organization. The agent doesn’t negotiate a dedicated IPsec tunnel.
If the agent installation is unsuccessful, see
SteelConnect Windows Agent.
Installing the Mac agent
After installing the agent, you must register it. As part of the installation process, you will install a helper application that will step you through the registration process. To register, you will need to provide an email address or phone number where you can receive a confirmation code. Have this information handy.
To install the Mac agent
1. Uninstall any previous versions of the agent.
2. Choose Organization > Organization.
3. Select the Agent tab.
4. Click Download Agent for Mac.
5. Navigate into the Downloads folder and launch the Agent-acme.dmg file.
6. Double-click the Install Agent.app file to launch the installer.
7. Click Open to verify that you want to install the application.
8. Review the license agreement and click Install.
The agent is installed.
9. Click Open.
10. Click Install to authorize the installation of the helper tool.
11. Enter your username and password and click Install Helper.
12. Enter an email address or phone number where you can receive a confirmation code.
13. Click Next.
14. Enter your 8-digit confirmation code.
15. Click Finish.
To uninstall the Mac agent
Follow these steps to remove the agent and all associated data.
To remove the agent but not items such as log files, VPN certificates, and so on, simply delete the agent from the Applications folder.
2. Right click the Install Agent.app file and choose Show Package Contents.
3. Navigate to Contents > Resources.
4. Right click the agent_unistall.sh file.
5. Choose Open With > Other.
6. Search for Terminal.
7. Select Terminal and click Open.
8. Type your password and press Enter.
Selecting the default agent home site
The agent always connects to a single site within the organization. By default, all agents connect to the same site. You can select the default site.
The default site is the headend for all agent traffic. There can only be one headend for the agents.
To select a default home site
1. Choose Network Design > Sites.
2. Select the current default home site for the agent, indicated by the Agent home icon.
The default home site for the agent

3. Select the Agent tab.
4. After Default site, click Off.
5. Click Submit.
6. Select the site you want to make the default home site.
7. Select the Agent tab.
8. After Default site, click On.
9. Click Submit.
Changing the agent IP address pool
Agents receive their IP address assignment from a pool of IPv4 addresses. You can choose the pool from which the headend will assign the IPv4 addresses to the agents.
To change the agent IP address pool
1. Choose Network Design > Sites.
2. Select the default home site for the agent, indicated by the Agent home icon.
3. Select the Agent tab.
4. Type an IPv4 address: for example, xxxx.xx.x.x/24. The subnet must be at least 24 (/24.)
5. Click Submit.
SSH
SteelConnect gateways, switches, and access points are zero touch configuration and don’t require console access; however, if you need to access the appliance console for troubleshooting, the controller can create an SSH tunnel. You enable SSH access to an appliance on the SSH tab. You must add a public SSH key.
Be sure to shut off SSH access when it is not needed.
Legal Disclaimer
This tab provides a place to add a predefined legal disclaimer that appears each time a user logs in to SCM. For example, “This computer system is the private property of its owner, whether individual, corporate, or government. It is for authorized use only.”
Appliances Login
This tab sets a login password required on all appliances in an organization for root access. We strongly recommend that you use an appliance console login password. The password must be a minimum of six characters. Leave the login password field blank and click Submit to generate a random console appliance password.