Replacing Disk Drives
This section describes how to remove and replace disk drives and includes the following procedures:
Note: If you need to replace an appliance, you cannot move the disks to preserve your data. Each disk is encoded with machine-level information, and moving disks is not supported.
Replacing Disk Drives in 1U SteelFusion Edge Appliances
1U SteelFusion Edge appliances are equipped with replaceable, hot-swappable hard disk drives (HDD) and solid-state drives (SSD). The disk slot numbers for the drives are numbered in ascending order from left to right.
Figure: 1U SteelFusion Edge Disk Slot Numbers

You must use approved disk drives. Slots 0 and 1 support HDD and slots 2 and 3 support SSD. The following table lists the disk drive configuration available for the 1U SteelFusion Edge appliances.
Appliance | Quantity | Slots Supported |
SteelFusion Edge 2100 | 2 x 3.5-inch 1-TB HDD | 0 and 1 |
2 x 2.5-inch 100 GB– 120 GB SDD | 2 and 3 |
SteelFusion Edge 2200 | 2 x 3.5-inch 2-TB HDD | 0 and 1 |
2 x 2.5-inch 100 GB–120 GB SSD | 2 and 3 |
Note: When you replace disk drives, you must wear a grounded ESD antistatic strap to protect the hardware against electrostatic discharge. Make sure that the strap makes skin contact prior to handling equipment.
Caution: 
Use caution when you remove or replace components; they can become hot to the touch.
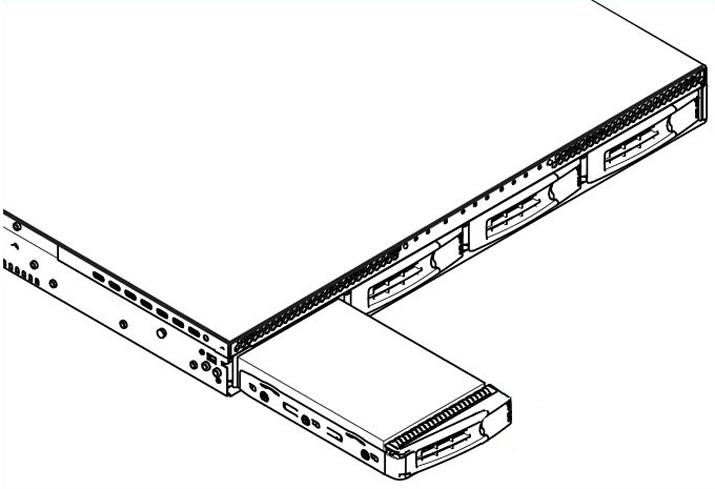
To replace the disk drive in 1U appliances
2. Identify the faulty disk drive.
3. Press the orange release button and pull the drive handle toward you.
Figure: Removing the Disk Drive

5. Slide in the new disk drive until it mates with the back connectors in the chassis.
The disk drive LED lights blue when connected.
6. Press in the disk-drive handle to close.
The new disk drive runs through a self-test automatically and then begins proper operation with the other disk drives. You do not need to set up or configure the new disk drive.
Note: It takes approximately 3 to 4 hours, depending on the system load, to rebuild a new disk drive. When the disk drive has finished rebuilding, the system sends an email to the administrator user.
Replacing Disk Drives in 2U SteelFusion Edge Appliances
The 2U SteelFusion Edge appliances are equipped with replaceable, hot-swappable disk drives. The drives are numbered in ascending order from the upper-left corner to the lower-right corner. (See
Figure: 2U SteelFusion Edge Disk Slot Numbers.)
Figure: 2U SteelFusion Edge Disk Slot Numbers

You must use approved disk drives. Slots 0 through 7 support HDD and slots 8 through 11 support SSD. The following table lists the disk drive configuration available for the 2U SteelFusion Edge appliances.
Appliance | Quantity | Slots Supported |
SteelFusion Edge 3100 | 4 x 3.5-inch 2-TB HDD | 0 to 7 |
4 x 2.5-inch 200 –240 GB SDD | 8 to 11 |
SteelFusion Edge 3200 | 8 x 3.5-inch 2TB HDD | 0 to 7 |
4 x 2.5-inch 200 –240 GB SSD | 8 to 11 |
4 x 2.5-inch 240 –400 GB SSD | 8 to 11 |
SteelFusion Edge 5100 | 8 x 3.5-inch 4-TB HDD | 0 to 7 |
4 x 2.5-inch 400–480 GB SSD | 8 to 11 |
Note: When you replace disk drives, you must wear a grounded ESD antistatic strap to protect the hardware against electrostatic discharge. Make sure that the strap makes skin contact prior to handling equipment.
Caution: 
Use caution when you remove or replace components; they can become hot to the touch.
To replace a disk drive in the 2U SteelFusion Edge appliances
1. Open the bezel.
2. Identify the faulty disk drive.
The Alarm Status page in the Management Console identifies the faulty disk drive.
The disk drive LED is orange for failed drives.
3. Connect to the CLI and enter the raid swraid fail-disk command:
amnesiac> raid swraid fail-disk <slot-number>
This command ensures the RAID system removes the disk partitions before the drive is removed from the slot. For details, see the Riverbed Command-Line Interface Reference Manual.
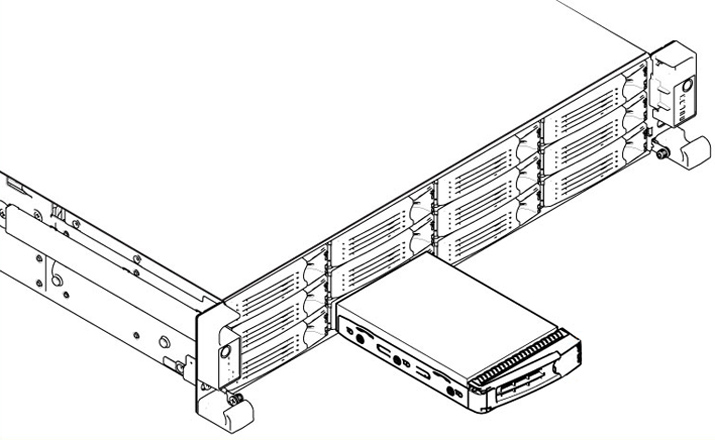
Figure: Releasing the Disk Drive

5. Slide the faulty disk drive out of the slot. Make sure you remove the correct drive.
6. Wait 60 seconds between removing the old drive and adding the new drive.
Waiting ensures the system detects the drive removal so it can rebuild properly after you insert the new drive. If you insert the new drive before the system detects the removal, data might be corrupted.
7. Open the new disk-drive handle by pressing the orange release button.
8. Slide in the new disk drive until it mates with the back connectors in the chassis.
The disk drive LED is blue when connected.
9. Press in the disk-drive handle to close.
The new disk drive runs through a self-test automatically and then begins proper operation with the other disk drives. You do not need to set up or configure the new disk drive.


 Use caution when you remove or replace components; they can become hot to the touch.

 Use caution when you remove or replace components; they can become hot to the touch.