Viewing policy drift
You can view policy drift under Manage > Topology: Appliances. Select an appliance, and then select the Policy Drift tab.
Policy Drift tab for an appliance
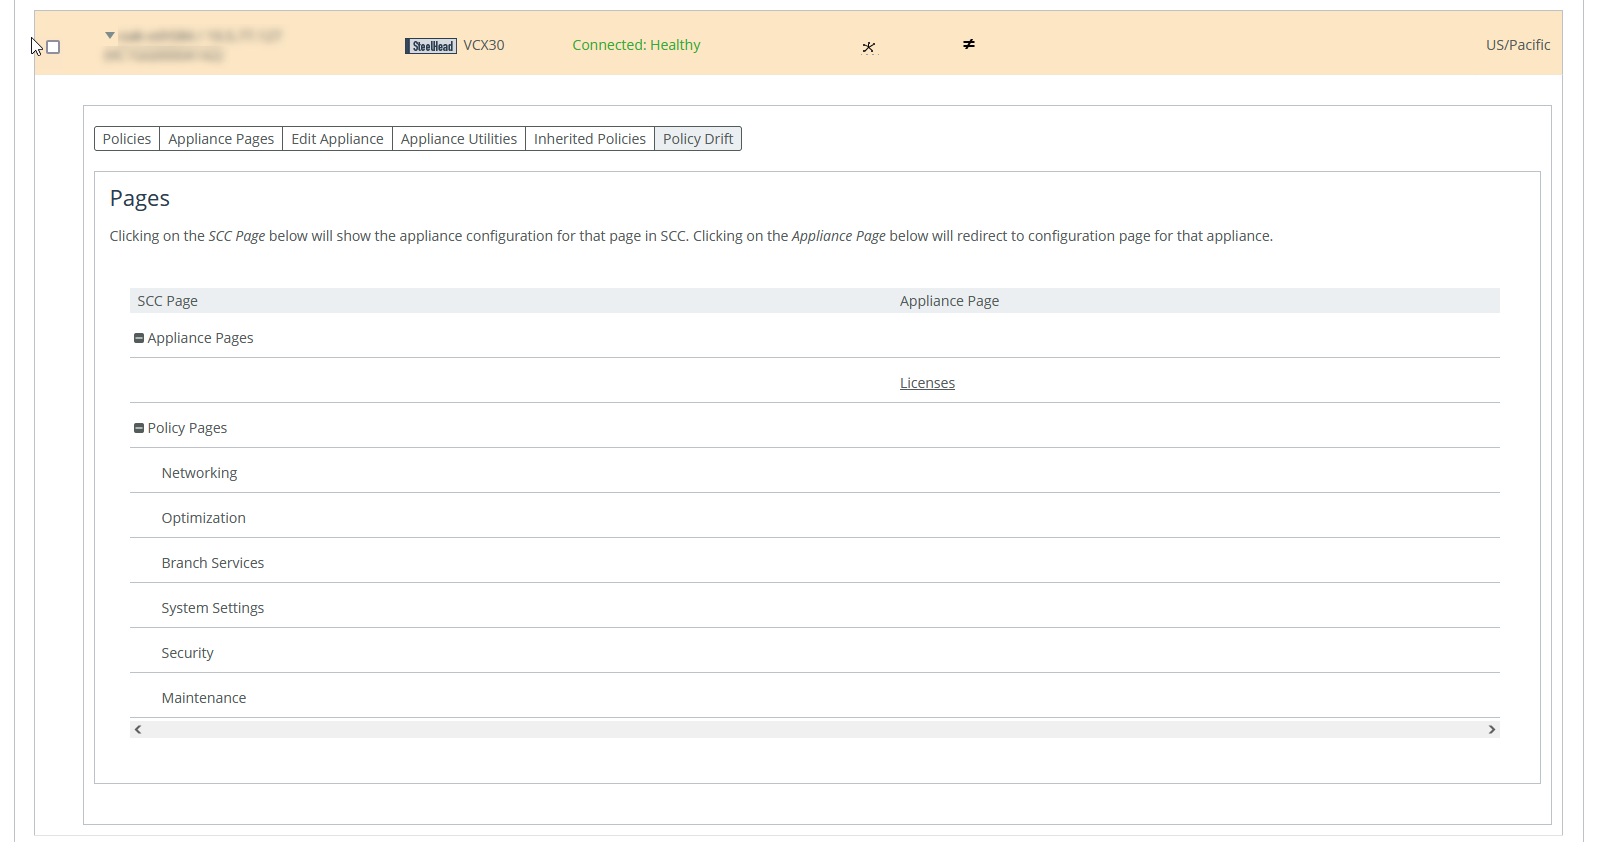
The page is divided into sections for SCC policy pages and appliance policy pages. Selecting an SCC policy page shows the configuration for that page in SCC. Selecting an appliance policy page redirects you to that configuration page in the Management Console for that appliance.
You can compare the two configurations to see where they are not synchronized. The SCC records any unsynchronized policy changes as policy drift. Additionally, changes made directly on a SteelHead appliance, even those that are reversed, are reported as policy drift here in the SCC’s Management Console. Previous versions of the SCC included limited information (an ≠ icon or simple notification) to indicate such changes. Now, the SCC reports policy drift changes page by page to aid in reviewing the specific settings.
Restarting the SCC clears all policy drift information.
Pushing policies to selected appliances or groups
You can push SCC configurations (in the form of policies) to selected appliances or appliance groups.
Any changes made to policies on the SCC don’t take effect on remote appliances until the new configurations are pushed to the appliances.
When you push SCC configurations (in the form of policies) to selected appliances or appliance groups, appliance page configurations are also pushed.
For details about appliance page configurations, see
Managing appliance pages. Any scheduled operations on appliance groups execute according to the time on the SCC, not the time on the remote appliance. For example, if the SCC clock is set to Pacific Daylight Time (PDT) but the remote appliance clock is set to Central European Summer Time (CEST), then an operation scheduled for midnight on the SCC (PDT) is executed at 9:00 AM on the remote appliance (CEST). This operation applies only to SteelHeads and Interceptors.
For detailed information about pushing global policies, see
Performing global policy pushes.You can abort a pending policy push using the SCC CLI command cmc policy abort job <job-id>.
You can push a configuration to an appliance or an appliance group under Manage > Topology: Appliances. Click Appliance Operations to display the Appliance Operations page. Select the appliances or appliance groups to which you want to push settings in the appliances table. Select Push Policies from the operation drop-down list. These configuration options are available:
Include Path Selection, QoS, and Applications (RiOS 9.0 and later); Web Proxy and Application Stats Collection (RiOS 9.1 and later)
Includes path selection rules, QoS profiles, applications, web proxy settings, and application statistics in the policy push.
Restart Optimization Service If Required
Automatically restarts the RiOS service on the appliances after the push.
Restart QoS Service If Required
Automatically restarts the QoS service, if required.
• For legacy outbound QoS (Advanced) policy changes—The QoS service must first be disabled if the policy push changes queue type of an existing QoS class. If the QoS service isn’t disabled the policy push fails.
• For legacy outbound QoS (Basic) and outbound QoS (Advanced)—Disables the QoS service on all appliances that you push to. This option temporarily disrupts QoS enforcement.
Restart Xbridge If Required automatically
Restarts Xbridge if required. This applies to Interceptor appliances only.
Schedule Deferred Push
Schedules the action for a later time and date. If this option isn’t selected, the action occurs the next time the appliance connects.
• Date and Time—Specify the date and time in this format: yyyy/mm/dd hh:mm:ss
This operation applies only to SteelHeads and Interceptors.
Push
Pushes your configuration changes to the selected appliances and groups.
You can abort a pending policy push using the SCC CLI command cmc policy abort job <job-id>.
Replacing (generating) peering certificates
You can replace the peering certificates used to secure the inner channel between the SteelHeads by generating new private keys and self-signed public certificates.
If possible, the certificates are signed by the certificate authority, otherwise they’re self-signed.
A policy push must be initiated to all SteelHeads for the new certificates to be used in peering. If the policy push excludes any affected SteelHeads, SSL optimization to the SteelHeads doesn’t work properly.
If CA is enabled, all newly generated certificates are automatically be signed. The existing certificates must be replaced to be signed.
You can replace (generate) peering certificates under Manage > Topology: Appliances. Click Appliance Operations to display the Appliance Operations page. Select Replace (Generate) Peering Certificates from the operation drop-down list. These configuration options are available under Self-Signed Certificate.
Common Name
Specifies the common name of a certificate.
• Appliance Hostname—Select if the common name is the hostname or IP address.
• Custom Name—Select to specify a common name other than the hostname or IP address.
To facilitate configuration, you can use wildcards in the name: for example, *.example.com. If you have three origin servers using different certificates, such as webmail.example.com, internal.example.com, and marketingweb.example.com, on the server-side SteelHeads, all three server configurations can use the same certificate name *.example.com.
Organization Name
Specifies the organization name (for example, the company).
Organization Unit Name
Specifies the organization unit name (for example, the section or department).
Locality
Specifies the city.
State
Specifies the state.
Country
Specifies the country (2-letter code only).
Email Address
Specifies the email address of the contact person.
Validity Period
Specifies how many days the certificate is valid.
Click Replace to replace the peering certificates.
Updating licenses
The SCC fetches and pushes licenses to selected appliances or groups. You can also fetch a license from the Riverbed License portal and store it locally. This option ignores the selected appliances and applies the license to all appliances specified in the license file.
CLMF license installation is not supported.
You can update licenses under Manage > Topology: Appliances. Click Appliance Operations to expand the page, and select License Update from the operation drop-down list. These configuration options are available under License Update Method:
Update License using Riverbed Licensing Portal
Updates the license using the Riverbed Licensing Portal.
From Local File
Specifies the path. Alternatively, click Browse to navigate to the local file directory.
Update
Updates the current license.
Starting and stopping appliances
You can start and stop the system service on selected appliances and appliance groups under Manage > Topology: Appliances. Click Appliance Operations to expand the page, and select Start/Stop Services from the operation drop-down list. These configuration options are available:
Service Action
Specifies Start, Stop, or Restart from the drop-down list.
Clean Data Store
Clears the RiOS data store. This option only applies to SteelHeads.
Schedule Deferred Service Action
Schedules the action for a later time and date. If this option isn’t selected, the action occurs the next time the appliance connects.
• Date and Time—Specify the date and time in this format: yyyy/mm/dd hh:mm:ss
This option only applies to SteelHeads and Interceptors.
The results of this operation can be viewed in the Operation History page. For detailed information about operation history, see
Managing appliance operation history.Shutting down appliances
You can shut down the system on selected appliances and appliance groups under Manage > Topology: Appliances. You can also clean the data store and schedule a shutdown.
Click Appliance Operations to expand the page, and select Shutdown from the operation drop-down list. These configuration options are available:
Clean Data Store
Cleans the RiOS data store.
Schedule Deferred Shutdown
Schedules the action for a later time and date. If this option isn’t selected, the action occurs the next time the appliance connects.
• Date and Time—Specify the date and time in this format: yyyy/mm/dd hh:mm:ss
Shutdown
Shuts down the selected appliance and appliance groups. Click Shutdown.
The results of this operation can be viewed in the Operation History page. For detailed information about operation history, see
Managing appliance operation history.Setting the password for appliances
You can set the password for administrator and monitor users on selected appliances and groups under Manage > Topology: Appliances.
The SCC sets the password used to connect with the remote appliance. The SCC automatically updates the password that’s used by the SCC to connect with the remote appliance.
Select the Appliance Operations tab to expand the page.
Select the Appliance Operations tab to expand the page. Select Set Password from the operation drop-down list. These configuration options are available:
User
Specifies admin or monitor in the text box.
Password
Specifies the password.
Confirm Password
Confirms the password.
Set Password
Sets the specified password.
The results of this operation can be viewed in the Operation History page. For detailed information about operation history, see
Managing appliance operation history.Unlocking the secure vault
You can unlock the Secure Vault on selected appliances and appliance groups under Manage > Topology: Appliances. This operation applies only to SteelHeads.
The SCC unlocks the secure vault on the selected appliances or groups if the correct password has been specified. If successful, this operation also automatically updates the stored copy of the secure vault password for each selected appliance.
When the secure vault on an appliance or an appliance group is locked, you can’t push some configuration settings.
Click Appliance Operations to display the Appliance Operations page. Select Unlock Secure Vault from the operation drop-down list. Specify the password and click Unlock Vault to unlock the secure vault on the selected appliances or appliance groups.
The results of this operation can be viewed in the Operation History page. For detailed information about operation history, see
Managing appliance operation history.Changing the secure vault password
You can change the password for the Secure Vault on selected appliances and appliance groups under Manage > Topology: Appliances. This operation applies only to SteelHeads and Client Accelerators.
The SCC must know the current secure vault password that’s set on the SSL configuration page of each appliance. This operation automatically updates the stored copy of each password on the selected appliance.
1. Click Appliance Operations to display the Appliance Operations page.
2. Select Change Secure Vault Password from the operation drop-down list.
3. Specify the current password, or leave the text box blank if the factory default password is used.
4. Specify the new vault password, or leave the text box blank to reset to the factory default password, and confirm the new secure vault password.
5. Click Change Password to change the secure vault password.
The results of this operation can be viewed in the Operation History page. For detailed information about operation history, see
Managing appliance operation history.Sending CLI commands
You can send a set of CLI commands to the selected appliances and groups under Manage > Topology: Appliances. Click Appliance Operations to display the Appliance Operations page. Select Send CLI Commands from the operation drop-down list. These configuration options are available:
Text field
Specifies the set of CLI commands. Paste or type the set of CLI commands. Each command must be on a separate line. This feature provides the flexibility to configure your appliances using CLI commands. For example, using the CLI commands in policies:
• enables you to configure new appliance features.
• enables you to override specific configuration items at a subpage granularity without maintaining multiple copies of otherwise identical policies.
Sending CLI commands has these restrictions:
• The SCC can’t parse the CLI commands and perform a check to verify if they’re compatible with the rest of the configuration; therefore, a failure is harder to diagnose.
• The CLI commands from all assigned policies are sent with every push. Given this, you must check each policy that’s assigned to each parent group and individually check its details to review exactly what was pushed.
Schedule Deferred Command Execution
Schedules the action for a later time and date. If this option isn’t selected, the action occurs the next time the appliance connects.
• Date and Time—Specify the date and time in this format: yyyy/mm/dd hh:mm:ss
Send
Executes the commands on the appliance.
Starting or stopping SteelCentral NetShark service
You can start or stop the SteelCentral NetShark service under Manage > Topology: Appliances. This operation applies only to SteelHeads and can take up to five minutes to take effect.
Click Appliance Operations to display the Appliance Operations page. Select SteelCentral NetShark from the operation drop-down list. These configuration options are available:
Service Action
Specifies Start or Stop from the drop-down list.
Apply
Applies your settings to the running configuration.
Disabling SSL server certificate export
You can disable the SSL server certificate export feature under Manage > Topology: Appliances. For security reasons, once a certificate export has been disabled, it can’t be reenabled.
This operation applies only to SteelHeads.
Consider making SSL server certificates and private keys nonexportable with your particular security goals in mind. Before doing so, you must have a thorough understanding of its impact. Use caution and consider these best practices before making SSL configurations nonexportable:
• After disabling export on a new SteelHead running 7.0.1, you can’t reenable it unless you clear the secure vault and perform a factory reset on the SteelHead. (Performing a factory reset results in losing your configuration settings.)
• After upgrading a SteelHead to 7.0.1 and disabling export, you can’t export any preexisting or newly added server certificates and private keys to another SteelHead.
• After disabling export, any newly added server certificates and keys are marked as nonexportable.
• After disabling export and then downgrading a SteelHead to a previous RiOS version, you can’t export any of the existing server certificates and private keys. You can export any newly added server certificates and private keys.
• Disabling export prevents you from copying the secure vault content.
Click Appliance Operations to display the Appliance Operations page. Select Disable SSL Server Certificate Export from the operation drop-down list. Click Disable Export.
Joining or leaving a windows domain
You can join or leave a Windows domain under Manage > Topology: Appliances. This action can take up to five minutes to take effect.
For detailed information about Windows domains, see the SteelHead User Guide.
Click Appliance Operations to display the Appliance Operations page. Select Join/Rejoin/Leave a Windows Domain from the operation drop-down list. These configuration options are available:
Domain action
Joins, rejoins, or leaves the domain. If you’re in domain mode and have joined a domain, you can’t change to local work-group mode until you leave the domain.
Active Directory Domain Name/Realm
Specifies the domain in which to make the SteelHead a member. Typically, this is your company domain name. RiOS supports Windows 2000 or later domains. RiOS doesn’t support nondomain accounts other than administrator accounts. If you create Local mode shares on a nonadministrator account, your security permissions for the share aren’t preserved on the origin-file server.
Domain Login
Specifies the login name, which must have domain join privileges. Domain administrator credentials aren’t strictly required, except when you join the domain as an Active Directory integration. RiOS deletes domain administrator credentials after the join.
Password
Specifies the password. This control is case sensitive.
Domain Controller Name(s)
Specifies the hosts that provide user login service in the domain, separated by commas. If the Join Account Type is Active Directory Integrated 2008 or later and the Windows domain controllers are a combination of Windows 2003, 2008, and later, then a name list of Windows 2008 or later domain controllers is required. We recommend specifying the domain controller names in environments where there is varying latency between the SteelHead and the domain controllers.
Short Domain Name
Specifies the short domain (NetBIOS) name if it doesn’t match the first portion of the Active Directory domain name. The short domain name is case sensitive.
Apply
Applies your changes to the running configuration.