Using the Hypervisor Installer
The Hypervisor Installer guides you through setting up your hostname, password, network settings, storage, and vCenter license (if applicable) and pushes these settings to the hypervisor configuration. Depending on your configuration, this process can take up to 30 minutes to complete. The hypervisor status must be Ready to Install, Normal, or Limited Qualification - VSP Managed before running the installer.
As shipped, the hypervisor is initialized but not installed. You must install the hypervisor before it can host virtual machines. The installer configures these settings:
Task | Overview | Procedure |
Administration | — | |
Storage | | |
Network | — | |
Advanced Administration, Storage and Network Settings | | |
Exiting the installer before completion will lose all changed settings. Changes are not committed until the installer finishes. You can cancel and restart the installer at any time during the process to redo any steps.
To configure the hostname, password, and license
1. Choose Virtualization > Installer: Installer to launch the installer. You can also click Hypervisor Installer in the Dashboard if a hypervisor has not been installed.
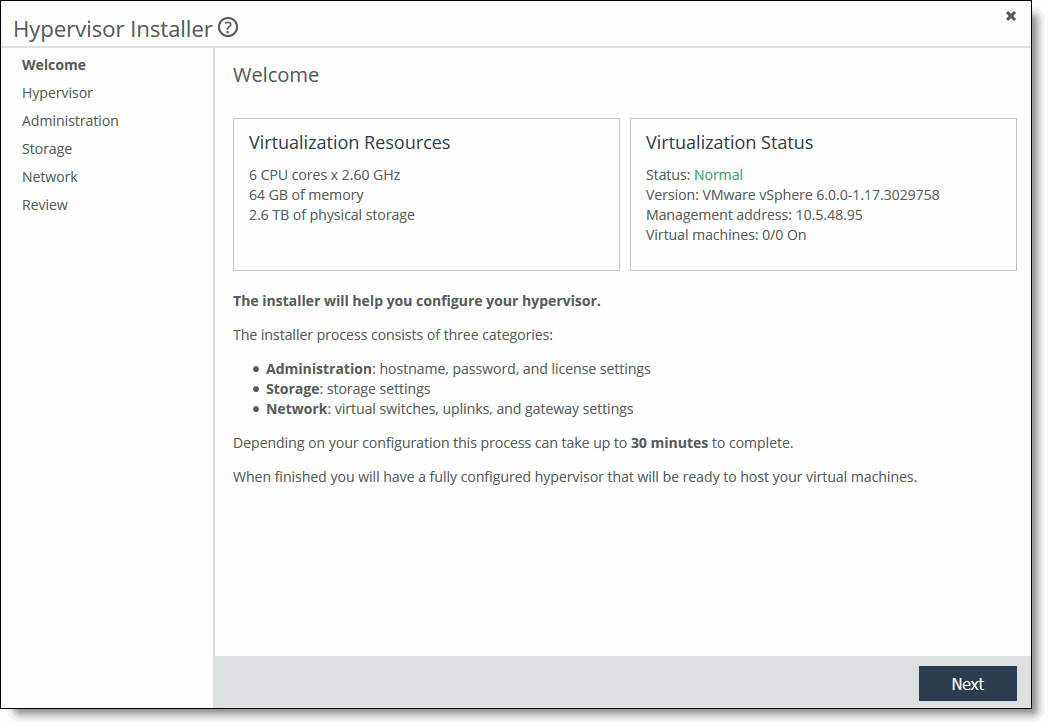
The Hypervisor Installer opens and displays the Welcome page. The Welcome page displays the available dedicated hypervisor node resources and the hypervisor status.
Figure: Hypervisor Installer Welcome page
2. Click Next to display the Hypervisor page.
Figure: Hypervisor Installer - Hypervisor page
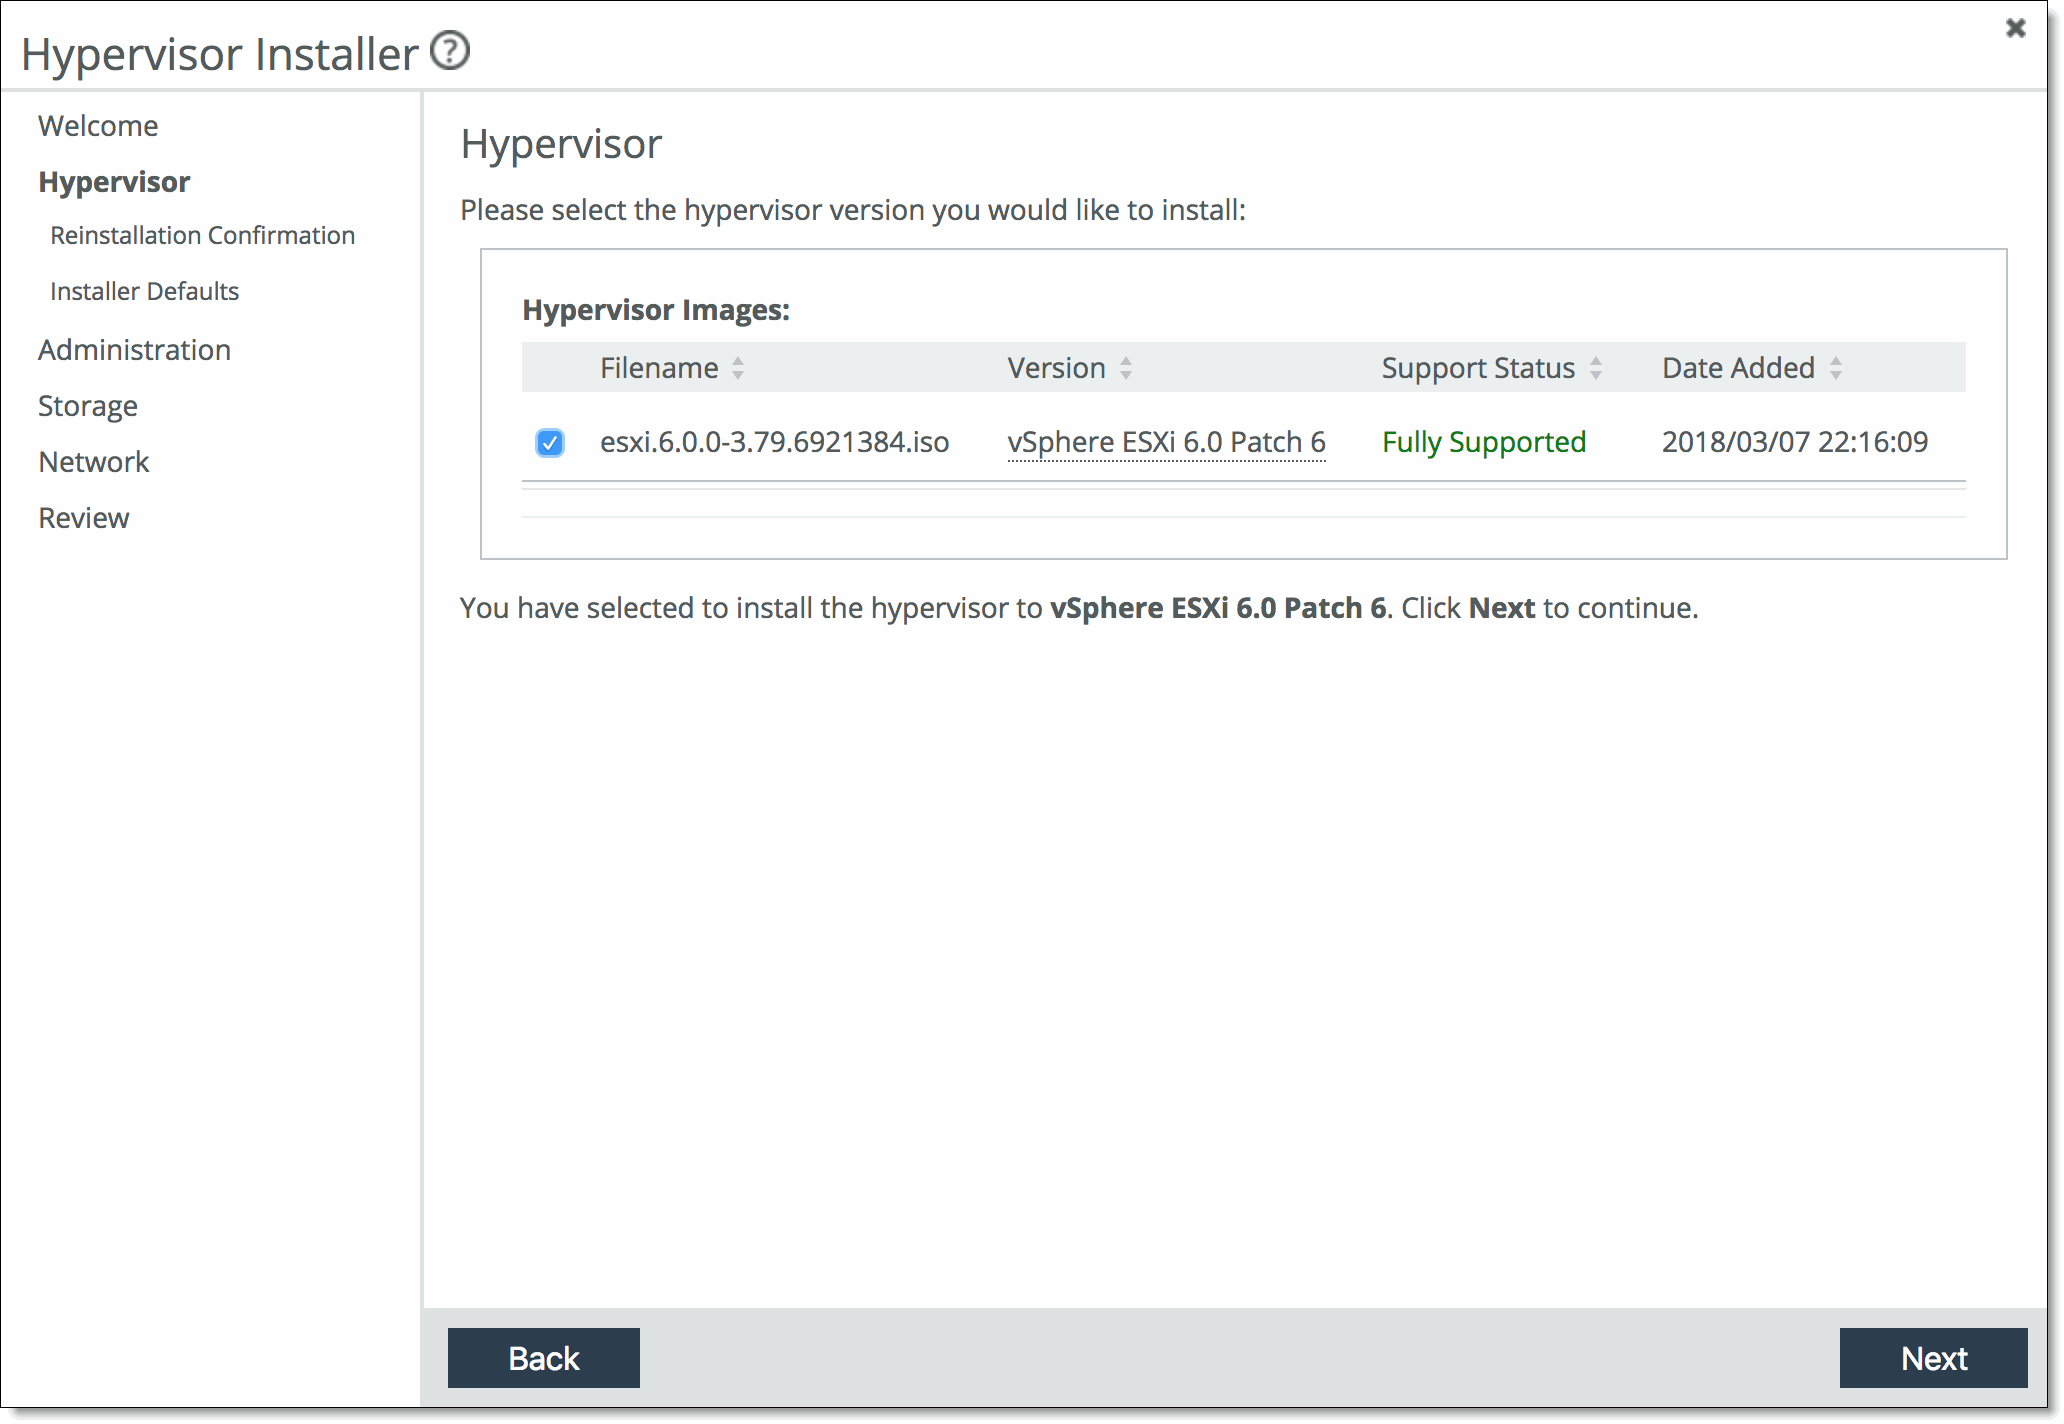
3. Select the hypervisor version you would like to install and click Next.
If you do not see the hypervisor version in the list, exit the Hypervisor Installer and add the image before proceeding. For details, see
Adding a new image.
4. If you have previously installed a hypervisor, you are prompted to confirm reinstallation. Select Reinstall hypervisor and click Next. In the Installer Default Settings page that appears next, click Previous Settings to continue using existing settings from the latest installation or click Factory Settings to reset the hypervisor to the original factory settings.
5. Click Next.
The Administration Overview page appears. The installer will guide you through configuring direct attached storage after you configure the password, hostname, and license.
If you have not configured a Core, you will be prompted to configure and connect the Core. After you have done so, relaunch the Hypervisor Installer.
6. Click Next. The Password Configuration page appears.
7. Specify the password that will be used to log in to the root user account of the hypervisor through vSphere or vCenter client. The password must meet the default vSphere password complexity requirements. Confirm the password in the Password Confirm text box.
8. Click Next. The Hostname Configuration page appears.
Figure: Hostname Configuration page
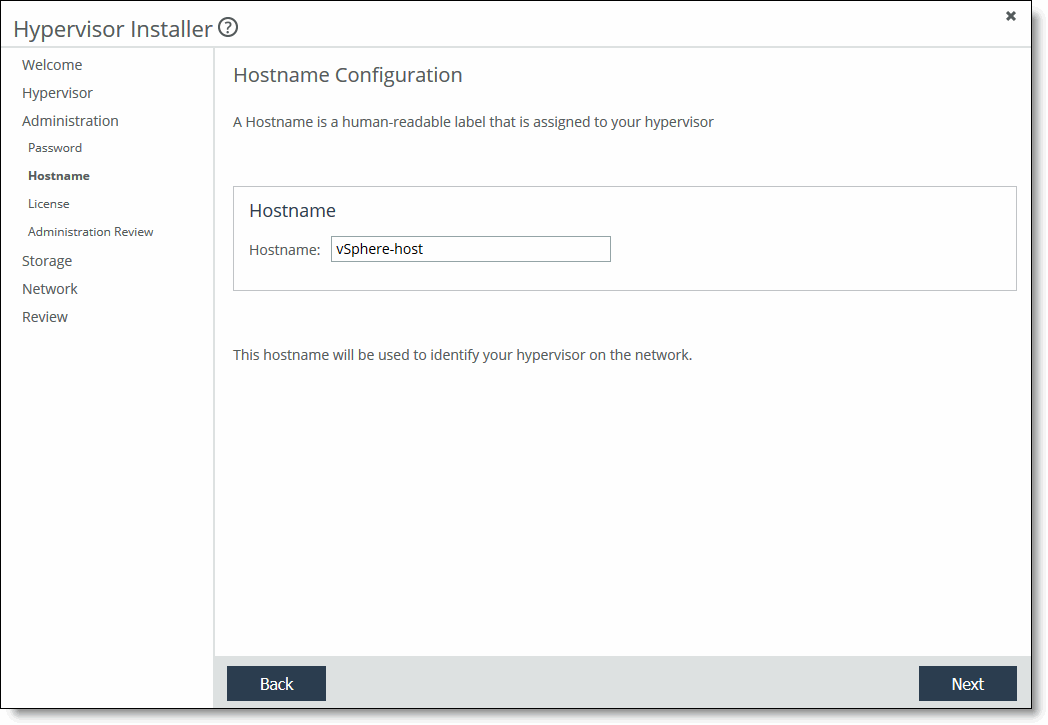
9. Specify the hostname that maps to the IP address of your hypervisor.
10. Click Next. The License Configuration page appears.
Figure: License Configuration page
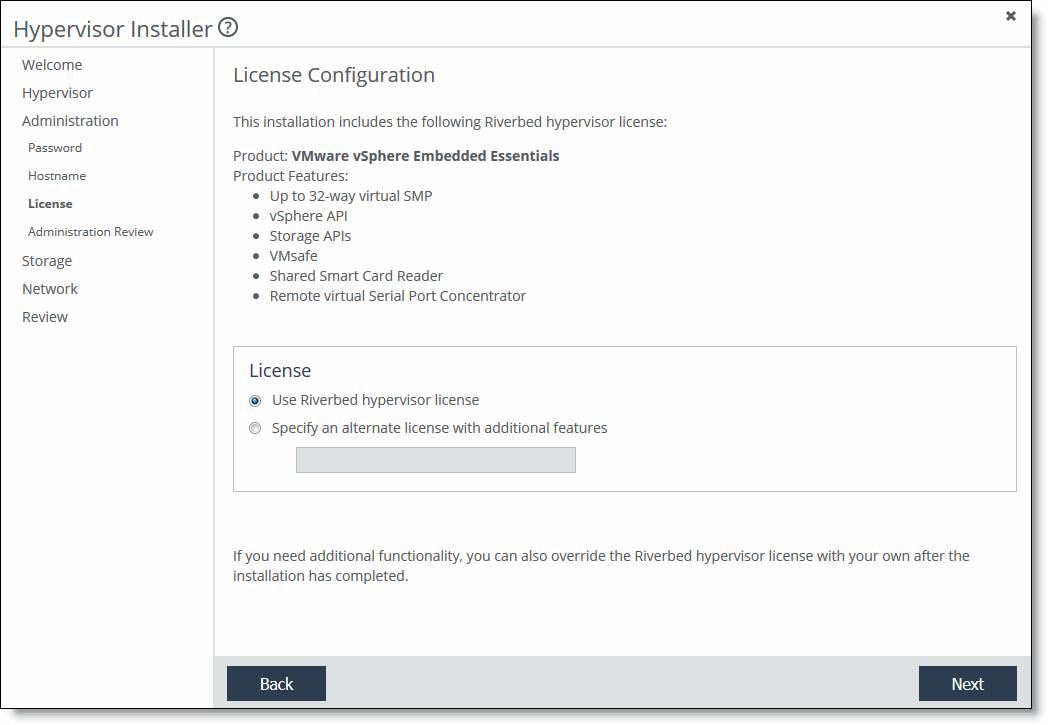
11. Select the Riverbed license or select Specify an alternate license with additional features and specify your own license.
The Riverbed VMware vSphere license, VSPESXI, enables basic hypervisor functions without support for more advanced vSphere features such as vCenter, vMotion, high availability, and so on. If you need additional features beyond what the embedded VSPESXI level licensing provides, you must purchase a license upgrade through your VMware reseller.
After installing the Riverbed hypervisor license, if you add functionality later, you can override the Riverbed license with your own by entering it through vSphere Client.
12. Click Next. A summary of your administration settings appears.
13. Review the settings and click Next to configure the storage settings, or click Back to change any settings.
Configuring hypervisor storage
All hypervisor storage is provided by RiOS through NFS using Riverbed BlockStream technology. A hypervisor has no local disks for storage. When a SteelFusion Core is connected to the Edge, you can use it to manage remote storage at your data center. This configuration allows future expandability.
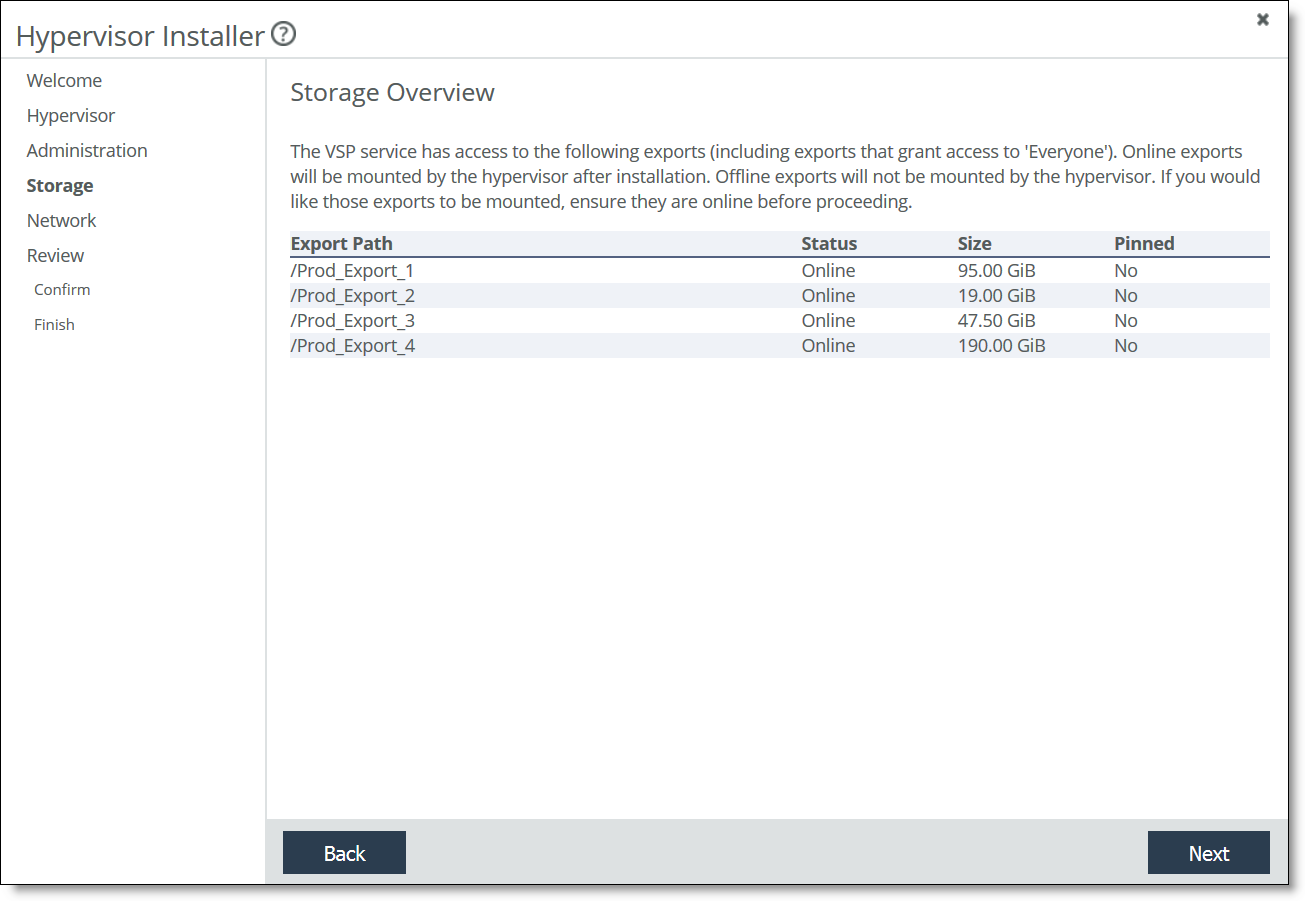
The Storage Overview page of the Hypervisor Installer displays all NFS exports that you mapped to this Edge from the Core, and are available for use by the hypervisor. You can grant different access permissions to these exports at the Core. Only exports mapped to the Edge and configured with one of these permissions will be available for use by the hypervisor:
• Everyone
• Restrict to VSP service on the active Edge
• Restrict to a few hostnames and subnets. If you select this access permission, you must also select the Give VSP service on the Edge Read/Write access option. If your Edges are connected in a high-availability configuration, specify the VSP IP address for each Edge’s ESXi in this section to enable communication between each Edge’s VSP.
To use remote storage for the hypervisor through a Core
If you don’t see the NFS exports you expected:
• Make sure there is a working connection between the Edge and Core.
• Check your export settings on the Core (if you don’t have access to Core settings, contact the Core administrator). It is possible that some exports weren’t exposed at the Edge, or that the exports are mapped but the hypervisor doesn’t have the appropriate permissions.
Figure: Storage Overview page
The Network Settings or Network Overview page appears, depending on whether you have previously configured advanced network settings.
To configure network settings
1. Click Next to accept the default settings (you will get a chance to review the settings before they are installed) or Advanced Network Settings to configure the network settings manually.
The advanced network settings include adding vSwitches, configuring VMkernel adapters with IP and tag settings, adding uplinks, teaming interfaces, or adding VMkernel (VMK) services such as vMotion. See
Configuring advanced network settings for details on manual network configuration.
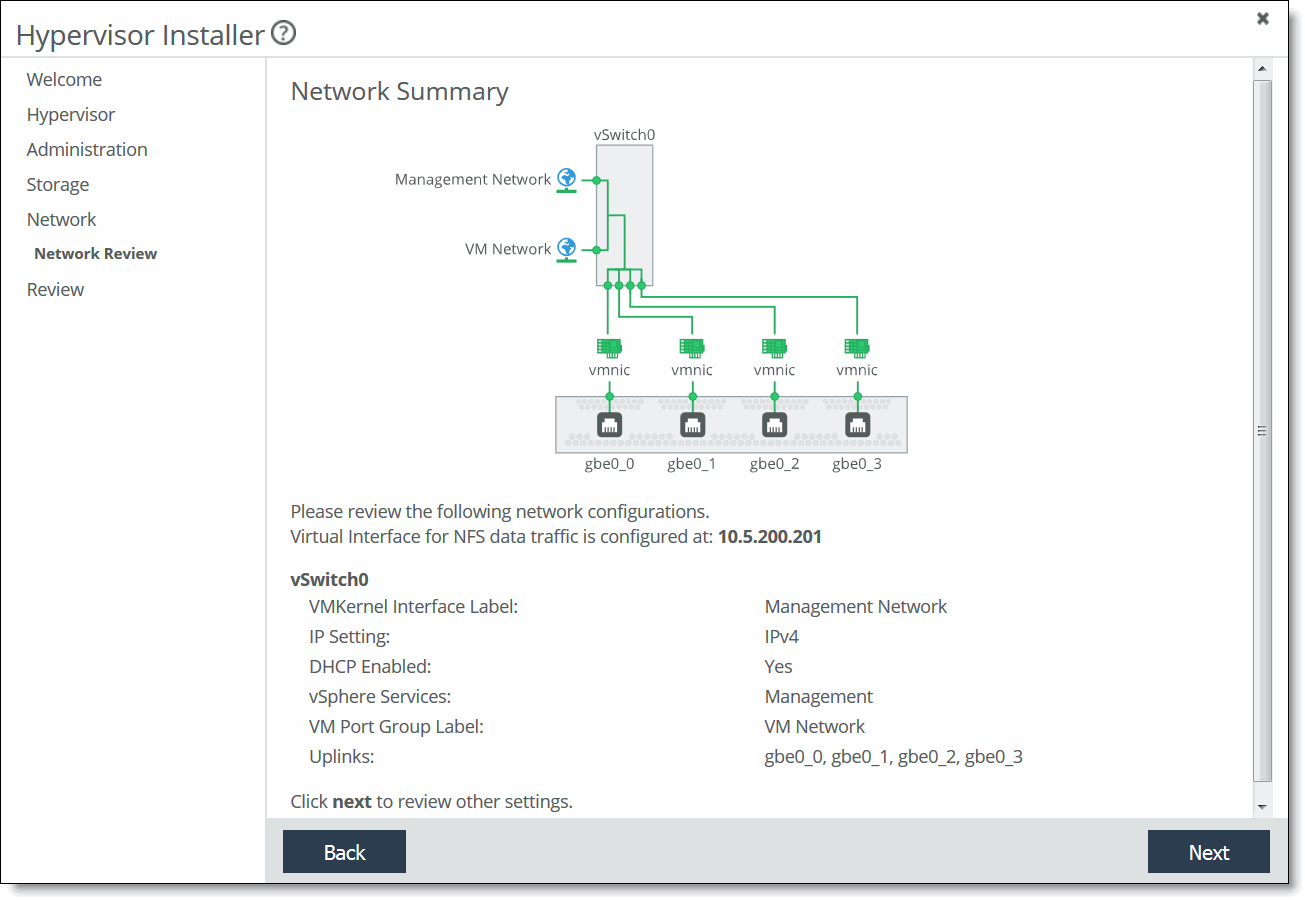
By default, the installer:
• creates one vSwitch called vSwitch0.
• attaches all onboard hypervisor NIC uplinks to the vSwitch (the number of uplinks depend on the appliance model), but excludes add-on NICs for the hypervisor node. You can configure add-on NICs for the hypervisor node through vSphere.
• creates 1 VMkernel port group named Management Network.
• creates one VM port group called VM Network.
• enables DHCP for IPv4 addressing and tagged with management traffic.
The Network Summary page appears.
Figure: Network Summary page
2. Review the default settings and click Next, or click Back and then Advanced Network Settings to change any settings.
For NFS traffic, the hypervisor must have access to the IP address listed on the Storage Edge Configuration page. For details on the Storage Edge Configuration page, see
Connecting an Edge to a Core.
3. Click Next. The installer validates the network settings, and the Review page appears.
If there is an error in the configuration, an error message appears and you must dismiss the message, correct your network settings, and click Next again to proceed to the Review Changes page.
Figure: Review Changes page
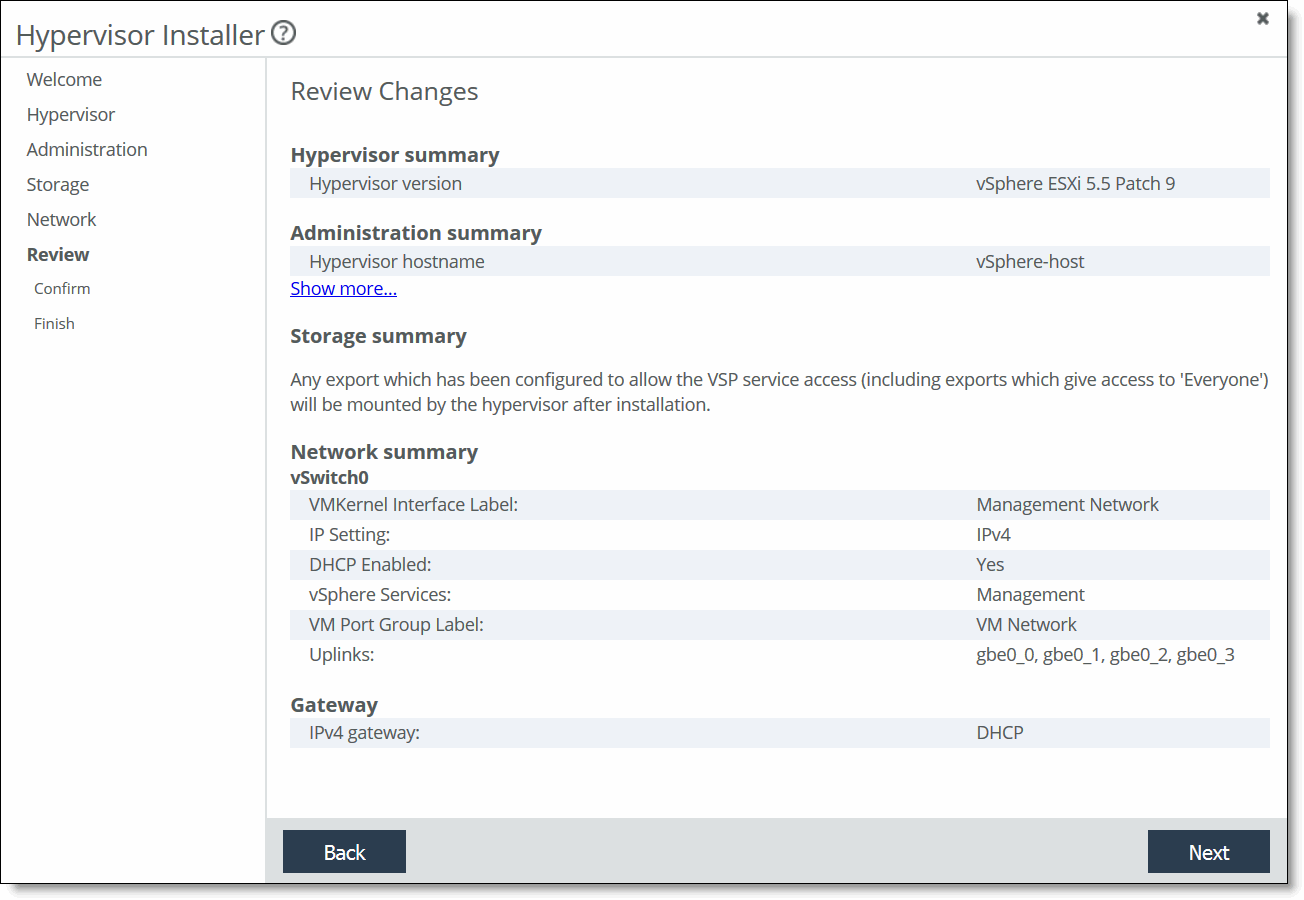
4. Click Next. The confirmation page displays the configuration settings for the hypervisor. The settings include both the values you specified in the installer as well as default configuration settings optimized for the hypervisor with the Edge.
5. Click Install Hypervisor.
The system copies the settings to the hypervisor configuration. This is a one-time, one-way transfer. The changes overwrite any changes that were made directly in the hypervisor outside of the installer. You can make future changes to the hypervisor configuration through vSphere and vCenter, but if you run the installer again, it overwrites all the changes in the hypervisor with the new values from the installer.
The installer places a green check mark next to the message indicating a successful installation, which takes up to 30 minutes.
After a successful installation, if the system can determine the management IP address for the vSphere/vCenter client, it appears in the page.
The installer automatically imports the DNS and NTP settings from RiOS to the hypervisor.
6. Click Close to close the installer and return to the Dashboard.
The Dashboard displays the current resource allocations along with the hypervisor version and uptime.
7. If you have Edges in a high-availability configuration, repeat the Hypervisor Installer steps for the peer appliance.
Configuring advanced network settings
This section describes how to configure advanced network options. The advanced network settings include adding vSwitches, configuring VMkernel adapters with IP and tag settings, adding uplinks, teaming interfaces, or adding VMK Services such as vMotion.
To configure administration settings (advanced settings)
1. Choose Virtualization > Installer: Installer to launch the installer. You can also click Hypervisor Installer in the Dashboard if a hypervisor has not been installed.
The installer opens and displays the Welcome page. If the system detects a previously installed hypervisor, it provides options to reinstall or quit the installer.
2. Step through the administration settings, licensing, and storage. The Network Settings or Network Overview page appears, depending on whether you have previously configured advanced network settings.
3. Click Advanced Network Settings. The Create vSwitch page appears.
A virtual switch is a logical switching component built into your hypervisor so that the Virtual Machines (VMs) can communicate. It routes traffic internally between virtual machines and links to external networks.
To create a virtual switch (advanced settings)
1. Click Create a new vSwitch. The Configure vSwitch page appears, which updates dynamically as you configure the settings.
Figure: Configure vSwitch page
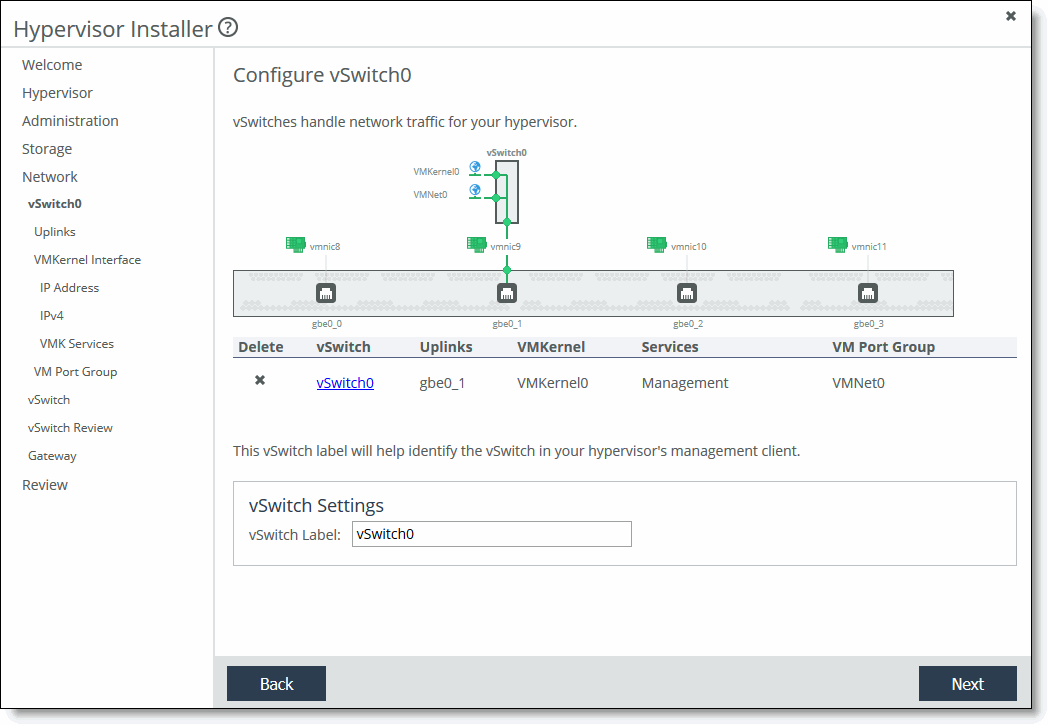
2. Specify the vSwitch label.
You can delete a vSwitch by clicking the x next to the vSwitch name. Click a vSwitch to change any settings.
3. Click Next.
The Configure vSwitch Uplinks page displays the active uplink in focus. Uplinks serve as bridges between physical and virtual networks.
Figure: Configure vSwitch Uplinks page

4. Select an uplink to associate with the vSwitch. You can select more than one to team the uplinks onto the vSwitch.
5. Click Next. The Configure VMKernel interface page appears. Creating a VMkernel interface is optional.
Figure: VMKernel Interface page
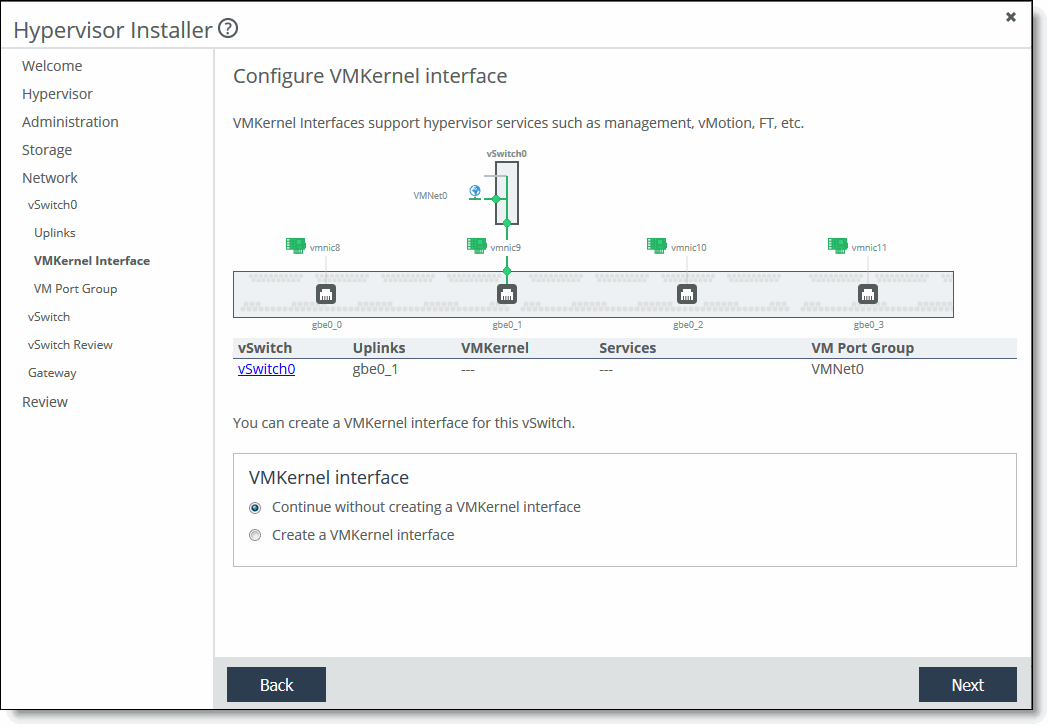
6. Select Continue without creating a VMKernel interface and skip to
Step 8 or select Create a VMKernel interface.
7. Specify a VLAN ID and a VMkernel port label.
8. Click Next. The Configure IP Address page appears. From this page, you can configure VMkernel adapters with IP settings.
Figure: Configure IP Address page

9. Select IPv4 (the default setting), IPv6, or both IPv4 and IPv6 from the drop-down list.
10. Click Next. The Configure VMKernel IPvx page appears.
Figure: Configure VMKernel IPv4 page
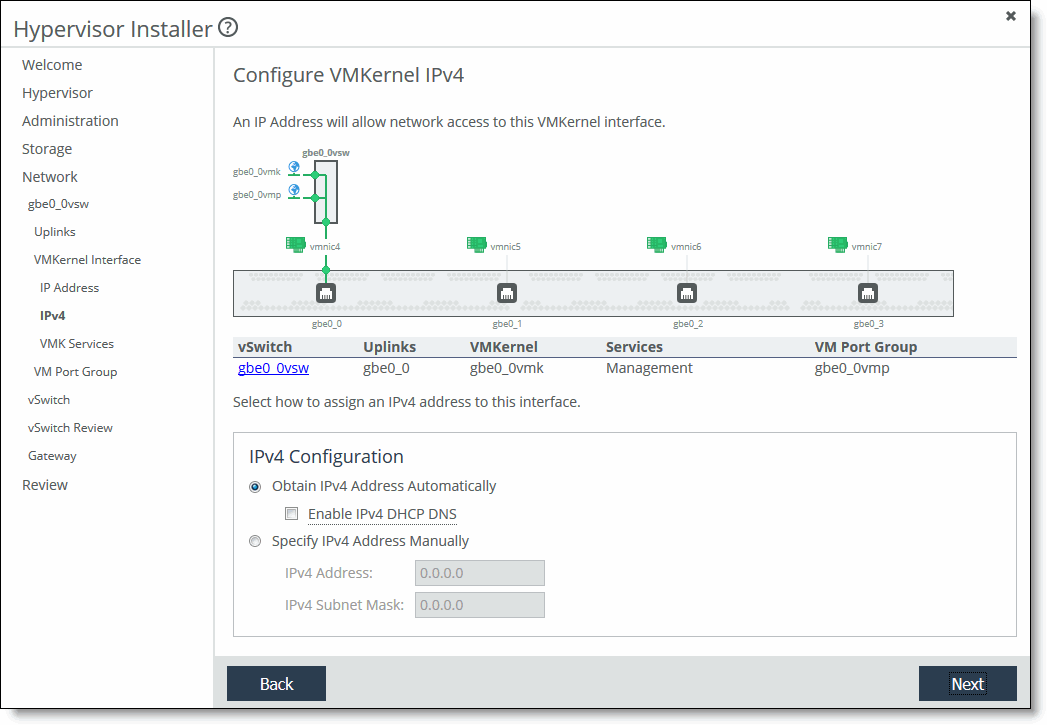
You must specify IP address settings for the hypervisor management interface.
11. Select Obtain IPvx Address Automatically to automatically obtain the interface IPvx address from a DHCP server. A DHCP server must be available so that the system can request the IP address from it.
Select Enable IPvx DHCP DNS to enable IPvx dynamic DNS.
Select Specify IPvx Address Manually if you do not use a DHCP server to set the interface IP address. Specify these values:
• IPvx Address - Specify an interface IPvx address.
• IPvx Subnet Mask - Specify an IPvx subnet mask.
If you select both IPv4 and IPv6, you need to select settings for both types of addresses.
12. Click Next. The Configure VMkernel Services page appears.
Figure: Configure VMkernel Services page
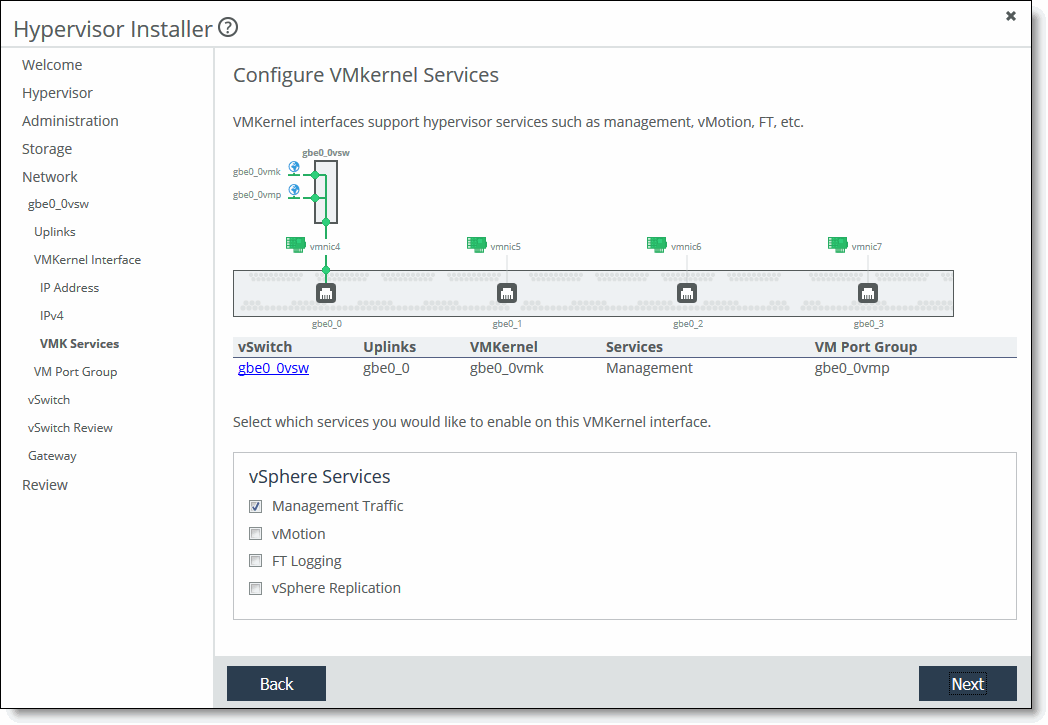
13. Select the vSphere services traffic to enable on this VMkernel interface. If you select vMotion, there are specific VMware rules and requirements that you must follow. For details, see the VMware website.
14. Click Next. The Add Virtual Machine Port Group page appears.
Figure: Add Virtual Machine Port Group page

15. Optionally, select Create a VM port group or select Continue without creating a VM port group.
If you are creating a port group, specify a VLAN ID and a VMkernel port group label.
If you specify a VLAN ID of 0, the port group can see only untagged (non-VLAN) traffic. If you specify a VLAN ID of 4095, the port group can see traffic on any VLAN while leaving the VLAN tags intact.
16. Click Next. The Create a vSwitch page reappears.
You have successfully created a vSwitch. To create another vSwitch, click Create vSwitch and repeat the previous steps.
17. Click Next. The vSwitch Review page reappears. Review the vSwitch settings.
18. Click Next. The Configure Gateway page appears. The page displays IPv4, IPv6, or both, depending on the IP address settings.
Figure: Configure Gateway page
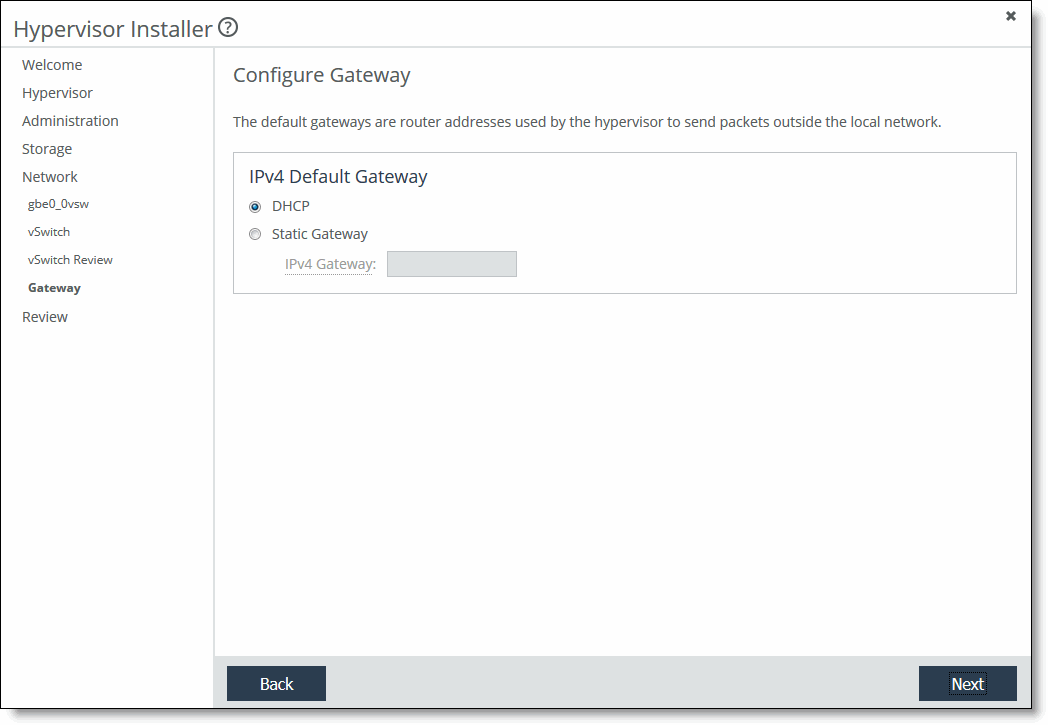
To configure a gateway (advanced settings)
1. Select an IPv4 or IPv6 gateway, or both. The gateway field is available only for the interface that is currently selected as the hypervisor management interface. Select DHCP or specify a static IP gateway. If you select a static gateway, specify an IP address.
2. Click Next. The installer validates the network settings, and the Review page appears.
Figure: Review Changes page
If there is an error in the configuration, an error message appears and you must dismiss the message, correct your network settings, and click Next again to proceed to the Review Changes page.
The confirmation page displays the configuration settings for the hypervisor. The settings include both the values you specified in the installer as well as default configuration settings optimized for the hypervisor with the Edge.
3. Review the changes. Click Show more to view details that do not appear. Click Next.
4. Click Install Hypervisor.
The system copies the settings to the hypervisor configuration. This is a one-time, one-way transfer. The changes overwrite any changes that were made directly in the hypervisor outside of the installer. You can make future changes to the hypervisor configuration through vSphere and vCenter, but if you run the installer again, it overwrites all the changes in hypervisor with the new values from the installer.
The installer places a green check mark next to the message indicating a successful installation, which takes up to 30 minutes.
After a successful installation, if the system can determine the management IP address for the vSphere/vCenter client, it appears in the page.
The installer automatically:
• imports the DNS and NTP settings from RiOS to the hypervisor.
• mounts all your NFS exports.
5. Click Close to close the installer and return to the Dashboard.
The hypervisor restarts with the new values. The Dashboard displays the current resource allocations along with the hypervisor version, status, and uptime.
Note: The Edge includes a host private network (HPN) virtual switch on vmnic0, called rvbd_vswitch. The switch has a kernel port and a virtual machine port. This is an internal switch used for communication within the appliance. Do not modify or delete this virtual switch.
6. If you have Edges in a high-availability configuration, repeat the Hypervisor Installer steps for the peer appliance.