SteelHead-v and SR-IOV
Single Root Input/Output Virtualization (SR-IOV) enables multiple virtual machines in a virtual environment to share a single PCIe hardware interface. SR-IOV works by introducing the idea of physical functions (PFs) and virtual functions (VFs). PFs are full-featured PCIe functions; VFs are lightweight functions that inherit their configuration from their parent PF.
PFs are discovered, managed, and manipulated like any physical PCIe device. PFs have full configuration resources; it’s possible to configure or control the PCIe device through the PF. PFs also have the full ability to move data in and out of the device.
VFs are similar to PFs but lack configuration resources; basically, they only have the ability to move data in and out. VFs can’t be configured because that would change the underlying PF and thus all other VFs. Configuration can only be done against the PF.
SteelHead-v models VCX10 through VCX110 support SR-IOV.
SteelHead-v for KVM models support SR‑IOV across only 1G and 10G interfaces. The drivers for those interfaces are igbevf and ixgbevf, respectively. When SR‑IOV is not applied, in-path interfaces are visible if they are 1G or 10G interfaces.
SR-IOV requirements
Ensure your system meets these requirements:
• The hypervisor and BIOS on the host system supports SR-IOV.
• The physical NIC on the host system supports SR-IOV.
• You are using the most recent version of the iproute2 command source.
• Virtual functions can support promiscuous mode, spoof-checking mode (off), and trust mode (on).
Configuring the host system
BIOS menus and settings may differ depending on motherboard models, installed hardware components, and BIOS software version.
To configure the host system
1. Restart the host machine and press F2 after the Power-On Self-Test (POST) memory test begins and before the operating system boot begins to enter the BIOS Setup program.
2. Choose System BIOS > Processor Settings > Virtualization Technology.
3. Enable Virtualization Technology (VT Technology).
4. Enable Intel© VT-d.
5. Choose System BIOS > Device Settings > [Select NIC] > Device Level Configuration > Virtualization mode and set the virtualization mode to SR-IOV.
6. Restart the host machine and allow the operating system to boot.
7. Open a command window and view the file /etc/default/grub.
8. Ensure that these items are in the GRUB_CMDLINE_LINUX_DEFAULT variable:
nomdmonddf nomdmonisw intel_iommu=on
9. At the command prompt, enter this command:
sudo update-grub
10. Restart the host machine. Open a command window after the operating system boots.
11. Load the ixgbe 5.3.3 driver.
12. Specify the number of virtual functions (VF) to each physical function (PF). See Figure: Command output showing VFs for each PF for example.
echo 2 > /sys/class/net/<pf#>/device/sriov_numvfs
echo 2 > /sys/class/net/<pf#>/device/sriov_numvfs
13. Enter these commands:
cd ~/iproute2/ip;
sudo ./ip link set dev <pf#> vf 0 spoofchk off;
sudo ./ip link set dev <pf#> vf 0 spoofchk off;
sudo ./ip link set <pf#> vf 0 trust on;
sudo ./ip link set <pf#> vf 0 trust on;
sudo ./ip link show <pf#>;
sudo ./ip link show <pf#>;
sudo ifconfig <pf#> promisc up;
sudo ifconfig <pf#> promisc up;
sudo ifconfig <enp1s16> promisc up;
sudo ifconfig <enp1s16f1> promisc up;
Command output showing VFs for each PF

14. Verify your setup.
15. After you verify your setup, update these drivers:
– Update the ixgbe driver on the host to version 5.3.2.
– Update the ixgbevf driver on both the host and the guest to version 4.3.2.
16. Set promiscuous mode for PFs to on. The order is important: start with the PFs.
17. Set promiscuous mode for VFs to on. Set these only after you have set promiscuous mode for PFs.
18. Using the latest iproute2 tools, turn on trust mode for all VFs. For example:
ip link set <pf-link> vf 0 trust on
19. Verify that the system now optimizes traffic.
Configuring the virtual machine guest system
1. Find the MAC address and PCI ID for each of the VFs you created in
Configuring the host system and keep that information in a convenient location. You will need that information in later steps.
2. Create a virtual machine configuration file using this command:
virsh create SSH.xml
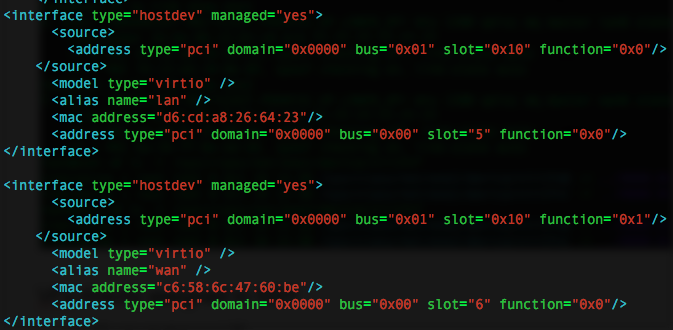
3. Open SSH.xml for editing and use the information you gathered in
Step 1 to specify the MAC address and PCI IDs of VFs in that XML configuration file. See
Figure: Virtual machine configuration file.
Virtual machine configuration file
4. Verify your setup.