Upgrading SteelHead CX, EX, and SteelFusion Core Appliances
This chapter describes how to upgrade SteelHead CX, EX, and SteelFusion Core appliances. It includes the following sections:
Overview
A model upgrade enables you to add a license to an existing CX, EX, or SteelFusion appliance to increase the capacity and the model number of the appliance within its platform family.
You can install licenses using the Riverbed command-line interface (CLI) or the SteelHead Management Console. Model upgrades always preserve the configuration of the appliance.
In some cases, model upgrades require the installation of additional disk drives and memory modules. Upgrades that require the installation of additional hardware don’t preserve the data store.
Model upgrades and platform requirements
The following table describes the available model upgrades, the system requirements for the upgrade, and the impact of the upgrade on the appliance.
Source model | Destination model | Upgrade requirements | Minimum software version | Impact on data store | Impact on configuration | Reboot required |
CX255U | CX255L | License only | RiOS 8.0.3a,
8.5.0 | None | None | No |
CX255U | CX255M | License only | RiOS 8.0.3a,
8.5.0 | None | None | No |
CX255U | CX255H | License only | RiOS 8.0.3a,
8.5.0 | None | None | No |
CX255L | CX255M | License only | RiOS 8.0.3a,
8.5.0 | None | None | No |
CX255L | CX255H | License only | RiOS 8.0.3a,
8.5.0 | None | None | No |
CX255M | CX255H | License only | RiOS 8.0.3a,
8.5.0 | None | None | No |
CX555M | CX555H | License only | RiOS 6.5.4,
7.0.1 | None | None | No |
CX570L | CX570M | License only | RiOS 8.0.6,
8.5.3, 8.6.1 | None | None | No |
CX570L | CX570H | License only | RiOS 8.0.6,
8.5.3, 8.6.1 | None | None | No |
CX570M | CX570H | License only | RiOS 8.0.6,
8.5.3, 8.6.1 | None | None | No |
CX755L | CX755M | License only | RiOS 6.5.4,
7.0.1 | None | None | No |
CX755L | CX755H | License and Hardware Kit | RiOS 8.0.3,
8.5 | Clears RiOS data store and log files. | None | Yes |
CX755M | CX755H | License and Hardware Kit | RiOS 8.0.3,
8.5 | Clears RiOS data store and log files. | None | Yes |
CX770L | CX770M | License only | RiOS 8.0.6,
8.5.3, 8.6.1 | None | None | No |
CX770L | CX770H | License only | RiOS 8.0.6,
8.5.3, 8.6.1 | None | None | No |
CX770M | CX770H | License only | RiOS 8.0.6,
8.5.3, 8.6.1 | None | None | No |
CX1555L | CX1555M | License only | RiOS 6.5.4,
7.0.1 | None | None | No |
CX1555L | CX1555H | License and Hardware Kit | RiOS 8.0.3,
8.5 | Clears RiOS data store and log files. | None | Yes |
CX1555M | CX1555H | License and Hardware Kit | RiOS 8.0.3,
8.5 | Clears RiOS data store and log files. | None | Yes |
CX3070L | CX3070M | License only | RiOS 8.6.2,
9.0.0a | None | None | No |
CX3070M | CX3070H | License only | RiOS 8.6.2,
9.0.0a | None | None | No |
CX5055M | CX5055H | License only | RiOS 7.0.5,
8.0 | None | None | No |
CX5070M | CX5070H | License only | RiOS 8.6.2,
9.0.0a | None | None | No |
EX560L | EX560M | License only | EX 1.0 | None | None | No |
EX560L | EX560H | License only | EX 1.0 | None | None | No |
EX560M | EX560H | License only | EX 1.0 | None | None | No |
EX560G | EX560L | License only | EX 1.0 | None | None | Yes |
EX560G | EX560M | License only | EX 1.0 | None | None | Yes |
EX560G | EX560H | License only | EX 1.0 | None | None | Yes |
EX760L | EX760M | License only | EX 1.0 | None | None | No |
EX760L | EX760H | License only | EX 1.0 | None | None | No |
EX760M | EX760H | License only | EX 1.0 | None | None | No |
EX1160L | EX1160M | License only | EX 1.0/2.5.3 | None | None | No |
EX1160L | EX1160H | License only | EX 1.0/2.5.3 | None | None | No |
EX1160L | EX1160VH | License and Hardware Kit | EX 3.5 | Clears RiOS data store and log files. If SteelFusion is enabled, it clears the blockstore. (Local VSP data isn’t cleared.) | None | Yes |
EX1160M | EX1160H | License only | EX 1.0/2.5.3 | None | None | No |
EX1160M | EX1160VH | License and Hardware Kit | EX 3.5 | Clears RiOS data store and log files. If SteelFusion is enabled, it clears the blockstore. (Local VSP data isn’t cleared.) | None | Yes |
EX1160H | EX1160VH | License and Hardware Kit | EX 3.5 | Clears RiOS data store and log files. If SteelFusion is enabled, it clears the blockstore. (Local VSP data isn’t cleared.) | None | Yes |
EX1160G | EX1160L | License only | EX 1.0/2.5.3 | None | None | Yes |
EX1160G | EX1160M | License only | EX 1.0/2.5.3 | None | None | Yes |
EX1160G | EX1160H | License only | EX 1.0/2.5.3 | None | None | Yes |
EX1160G | EX1160VH | License and Hardware Kit | EX 3.5 | Clears RiOS data store, SteelFusion blockstore, and log files. | None | Yes |
EX1260L | EX1260M | License only | EX 1.0/2.5.3 | None | None | No |
EX1260L | EX1260H | License only | EX 1.0/2.5.3 | None | None | No |
EX1260L | EX1260VH | License and Hardware Kit | EX 3.5 | Clears RiOS data store and log files. If SteelFusion is enabled, it clears the blockstore. | None | Yes |
EX1260M | EX1260H | License only | EX 1.0/2.5.3 | None | None | No |
EX1260M | EX1260VH | License and Hardware Kit | EX 3.5 | Clears RiOS data store and log files. If SteelFusion is enabled, it clears the blockstore. (Local VSP data isn’t cleared.) | None | Yes |
EX1260H | EX1260VH | License and Hardware Kit | EX 3.5 | Clears RiOS data store and log files. If SteelFusion is enabled, it clear the blockstore. (Local VSP data isn’t cleared.) | None | Yes |
EX1260G | EX1260L | License only | EX 1.0/2.5.3 | None | None | Yes |
EX1260G | EX1260M | License only | EX 1.0/2.5.3 | None | None | Yes |
EX1260G | EX1260H | License only | EX 1.0/2.5.3 | None | None | Yes |
EX1260G | EX1260VH | License and Hardware Kit | EX 3.5 | Clears RiOS data store, SteelFusion blockstore, and log files. | None | Yes |
EX1360G | EX1360L | License only | EX 2.5 | None | None | Yes |
EX1360L | EX1360M | License only | EX 2.5 | None | None | No |
GC2000L | GC2000M | License only | SteelFusion 1.0 | None | None | No |
GC2000L | GC2000H | License only | SteelFusion 1.0 | None | None | No |
GC2000L | GC2000VH | License only | SteelFusion 1.0 | None | None | No |
GC2000M | GC2000H | License only | SteelFusion 1.0 | None | None | No |
GC2000M | GC2000VH | License only | SteelFusion 1.0 | None | None | No |
GC3000L | GC3000M | License only | SteelFusion 3.0 | None | None | No |
GC3000L | GC3000H | License only | SteelFusion 3.0 | None | None | No |
GC3000M | GC3000 H | License only | SteelFusion 3.0 | None | None | No |
Notes:
• The CX7070 and CX7055 appliances don’t provide a model upgrade through a license. To upgrade these appliances, you need to exchange the appliance. During this upgrade, there is no data store migration. For more information about this upgrade, contact the Riverbed SalesOps team.
• You can’t upgrade an EX1260 (2 TB) to an EX1260 (4 TB).
• Once you perform a VH upgrade for a SteelHead EX, you can’t downgrade to a software version earlier than 3.5.
• Newer EX 1160 and 1260 appliances—those with SKUs that end with a 5—require a minimum software version of 2.5.3.
• The upgrade process from a G specification to a VH specification is a two-step process: first, upgrade from a G to a L/M/H specification and then upgrade from the L/M/H specification to the VH specification.
Hardware upgrade kits
Some model upgrades require the installation of hardware. The hardware required for your model upgrade is contained in the Upgrade Kit shipped to you.
This table lists the Upgrade Kit part numbers and hardware contents for model upgrades requiring additional hardware.
Upgrade | Upgrade kit
part number | Memory modules included in kit | Hard disks included in kit |
CX755L--->CX755H | UPG-CXA-755-L-H | 1 x 2 GB memory module | Hard disk casing with 1 x 250 GB HDD and 1 x 160 GB SSD |
CX755M--->CX755H | UPG-CXA-755-M-H | 1 x 2 GB memory module | Hard disk casing with 1 x 250 GB HDD and 1 x 160 GB SSD |
CX1555L--->CX1555H | UPG-CXA-1555-L-H | None | 2 x 160 GB SSD disks |
CX1555M--->CX1555H | UPG-CXA-1555-M-H | None | 2 x 160 GB SSD disks |
EX1160 L/M/H (20G)
---> EX1160VH For SKU EXA-01160-B030 ---> EXA-01160-B020 | UPG-EXA-1160-20G-VH | 1 x 4 GB memory module | 2 x 200 GB SSD disks |
EX1160 L/M/H (48G)
---> EX1160VH For SKU EXA-01160-B035 ---> EXA-01160-B025 | UPG-EXA-1160-48G-VH | None | 2 x 200 GB SSD disks |
EX1260 L/M/H ---> EX1260VH | UPG-EXA-1260-VH | None | 2 x 100 GB SSD disks |
For instructions on installing required hardware, see
Installing hardware for model upgrades.
Basic steps
You perform the following steps to upgrade a model.
To perform a license-only upgrade
1. Install the model upgrade license.
You can install the model upgrade license in the CLI or the Management Console. For detailed information, see
Installing licenses and activating specifications. After you install the license, the system indicates the model specifications available and if hardware is required for activation.
2. Stop the service.
You need to stop the SteelHead optimization service to activate a model upgrade specification.
3. Activate the specification.
4. Reboot the system (if needed).
The system notifies you if a reboot is necessary.
5. Restart the service.
To perform a license and hardware kit upgrade
1. Install the model upgrade license.
You can install the model upgrade license in the CLI or the Management Console. For detailed information, see
Installing licenses and activating specifications. After you install the license, the system indicates the model specifications available and if hardware is required for activation.
2. Stop the service.
You need to stop the SteelHead optimization service to activate a model upgrade specification.
3. Activate the specification.
Activate the model upgrade specification in the CLI or the Management Console. For detailed information, see
Installing licenses and activating specifications. When you activate the specification for an upgrade requiring hardware changes, the system shuts down.
If you have SteelFusion configured on a SteelHead EX system, you need to remove the Core. From the SteelHead EX, choose EX Features > SteelFusion Edge: Storage and click Remove Core. For details, see the SteelHead User’s Guide.
4. Install the required hardware.
5. Power on the appliance.
The system reformats the hard drives and completes the upgrade.
Installing licenses and activating specifications
This section describes how to install model upgrade licenses and activate model specifications using the CLI or the Management Console.
After you install a model upgrade license, you must stop the SteelHead service to activate the model specification.
Model upgrades using the CLI
This section describes how to install a model upgrade license and activate a specification using the CLI.
To install a model upgrade license from the CLI
1. Connect to the Riverbed CLI.
For detailed information about using the CLI, see the Riverbed Command-Line Interface Reference Manual.
2. Enter enable mode; at the system prompt, enter the enable command:
amnesiac > enable
3. Enter configuration mode; at the system prompt, enter the configure terminal command:
amnesiac # configure terminal
amnesiac (config) #
4. View current and available model specifications; enter the show hardware spec command:
Note: This step doesn’t apply to SteelFusion Core.
amnesiac (config) # show hardware spec
Spec Description
- ------ ----------------------------------------------------------------------
* EX760L BW Limit: 10000 Kb/s Connection Limit: 900
EX760M BW Limit: 10000 Kb/s Connection Limit: 1500
(activation requires license)
EX760H BW Limit: 20000 Kb/s Connection Limit: 2300
(activation requires license)
* = active
5. Install the model upgrade license; enter the license install <license-key> command:
amnesiac (config) # license install LIC-EXAMPLE-EX760H-0000-0000-0-000X-0XX0
Important: We recommend you write the license to memory after it has been installed.
6. Write the model upgrade license to memory; enter the write memory command:
amnesiac (config) # write memory
7. View licenses installed on the appliance; enter the show licenses command:
amnesiac (config) # show licenses
LIC-EXAMPLE-EX760H-0000-0000-0-000X-0XX0
Index: 6
Feature: MSPECEX760H
Valid: yes
Active: yes
8. View the available model upgrade specification; enter the show hardware spec command.
Note: This step doesn’t apply to SteelFusion Core.
amnesiac (config) # show hardware spec
Spec Description
- ------ ----------------------------------------------------------------------
EX760L BW Limit: 10000 Kb/s Connection Limit: 900
(activation requires license)
EX760M BW Limit: 10000 Kb/s Connection Limit: 1500
(activation requires license)
* EX760H BW Limit: 20000 Kb/s Connection Limit: 2300
* = active
9. Stop the optimization service; enter the no service enable command:
amnesiac (config) # no service enable
Terminating optimization service.......
Note: You must stop the optimization service prior to model upgrade activation.
10. Activate the model specification; enter the hardware spec activate <model-umber> command.
Note: This step doesn’t apply to SteelFusion Core.
amnesiac (config) # hardware spec activate EX760H
Appliance upgrade to EX760H successful
Note: Upgrades that require additional hardware automatically shut down the appliance after you activate the model upgrade specification. Install the new hardware and power on the system. The system reformats the drives and completes the upgrade.
11. Restart the optimization service for model upgrades that don’t require a reboot, enter the restart command:
amnesiac (config) # restart
Terminating optimization service......
Relaunching optimization service.
Note: After upgrading a model, you need to reapply admission control overrides relative to the default admission control values of the new model.
Model upgrades using the Management Console
This section describes how to install a model upgrade license and activate the specification using the SteelHead Management Console. For more information about using the Management Console, see the SteelHead User’s Guide.
To install a model upgrade license using the Management Console
1. Choose Configure > Maintenance > Licenses to display the Licenses page.
Figure: Licenses page in the Management Console
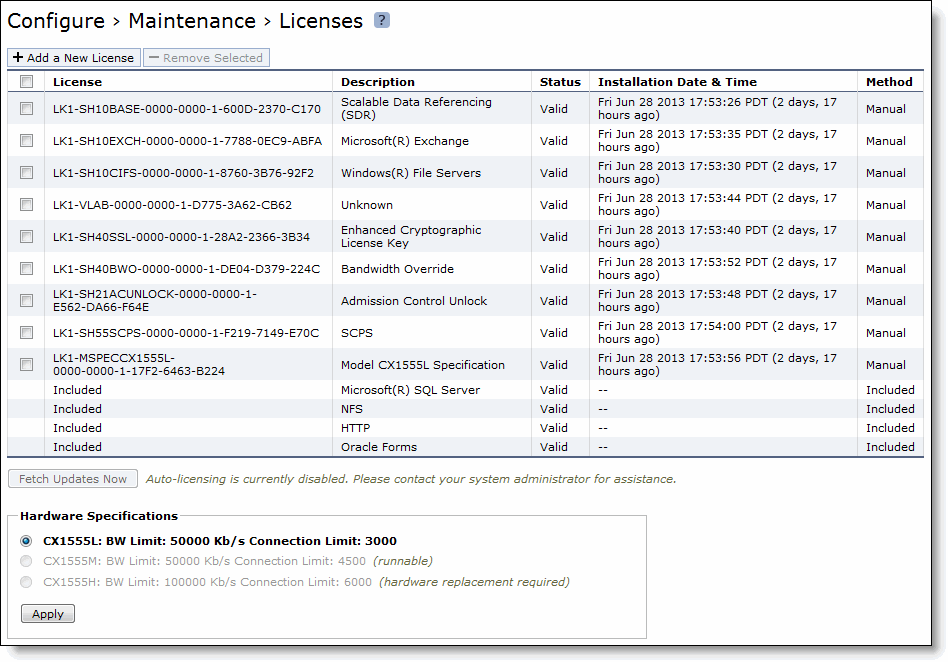
2. Click Add a New License to display the text box to add a new license.
3. Copy and paste the license key into the text box.
4. Click Add to add the license.
5. Click Save to save your settings permanently.
To activate a model upgrade specification using the Management Console
1. Choose Configure > Maintenance > Services to display the Services page.
2. Under Optimization Service click Stop to stop the SteelHead service.
3. Choose Configure > Maintenance > Licenses to display the Licenses page.
The hardware model specifications appear at the bottom of the page. The current specification appears in bold.
Figure: Hardware model specifications appear in the licenses page of the Management Console
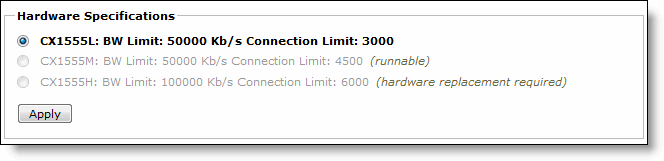
4. Select the model specification you want to activate.
If a model specification requires an appliance reboot after activation, the message activation reboots appliance appears.
5. Click Apply.
Note: Upgrades that require additional hardware automatically shut down the appliance after you activate the model upgrade specification. Install the new hardware and power on the system. The system reformats the drives and completes the upgrade.
6. If your model upgrade doesn’t require the installation of additional hardware, click the Restart icon to restart the optimization service.
When the upgrade is complete, the appliance is transformed into the new model. The model number appears on the appliance banner in the upper-right corner of the screen. The appliance retains its original serial number.
Note: After upgrading a model, you need to reapply admission control overrides relative to the default admission control values of the new model.
Installing hardware for model upgrades
This section describes how to install the hardware for model upgrades from CX755L and CX755M to CX755H and from CX1555L and CX1555M to CX1555H appliances. It includes the following procedures:
For model upgrades that require additional hardware, you can install the license but can’t fully activate the specification until you install the required hardware.
Note: Model upgrades that require additional hardware don’t preserve the data store.
Installing required memory and disk drives for CX755H upgrades
This section describes how to install memory modules and replacement disk drives for CX755L and CX755M to CX755H upgrades. For the disk drive upgrade, you replace the hard drive casing that contains two HDDs with a new casing that contains one SSD and one HDD.
To upgrade memory and disk drives for CX755 model upgrades
1. When you activate the upgrade license, the system shuts down.
2. Disconnect the system from the electrical outlet.
3. Remove the chassis cover.
4. Install the Upgrade Kit memory module in DIMM slot 1.
CX755L and CX755M ship with a 2 GB memory module installed in DIMM slot 0; install the Upgrade Kit memory module in DIMM slot 1.
Note: If you don’t install the memory module in the correct slot, the system doesn’t function properly.
Figure: Adding memory modules for CX755 upgrades
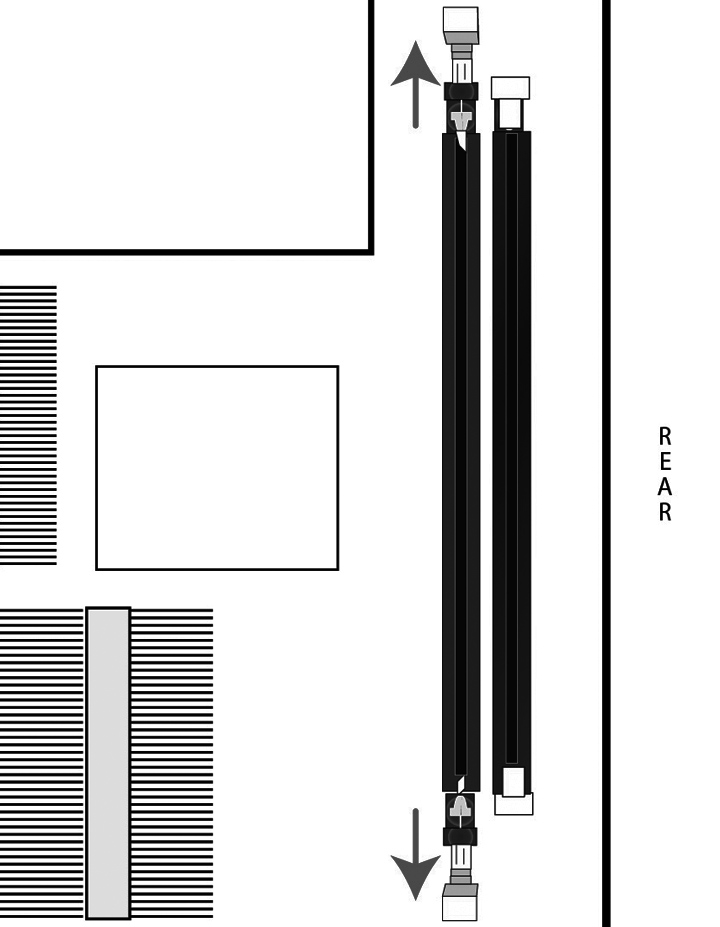
5. Align the memory-module edge connector with the slot alignment keys and insert it into the slot.
The module slot has two alignment keys that allow you to install the module in only one direction.
Figure: Inserting and securing the memory module in the DIMM slot
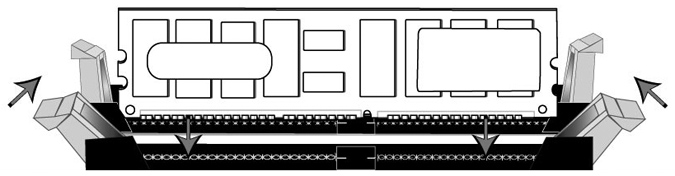
6. Ensure that all ejector tabs are in the upright locked position.
7. To remove the disk drive, remove the three screws and washers holding the disk drive casing to the chassis.
Caution: 
Use a magnetic screwdriver to remove the screws. Use caution when removing the screws and washers; don’t drop them into the system.
8. Pull the entire disk drive casing upward and out of the chassis.
Figure: Removing the disk drive casing from chassis

9. Insert the new disk drive with casing in the same position and secure the casing to the chassis with the three screws.
10. Replace the system cover, making sure the tabs of the cover are under the front frame.
11. Plug the power cord into the AC circuit.
12. Power on the system.
The system automatically reformats the new drive. You don’t need to set up or configure the new disk drive.
Replacing hard disk drives for CX1555H upgrades
This section describes how to install disk drives for CX1555H upgrades. For the upgrade, you replace two HDDs with two SSDs.
To upgrade the disk drives in the CX1555 appliances
1. When you activate the upgrade license, the system shuts down.
2. Open the bezel.
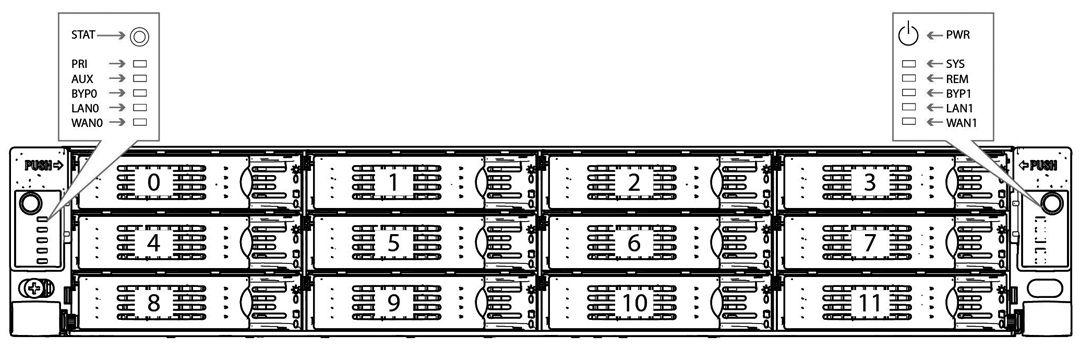
3. Identify the hard disk drives to replace.
The drives are numbered in ascending order from left to right (that is, 0, 1, 2, 3). You replace disks in slots 2 and 3.
Figure: Disk drive numbers

4. Remove the disks from slots 2 and 3.
Press the orange release button and pull the drive handle toward you.
Figure: Releasing the disk drive
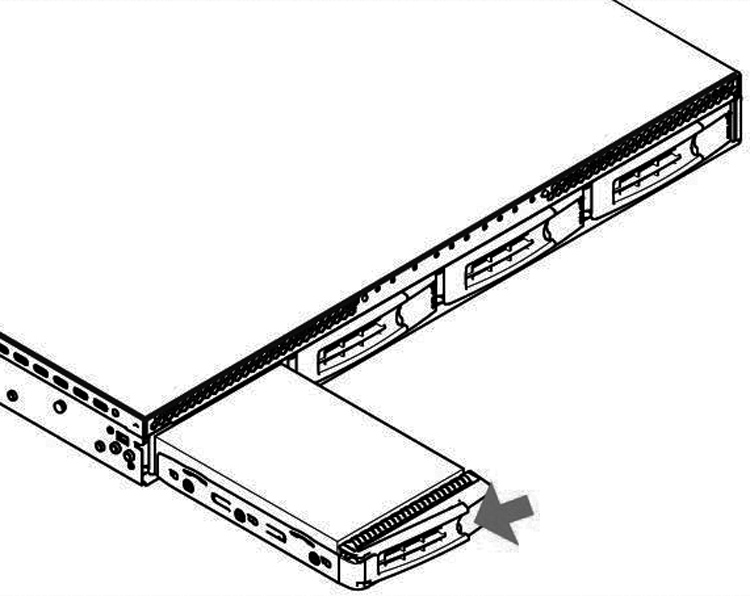
5. Slide the disk drive out of the slot.
6. Open the new disk-drive handles by pressing the orange release button.
7. Slide each new disk drive into the slots until they mate with the back connectors in the chassis.
8. Press in the disk-drive handles to close.
9. Restart the appliance.
The disk drive automatically begins proper operation with the other disk drives. You don’t need to set up or configure the new disk drive. The disk drive LED lights blue when connected.
Installing required memory and disk drives for EX1160VH upgrades
This section describes how to install memory modules and replacement disk drives for upgrades to EX1160VH appliances. For the disk drive upgrade, you replace the two existing SSDs with two 200-GB SSDs. If your EX1160 appliance has 20 GB of memory (SKU EXA-01160-B030), you add 4 GB of memory to upgrade to the EX1160VH (SKU EXA-01160-B020). If your EX1160 appliance has 48 GB of memory (SKU EXA-01160-B035), you don’t need to add memory.
To upgrade memory and disk drives for EX1160VH model upgrades
1. When you activate the upgrade license, the system shuts down.
2. Disconnect the system from the electrical outlet.
3. Remove the chassis cover.
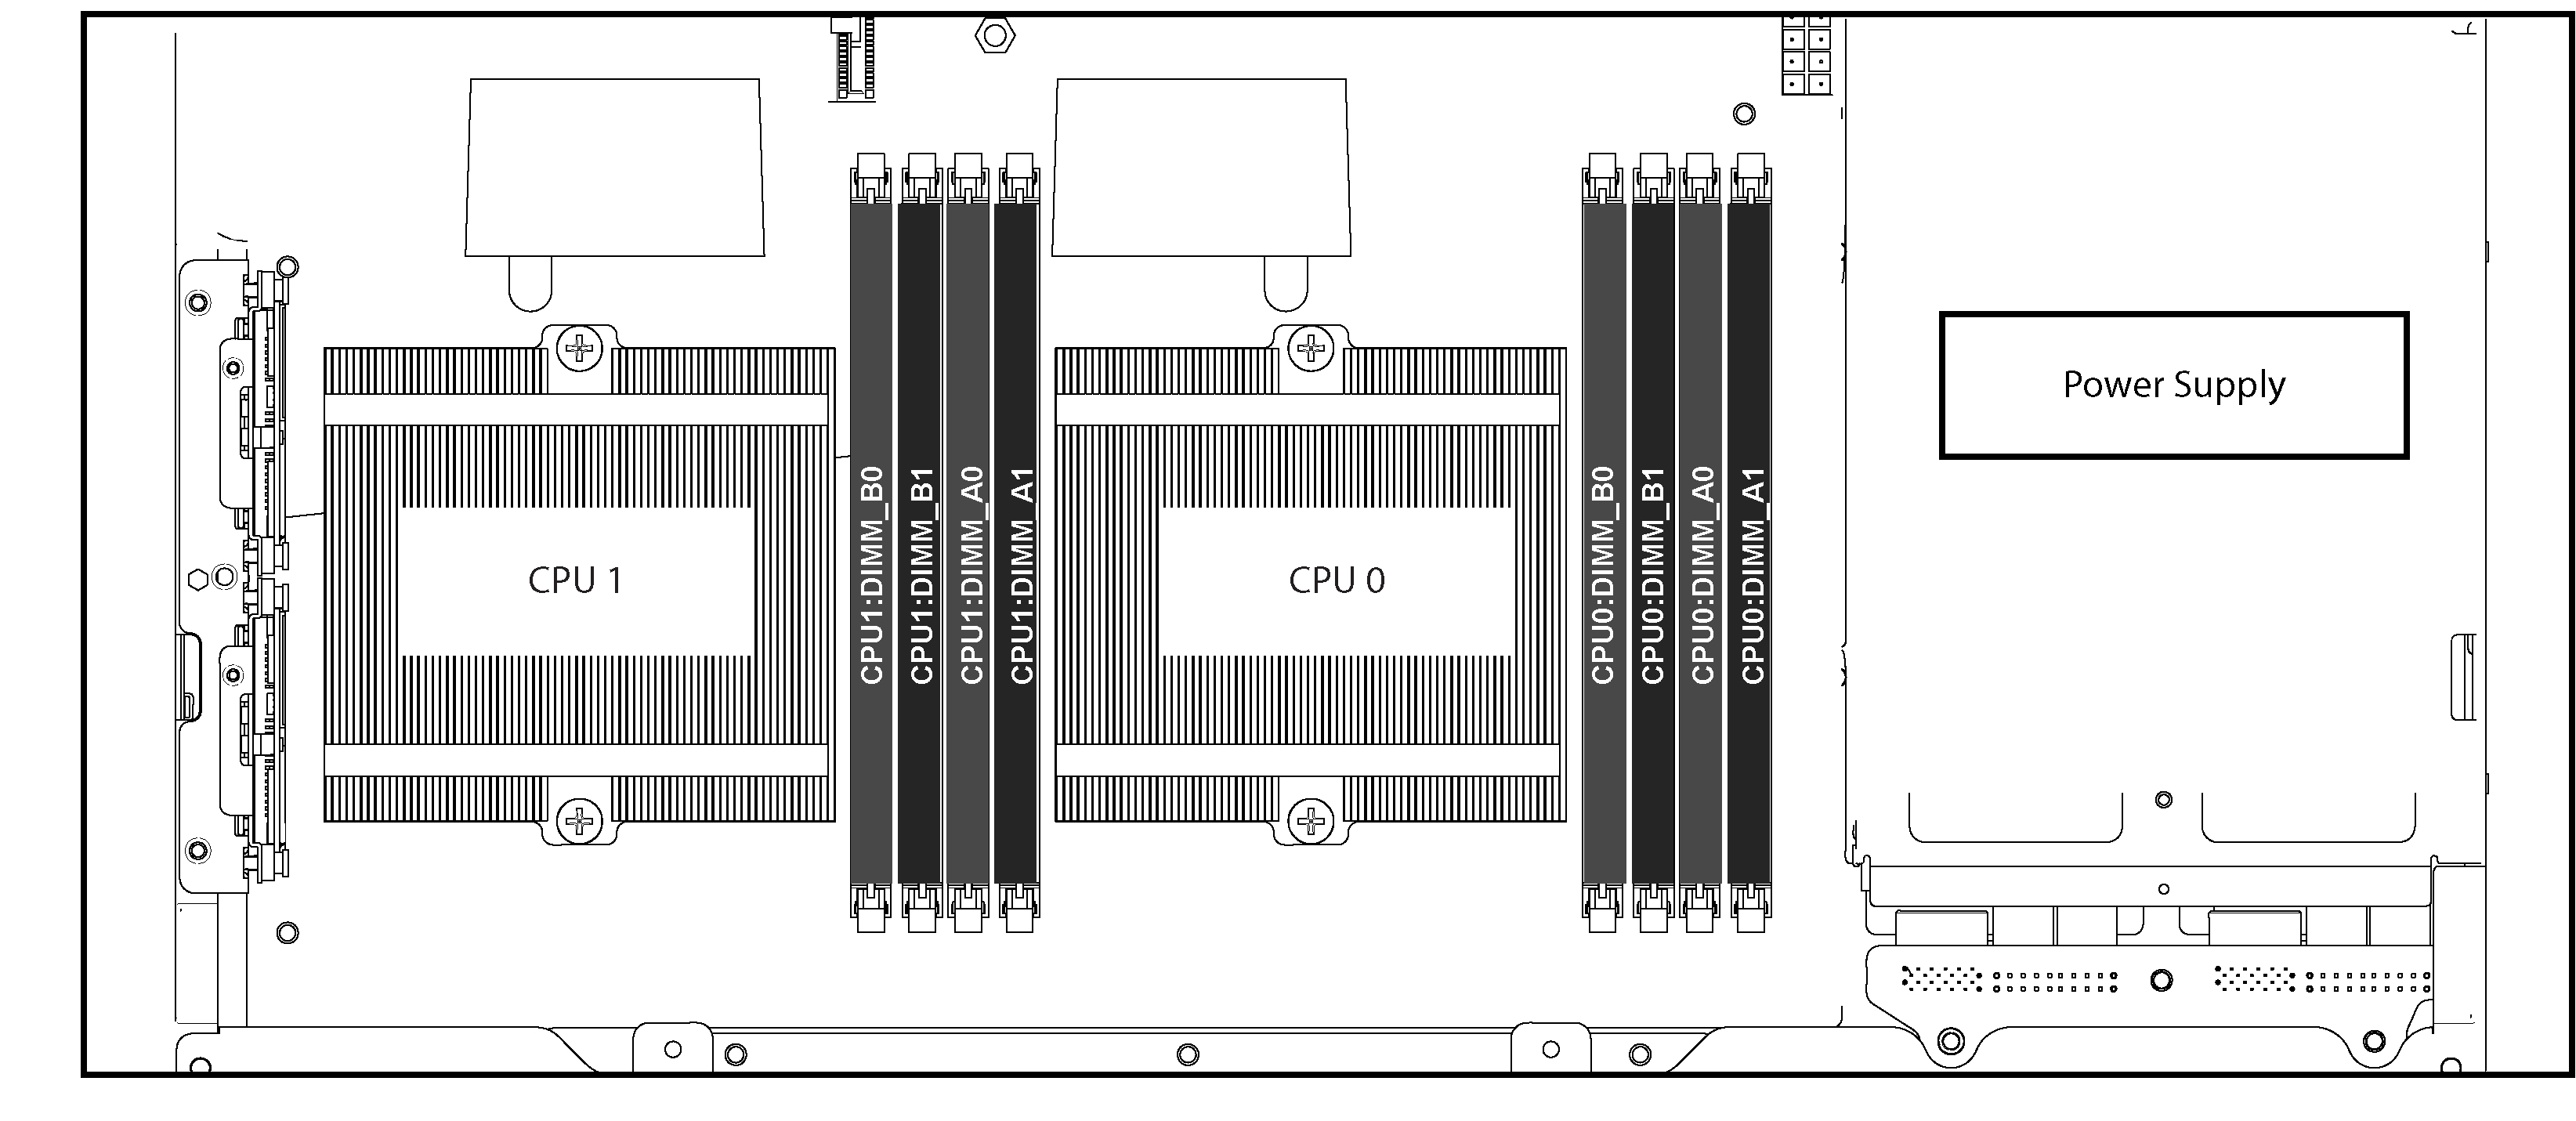
4. For the EX1160 with 20 GB of memory (SKU EXA-01160-B030), install the Upgrade Kit memory module in slot 5 (CPU1 A1).
EX1160 L/M/H ship with memory modules installed in DIMM slots 1 (4 GB), 3 (8 GB), and
7 (8 GB). These slots correspond to CPU0 A1, CPU0 B1, and CPU1 B1.
Note: If you don’t install the memory module in the correct slot, the system doesn’t function properly.
Figure: Memory module slot locations in EX1160
5. Remove the existing SSD drives in slots 2 and 3 and insert the new 200-GB SSDs.
The drives are numbered in ascending order from left to right (that is, 0, 1, 2, 3).
Figure: Disk drive numbers
6. Plug the power cord into the AC circuit.
7. Power on the system.
The system automatically reformats the new drives. You don’t need to set up or configure the new disk drives.
Adding Disk Drives for EX1260VH Upgrades
This section describes how to install disk drives for EX1260VH upgrades. For the upgrade, you add two 100-GB SSDs to the existing configuration.
To add disk drives in the EX1260 appliances for the VH upgrade
1. When you activate the upgrade license, the system shuts down.
2. Open the bezel.
3. Identify the location for the new SSDs.
The drives are numbered in ascending order from the upper-left corner to the lower-right corner. Add the two new SSDs to slots 10 and 11.
Figure: Disk drive numbers
4. Open the new disk-drive handles by pressing the orange release button.
5. Slide each new disk into the available SSD slots until they mate with the back connectors in the chassis.
6. Press in the disk-drive handles to close.
7. Power on the system.
The disk drive LED lights blue when connected. The new disk drive runs through a self-test automatically. The disk drive automatically begins proper operation with the other disk drives. You don’t need to set up or configure the new disk drive.
Upgrading memory for EX1260 appliances
The SteelHead EX1260 supports two memory upgrades. This section describes the memory placement for each upgrade.
Figure: Memory module slot locations in EX1260 appliances
Upgrading to 32 GB
You can upgrade a 2-TB 1260 from 24-GB to 32-GB memory. The 24-GB configuration includes six 4-GB DIMMS. The upgrade kit contains two additional 4-GB DIMMS. Add the additional DIMMS to the two remaining open slots.
For detailed instructions for adding memory to the system, see
Replacing memory modules in 2U appliances.
Upgrading to 64 GB
You can upgrade a 4-TB 1260 from 32-GB to 64-GB memory. The 32-GB configuration includes four 8-GB DIMMS. The upgrade kit contains four additional 8-GB DIMMS. Add the additional DIMMS to the four remaining open slots.
For detailed instructions for adding memory to the system, see
Replacing memory modules in 2U appliances.