Monitoring and Managing GX, xx70, Interceptor 9600, and Core 3500 with BMC
The SteelHead GX10000, CX xx70, SteelHead Interceptor 9600, SteelFusion Core 3500, and SteelCentral xx70 appliances include Baseboard Management Controller (BMC) support.
The BMC monitors the physical state of the appliance. The BMC tracks system and network watchdogs, error logs, and sensors. The sensors of a BMC measure internal physical variables such as temperature, power settings, voltage levels, and fan speeds. You can configure alerts for activity detected outside specified limits.
The BMC also lets you start, restart, and turn off the appliance remotely.
This appendix provides an overview of the features of the BMC on these appliances. It includes the following sections:
Note: This chapter describes some of the key features of the BMC. For complete details about each page, log in to the BMC and click the Help icon in the upper-right corner.
Setting up the BMC for initial access
Before you can access the BMC, you need to configure its network settings.
Note: On 1U appliances, BMC uses the AUX port of the appliance for communication; 2U appliances have a dedicated port for communication.
Setting up BMC on SteelHead and SteelFusion Core 3500
For SteelHead and SteelFusion Core, you set up BMC through the CLI.
To configure the BMC on a SteelHead or SteelFusion Core 3500
• Enable DHCP on the remote management port with this command:
(config) # remote dhcp
—or—
• Set up a static network configuration using the remote ip address, remote ip default-gateway, and remote ip netmask commands.
The BMC address can be on a different subnet than the appliance. (Make sure that the routers are configured to support a different subnet.)
To verify the network configuration
• Enter the show remote ip command:
(config) # show remote ip
DHCP: Enabled
IP Address: 192.168.229.185
Netmask: 255.255.255.0
Gateway: 192.168.229.1
Mac Address: 99:0e:b6:b0:2e:2f
Setting up BMC on NetProfiler
For NetProfiler, you configure BMC through the web interface.
To configure the BMC on NetProfiler
1. Choose Configuration > General Settings in the web user interface.
2. In the Baseboard Management Controller Settings section, click Edit in the Action column and specify the network settings for the BMC.
Consult the NetProfiler online help for details.
Setting Up BMC on NetShark
For NetShark, you set up BMC through the CLI.
To configure the BMC on a NetShark
• Enable DHCP on the remote management port with this command:
(config) # system ipmi enable dhcp
—or—
• Set up a static network configuration using the system ipmi enable ipaddr netmask gateway command.
The BMC address can be on a different subnet than the appliance. (Make sure that the routers are configured to support a different subnet.)
To verify the network configuration
• Enter the interface show ipmi command.
Logging in to the BMC
The BMC provides a web interface for monitoring and management. You can access this interface through HTTP or HTTPS.
To connect to the BMC Web interface
1. In a web browser, enter the IP address for the BMC management port.
To display the BMC IP address for a SteelHead, from the command line use the show remote ip command.
To display the BMC IP address for a NetShark, from the command line use the interface show ipmi command.
2. If the connection isn’t trusted (possibly using a self-signed certificate), you are prompted to add and confirm a security exception.
3. When prompted, log in to the web interface.
The default user name is root; the default password is superuser.
Figure: BMC login page
When you log in, the BMC interface appears and displays the System Information page.
Figure: BMC interface
The page includes a menu bar to access BMC features. A Help link appears in the upper-right corner to provide information about specific pages and features.
Viewing System Information
The System Information section contains general information about system components. Click the System Information tab and use the navigation bar on the left to view these sections:
• System Information - Displays power status, build and firmware details, and overall system health.
• FRU Information - Displays appliance information, including the model number and the serial number.
• System Debug Information - Lets you generate a log file with debug information.
• CPU Information - Displays processor information.
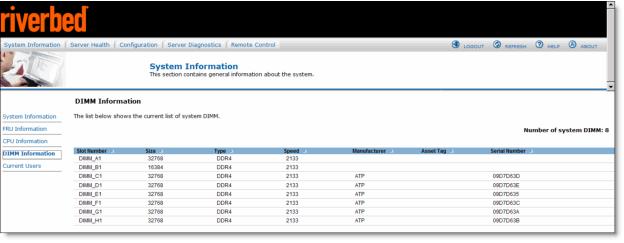
• DIMM Information - Displays the current list of installed DIMMs, including their slot number, size, and type.
• Current Users - Displays a list of current users.
Figure: DIMM Information
Viewing Server Health
From the Server Health section, you can view sensor readings and event logs. Select the Server Health tab and use the navigation bar on the left to view these sections:
• Sensor Readings - Displays system sensor information, including status, health, and readings.
• Event Log - Displays a list of events from the system event log. You can filter by category and sort by columns. You can save the log to a file or you can clear the log.
• Power Statistics - Displays the power usage for the appliance including the current, maximum, and average power consumption.
Figure: Server Health
Configuring the BMC
From the Configuration section you can view the BMC settings and configure settings not related to your network configuration. Select the Configuration tab and use the navigation bar on the left to view these sections:
• IPv4/IPv6 Network - Although sections appear for network configuration, we don’t recommend setting BMC network values from the BMC interface. The changes won’t be saved between system restarts. Instead, configure the network settings for the BMC through the appliance CLI (or for NetProfiler, through the standard web interface). For details, see
Setting up the BMC for initial access.
• Users - Displays the users configured for BMC access and shows their status, access privilege, and user names. You can add, modify, and delete users from this page. You can configure up to 15 users for BMC access.
• Security Settings - View and configure security settings, such as the number of failed login attempts before a user is locked out, session timeout length, and protocols for sessions and network services.
We don’t recommend modifying the SSH settings in the security section.
• LDAP - Enable or disable LDAP authentication.
• VLAN - We don’t recommend setting VLAN configuration from the BMC interface. The changes won’t be saved between system restarts.
• SSL - Upload an SSL certificate and privacy key to allow appliance access in secured mode.
• Remote Session - Set encryption on KVM or Media during a redirection session.
• Mouse Mode - Set mouse emulation from local window to remote screen.
• Keyboard Macros - Configure keyboard macro buttons for the Remote Console.
• Alerts - Configure which system events generate alerts and how to send notifications.
• Alert Email - Configure how alerts are sent by email to an external SMTP email server.
• Node Manager - Set node manager power policies. Note, we don’t recommend setting up suspend periods.
Remotely controlling the appliance
From the Remote Control section, you can control the appliance power and view the front panel status. Select the Remote Control tab and use the navigation bar on the left to view these sections:
• Console Redirection - This is feature isn’t available on the xx70 appliances.
• Server Power Control - View the current power status of the appliance and reset, power off, shut down, power on, or power cycle the appliance.
• Virtual Front Panel - Provides visibility and virtual access to the front panel of the appliance. You can power on or power off the appliance and view the status of the LEDs.
Changing the BMC administrator password
The Configuration > Users page lets you change the BMC password.
To change the BMC administrator password
1. Choose Configuration > Users.
2. Select the root user and click Modify User.
The Modify User page appears.
3. Ensure the Change Password field is selected.
4. Enter and confirm the new password.
The password must be between 0 and 20 characters and it can’t contain spaces.
5. Click Modify.