Installing and Configuring the SteelHead
This chapter describes how to install and configure the SteelHead in an in-path and out-of-path network deployment. This chapter includes these sections:
Note: Read and follow the safety guidelines described in the Safety and Compliance Guide. Failure to follow these safety guidelines can result in damage to the equipment.
Choosing a network deployment
Typically, you deploy the SteelHead on a LAN, with communication between appliances taking place over a private WAN or VPN. Because optimization between SteelHeads typically takes place over a secure WAN, you don’t need to configure company firewalls to support SteelHead-specific ports.
Note: If there are one or more firewalls between two SteelHeads, ports 7800 and 7810 must be passed through firewall devices located between the pair of SteelHeads. Also, SYN and SYN/ACK packets with the TCP option 76 must be passed through firewalls for auto-discovery to function properly.
For optimal performance, you should minimize latency between SteelHeads and their respective clients and servers. SteelHeads should be as close as possible to your network end points (client-side SteelHeads should be as close to your clients as possible and server-side SteelHeads should be as close to your servers as possible).
Ideally, SteelHeads optimize only traffic that is initiated or terminated at their local site. The best and easiest way to achieve this is to deploy the SteelHeads where the LAN connects to the WAN, and not where any LAN-to-LAN or WAN-to-WAN traffic can pass through (or be redirected to) the SteelHead.
For detailed information about your deployment options and best practices for deploying SteelHeads, see the SteelHead Deployment Guide.
Before you begin the installation and configuration process, you must select a network deployment:
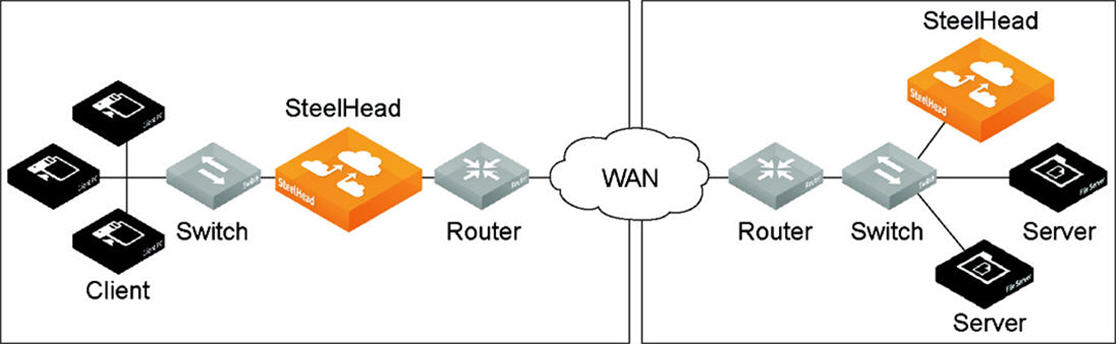
• Physical in-path - In a physical in-path deployment, the SteelHead is physically in the direct path between clients and servers. The clients and servers continue to see client and server Internet Protocol (IP) addresses. In-path designs are the simplest to configure and manage, and the most common type of SteelHead deployment, even for large sites.
Figure: Physical in-path deployment

• Virtual in-path - In a virtual in-path deployment, the SteelHead is virtually in the path between clients and servers. Traffic moves in and out of the same WAN interface, and the LAN interface is not used. This deployment differs from a physical in-path deployment in that a packet redirection mechanism, such as a SteelHead Interceptor, WCCP, policy based routing (PBR), or Layer-4 switching, directs packets to SteelHeads that aren’t in the physical path of the client or server. For details on the redirection mechanisms, see the SteelHead Deployment Guide.
Figure: Virtual in-path deployment
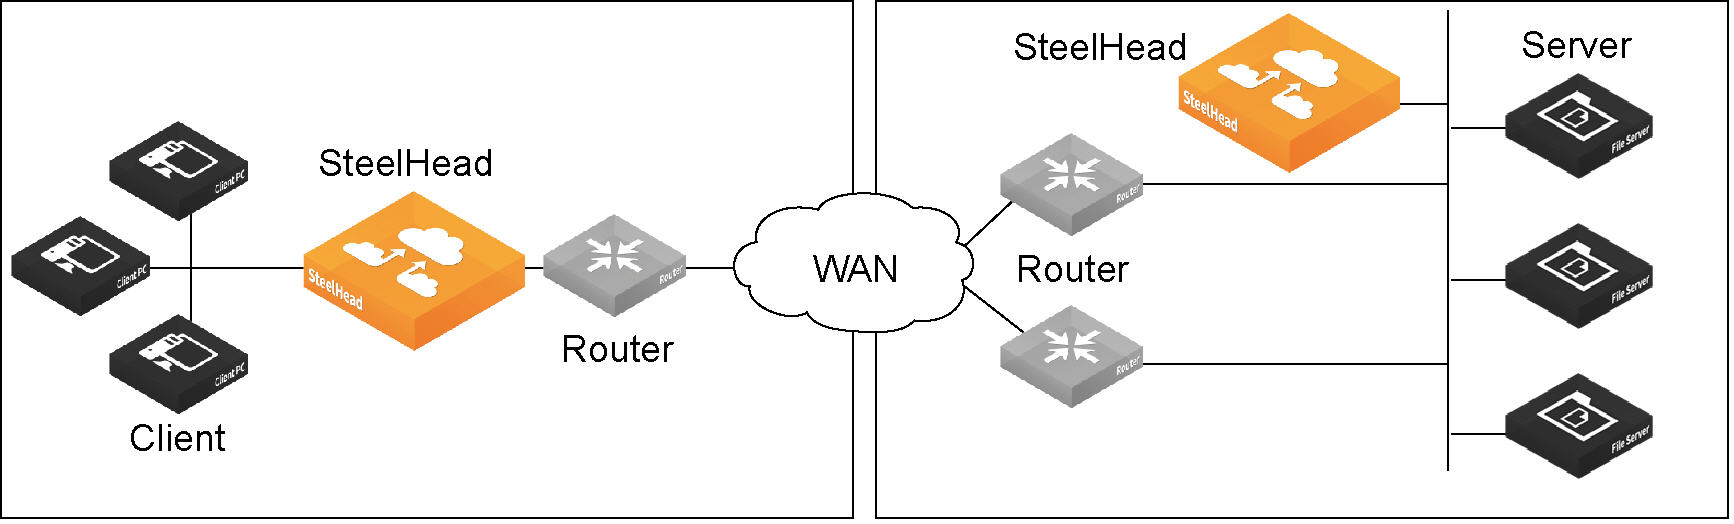
• Out-of-path - In an out-of-path deployment, the server-side SteelHead is not in the direct path between the client and the server. In an out‑of‑path deployment, the SteelHead acts as a proxy. This type of deployment might be suitable for locations where physical in-path or virtual in-path configurations aren’t possible. This deployment requires only a SteelHead primary interface to connect to the network. The SteelHead can be connected anywhere in the LAN.
An out-of-path SteelHead deployment doesn’t use a redirecting mechanism. You configure fixed-target in-path rules for the client-side SteelHead. The fixed-target in-path rules point to the primary IP address of the out-of-path SteelHead. The out-of-path SteelHead uses its primary IP address when communicating to the server. The remote SteelHead must be deployed either in a physical or virtual in-path mode.
Figure: Out-of-path deployment
This table gives you a summary of the in-path and out-of-path deployment options.
Deployment type | Benefits | Requires | Challenges |
Physical In-Path | Simple to configure and uses automatic discovery of peers. | In-path rules | Scaling, availability, cabling |
Virtual In-Path | Limited physical disruption, routing forces traffic to WAN, automatic discovery of peers. | External setup to use PBR, WCCP, a SteelHead Interceptor, or Layer-4 switching | Dependent on the external configuration |
Out-of-Path | The client-side SteelHead sends directly to the server-side SteelHead with no physical disruption. This configuration is typically used as a way to rapidly deploy a SteelHead in a site with very complex or numerous connections to the WAN. | Fixed-target rules | Requires explicit manual configuration. Connections initiated from the site with the out-of-path SteelHead can’t be optimized. Servers at the site detect the optimized traffic coming from the out-of-path SteelHead primary IP address instead of a client IP address. |
Checking your inventory
Your shipping carton contains these items:
• The SteelHead
• One standard Ethernet straight-through cable
• One standard Ethernet crossover cable
• One serial null-modem cable
• One or two power cables (depending on your order)
Aside from country-specific requirements, all systems ship with the same power cable. The power cable has a IEC 60320 C13 plug on one end (to connect to the SteelHead) and a country-specific plug that fits the wall socket for that country. If a system has two power supplies, it ships with two suitable cables.
You must always connect the SteelHead using either the cable in the accessories box or another cable that is approved for use by the IEC in the country in which the appliance is connected.
You can’t connect a SteelHead directly to multiphase outlets. You must use a rack PDU or power strip that provides the appropriate three-prong outlet (hot/neutral/ground). For details, see the
Knowledge Base solution number 1301. • One Phillips screwdriver
• Rails are preinstalled on the xx55
• One mounting kit
• Documentation kit
If any items are damaged or missing, notify Riverbed Support at https://support.riverbed.com for replacement or repair.
Preparing your site for installation
The SteelHead is shipped completely assembled, with all the equipment parts in place and securely fastened.
Site requirements
Before you install the SteelHead, make sure that your site meets these requirements:
• It’s a standard electronic environment where the ambient temperature doesn’t exceed 40º C (104º F) and the relative humidity doesn’t exceed 80% (noncondensing). For detailed information, see the appendices that follow.
• Ethernet connections are available within the standard Ethernet limit.
• There’s available space on a two-post or four-post 19-inch rack. For details about installing the SteelHead to a rack, see the Rack Installation Guide or the printed instructions that were shipped with the system.
• A clean power source is available, dedicated to computer devices and other electronic equipment.
• The rack is a standard 19-inch Telco-type mounting rack.
Note: Riverbed recommends that you use a four-post mounting rack for 2U and 3U systems.
Note: If your rack requires special mounting screws, contact your rack manufacturer.
SteelHead ports
This table summarizes the ports used to connect the SteelHead to your network.
Port | Description |
Console | Depending on your appliance, the Console port is either a DB9F port or an RJ45 port. (For port details for your appliance model, see the specification appendix for your product.) The appropriate console cable ships with your appliance. Connects the serial cable to a terminal device. You establish a serial connection to a terminal emulation program for console access to the configuration wizard and the SteelHead CLI. |
Primary
(PRI) | The management interface that connects the SteelHead to a LAN switch. This management interface enables you to connect to the Management Console and the SteelHead CLI. The primary and auxiliary ports can’t share the same network subnet. The primary and in-path interfaces can share the same subnet. You must use the primary port on the server-side for out-of-path deployments. |
Auxiliary (AUX) | An optional port that provides an additional management interface for a secondary network. You can’t have the primary and auxiliary ports on the same subnet. The auxiliary and in-path interfaces can’t share the same network subnet. You can’t use the auxiliary port for out-of-path SteelHeads. This port is not available on the SteelHead model CX255. |
WAN | Connects the WAN port of the SteelHead and the WAN router using a crossover cable. |
LAN | Connects the LAN port of the SteelHead and the LAN switch using a straight-through cable. Note: If the SteelHead is deployed between two switches, both the LAN and WAN ports must be connected with straight-through cables. |
Avoiding duplex mismatch
Before you begin the configuration process, ensure that your LAN and WAN interfaces have the same duplex settings.
The SteelHead automatically negotiates duplex settings. If one end of the link is set to auto-negotiate and the other end of the link is not set to auto-negotiate, the duplex settings on the network device default to half-duplex. This duplex mismatch passes traffic, but it causes late collisions and results in degraded optimization. To achieve maximum optimization, set your network devices to 100 and full.
To avoid duplex mismatches, manually configure the duplex settings on your:
• router.
• switch.
• SteelHead WAN interface.
• SteelHead LAN interface.
• SteelHead primary interface.
These can be signs of a duplex mismatch:
• The Link Duplex alarm triggers.
• On the Reports > Diagnostics: System Logs page you see errors for sends, receives, CRC, and short sends.
• You can’t connect to an attached device.
• You can connect to a device when you choose automatic negotiation, but you can’t connect to that same device when you manually set the speed or duplex.
• Slow performance across the network.
For detailed information about checking for duplex mismatches, see
Troubleshooting. Bypass card interface naming conventions
The interface names for the bypass cards are a combination of the slot number and the port pairs (<slot>_<pair>, <slot>_<pair>). For example, if a four-port bypass card is located in slot 0 of your appliance, the interface names are lan0_0, wan0_0, lan0_1, and wan0_1, respectively. Alternatively, if the bypass card is located in slot 1 of your appliance, the interface names are lan1_0, wan1_0, lan1_1, and wan1_1, respectively.
For detailed information about installing additional bypass cards, see the Network Interface Card Installation Guide.
Completing the configuration checklist
Before you begin, consult the Rack Installation Guide for detailed information about how to install your model to a rack.
This checklist lists the parameters you specify to complete the initial configuration of the SteelHead. Be prepared to provide values for these parameters.
Appliance | Parameter | Your value |
SteelHead (the Primary Interface) | Host name | |
IP address | |
Netmask | |
Default gateway (the WAN gateway) | |
DNS IP address | |
Domain name for the system | |
Administrator password | |
SMTP server IP address | |
Events and failures notification email address | |
Primary interface speed | |
Primary interface duplex | |
In-Path Deployments | In-path interface IP address | |
In-path netmask | |
In-path gateway | |
In-path: LAN interface speed | |
In-path: LAN interface duplex | |
In-path: WAN interface speed | |
In-path: WAN interface duplex | |
The SteelHead automatically negotiates duplex settings. If one end of the link is set to auto-negotiate and the other end of the link is not set to auto-negotiate, the duplex settings on the network device default to half-duplex. This duplex mismatch passes traffic, but it causes late collisions and results in degraded optimization. To achieve maximum optimization, set the network devices to 100 and full.
Powering on the system
This section describes how to connect the AC power and how to power on the system.
Caution: In European electrical environments you must ground (earth) the Green/Yellow tab on the power cord, or risk electrical shock.
To power on the system
1. If your system has a master power switch, ensure that the system and master power switch is in the off position on the rear of the SteelHead.
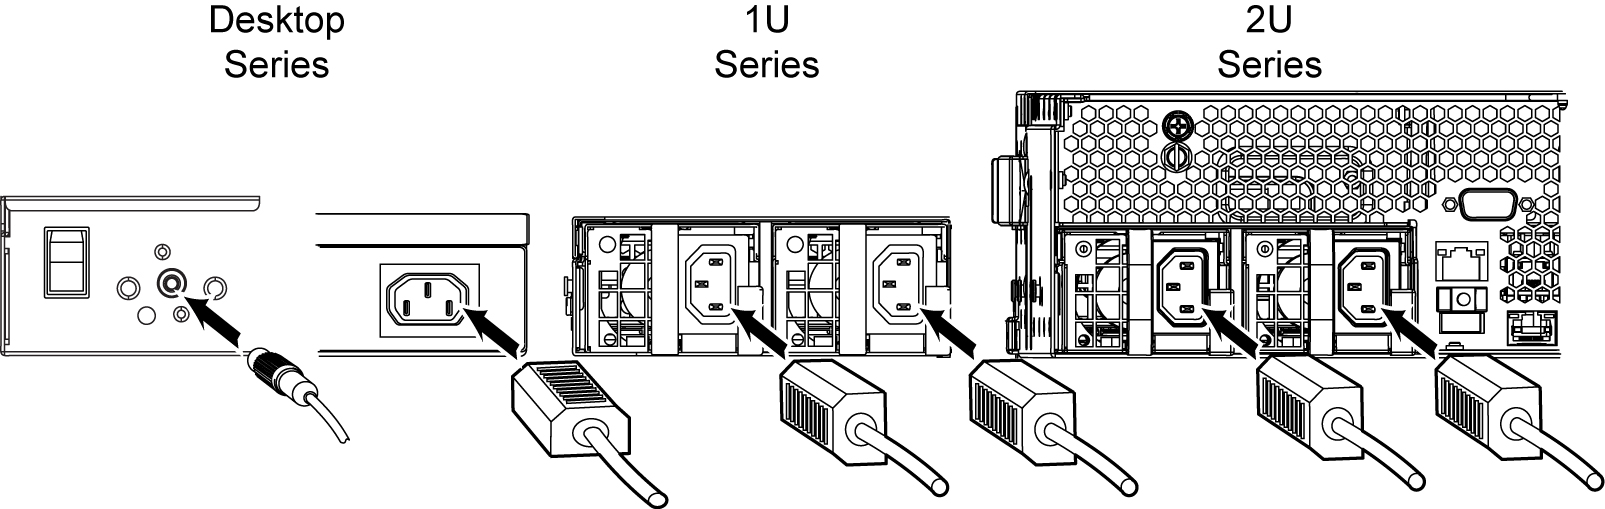
2. Plug the AC power cord into the SteelHead.
Note: If your model has multiple power supplies, you must plug in all the power cords or you will hear an alarm.
Figure: Connecting the AC power
3. Plug the AC power cord into an uninterrupted AC power source.
4. Press the system power switch on. If the SteelHead doesn’t immediately power on, press the power switch off, then press the power switch on again.
5. Check the status lights on the SteelHead. For detailed information about the status lights, see the appendices that follow.
Note: The SteelHead CX (Series xx55) takes approximately 10 minutes to boot.
Securing the power cord on desktop systems
The CX255 models include a power cord retention module. You can install this to reduce the risk of accidentally unplugging the power.
To install the power cord retention module
1. Push the retention module into the socket near the power connection.
The socket is left of the power supply.
2. Attach the retention fastener to module and tighten around the power cable.

The retention module doesn’t prevent accidental pulls from removing the power cord, but it does provide increased protection.
Configuring in-path SteelHeads
In a physical in-path deployment, the SteelHead is physically in the direct path between clients and servers. The clients and servers continue to see client and server IP addresses. Physical in-path configurations are suitable for any location where the total bandwidth is within the limits of the installed SteelHead. For a detailed figure, see
Choosing a network deployment.
For detailed information about in-path deployments, see the SteelHead Deployment Guide.
You use standard Ethernet straight-through and crossover cables to connect to your network in an in-path configuration. Make sure that you use the correct cables to establish your network connections:
• Straight-through cables - Primary and LAN ports on the appliance to the LAN switch.
• Crossover cable - WAN port on the appliance to the WAN router.
Connecting the SteelHead to your network
You use standard Ethernet straight-through and crossover cables to connect to your network in an in-path configuration. Make sure that you use the correct cables to establish your network connections:
• Straight-through cables - Primary and LAN ports on the appliance to the LAN switch.
• Crossover cable - WAN port on the appliance to the WAN router.
To connect the SteelHead to your network
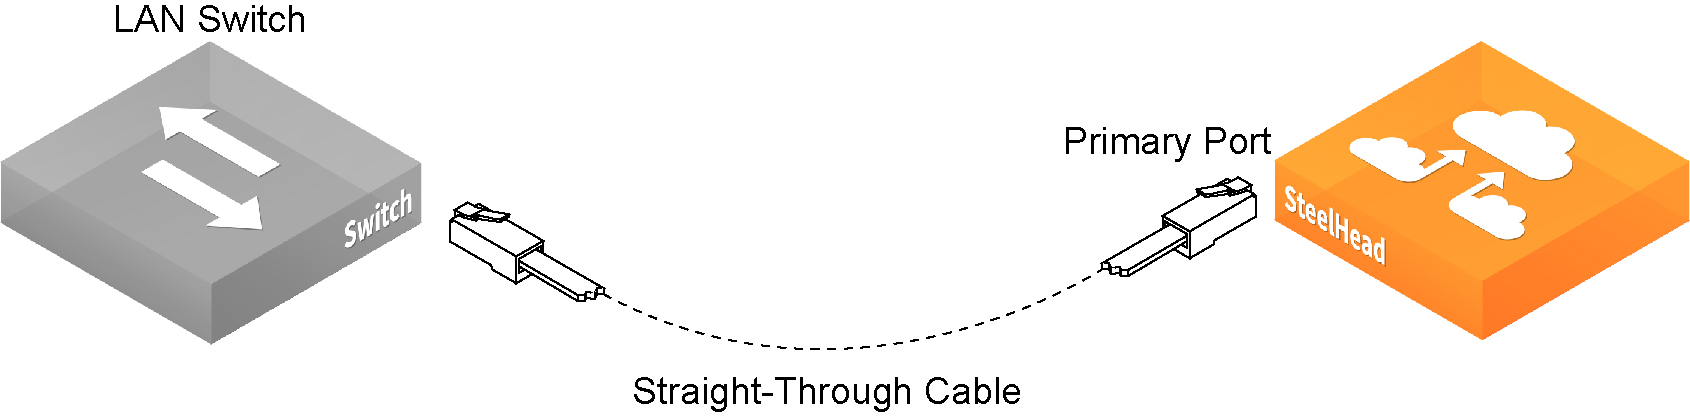
1. Plug the straight-through cable into the primary port of the SteelHead and the LAN switch. This can be any port on your LAN switch configured to connect to a host.
Figure: Connecting the primary port to the LAN switch
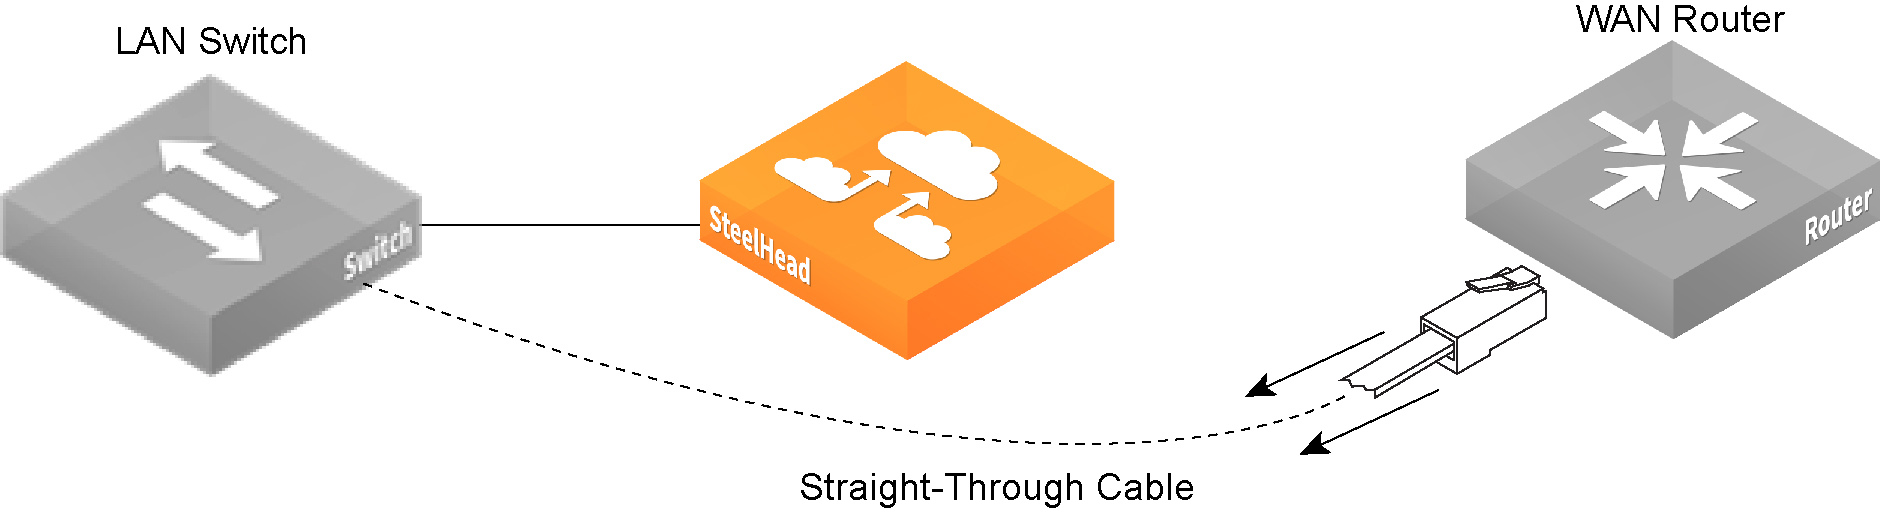
2. Identify the straight-through cable that connects your LAN switch to your WAN router. Unplug the end connected to the WAN router.
Figure: Disconnecting the WAN router
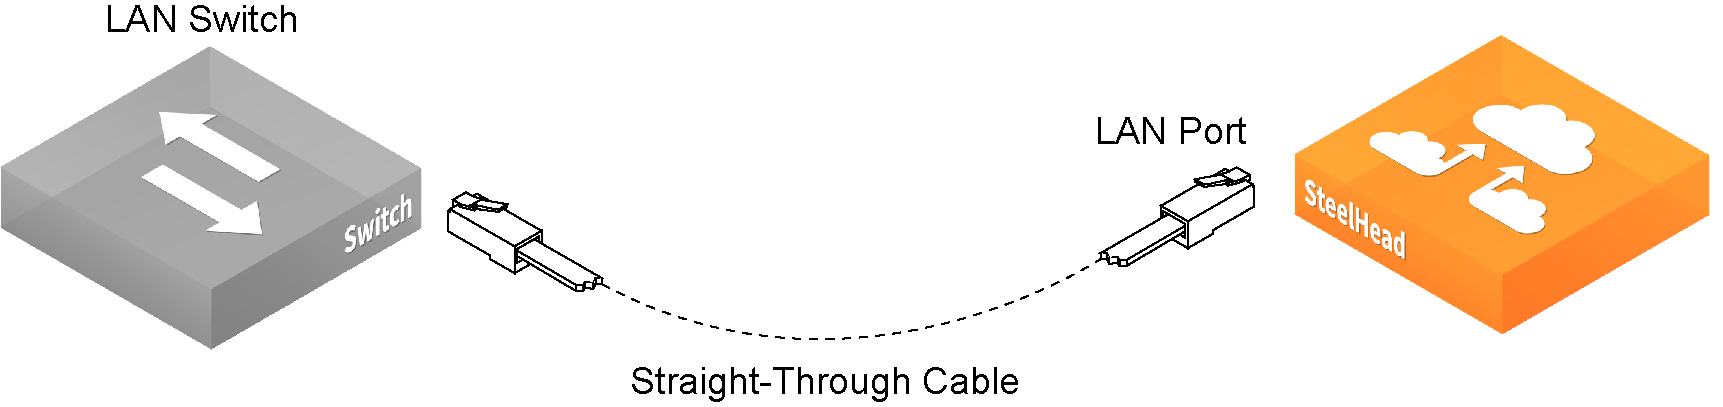
3. Plug the straight-through cable that you disconnected from the WAN router into the LAN port of the SteelHead.
Figure: Connecting the LAN switch to the LAN port
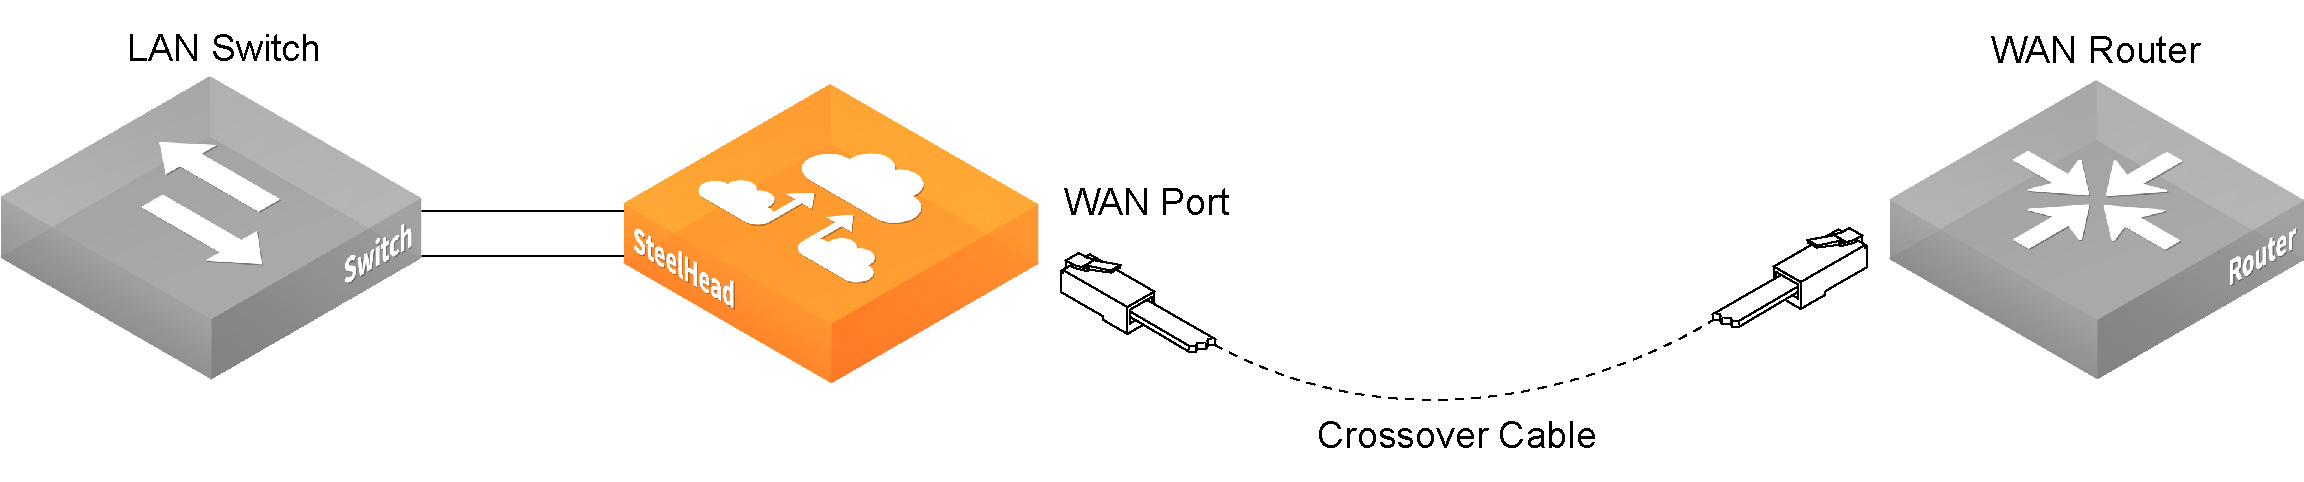
4. Using the provided crossover cable, plug the cable into the WAN port of the SteelHead and the WAN router. This must be a crossover cable.
Figure: Connecting the WAN port to the WAN router
Note: If you have a four-port or six-port bypass card, repeat
Step 1 through
Step 4. For detailed information about installing additional bypass cards, see the
Network Interface Card Installation Guide.
Running the configuration wizard
To access the configuration wizard and the SteelHead CLI, you establish a serial connection using a terminal emulator program.
To run the configuration wizard
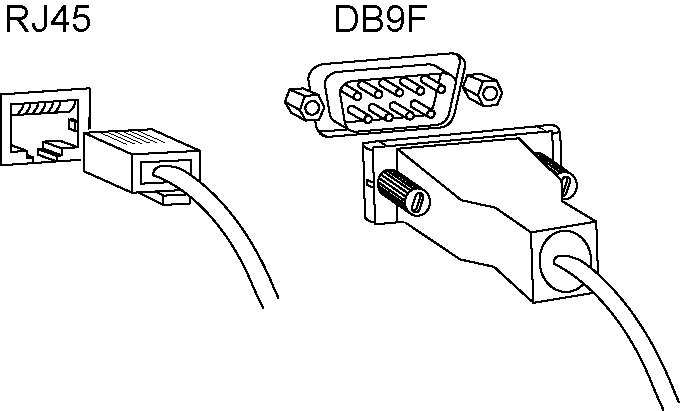
1. Plug the serial cable into the Console port and a terminal.
Depending on your appliance, the Console port is either a DB9F port or an RJ45 port. (For port details for your appliance model, see the specification appendix for your product.)
The appropriate console cable ships with your appliance.
Figure: Connecting to the SteelHead
2. Start your terminal emulation program, such as Tera Term Pro. The terminal device must have these settings:
• Baud rate: 9600 bps
• Data bits: 8
• Parity: none
• Stop bits: 1
• vt100 emulation
• No flow control
If you are using the SteelHead with a terminal server, the terminal server must use hardware flow control for the port connected to the SteelHead.
Riverbed recommends that you connect the console port to a device that logs output. Even though this is not a requirement, it can help you to identify problems with the system.
3. Log in as administrator user (admin) and enter the default password (password). For example,
login as: admin
Sent username "admin"
password: password
The configuration wizard automatically starts after you have entered the login and default password. After you have established a connection, you configure the SteelHead using the configuration wizard.
4. If you have a SCC appliance installed in your network to manage multiple SteelHeads, you can use it to automatically configure them:
Do you want to auto-configure using a Controller? no
If you answer yes, you are prompted for the SCC host name or IP address. The host name or IP address is used to contact the SCC. The default value is riverbedcmc. If you enter no, the wizard continues.
Note: If you mistakenly answer
yes, to return to the wizard from the CLI, enter the
configuration jump-start command from configuration mode. For detailed information, see the
To restart the configuration wizard.
5. To start the configuration wizard, enter yes at the system prompt.
Do you want to use the configuration wizard for initial configuration? yes
Press Enter to enter the default value; press ? for help; press Ctrl-B to go back to the previous step.
6. Complete the configuration wizard steps on the client-side and the server-side SteelHeads as described in this table.
Wizard prompt | Description | Example |
Step 1: Host name? | Enter the host name for the SteelHead. | hostname? amnesiac |
Step 2: Use DHCP on the primary interface? | You are given the option to enable the DHCP to automatically assign an IP address to the primary interface for the SteelHead. Riverbed recommends that you don’t set DHCP. The default value is no. | Use DHCP? no |
Step 3: Primary IP address? | Enter the IP address for the SteelHead. | Primary IP address? 10.10.10.6 |
Step 4: Netmask? | Enter the netmask address. | Netmask? 255.255.0.0 |
Step 5: Default gateway? | Enter the default gateway for the SteelHead. | Default gateway? 10.0.0.1 |
Step 6: Primary DNS server? | Enter the primary DNS server IP address. | Primary DNS server? 10.0.0.2 |
Step 7: Domain name? | Enter the domain name for the network where the SteelHead is to reside. If you set a domain name, you can enter host names in the system without the domain name. | Domain name? example.com |
Step 8: Admin password? | Riverbed strongly recommends that you change the default administrator password at this time. The password must be a minimum of six characters. The default administrator password is password. | Admin password? xxxyyy |
Step 9: SMTP server? | Enter the name of the SMTP server. External DNS and external access for SMTP traffic is required for email notification of events and failures to function. Note: Make sure that you provide a valid SMTP server to ensure that the email notifications for events and failures. | SMTP server? natoma |
Step 10: Notification email address? | Enter a valid email address to which notification of events and failures are to be sent. | Notification email address? example@xample.com |
Step 11: Set the primary interface speed? | Enter the speed on the primary interface (that is, the SteelHead). Make sure that this value matches the settings on your router or switch. The default value is auto. | Set the primary interface speed? [auto] auto |
Step 12: Set the primary interface duplex? | Enter the duplex mode on the primary interface. Make sure that this value matches the settings on your router or switch. The default value is auto. | Set the primary interface duplex? [auto] auto |
Step 13: Would you like to activate the in-path configuration? | Enter yes at the system prompt to configure in-path support. An in-path configuration is a configuration in which the SteelHead is in the direct path of the client and server. For detailed information about in-path configurations, see the SteelHead Deployment Guide. | Would you like to activate the in-path configuration? yes |
Step 14: In-Path IP address? | Enter the in-path IP address for the SteelHead. | In-Path IP address? 10.11.11.6 |
Step 15: In-Path Netmask? | Enter the in-path netmask address. | In-Path Netmask? 255.255.0.0 |
Step 16: In-Path Default gateway? | Enter the in-path default gateway (the WAN gateway). | In-Path Default Gateway? 10.11.11.16 |
Step 17: Set the in-path: LAN interface speed? | Enter the in-path, LAN interface speed. Make sure that this value matches the settings on your router or switch. The default value is auto. | Set the in-path: LAN interface speed? [auto] auto |
Step 18: Set the in-path: LAN interface duplex? | Enter the in-path, LAN duplex value. Make sure that this value matches the settings on your router or switch. The default value is auto. | Set the in-path: LAN interface duplex? [auto] auto |
Step 19: Set the in-path: WAN interface speed? | Enter the in-path, WAN interface speed. Make sure that this value matches the settings on your router or switch. The default value is auto. | Set the in-path: WAN interface speed? [auto] auto |
Step 20: Set the in-path: WAN interface duplex? | Enter the in-path, WAN duplex speed. Make sure that this value matches the setting on your router or switch. The default value is auto. | Set the in-path: WAN interface duplex? [auto] auto |
The system confirms your settings.
You have entered the following information:
1. Hostname: amnesiac
2. Use DHCP on primary interface: no
3. Primary IP address: 10.10.10.6
4. Netmask: 255.255.0.0
5. Default gateway: 10.0.0.1
6. Primary DNS server: 10.0.0.2
7. Domain name: example.com
8. Admin password: xxxyyy
9. SMTP server: natoma
10. Notification email address: example@example.com
11. Set the primary interface speed: auto
12. Set the primary interface duplex: auto
13. Would you like to activate the in-path configuration: yes
14. In-Path IP address: 10.11.11.6
15. In-Path Netmask: 255.255.0.0
16. In-Path Default gateway: 10.11.11.16
17. Set the in-path:LAN interface speed: auto
18. Set the in-path:LAN interface duplex: auto
19. Set the in-path:WAN interface speed: auto
20. Set the in-path:WAN interface duplex: auto
To change an answer, enter the step number to return to.
Otherwise hit <enter> to save changes and exit.
Choice:
The SteelHead configuration wizard automatically saves your configuration settings.
7. To log out of the system, enter this command at the system prompt:
amnesiac> exit
To restart the configuration wizard
• Enter these commands at the system prompt:
> enable
# configure terminal
(config) # configuration jump-start
For detailed information about the CLI, see the Riverbed Command-Line Interface Reference Manual.
Verifying you are connected to the SteelHead
Perform these tasks to verify that you have properly connected the SteelHead.
To verify you are connected to the SteelHead
1. Verify that you can connect to the CLI using one of these devices:
• An ASCII terminal or emulator that can connect to the serial console. It must have these settings: 9600 baud, 8 bits, no parity, 1 stop bit, vt100, and no flow control.
• A computer with a Secure Shell (SSH) client that is connected to the SteelHead primary port.
2. At the system prompt, enter this command:
ssh admin@host.domain
or
ssh admin@ipaddress
3. You are prompted for the administrator password. This is the password you set in the configuration wizard.
4. At the system prompt, ping from the management interface:
ping -I <primary-IP-address> <primary-default-gateway>
5. At the system prompt, ping from the in-path default gateway:
ping -I <in-path-IP-address> <in-path-default-gateway>
If you have problems connecting to the SteelHead, use this flow chart to trouble shoot issues.
Figure: Resolving IP connectivity

Connecting to the Management Console
After you configure the SteelHead, you can check and modify your configuration settings and view performance reports and system logs in the Management Console. You can connect to the Management Console through any supported Web browser.
To connect to the Management Console, you must know the host, domain, and administrator password that you assigned in the configuration wizard.
Note: Cookies and JavaScript must be enabled in your Web browser.
To connect to the Management Console
1. Specify the URL for the Management Console in the location box of your Web browser:
<protocol>://<host>.<domain>
The <protocol> variable is http or https. HTTPS uses the SSL protocol to ensure a secure environment. When you connect using HTTPS, the system prompts you to inspect and verify the SSL certificate. This is a self-signed certificate that provides encrypted Web connections to the Management Console. The system recreates the certificate when you change the appliance hostname or when the certificate expires.
The secure vault doesn’t protect the self-signed certificate used with HTTPS connections.
The <host> variable is the hostname you assigned to the SteelHead primary interface in the configuration wizard. If your DNS server maps that IP address to a name, you can specify the DNS name.
The <domain> variable is the full domain name for the appliance.
Note: Alternatively, you can specify the IP address instead of the host and domain.
The Management Console appears, displaying the Sign in page.
Figure: Sign in page
2. In the Username text box, type the user login: admin, monitor, a signin from a RADIUS or TACACS+ database, or any local accounts created using the Role-Based Accounts feature. The default signin is admin.
Users with administrator (admin) privileges can configure and administer the SteelHead. Users with monitor privileges can view the SteelHead reports, view user logs, and change their own password. A monitor user can’t make configuration changes.
3. In the Password text box, type the password you assigned in the configuration wizard of the SteelHead. (The SteelHead is shipped with the default password: password.)
4. Click Sign In to display the Dashboard.
The Dashboard summarizes the current status of your system.
Verifying WAN optimization
Perform these tasks to verify that you have properly configured the SteelHead.
To verify optimization
1. Go to the Reports > Optimization: Bandwidth Optimization in the Management Console to verify optimization.
2. Map a remote drive on a client machine.
3. Drag and drop a 1 MB file from the client to the remote server.
Ensure that the server is located across the WAN.
4. Drag and drop the 1 MB file again.
Performance improves significantly.
Checking for speed and duplex errors
If you selected auto-negotiation (auto) for your in-path and primary interfaces, you must ensure that the SteelHead negotiated the speed and duplex at the rate your devices expect. For example, ensure settings are auto on the LAN and WAN and 100 FULL on the LAN and WAN. You can verify your speed and duplex settings in the Networking > Networking: In-path Interfaces page and the Networking > Networking: Base Interfaces page of the Management Console.
To check for speed and duplex errors
1. In the Management Console, go to the Reports > Diagnostics: System Logs page.
2. Check the system logs for duplex or speed errors (cyclic redundancy check (CRC) or frame errors).
3. Go to the Administration > System Settings: Alarms page.
4. Check the link duplex and link I/O alarms.
If a link alarm status is degraded, choose Networking > Networking: Base Interfaces or Networking > Networking: In-path Interfaces and examine the SteelHead link configuration. Next, examine the peer switch user interface to check its link configuration. If the configuration on one side is different from the other, traffic is sent at different rates on each side, causing many collisions.
To troubleshoot, change both interfaces to automatic duplex negotiation. If the interfaces don’t support automatic duplex, configure both ends for full duplex.
You can enable or disable the alarm for a specific interface. To disable an alarm, choose Administration: System Settings > Alarms and select or clear the check box next to the link alarm.
Configuring out-of-path SteelHeads
In an out-of-path deployment, the SteelHead is not in the direct path between the client and the server. Servers see the IP address of the server-side SteelHead rather than the client-side IP address.
An out-of-path configuration is suitable for data center locations where physical in-path or logical in-path configurations aren’t possible. For a detailed figure, see
Choosing a network deployment.
For detailed information about out-of-path deployments, see the SteelHead Deployment Guide.
Connecting out-of-path SteelHeads to your network
You use a standard Ethernet straight-through cable to connect the primary port of the SteelHead to the LAN switch in an out-of-path configuration.
To connect an out-of-path SteelHead to your network
• Plug the straight-through cable into the primary port of the SteelHead and the LAN switch. This can be any port on your LAN switch that is configured to connect to a host.
Figure: Connecting the primary port and LAN switch
Configuring the server-side SteelHead
The configuration wizard automatically starts when you log in to the SteelHead CLI for the first time. For detailed information about the configuration wizard and how to start it, see
To run the configuration wizard.
In an out-of-path configuration, the client-side SteelHead is configured as an in-path device and the server-side SteelHead is configured as an out-of-path device.
To configure the server-side SteelHead
1. Check the duplex and speed settings on the router and switch that connects to your SteelHead. Make sure that the settings on the router, switch, and the SteelHead match. For example, ensure that settings are auto speed and duplex on the LAN and WAN or 100 FULL on the LAN and WAN. If the settings don’t match, optimization might be degraded.
2. Connect to the CLI.
3. If you have a SteelCentral Controller for SteelHead (SCC) appliance installed in your network to manage multiple SteelHeads, you can use it to automatically configure them.
Do you want to auto-configure using a Controller? no
If you enter yes, you are prompted for the SCC host name or IP address. The host name or IP address is used to contact the SCC. The default value is set to riverbedcontroller. If you enter no, the wizard continues.
4. To start the configuration wizard, enter yes at the system prompt.
Do you want to use the configuration wizard for initial configuration? yes
Note: If you mistakenly answer
no, to return to the wizard from the CLI, enter the
configuration jump-start command from configuration mode. For detailed information, see the
To restart the configuration wizard.
5. Complete the configuration wizard steps on the client side and server side.
Wizard prompt | Description | Example |
Step 1: Host name? | Enter the host name for the SteelHead. | Hostname? amnesiac |
Step 2: Use DHCP on the primary interface? | You are given the option to enable the DHCP to automatically assign an IP address to the primary interface for the SteelHead. Riverbed recommends that you don’t set DHCP. The default value is no. | Use DHCP? no |
Step 3: Primary IP address? | Enter the IP address for the SteelHead. | Primary IP address? 10.10.10.6 |
Step 4: Netmask? | Enter the netmask address. | Netmask? 255.255.0.0 |
Step 5: Default gateway? | Enter the default gateway for the SteelHead. | Default gateway? 10.0.0.1 |
Step 6: Primary DNS server? | Enter the primary DNS server IP address. | Primary DNS server? 10.0.0.2 |
Step 7: Domain name? | Enter the domain name for the network where the SteelHead is to reside. If you set a domain name, you can enter host names in the system without the domain name. | Domain name? example.com |
Step 8: Admin password? | Riverbed strongly recommends that you change the default administrator password at this time. The password must be a minimum of 6 characters. The default administrator password is password. | Admin password? xxxyyy |
Step 9: SMTP server? | Enter the SMTP server. External DNS and external access for SMTP traffic is required for email notification of events and failures to function. Note: Make sure that you provide a valid SMTP server to ensure receipt of email notifications for events and failures. | SMTP server? natoma |
Step 10: Notification email address? | Enter a valid email address to receive email notification of events and failures. | Notification email address? example@example.com |
Step 11: Set the primary interface speed? | Enter the speed on the primary interface (that is, the SteelHead). Make sure that this value matches the settings on your router or switch. The default value is auto. | Set the primary interface speed? [auto] auto |
Step 12: Set the primary interface duplex? | Enter the duplex mode on the primary interface, and type a value at the system prompt. Make sure that this value matches the settings on your router or switch. The default value is auto. | Set the primary interface duplex? [auto] auto |
Step 13: Would you like to activate the in-path configuration? | Enter no at the system prompt to configure in-path support. An in-path configuration is a configuration in which the SteelHead is in the direct path of the client and server. For detailed information about in-path configurations, see the SteelHead Deployment Guide. | Would you like to activate the in path configuration? no |
Step 14: Would you like to activate the out-of-path configuration? | Enter yes at the system prompt to configure out-of-path support. An out-of-path configuration is a configuration in which the SteelHead is not in the direct path of the client and server. For detailed information about in-path configurations, see the SteelHead Deployment Guide. | Would you like to activate the out-of-path configuration? [no] yes |
The system confirms your settings:
You have entered the following information:
Step 1: Hostname? amnesiac
Step 2: Use DHCP on primary interface? no
Step 3: Primary IP address? 10.10.10.6
Step 4: Netmask? 255.255.0.0
Step 5: Default gateway? 10.0.0.1
Step 6: Primary DNS server? 10.0.0.2
Step 7: Domain name? example.com
Step 8: Admin password? xxxyyyy
Step 9: SMTP server? natoma
Step 10: Notification email address? example@example.com
Step 11: Set the primary interface speed? auto
Step 12: Set the primary interface duplex? auto
Step 13. Would you like to activate the in-path configuration: no
Step 14: Would you like to activate the out-of-path configuration? yes
To change an answer, enter the step number to return to.
Otherwise hit <enter> to save changes and exit.
The SteelHead configuration wizard automatically saves your settings.
6. To log out of the system, enter this command at the system prompt:
amnesiac> exit
For details on restarting the configuration wizard, see
To restart the configuration wizard.
Configuring the client-side SteelHead
In an out-of-path configuration, you configure the client-side SteelHead in the same way as in an in-path configuration. For optimization to occur, you must define a fixed-target rule on the client-side SteelHead that points to the out-of-path, server-side SteelHead. You can define fixed-target rules using the Management Console or the CLI.
For detailed information about the Management Console, see the SteelHead Management Console User’s Guide.
For detailed information about the CLI, see the Riverbed Command-Line Interface Reference Manual.
These procedures describe how to configure in-path rules using the Management Console.
To configure the client-side SteelHead
1. Follow the procedures for an in-path configuration.
2. Connect to the Management Console.
3. Choose Optimization > Network Services: In-Path Rules.
Figure: In-Path Rules page
4. Under In-Path Rules, click Add a New In-Path Rule to display the in-path rule configuration options.
5. For Type, select Fixed-Target from the drop-down list.
6. For Target Appliance IP Address, specify the IP address and port number for the peer SteelHead.
Use one of these formats:
xxx.xxx.xxx.xxx/xx (IPv4)
x:x:x::x/xxx (IPv6)
The IP address must be the primary Port IP address on the target SteelHead. The default port is 7810.
Note: If you are not optimizing all ports in your out-of-path deployment and you want to optimize MAPI Exchange, you must specify the MAPI end-point port (135), the SteelHead port used for Exchange traffic (7830), and the SteelHead port used for Exchange directory NSPI traffic (7840). For detailed information about MAPI Exchange settings, see the SteelHead Management Console User’s Guide.
7. Optionally, if you have a backup, out-of-path SteelHead in your system (that is, failover support), for Backup Appliance IP Address, specify the IP address and port for the backup appliance in the Backup IP and Port text boxes.
Use one of these formats:
xxx.xxx.xxx.xxx/xx (IPv4)
x:x:x::x/xxx (IPv6)
The default port is 7810.
8. Click Add to apply the rule to the running configuration.
9. Click Save to write your settings to memory.
You can now optimize WAN traffic using the SteelHead.