Rack Mounting SteelHead x50 and xx50 Appliances
This chapter describes how to install SteelHead x50 and xx50 appliances in a rack. It includes these sections:
All 3U appliances must be mounted to a four-post rack; they can’t be mounted to a two-post rack.
Mounting SteelHead desktop x50 appliances in a rack
This section describes how to install SteelHead desktop x50 appliances in a rack.
SteelHead desktop x50 appliances are designed for side-to-side airflow. If you install these appliances in a rack, do not place objects on the sides of the appliance; it restricts airflow and can damage the appliance.
To install mounting brackets to the appliance
1. Carefully lift the appliance out of the shipping carton.
2. To install the mounting brackets, use the included screw kit to secure the brackets onto the sides of the appliance (at the front of the appliance) using three screws on each side.
Figure 7‑1. Installing brackets to the desktop appliance
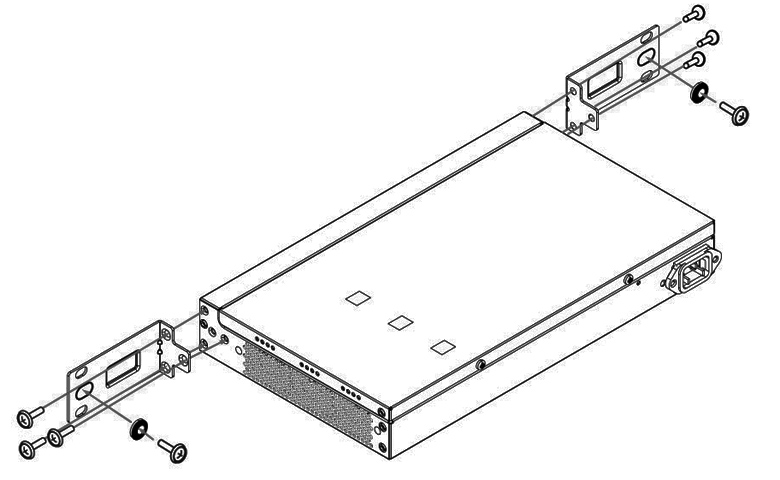
3. To mount the brackets to the posts, slide the appliance into the rack until the front is flush against the rack posts. Install the included washer and screw in the center hole of the bracket. The SteelHead x50 appliances must be installed in a front-mount position.
4. Insert and tighten the rack post screws on each side of the appliance.
Mounting 1U SteelHead xx50 appliances in a rack
This section describes how to install SteelHead xx50 appliances in a four-post or two-post rack. It includes these topics:
To open the bezel on xx50 appliances
• To open the bezel, firmly press in the buttons on each side of the bezel and slide it toward you. The bezel remains attached to the appliance on hinges.
Figure 7‑2. Opening the bezel on SteelHead xx50 appliances

Mounting 1U SteelHead xx50 appliances using RMK-002A rails
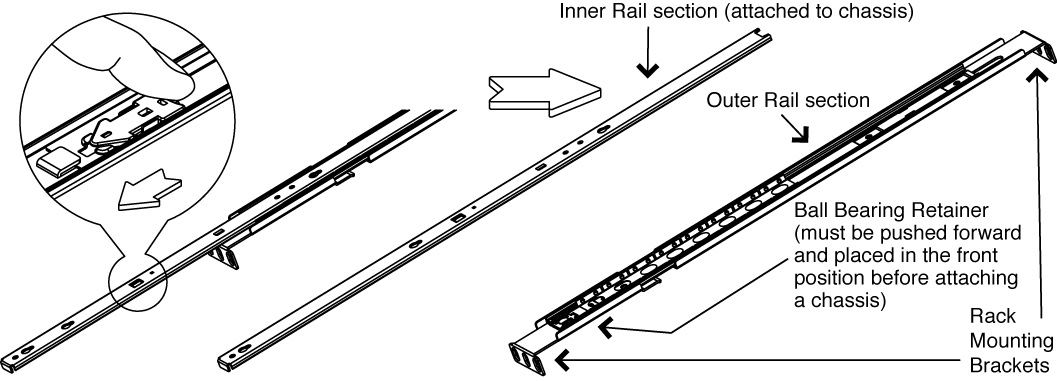
This section describes how to mount the SteelHead xx50 appliance to a four-post rack using rack mount kit RMK-002A. The RMK-002A rails are modified rails for 1U xx50 appliances.
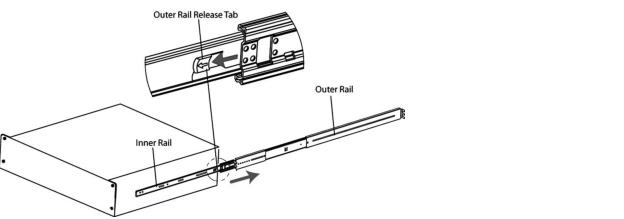
1. To detach the outer rails, press the release latch and pull the outer rails away from the appliance.
Figure 7‑3. Using the release latch to detach the outer rails
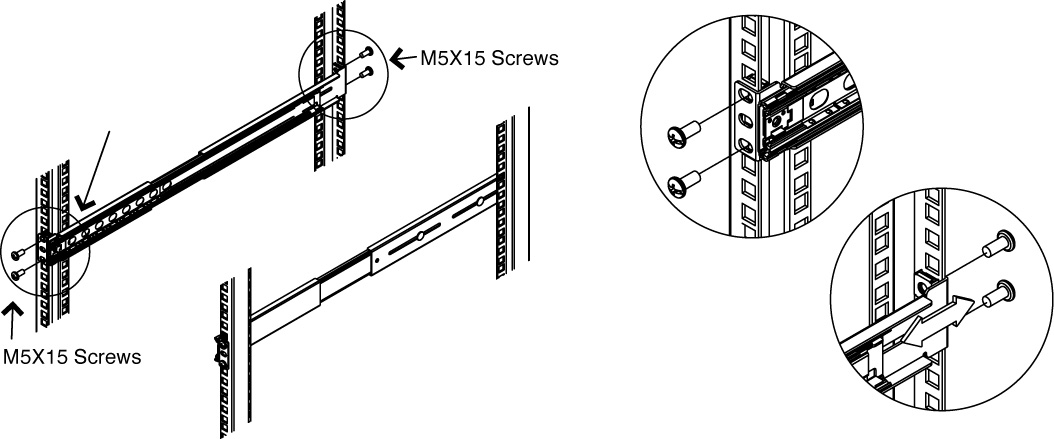
2. Install the outer rails to the rack posts.
The RMK-002A rails can accommodate a 22-inch to 32-inch (559-mm to 813-mm) deep rack and a maximum device weight of 88 lb (40 kg).
Figure 7‑4. Attaching the outer rails to the rack
3. Slide the ball bearing retainer on the inside of the outer rail to the forward position.
Figure 7‑5. Sliding the ball bearing retainer to the forward position

The ball bearing retainer must be pushed forward and placed in the front position before attaching an appliance to the rack.
4. Slide the inner rails into the outer rails, pushing the appliance into the rack.
Figure 7‑6. Sliding the appliance into the rack

For replacement rails for xx55 appliances, you can use the RMK–2-EXPRAIL kits.
Mounting 1U SteelHead xx50 appliances in a four-post rack
SteelHead xx50 appliances ship with rails preinstalled to the appliance for mounting to a four-post rack. This section describes how to mount the SteelHead xx50 appliance to a four-post rack.
To mount a SteelHead xx50 to a four-post rack
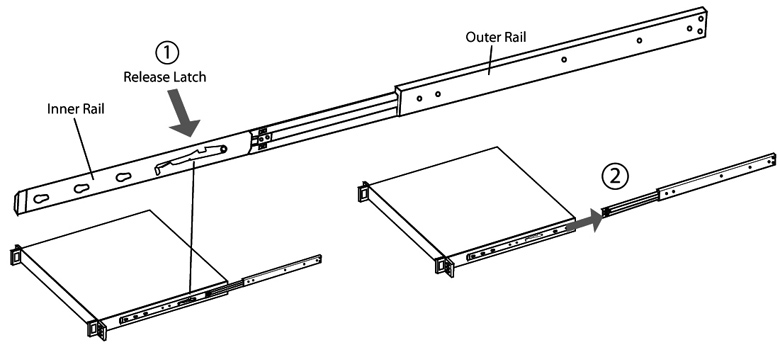
1. To detach the outer rails, slide the outer rail to the end of the appliance and engage the release latches. The right release latch must be pushed down and the left release latch must be pushed up.
2. Pull the outer rail completely off the appliance.
Figure 7‑7. Detaching the outer rails
3. If needed, attach the brackets to the outer rails with the included screw set.
Figure 7‑8. Attaching brackets to outer rails
4. To adjust the length of the outer rails to fit the distance between your rack posts, loosen the screws on the longer rear bracket of the outer rails. You can tighten and secure the bracket screws after you have affixed the outer rails to the rack posts.
5. Install the outer rails to the rack posts.
Figure 7‑9. Attaching the outer rails to the rack
6. Slide the ball bearing retainer on the inside of the outer rail to the forward position.
Figure 7‑10. Sliding the ball bearing retainer to the forward position
The ball bearing retainer on the outer rail must be returned to the forward position to connect with the inner rail on the appliance. The bearings might fall off if the ball bearing retainer isn’t pushed forward.
7. Slide the inner rails into the outer rails, pushing the appliance into the rack.
Figure 7‑11. Sliding the appliance into the rack
To operate the rails
• To pull out the appliance from the rack without removing it, pull it until it stops.
Center mounting 1U SteelHead xx50 appliances in a two-post rack
You can mount the SteelHead xx50 in a two-post rack in the center-mount position using rail kit RMK-004. This section describes how to remove the preinstalled four-post rails and install the two-post brackets for installation in a two-post rack.
To center mount xx50s to a two-post rack
1. If the appliance is already installed in a rack, remove the appliance from the rack.
2. To detach the outer rails, slide the outer rail to the end of the appliance, push the release latch toward the front of the appliance, and pull the outer rail completely off the appliance.
Figure 7‑12. Detaching the outer rails
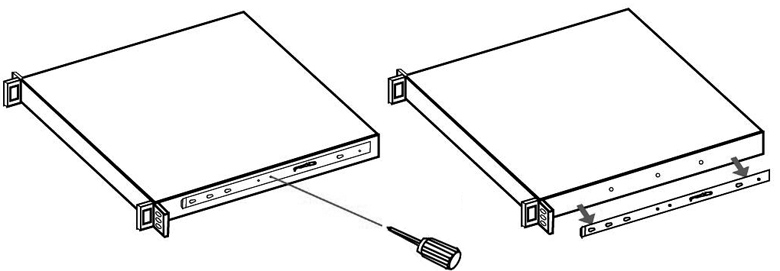
3. To remove the inner rail, unscrew the three screws on each side of the appliance.
Figure 7‑13. Removing inner rail securing screws
4. Attach the first bracket to the appliance with the three included screws.
Figure 7‑14. Attaching two-post center-mount brackets

5. Slide the second bracket onto the pegs of the first bracket by placing the second bracket over the first bracket at the widest opening and then slide toward the narrower part to secure.
Figure 7‑15. Attaching a second bracket to the first bracket
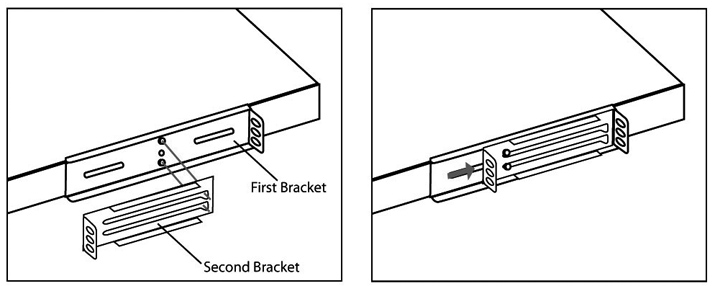
6. Repeat
Step 4 and
Step 5 on the other side of the appliance.
Mounting 3U SteelHead xx50 appliances in a rack
The SteelHead xx50 appliances ship with rails preinstalled to the appliance for mounting to a four-post rack. This section describes how to install the appliance in a four-post rack.
Before you begin the installation process:
• Unplug the AC power cords.
• Remove all external devices and connectors.
All 3U appliances must be mounted to a four-post rack; they can’t be mounted to a two-post rack.
3U appliances weigh from 59 to 71 lb (27 to 33 kg). At least two people are required to move a 3U appliance. Lift the appliance using both hands and with your knees bent.
The outer rails aren’t required to install the appliance in a shelving unit. Remove the outer rails before attempting to install the SteelHead xx50 in a shelving unit.
To detach the outer rails from the inner rails
• To detach the outer rails, slide the outer rail to the end of the appliance, pull the outer rail release tab toward the front of the appliance and pull the outer rail completely away from the appliance.
Figure 7‑16. Releasing the outer rail
To adjust the length of the outer rails
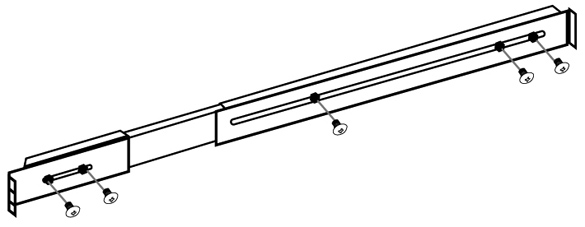
1. To adjust the length of the outer rails to fit the distance between your rack posts, loosen the screws on the longer rear bracket of the outer rails. You can tighten and secure the bracket screws after you have affixed the outer rails to the rack posts.
In some environments, you can’t reach the bracket screws after the rails have been installed. In this case the length of the outer rails should be adjusted and secured before mounting the outer rails into the rack.
Figure 7‑17. Adjusting the length of the outer rails
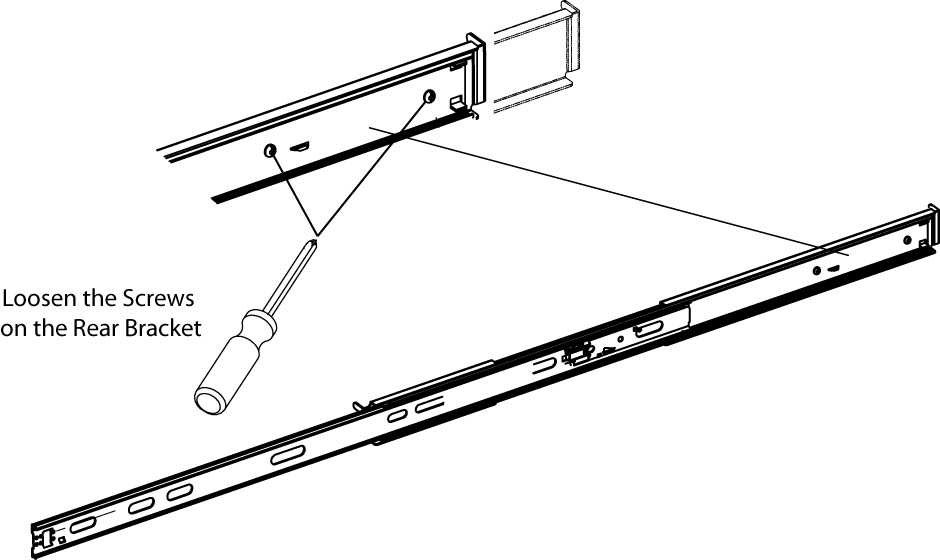
The screws on the front bracket are preadjusted, do not loosen those screws.
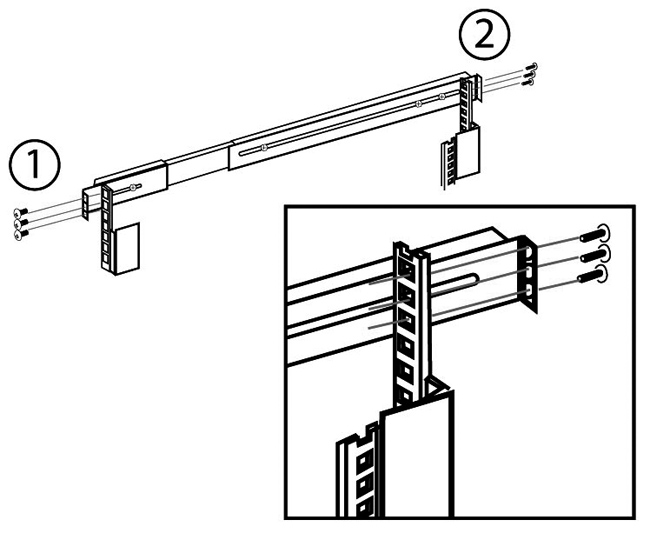
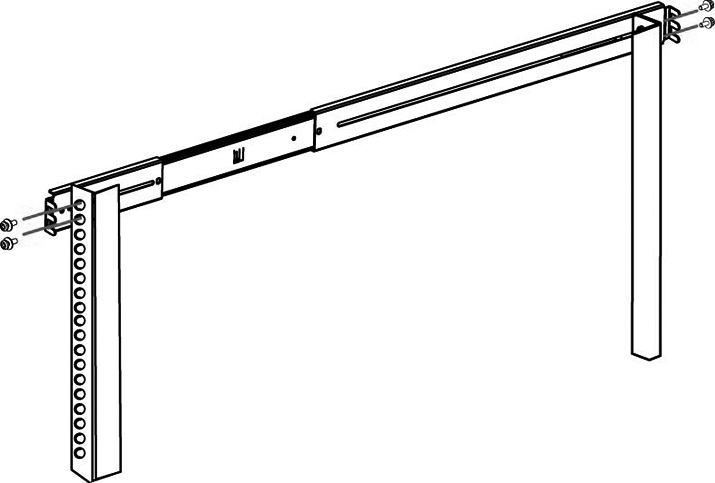
To install the outer rails to a rack
After you have detached the outer rails from the inner rails on the appliance and adjusted the length of the outer rails to fit your rack posts, you are ready to install the outer rail assemblies to the rack.
• Install the outer rails to the rack posts with the included screw set.
Figure 7‑18. Attaching the outer rails to the rack
The sliding part of the outer rails should not be extended when inserting or removing the appliance.
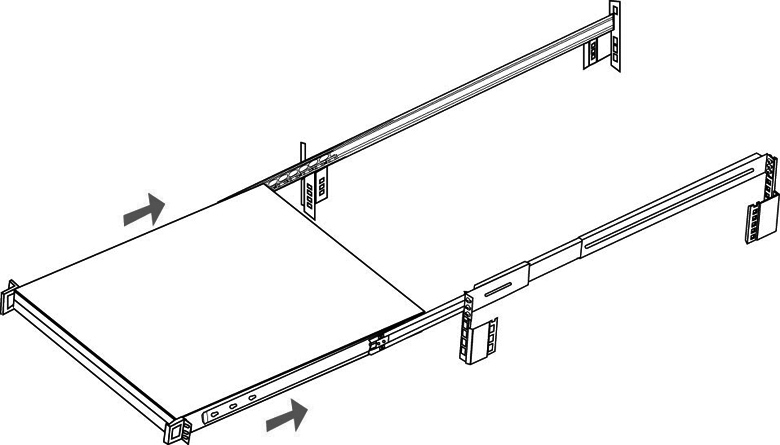
To mount the appliance in a rack
1. With two people lifting the appliance, gently slide the inner rails into the outer rails until you get to a hard stop.
The inner and outer rails must meet precisely, and the appliance must be held level to join the rails. The sliding part of the outer rails should not be extended when joining the inner and outer rails.
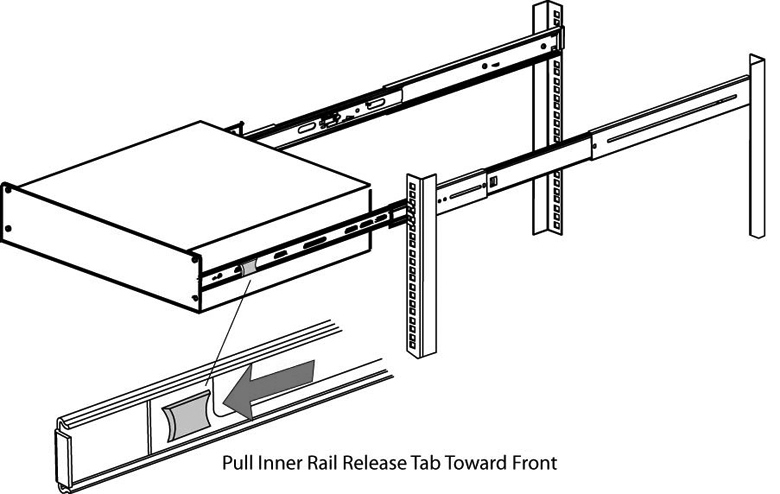
2. When the appliance has reached a hard stop, pull the release tabs on both of the inner rails and push the appliance all the way into the rack.
Figure 7‑19. Sliding the appliance into the rack and pulling the inner rail release tab
To operate the rails
• To pull out the appliance from the rack without removing it, pull it until it stops.
• To push the appliance back into the rack, use the inner rail release tab.
Use caution when the appliance is mounted in a rack and the outer rails are extended. Do not place objects or additional weight on the appliance.