Deploying Client Accelerator packages
This section describes how to deploy Client Accelerator packages using the Microsoft Windows Installer for Windows clients and the Apple PackageMaker for Mac OS X clients.
You can use any of these methods to deploy packages to the endpoint clients in your network:
• Deployment Tools - Typically, in larger organizations, you might use deployment tools to install the Client Accelerator endpoint software (for example, Microsoft SMS and GPO, Altiris, Tivoli, Radia, and Zenworks). Deployment of Client Accelerator software has been tested with Microsoft SMS, Active Directory, and GPO (Group Policy Object). Consult your vendor’s documentation for information about its products.
• Email - You can use email to send the link provided on the Client Accelerator.
• Manual Installation - If your deployment is small, you might want to install each package manually on the client machines.
• Scripts - You can use login scripts or batch files to trigger an installation when users log in to their systems.
After you save the Client Accelerator package to your computer, double-click the package to install the package on your computer.
If the package is to be downloaded by more than 50 Client Accelerator endpoints, we recommend that you put the package on a file server so the Client Accelerator is not overloaded with requests.
Basic steps for deploying packages
Perform these basic steps to deploy packages to your Client Accelerator endpoints.
1. Choose Manage > Services: Packages to display the Packages page.
2. Click the group name to display a list of packages.
3. Click the package name to view package details, including the download URL for Windows and Mac packages.
4. Click the URL for the Windows or Mac package and save it to your local machine.
5. Distribute your package using a deployment tool of your choice:
– You use a deployment tool, for example, you can use Microsoft GPO or SMS.
– You can deploy your package from an internal website, by email, or manually. If you use one of these methods, you must install the Client Accelerator endpoints manually by double-clicking on the Client Accelerator package to install the package on your computer.
6. Verify the Client Accelerator connections and optimization in the Reports > Endpoints: Endpoint Report on the Client Accelerator.
Installing the Client Accelerator packages on Windows and Mac clients
Perform these steps to install the Client Accelerator package on a Windows Client. For details on Microsoft Windows Installer Properties (MSI) properties, see
Appendix: Windows Installer Properties.The Client Accelerator installer for the Mac OS X is a standard Apple PackageMaker installer. Perform these steps to install the Client Accelerator package on Mac clients.
To install the Client Accelerator package on a Windows client
1. After you have saved the Client Accelerator package to your computer, double-click the msi file to execute the package.
2. Accept the license agreement.
3. Choose the installation destination folder.
4. Specify whether to have a Desktop icon or a Start menu icon.
5. Choose a Typical or Advanced installation. If you select Advanced, set your Client Accelerator RiOS data store size and configure your Client Accelerator.
6. Click the desktop icon to launch the Client Accelerator.
7. Reboot your machine, if prompted.
To install the Client Accelerator package on a Mac client
1. After you have saved the Client Accelerator package to your computer, double-click the tgz file to run it.
2. Accept the license agreement.
3. Select the installation Destination disk.
4. Specify an administrator name and password, and click OK.
5. Click Close to complete the installation.
If the Show Client in the System Tray option is enabled in the policy, the Client Accelerator software icon is now shown in the system tray.
The Client Accelerator runs in the background and optimizes traffic transparently. After approximately thirty seconds, the client is visible on the Client Accelerator.
To verify your client connections and optimization, navigate to the Reports > Endpoints: Endpoint Report page on the Client Accelerator. For details, see
Viewing Endpoint reports.Updating Client Accelerator software
You use packages to provide automatic software updates to your Client Accelerator endpoints. After a package is created, it can’t be edited.
HTTP access must be enabled on the Client Accelerator for automatic updates to be downloaded to your Client Accelerator endpoints.
When the Client Accelerator software is installed a client is assigned a group ID based on the package that was installed. If you used the Default package, then the client will be in the Default group. Using groups allows you to assign upgrades and policies to several Client Accelerator endpoints at a time. For details on groups, see
Managing Client Accelerator assignments.If you want to change a Client Accelerator’s group while still having the client using the same version, you must manually uninstall the Client Accelerator software to install the package with the new group. The Client Accelerator’s group can also be changed using the
Group Policy Object (GPO) template. For details, see
Changing an endpoint group for clients using a GPO.Basic steps for creating a package for Client Accelerator software updates
This list describes the basic steps for creating a package for Client Accelerator software updates.
Task | Reference |
1. Create new packages for each group. | |
2. Modify the package assigned to the current group or assign your policies to group. | |
3. Deploy the package to the endpoint clients in your network using the deployment tool of your choice. When using the upgrade method built into the Client Accelerator, the endpoint user will be prompted to install the update. | |
4. Verify your connection and optimization in the Reports > Endpoints: Endpoint Report page. | |
5. You can also make individual assignments to Active Directory users based on their username identified by the Client Accelerator without using a group. | |
Upgrading can terminate existing connections on the client. Client connections are terminated each time the policies are updated.
Managing Client Accelerator assignments
On the Manage > Services: Assignments page, you configure two types of assignments:
• Default policy assignments for desktop devices.
• Group assignments for Client Accelerator endpoints.
Figure 7‑20. Assignments page
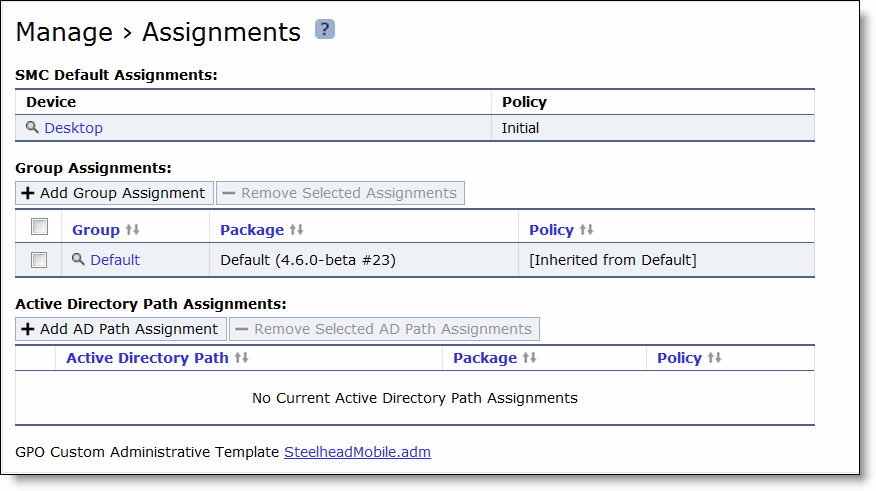
Changing default policy assignments
You can configure default policy assignments for the desktop. The default policy is Initial.
To change a default policy assignment
1. Choose Manage > Services: Assignments to display the Assignments page.
2. Click the device type that you want to edit. (You can also click the search icon next to the device type.)
Clicking the device type displays its details, and the search icon changes to an “x.” Click the “x” to collapse the details.
3. Under Edit Assignment, select a policy from the drop-down list.
4. Click Update SMC Default Assignment to make the change effective.
Working with group assignments
Typically, you use Group assignments to link policies and packages to your Client Accelerator endpoints. Group assignments enable you to create different packages that are associated with different policies and assign them to groups of Client Accelerator endpoints. When you deploy a package, the Client Accelerator reports its group to be that of the package that was installed. The Client Accelerator uses the group to identify the Client Accelerator endpoints associated with that group and automatically provides policy and software updates to them.
Your group assignments can be based on your endpoint client computers, such as applications used, computer memory, or disk space. Your group assignments can also be based on department, job function, geographic location, and so forth. Finally, they can be based on the type of Client Accelerator deployment you want, such as whether to optimize Client Accelerator endpoints when they are in the office.
For example, suppose your Client Accelerator endpoints have two types of computers: one with a minimal amount of disk space and another that has substantially larger amounts of disk space. You can deploy two packages:
• You can deploy the default package (which has a group assignment, Default and default policy, Initial) to your Client Accelerator endpoints with minimal disk space. Deploying the default package requires no additional configuration. After these Client Accelerator endpoints install the package, they are associated with the Default group and automatically receive policy and software updates assigned to the Default group.
• You can create a policy called, for example, high_end. The high_end policy would allot more disk space for data optimization. You would create a package and give it a unique group called, for example, graphics_department. You would assign the high_end policy to the graphics_department group, and you would deploy the associated package to those users with the larger disk space. After your users install the package, their computers become associated with the graphics_department group and, subsequently, receive policy and software updates assigned to the graphics_department group. You could also use the high_end policy for clients associated with a different group.
You can also make individual assignments to Active Directory users without using a group. We recommend that you use a group to assign policies to packages.
If your network environment requires the deployment of multiple packages, create the packages you need before deploying the default package. For details, see the Client Accelerator Installation Guide.
To manage group assignments
1. Choose Manage > Services: Assignments to display the Assignments page.
2. Complete the configuration as described in this table.
Controls | Description |
Add Group Assignments | Specify the group assignments. • Group - Specify a new, unique group. If you’re updating endpoint clients, specify an existing group. • Package - Specify a name for the package from the drop-down list. • Policy - Specify the policy from the drop-down list. The default is Initial. In Client Accelerator 5.5, you can select Inherit from Default as an option. |
Add | Adds the group assignment. |
Remove Selected Assignments | Removes the selected assignment. |
Add AD Path Assignments | Specify the Active Directory path assignment. Active Directory Path Assignment - Specify a new, unique active directory path assignment. Package - Specify a name for the package from the drop-down list. Policy - Specify the policy from the drop-down list. |
Add | Adds the active directory path assignment. |
GPO Custom Administrative Template | Complete these tasks: • Click the link to download the GPO template (SteelheadMobile.adm) to your local machine. • On the Active Directory Server, in the Group Policy Editor, under Computer Configuration or User Configuration, right-click Administrative Templates and select Add/Remove Templates. • Click Add. • Navigate to the location of the SteelheadMobile.adm file downloaded above, select it, and click Open. • The SteelheadMobile.adm file is listed under Current Policy Templates. The GPO now contains a Client Accelerator section with a list of the available Client Accelerator policy settings. On Windows Server 2008 R2 or later, the new template appears under a subsection of Current Policy Templates labeled Classic Administrative Templates. |
3. Click Save to Disk to save your settings permanently.
Changing an endpoint group for clients using a GPO
You can also use the Group Policy Object (GPO) custom administrative template to configure Client Accelerator deployment settings in the Manage > Services: Assignments page.
The GPO custom administrative template adds Client Accelerator-specific policy settings to existing GPOs. After the template is added, you can configure these policy settings for use on the Client Accelerator endpoints. The GPO template can be added to the computer-specific or to the user-specific section of a GPO, depending on whether you want to apply settings based on computer name or username.
To change a client endpoint group with GPO
1. Double-click Group.
2. Select the option to enable the policy setting.
3. Type the group name.
When the policy is applied, the affected client begins using the specified group when communicating with the Client Accelerator, downloading policies, and so on.
Enabling or disabling optimization using a GPO template
In Windows Server you can enable or disable optimization using a GPO template.
To enable or disable optimization using a GPO template
1. Double-click Enable Optimization.
2. Select the policy that you want to enable.
3. To disable optimization, uncheck Enable Optimization.
When the policy is applied, optimization on the client is disabled.