Replacing Disk Drives
This section describes how to remove and replace disk drives in the SteelHead CX xx70, SteelCentral xx70, SteelHead Interceptor 9600, and SteelFusion Core 3500 appliances.
This section includes the following procedures:
Note: If you need to replace an appliance, you cannot move the disks to preserve your data. Each disk is encoded with machine-level information and moving disks is not supported.
Replacing Disk Drives in 1U Appliances with 3.5-inch Drives
SteelHead CX3070, SteelCentral NetExpress 470, SteelCentral NetProfiler 4270DP, SteelCentral Flow Gateway 2270, and SteelCentral NetShark 2170 appliances are equipped with replaceable, hot-swappable 3.5-inch hard-disk drives (HDD). SteelHead CX3070 appliances include HDDs and solid-state drives (SSD). SteelCentral NetProfiler 4270DB/UI includes SSDs.
When replacing a drive, replace only one drive at a time. You must use approved disk drives. To order disk drives, contact Riverbed Support at https://support.riverbed.com.
Note: When you replace disk drives, you must wear a grounded ESD antistatic strap to protect the hardware against electrostatic discharge. Make sure that the strap makes skin contact prior to handling equipment.
Caution: 
Use caution when you remove or replace appliance components; they can become hot to the touch.
To replace the disk drive in 1U appliances
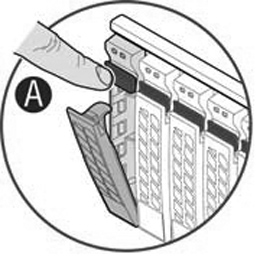
1. Remove the bezel.
2. Identify the faulty disk drive.
The Web interface identifies the faulty disk drive. On a SteelHead, the Alarm Status page in the Management Console identifies the faulty drive.
The disk drive LED is orange for failed drives.
The drives are numbered in ascending order from left to right (that is, 0, 1, 2, 3).
– SteelHead CX3070 HDDs can be in slots 0 and 1; SSDs can be in slot 2 and 3.
– SteelCentral NetProfiler 4270-DB/UI have SSDs in slots 0 and 1.
– SteelCentral NetProfiler 4270-DP has HDDs in slots 0 and 1.
– SteelCentral NetExpress 470 has 4 TB drives in slots 0 and 1 and 2 TB drives in slots 2 and 3.
– SteelCentral Flow Gateway has 1T B HDDs in slots 0 and 1.
– SteelCentral NetShark 2170 has 2 TB SATA drives in slots 0 and 1 and 4 TB SATA drives in slots 2 and 3.
Figure: Disk Drive Numbers

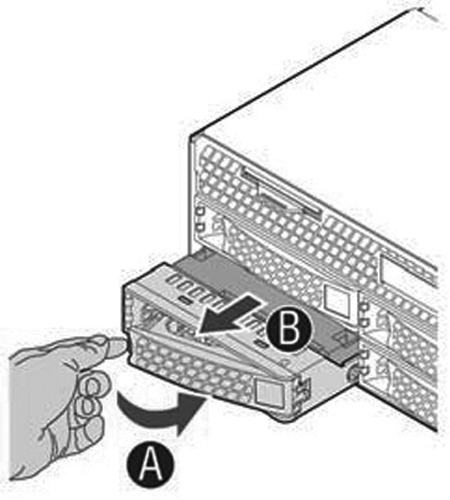
3. Press the orange release button and pull the drive handle toward you.
Figure: Removing the Disk Drive
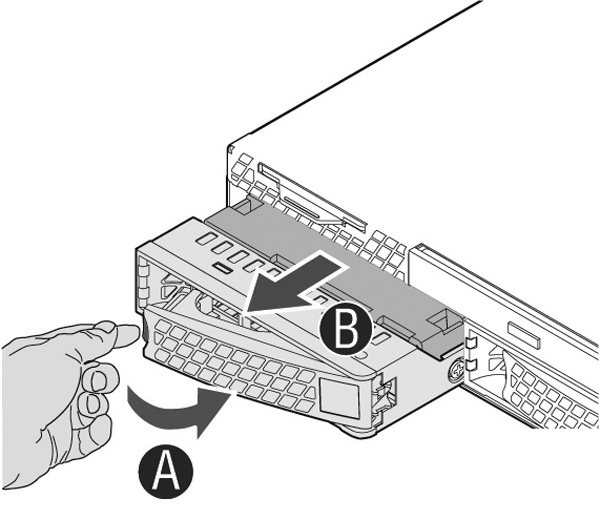
4. Slide the faulty disk drive out of the slot.
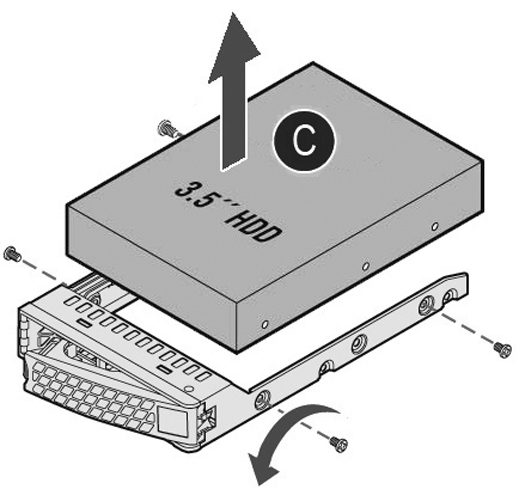
5. Remove the four screws securing the drive from the carrier and remove the failed drive.
Figure: Removing the Drive from the Carrier
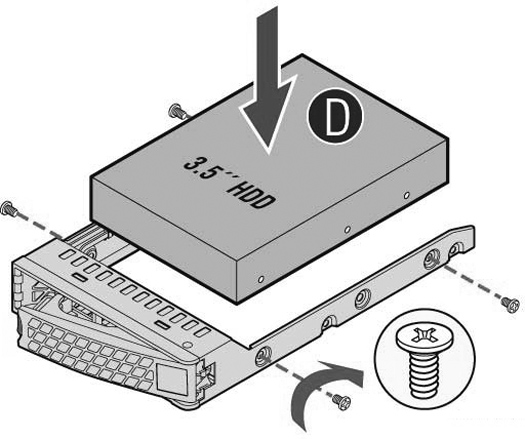
6. Insert the new drive in the carrier and secure using the four screws.
Make sure the drive connector matches the backplane connector.
Figure: Inserting the Drive in the Carrier
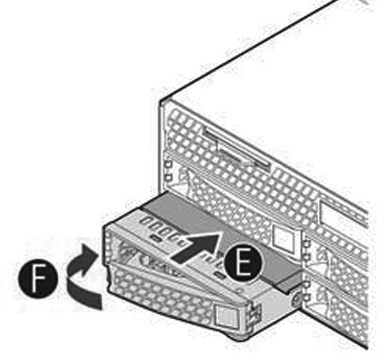
7. Open the new disk-drive handle by pressing the orange release button.
8. Slide in the new disk drive until it mates with the back connectors in the chassis.
The disk drive LED lights blue when connected.
Figure: Inserting the Disk Drive

9. Press in the disk-drive handle to close.
The new disk drive runs through a self-test automatically. The disk drive automatically begins proper operation with the other disk drives. You do not need to set up or configure the new disk drive.
Note: When replacing drive 2 or 3 on a NetShark 2170, Packet Storage appears as Inoperable in the NetShark Web interface Status page. Choose System > Maintenance; the new HDD is labeled New. Click Reinitialize Packet Storage to restore operation.
Important: It takes approximately 3 to 4 hours, depending on the system load, to rebuild a new disk drive. You can configure the system to send an email to the administrator user when the disk drive has finished rebuilding.
Replacing Disk Drives in 2U Appliances with 2.5-inch Drives
2U SteelHead CX (CX5070 and CX7070) and SteelHead Interceptor 9600 appliances are equipped with replaceable, hot-swappable 2.5-inch drives.
When replacing a drive, replace only one drive at a time. You must use approved disk drives. To order disk drives, contact Riverbed Support at https://support.riverbed.com.
Note: When you replace disk drives, you must wear a grounded ESD antistatic strap to protect the hardware against electrostatic discharge. Make sure that the strap makes skin contact prior to handling equipment.
Caution: Use caution when you remove or replace components; they can become hot to the touch.
To replace a 2.5-inch disk drive in the 2U appliances
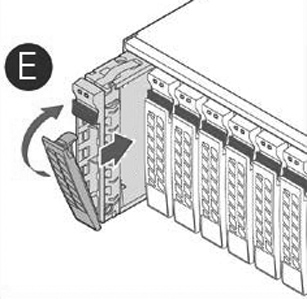
1. Remove the bezel.
2. Identify the faulty disk drive.
The Web interface identifies the faulty disk drive. On a SteelHead, the Alarm Status page in the Management Console identifies the faulty drive.
The disk drive LED is orange for failed drives.
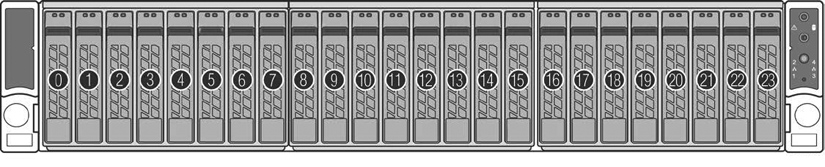
The drives are numbered in ascending order from left to right (that is, starting with 0 on the left and ending with 23 on the right).
– For the CX appliances, disks 0 and 23 are HDDs and disks 1 to 22 are SSDs.
– For the Interceptor 9600 appliances, disks 0 and 23 are HDDs.
Figure: Disk Drive Number
s
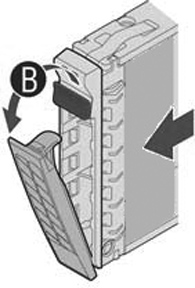
3. Press the release button and pull the drive handle toward you to release the disk drive.
Figure: Releasing the Disk Drive
4. Slide the faulty disk drive out of the slot.
Figure: Remove the Disk Drive
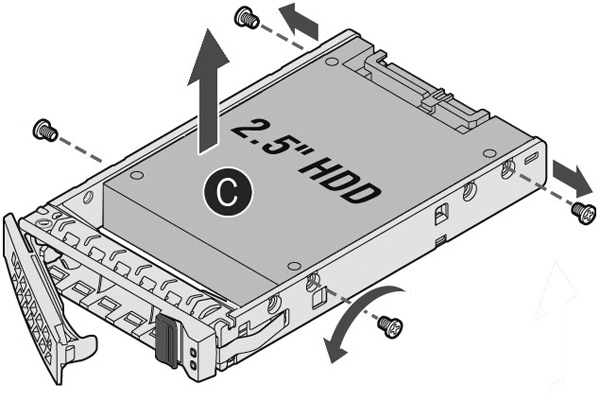
5. Remove the four screws securing the drive from the carrier and remove the failed drive.
Figure: Removing the Drive from the Carrier
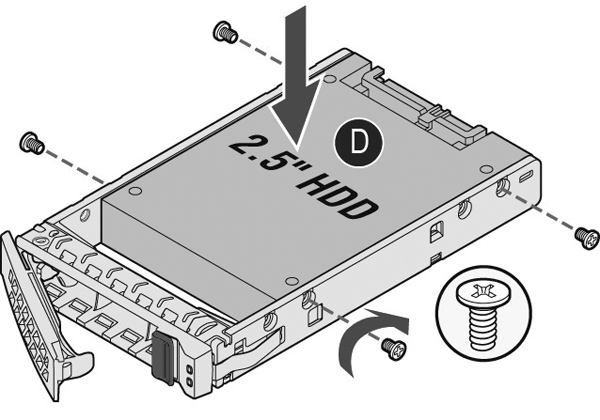
6. Insert the new drive in the carrier and secure using the four screws.
Make sure the drive connector matches the backplane connector.
Figure: Inserting the Drive in the Carrier
7. Open the new disk-drive handle by pressing the release button.
8. Slide in the new disk drive until it mates with the back connectors in the chassis.
The disk drive LED lights blue when connected.
9. Press in the disk-drive handle to close.
Figure: Inserting the Disk Drive
The new disk drive runs through a self-test automatically. The disk drive automatically begins proper operation with the other disk drives. You do not need to set up or configure the new disk drive.
Replacing Disk Drives in 2U Appliances with 3.5-inch Drives
2U SteelFusion Core 3500, SteelCentral NetProfiler (2270, 4270-EX, and 4270-AN), SteelCentral NetShark (4170 and 6170), and SteelCentral NetShark Storage Unit (48 TB and 72 TB) appliances are equipped with replaceable, hot-swappable 3.5-inch HDDs.
When replacing a drive, replace only one drive at a time.
You must use approved disk drives. To order disk drives, contact Riverbed Support at https://support.riverbed.com.
Note: When you replace disk drives, you must wear a grounded ESD antistatic strap to protect the hardware against electrostatic discharge. Make sure that the strap makes skin contact prior to handling equipment.
Caution: Use caution when you remove or replace components; they can become hot to the touch.
To replace a disk drive in 2U appliances with 3.5-inch drives
1. Remove the bezel.
2. Identify the faulty disk drive.
The Web interface displays an alarm that identifies the faulty disk drive.
The disk drive LED is orange for failed drives.
– SteelFusion Core 3500 has 1TB HDD drives in slots 0 to 3 and 80GB SSDs in slots 4 and 5.
– NetShark 4170 has 2TB SATA drives in slots 0 to 3 and 4TB SATA drives in slots 4 to 11.
– NetShark 6170 has 2TB SATA drives in slots 0 to 3.
– SteelCentral NetProfiler 2170 have 2TB drives in slots 0 to 11.
– SteelCentral NetProfiler 4270-EX and 4270-AN have 4TB drives in slots 0 to 11.
Figure: Disk Drive Numbers

3. Press the orange release button and pull the drive handle toward you to release the disk drive.
Figure: Releasing the Disk Drive
4. Slide the faulty disk drive out of the slot.
5. Remove the four screws securing the drive from the carrier and remove the failed drive.
Figure: Removing the Drive From the Carrier
6. Insert the new drive in the carrier and secure using the four screws.
Make sure the drive connector matches the backplane connector.
Figure: Inserting the Drive in the Carrier
7. Open the new disk-drive handle by pressing the orange release button.
8. Slide in the new disk drive until it mates with the back connectors in the chassis.
The disk drive LED lights blue when connected.
Figure: Inserting the Disk Drive
9. Press in the disk-drive handle to close.
The new disk drive runs through a self-test automatically. The disk drive automatically begins proper operation with the other disk drives. You do not need to set up or configure the new disk drive.
Note: When replacing a drive on a NetShark 4170, 6170 or Storage Unit, Packet Storage appears as Inoperable in the NetShark Web interface Status page. Choose System > Maintenance; the new HDD is labeled New. Click Reinitialize Packet Storage to restore operation.