Configuring the BMC
From the Configuration menu, you can customize network settings, configure platform event filtering, set up authorized users, and configure SSL.
Configuring the Network
Initially, you configure the network settings for the BMC through the appliance CLI. You can use the Configuration > Network page to manage or change the settings.
To change the network settings
1. Choose Configuration > Network.
2. Complete the configuration as described in this table.
Control | Description |
LAN Interface | Select the LAN interface to configure. |
LAN Settings | Check this option to enable LAN support for the selected interface. |
MAC Address | This read-only field displays the MAC address of the selected interface. |
Obtain an IP address automatically | Enable Use DHCP to dynamically configure the IP address using Dynamic Host Configuration Protocol (DHCP). |
IPv4 Address, Subnet Mask, Default Gateway | If DHCP is disabled, specify a static IP address, Subnet Mask, and Default Gateway for the selected interface. |
IPv6 Settings | Check this option to enable IPv6 support for the selected interface. |
Subnet Prefix length | Specify the subnet prefix length for the IPv6 settings. Value ranges from 0 to 128. |
VLAN Settings | Check this option to enable VLAN support for the selected interface. |
VLAN ID | Specify the Identification for VLAN configuration. Value ranges from 2 to 4094. VLAN ID 0, 1, and 4095 are reserved VLAN IDs. You cannot change the VLAN ID without resetting the VLAN configuration. |
VLAN Priority | Specify the priority for VLAN configuration. Value ranges from 1 to 7. (7 is the highest priority for the VLAN.) |
3. Click Save.
You are prompted to log out of the current session and log back in at the new IP address.
4. Click Reset to revert the changes.
Configuring Platform Event Filtering
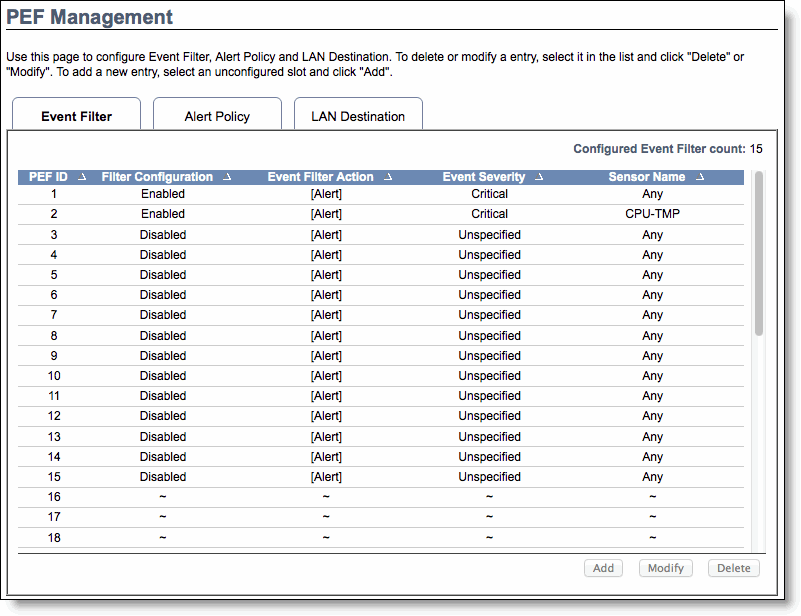
You can use the Configuration > PEF page to manage the Platform Event Filtering settings. You can configure the Event Filter, Alert Policy, and LAN Destination for alerts.
To view the page, you must at least be an Operator. To modify or add a PEF, the user must be an administrator.
The PEF page lets you configure the following:
• Event Filter - Select the Event Filter tab to display configured event filters and available slots. You can modify or add new event filter entry. By default, 15 event filter entries are configured among the 40 available slots.
• Alert Policy - Select the Alert policy tab to show configured Alert policies and available slots. You can modify or add a new alert policy entry from here. A maximum of 60 slots is available.
• LAN Destination - Select the LAN Destination tab to show configured LAN destinations and available slots. You can modify or add a new LAN destination entry. A maximum of 15 slots is available.
A tilde character (~) indicates a free slot.
Figure: Platform Event Filtering

To add a new entry
• Select a free slot and click Add. Alternatively, double click a free slot.
To modify an entry
• Select a configured entry and click Modify. Alternatively, double click the entry.
To delete an entry
• Select the entry to be deleted and click Delete.
Configuring Users
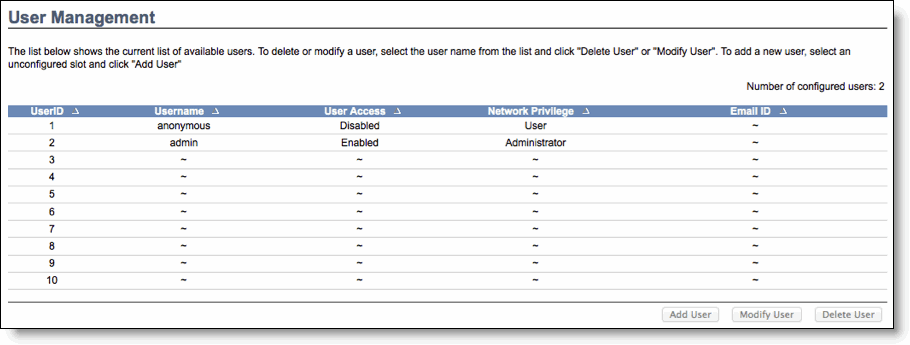
You can view and manage users with access to the BMC in the Configuration > Users page. The page shows all configured users and available spaces. To view the page, you must have operator privileges.
You can set up 10 users, including the defaults of admin and anonymous. To modify or add a user, you must have administrator privileges.
Figure: User Configuration

A tilde character (~) indicates a free slot.
To add a user
• Select a free slot and click Add User. Alternatively, double click a free slot.
To modify a user
• Select a configured user and click Modify User. Alternatively, double click the user.
To delete a user
• Select the user to be deleted and click Delete User.
Configuring SSL
You can use SSL to access the BMC in a secure mode. You can upload a certificate and private key file into the BMC or you can generate an SSL certificate based on configuration details.
Note: SSL is only available in BMC firmware v0.20 and later. (The dashboard displays the firmware version.) If you have an earlier version of BMC firmware and you want to use SSL, you need to upgrade your firmware. For details, see
Updating the Firmware.
To upload a certificate and private key
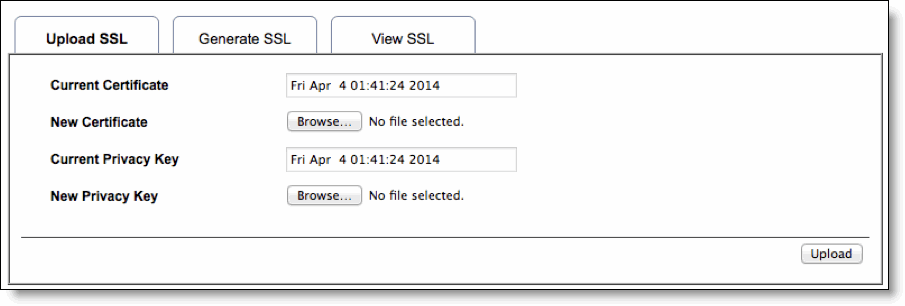
1. Choose Configuration > SSL and select the Upload SSL tab.
The Current Certificate and Current Privacy Key appear with the date and time of the upload.
Figure: Upload SSL Certificate

2. Click Browse and navigate to the certificate and privacy key file.
The file needs to be a PEM file.
3. Click Upload to transfer the SSL certificate and privacy key to the BMC.
Once uploaded, the HTTPS service restarts and begins using the uploaded SSL certificate.
4. Restart your browser to begin using the new certificate.
You can view the certificate details in the View SSL tab.
If this is a self-signed certificate, you need to add the certificate to the trusted list of certificates for your browser.
To generate an SSL certificate
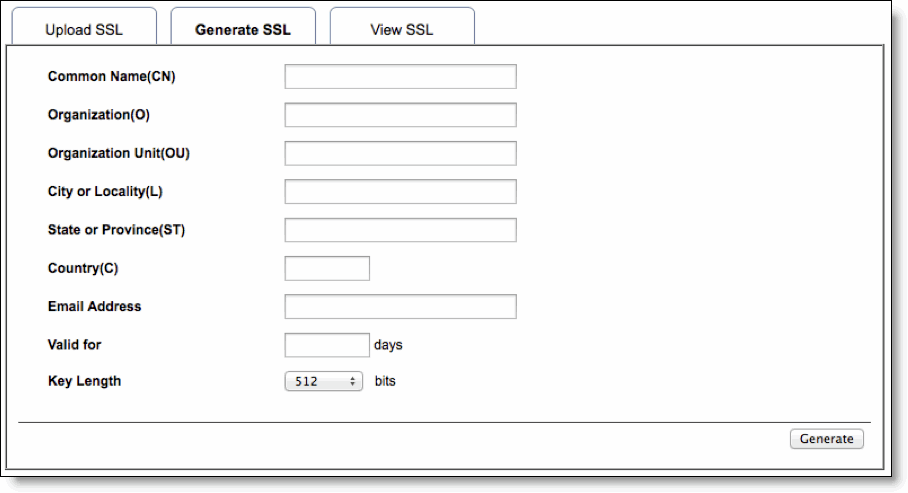
1. Choose Configuration > SSL and select the Generate SSL tab.
Figure: Generate SSL Certificate

2. Complete the configuration as described in this table.
Control | Description |
Common Name (CN) | Specify a common name for the certificate. The name can contain up to 64 alphanumeric characters. Special characters # and $ are not allowed. |
Organization (O) | Specify the organization name for the certificate. The name can contain up to 64 alphanumeric characters. Special characters # and $ are not allowed. |
Organization Unit (OU) | Specify the organization section unit name for certificate. The name can contain up to 64 alphanumeric characters. Special characters # and $ are not allowed. |
City or Locality (L) | Specify the city or locality. The name can contain up to 64 alphanumeric characters. Special characters # and $ are not allowed. |
State or Province (ST) | Specify the state or province. The name can contain up to 64 alphanumeric characters. Special characters # and $ are not allowed. |
Country (C) | Specify the country code. This must be two characters. Special characters are not allowed. |
Email Address | Specify the email address of the organization. |
Valid for | Specify the number of days the certificate is valid. Value ranges from 1 to 3650 days. |
Key Length | Choose the key length bit value of the certificate. |
3. Click Generate to create a new SSL certificate.
The HTTPS service restarts and begins using the new SSL certificate.
4. Restart your browser to begin using the new certificate.
You can view the certificate details in the View SSL tab.


