Managing Appliance Operations and Upgrades
This chapter describes how to use the SCC to manage device configurations and policies. This chapter includes these sections:
Managing appliance operation history
You can view the operation history of the system, including the operation ID, timestamp, product/model, and status of the operation in the Operation History page. You can open each operation to view its details, including the serial number of the appliance, current status of the operation for the appliance, and messages associated with the operation.
Users can view the operation history of only those appliances and appliance groups for which they have permission.
To manage and view operation history
1. Choose Manage > Operations: Operation History to display the Operation History page.
Operation history
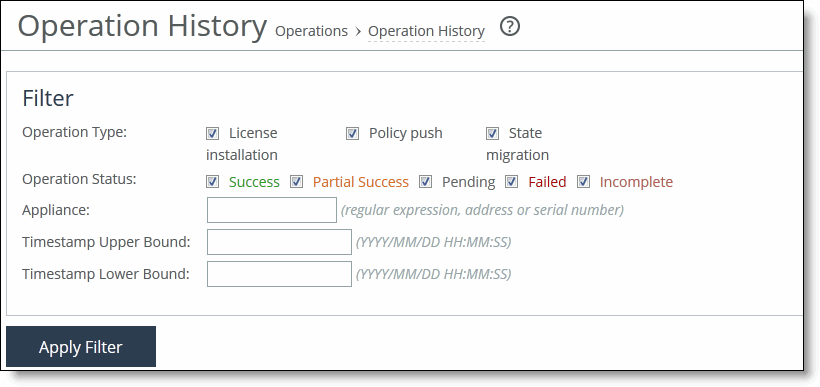
2. Complete the configuration as described in this table.
Control | Description |
Operation Type | Specify the operation type you want to display: •License installation •Policy push •State migration |
Operation Status | Specify the status of the operation you want to display: Success, Partial Success, Pending, Failed, Incomplete. |
Appliance | Specify the IP address or serial number of the appliance. |
Timestamp Upper Bound | Specify the time for which the report should begin. |
Timestamp Lower End | Specify the time for which the report should end. |
Apply Filter | Applies your settings to the report. |
3. Under Operations, click the Date/Time value expand the page and view appliance hostname, product/model, status, and any messages associated with the operation. Click the > next to the appliance name to display appliance details. Click the down arrow to close the pane. Optionally, you can enter a comment and click Apply.
4. Optionally, under History Management, complete the configuration as described in this table.
Control | Description |
Clear History | Specifies to clear the history based on one of these options: •Clear All History - Specify to clear all history. •Clear History Older Than - Specify date (yyyy/mm/dd) and time (hh:mm:ss). |
Clear | Clears the history. |
Managing backups and restores
You back up appliance configuration settings in the Backups/Restore page. This section describes these tasks:
Backup and restore operations use hostname resolutions. You must have DNS configured for these operations to function correctly.
Typically, you don’t need to use backups. We recommend that you restore an appliance to health by resending its configuration policies. If using policies for restoration isn’t possible, you can use this procedure to restore the system to the backup restore point. However, the restore point doesn’t include SSL settings configured in the SSL page.
The SCC collects backups automatically, every day, at 3:00 AM, with the filename <yyyy>.<mm>.<dd><config-name>, where <config-name> is the name of the active configuration on the SteelHead.
Assigning rollover strategy
You assign a rollover strategy in the Backup/Restore page. You select the rollover strategy for the backups.
All backups for the last 30 days are kept, and for anything older only the first backup of the month is kept.
To assign a rollover strategy
1. Choose Manage > Operations: Backup/Restore to display the Backup/Restore page.
Appliance snapshot rollover strategy
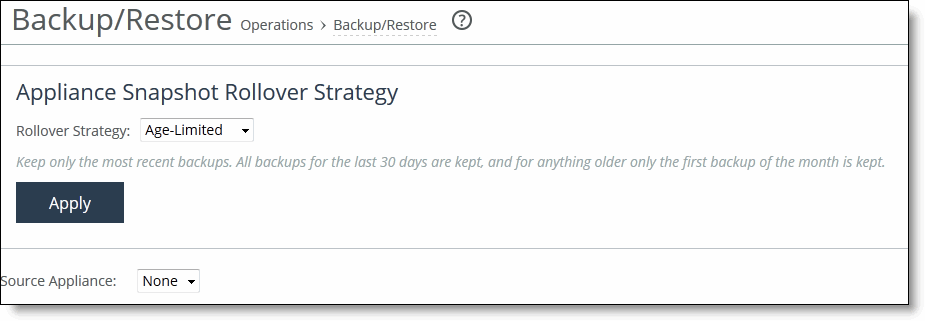
2. Under Appliance Snapshot Rollover Strategy, select the rollover strategy from the drop-down list as described in this table.
Control | Description |
Age-Limited | Select this option to keep only the most recent backups. All backups for the last 30 days are kept and for anything older only the first backup of the month is kept. Keeps only the most recent backups. All backups for the last 30 days are kept, and for anything older only the first backup of the month is kept. |
Deduplicated | Select this option to keep only the most recent backups. |
3. Click Apply to commit to the running configurations.
Backing up an appliance configuration settings
You can backup an appliance configuration from the SCC by creating a snapshot of the appliance CLI configuration settings.
To backup an appliance configuration settings
1. Choose Manage > Operations: Backup/Restore to display the Backup/Restore page.
2. Select the source appliance from the drop-down list.
3. Specify the snapshot name to back up the appliance to the SCC, and click Backup.
User-generated backups must be removed manually; they’re not deleted automatically. Daily backups are automatically deleted as follows:
•The first automatic daily backup of the month is automatically deleted after three years.
•All other daily automatic backups are automatically deleted after thirty days.
To remove configuration backups
1. Choose Manage > Appliances: Backup/Restore to display the Backup/Restore page.
2. Select the appliance from the Source Appliance drop-down list to display the configuration backups for the specified appliance.
3. Select the check box next to the backup name and click Remove Selected Snapshots to remove the from the list.
Restoring an appliance configuration settings
You can restore an appliance configuration from the SCC by specifying the snapshot configuration name.
To restore an appliance
1. Choose Manage > Operations: Backup/Restore to display the Backup/Restore page.
2. Select the source appliance from the drop-down list.
3. Select the snapshot name that you want to restore to expand the page.
Restoring an appliance configuration settings

4. Optionally, select Include defaults and hidden commands.
5. Optionally, select Restore to a Different Appliance and select a different appliance from the drop-down list to change the appliance to restore.
6. Optionally, select Restore Primary and Aux network interfaces.
7. Click Restore.
To remove a snapshot from the restore list, select the check box next to the name and click Remove Selected Snapshot.
Migrating the current state of a source appliance
You can migrate the state (statistics, SCC configuration, snapshots) of the source appliance to a different appliance in the Backup/Restore page. select the target (The Source appliance will be deleted). You can migrate the state from one appliance to another in the Backup/Restore page.
When you perform a migrate operation, SCC 9.0.x doesn’t update the domain join status or the hybrid network settings (that is, sites, path selection, secure transport, or QoS). You must update the domain and the hybrid network settings manually.
To migrate status from one appliance to another
1. Choose Manage > Operations: Backup/Restore to display the Backup/Restore page.
2. Under Migrate Operation, select the target appliance from the drop-down list.
3. Click Migrate.
Related topics
•Managing external backups
•Setting daily maintenance window settings
Upgrading appliances
You can view and upgrade appliances in the Upgrade Appliances page. The Upgrade Appliances page displays the current status of upgrade jobs.
A wizard guides you through the configuration of an upgrade job.
To display upgrade jobs
•Choose Manage > Upgrades: Upgrade Appliances to display the Upgrade Appliances page.
Displaying upgrade jobs
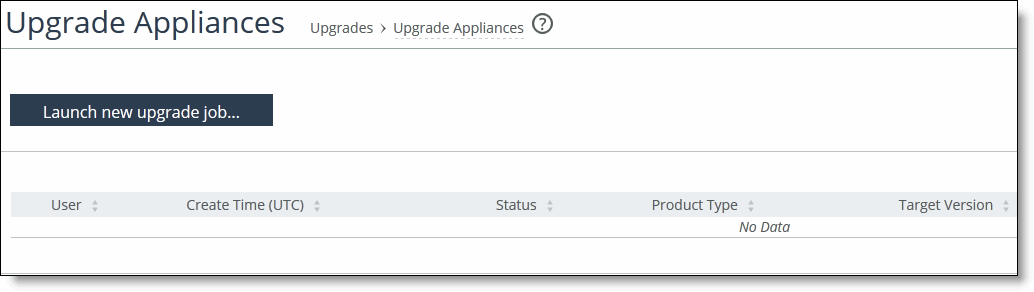
To launch the upgrade wizard
1. Choose Manage > Upgrades: Upgrade Appliances to display the Upgrade Appliances page.
2. Click Launch a new upgrade job to display the Welcome page.
3. Click Select your appliances to display the Select your appliances to upgrade page.
4. Complete the configuration as described in this table.
Setting | Description |
Choose product type | Select the product type from the drop-down list. |
Choose target version | Select the target version from the drop-down list. |
View ineligible appliances | Click to view the ineligible appliances for the upgrade job. |
Filter | Select the Show All from the drop-down list to view all appliances eligible for upgrade. You can filter appliances by current version, group, hostname, IP address, model, and serial number. •Show Selected Appliances - Select an appliance to view and select this option from the drop-down list to view appliance details. Click Return to Eligible Appliances to return to |
Select/Unselect all | Select the check box to either select or unselect all the appliances. |
5. Click Configure Settings to display the Settings page and complete the configuration as described in this table.
Setting | Description |
Notes for this upgrade job | Optionally, specify any notes for the new upgrade job. |
Upgrade Time | •Upgrade Now - Select this option to start the upgrade now. •Schedule the upgrade - Select this option to schedule the upgrade. •UTC time - Specify the UTC date and time in this format: yyyy/mm/dd and hh:mm:ss •Local time - Specify the local date and time in this format: yyyy/mm/dd hh:mm:ss |
Reboot Options | •Reboot immediately after installing the image - Select this option to reboot the appliance immediately after installing the image. •Schedule the reboot after installing the image - Select this option to schedule the reboot. •UTC time -Specify the UTC date and time in this format: yyyy/mm/dd hh:mm:ss •Local time - Specify the local date and time in this format: yyyy/mm/dd hh:mm:ss •Don’t reboot - Select this option to not reboot the appliance. |
6. Click Summary to display the Summary page that lists your upgrade settings.
7. Click Upgrade to launch the software upgrade.
Downgrading appliances
You downgrade appliances and view downgrade jobs in the Downgrade Appliances page.
A wizard guides you through the initial configuration of the new downgrade jobs. After you run the wizard, you can view your jobs in the Downgrade Appliances page.
To view downgrade jobs
•Choose Manage > Upgrades: Downgrade Appliances to display the Downgrade Appliances page.
Viewing downgrade jobs
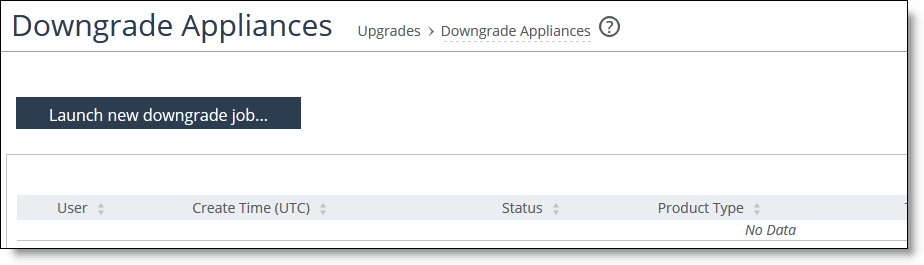
To downgrade an appliance
1. Choose Manage > Upgrades: Downgrade Appliances to display the Downgrade Appliances page.
2. Click Launch new downgrade job to launch the wizard and display the Welcome page.
3. Click Select your appliances to display the Select your appliances page.
4. Complete the configuration as described in this table.
Setting | Description |
Choose product type | Select the product type from the drop-down list. |
Choose target version | Select the target version from the drop-down list. |
View ineligible appliances | Click to view the ineligible appliances for the upgrade job. |
Filter | Select the Show All from the drop-down list to view all appliances eligible for upgrade. You can filter appliances by current version, group, hostname, IP address, model, and serial number. •Show Selected Appliances - Select an appliance to view and select this option from the drop-down list to view appliance details. Click Return to Eligible Appliances to return to |
Select/Unselect all | Select the check box to either select or unselect all the appliances. |
5. Click Configure Settings to display the Settings page and complete the configuration as described in this table.
Setting | Description |
Notes for this upgrade job | Optionally, specify any notes for the new upgrade job. |
Upgrade Time | •Upgrade Now - Select this option to start the upgrade now. •Schedule the upgrade - Select this option to schedule the upgrade. •UTC time - Specify the UTC date and time in this format: yyyy/mm/dd hh:mm:ss •Local time - Specify the local date and time in this format: yyyy/mm/dd hh:mm:ss |
Reboot Options | •Reboot immediately after installing the image - Select this option to reboot the appliance immediately after installing the image. •Schedule the reboot after installing the image - Select this option to schedule the reboot. •UTC time -Specify the UTC date and time in this format: yyyy/mm/dd hh:mm:ss •Local time - Specify the local date and time in this format: yyyy/mm/dd hh:mm:ss •Don’t reboot - Select this option to not reboot the appliance. |
6. Click Summary to display the Summary page that lists your upgrade settings.
7. Click Upgrade to launch the software upgrade.
Performing an in-field software upgrade to SteelHead SD
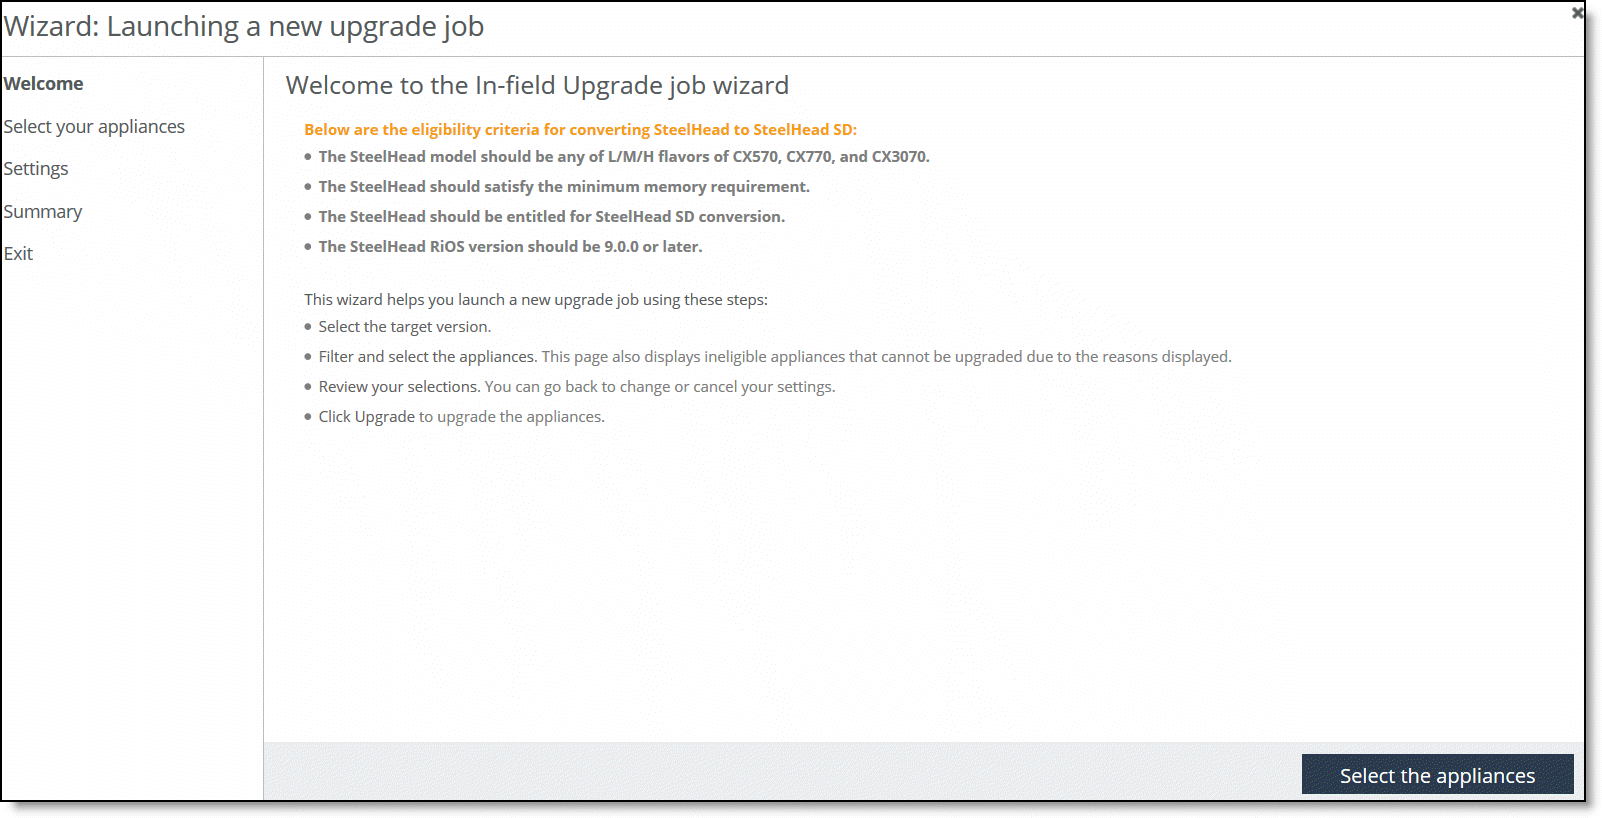
You can upgrade SteelHead CX to SteelHead SD in the Upgrade Appliances to SteelHead SD page. Make sure you have performed the hardware memory upgrade and you are familiar with the prerequisites and requirements for upgrading to a SteelHead SD. For details, see the SteelHead SD In-Field Upgrade Guide.
The SteelHead must be entitled before you begin the software upgrade to SteelHead SD. An entitled SteelHead is an appliance that is eligible for an in-field software upgrade using the SCC wizard. You must have already purchased the SteelHead to SteelHead SD license and have received the serial number that begins with XN for the appliance. The SCC will verify whether an appliance is eligible or ineligible when you select appliances in the wizard based on the model, the amount of memory in the appliance, and its entitlement status.
The only SteelHeads models that can be upgraded are the L/M/H versions of CX570, CX770, or CX3070. These models also require that you add additional memory before you begin the in-field software upgrade.
To perform the in-field software upgrade you must be running RiOS 9.6.0a or later.
To upgrade to a SteelHead SD
1. Choose Manage > Upgrades > In-Field Upgrades to display the Upgrade Appliances to SteelHead SD page.
Upgrade SteelHead to SteelHead SD page

2. Click Launch new in-field upgrade job to display the welcome page of the wizard.
Welcome page
3. Click Select the appliances to display the select your appliances page.
Selecting the target image and appliances
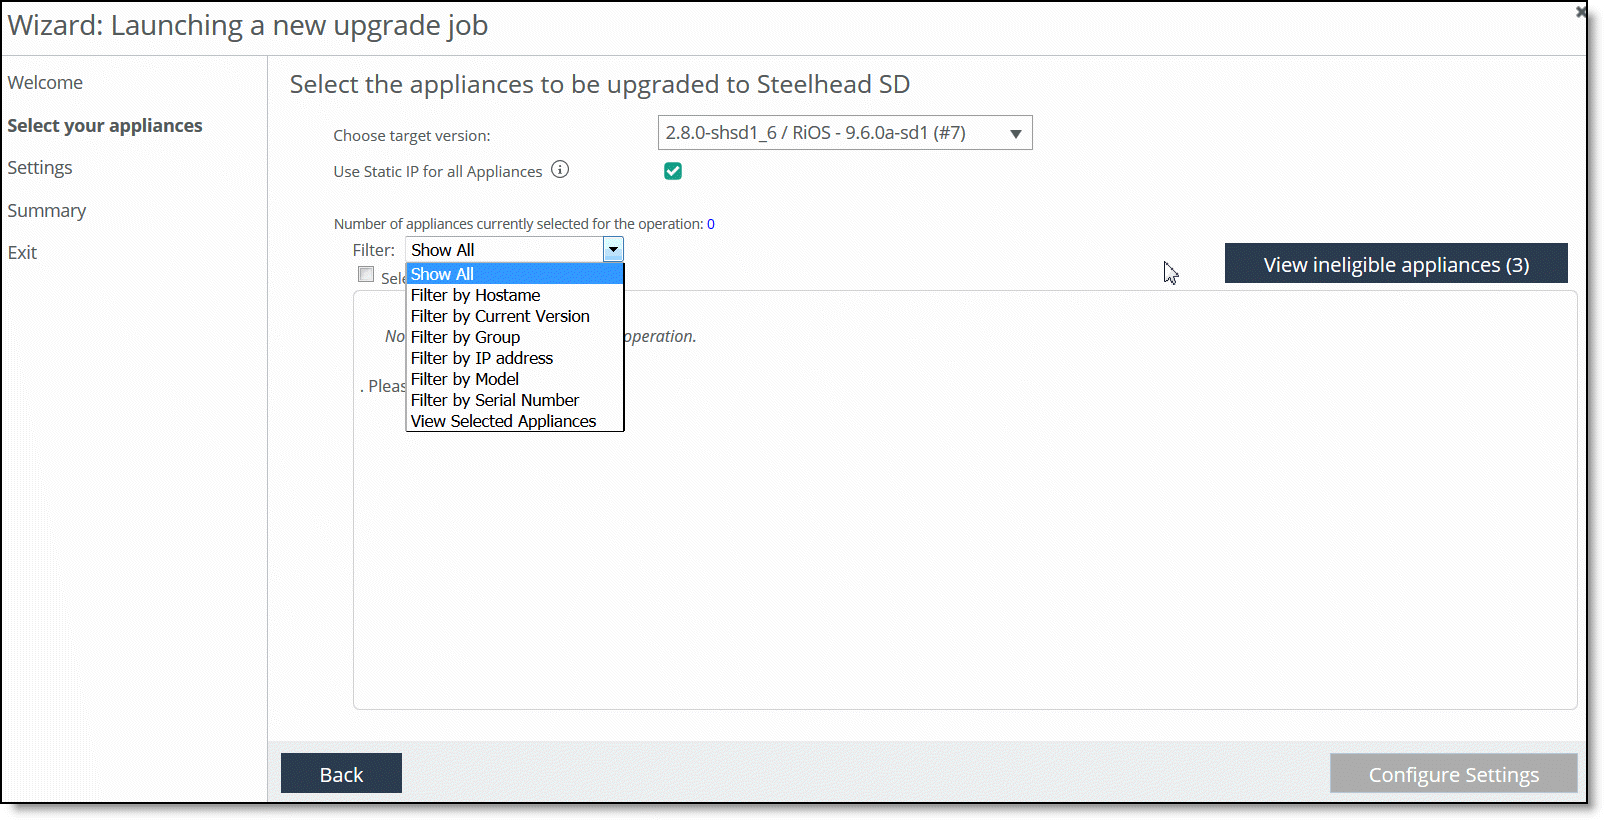
4. Complete the configuration as described in this table.
Control | Description |
Choose target version | Select the target image for the appliances you want to upgrade. If there are no target image available you are directed to the Local Images page to install the software image. |
Use Static IP for all Appliances | Uses a static IP address for the selected appliances in networks where a DHCP server is not available. We recommend you use DHCP server when you are upgrading SteelHeads to SteelHead SD. With a network running a DHCP server you don’t have to preconfigure the SteelHeads or the SCM. For details, see the SteelHead SD In-Field Upgrade Guide. If your network is not running a DHCP server, you can use a static IP, but you must preconfigure these in-path IP addresses, gateways, and DNS servers on the SteelHeads and in the SCM before beginning the in-field upgrade process. At least one uplink interface (wan0_0, wan0_1, wan3_0, wan3_1, etc.) must have internet connectivity. |
Filter | Select all appliances or filter appliances by: •Hostname •Current version •Group •IP address •Model •Serial number In the drop-down list, click View Selected Appliances to display all appliances currently selected. Click Return to eligible appliances to display the eligible appliances again. |
Select/Unselect All | Click to select all appliances or unselect all appliances. |
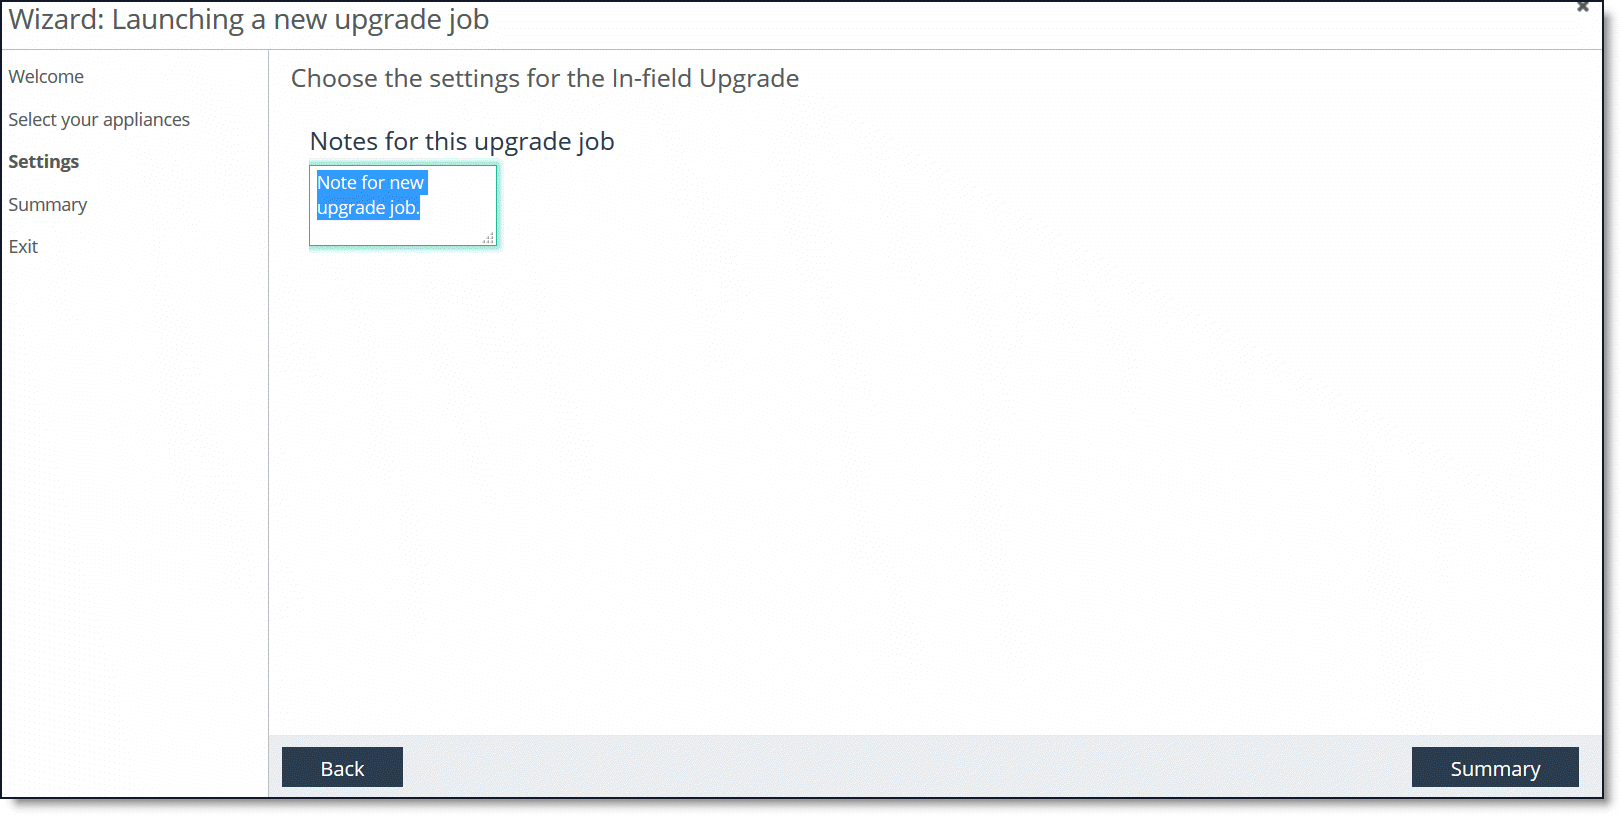
5. Click Configure Settings to display the Settings page. You can provide upgrade notes for the upgrade appliances to assist you in tracking the in-field upgrade job.
Notes for upgrade job
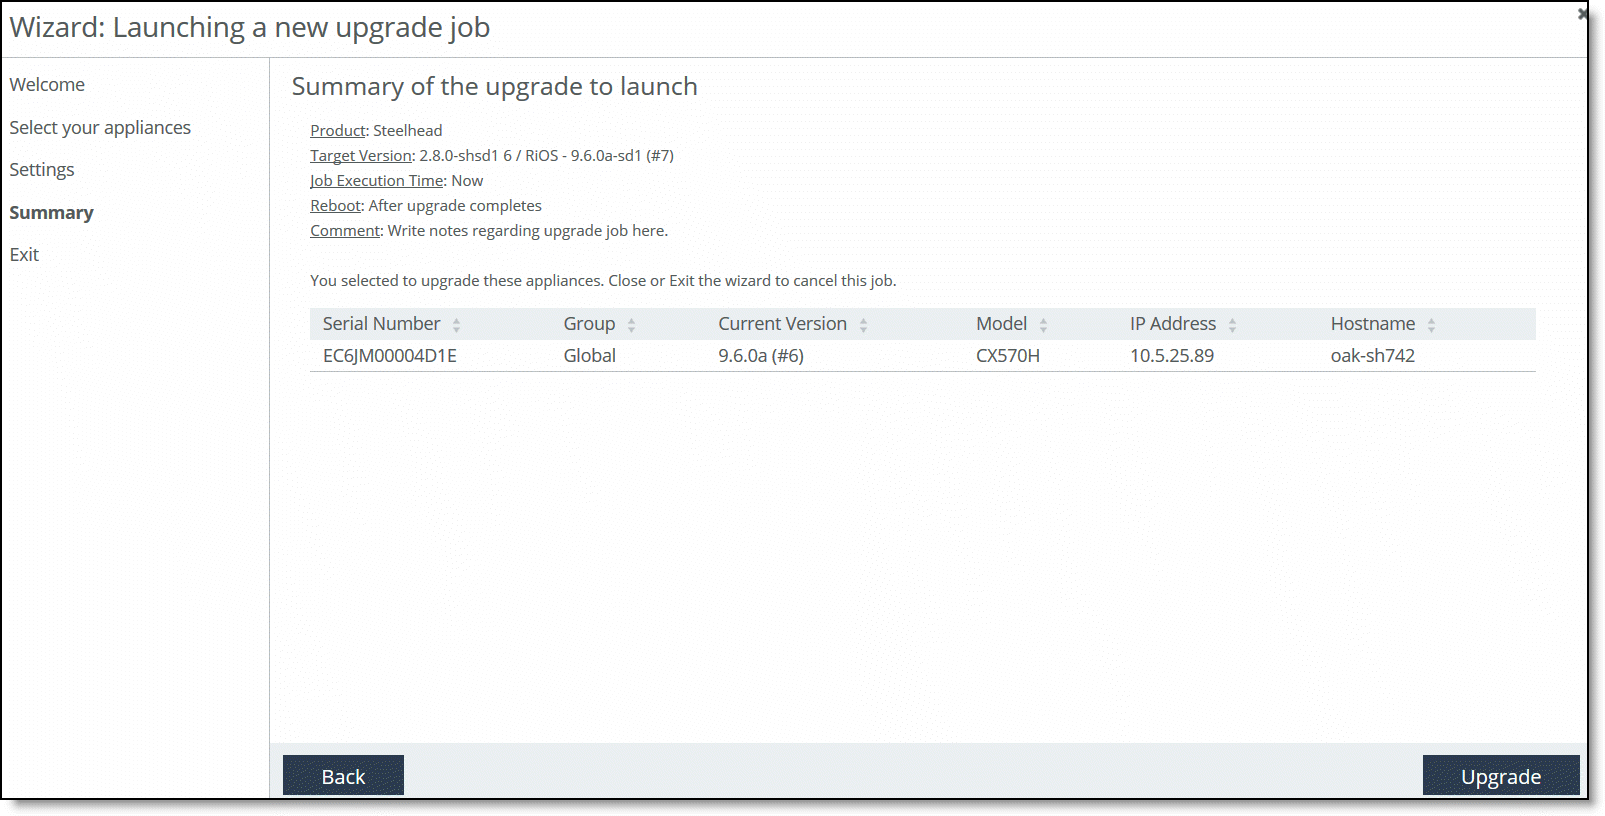
6. Click Summary to display the upgrade summary page.
Displaying summary information
7. Click Upgrade to begin the upgrade operation and display the Exit page, which displays exit information including the time for the upgrade process.
Launching the upgrade job
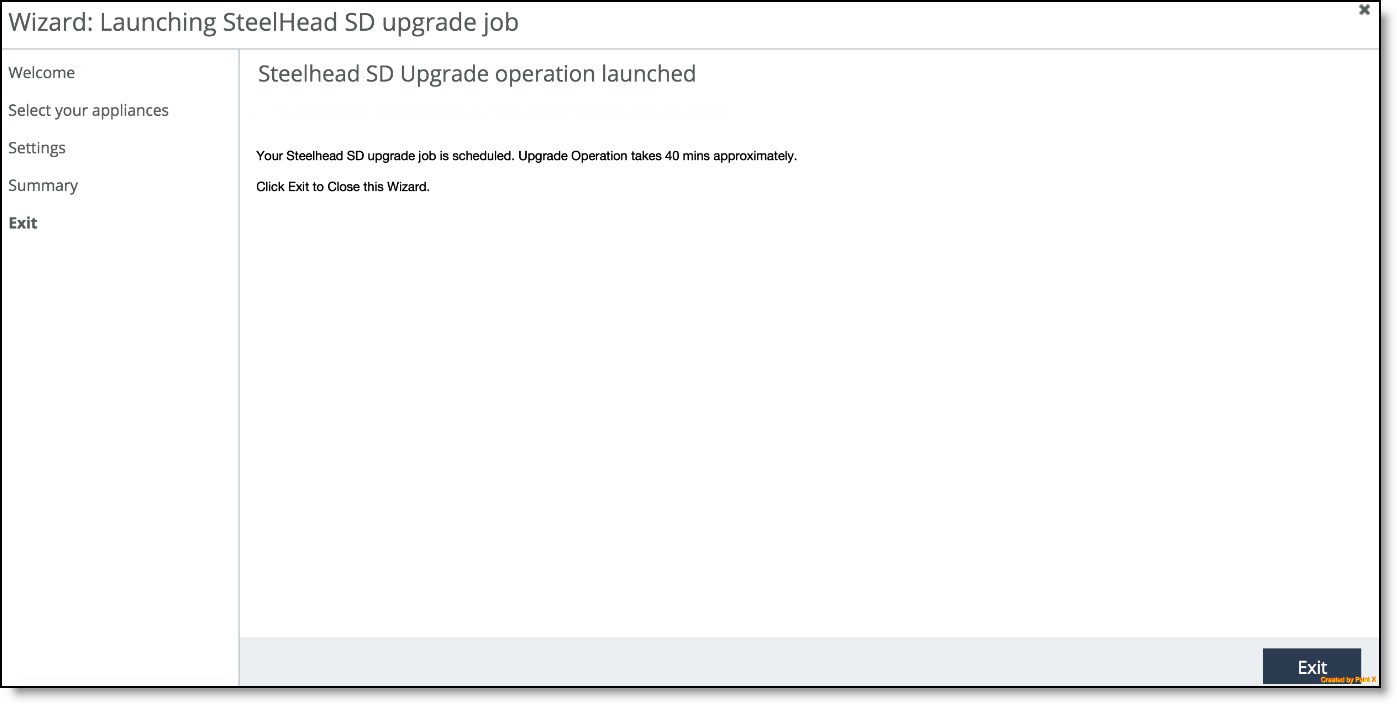
8. Click Exit to close the wizard.
Uploading local software images
You can add local images that are stored on the SCC or remote images that are stored at the customer-defined URL in the Local Images page.
Riverbed software images are now digitally signed, ensuring the integrity and authenticity of the image. You can see the status of image signatures and verify signatures on the Local Images page. For more information about image signature verification, see “Upgrading the SCC” on page 22.
To upload a local software image
1. Choose Manage > Upgrades: Local Images to display the Local Images page.
2. Click + Add to display the pop-up window.
Uploading a local image
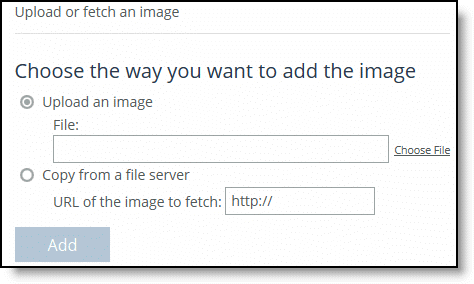
3. Complete the configuration as described in this table.
Control | Description |
Upload an image | Select to upload the local image. •File - Click Choose File to navigate to the image. |
Copy from a file server | Select to upload an image from a file server. •URL of the remote image to fetch - Specify the URL of the image. |
Add | Adds your specified image. |
To upload an external software image
1. Choose Manage > Upgrades: Local Images to display the Local Images page.
2. Under Externally hosted images, click + Add to display the pop-up window.
Uploading an external image
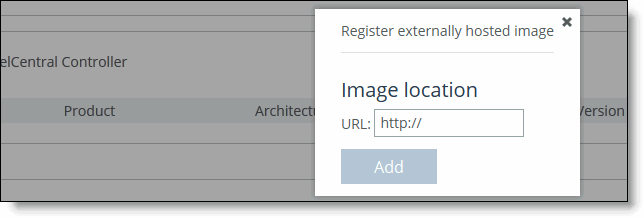
3. Specify the URL for the external image.
4. Click Add to add the image to the images table.
Viewing remote software images
You view remote software images for Riverbed products in the Remote Images page. The Remote Images pages also lists whether there are an software upgrades available on Riverbed Support.
To view a remote image
1. Choose Manage > Upgrades Remote Images to display the Remote Images page.
Viewing remote images
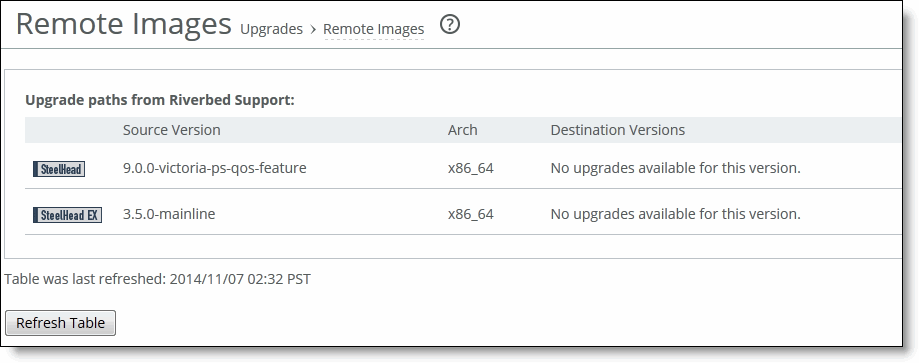
2. Click Refresh Table to refresh the table.
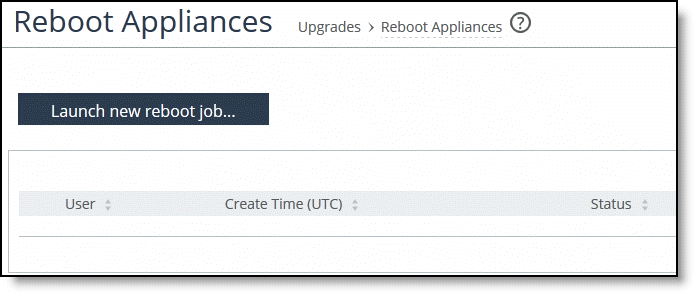
Rebooting appliances
You can reboot appliances and view reboot jobs in the Reboot Appliances page.
A wizard guides you through the configuration of the new reboot jobs.
To reboot an appliance
1. Choose Manage > Upgrades: Reboot Appliances to display the Reboot Appliances page.
Rebooting appliances
2. Click the Launch new reboot job button to launch the wizard and display the Welcome page.
3. Click Select your appliances to display the Select your appliances page.
4. Complete the configuration as described in this table.
Setting | Description |
Choose product type | Select the product type from the drop-down list. |
Choose target version | Select the target version from the drop-down list. |
View ineligible appliances | Click to view the ineligible appliances for the upgrade job. |
Filter | Select the Show All from the drop-down list to view all appliances eligible for upgrade. You can filter appliances by current version, group, hostname, IP address, model, and serial number. •Show Selected Appliances - Select an appliance to view and select this option from the drop-down list to view appliance details. Click Return to Eligible Appliances to return to |
Select/Unselect all | Select the check box to either select or unselect all the appliances. |
5. Click Configure Settings to display the Settings page and complete the configuration as described in this table.
Setting | Description |
Notes for this upgrade job | Optionally, specify any notes for the new upgrade job. |
Upgrade Time | •Upgrade Now - Select this option to start the upgrade now. •Schedule the upgrade - Select this option to schedule the upgrade. •UTC time - Specify the UTC date and time in this format: yyyy/mm/dd hh:mm:ss •Local time - Specify the local date and time in this format: yyyy/mm/dd hh:mm:ss |
Reboot Options | •Reboot immediately after installing the image - Select this option to reboot the appliance immediately after installing the image. •Schedule the reboot after installing the image - Select this option to schedule the reboot. •UTC time -Specify the UTC date and time in this format: yyyy/mm/dd hh:mm:ss •Local time - Specify the local date and time in this format: yyyy/mm/dd hh:mm:ss •Don’t reboot - Select this option to not reboot the appliance. |
6. Click Summary to display the Summary page that lists your upgrade settings.
7. Click Upgrade to start your upgrade.
8. Click Exit to exit the wizard.
To view reboot job status
•Choose Manage > Upgrades: Reboot Appliances to display the Reboot Appliances page.
Viewing reboot jobs