Configuring SaaS Acceleration
You configure SaaS acceleration through the SteelConnect Manager (SCM) as well as the client-side SteelHead, SteelFusion Edge, and/or the Mobile Controller. After you configure the environment, you configure SaaS acceleration on a per-application basis.
This chapter includes these sections:
Before you begin
Before you begin, ensure you have a license for the SaaS Accelerator and your environment meets these requirements:
•SteelHeads require version 9.8.1 software or later.
•SteelFusion Edges require version 6.0.2 or later.
•SCM requires version 2.12 or later.
•SteelCentral Controller for SteelHead Mobile requires version 6.1.0 or later.
•SteelCentral Controller for SteelHead (SCC) requires version 9.9.1 or later.
Licensing SCM for SaaS Accelerator
When you purchase SaaS Accelerator, Riverbed emails you a license token that you need to redeem through SCM.
To install your licenses for SaaS acceleration
1. Sign in to the SCM that will manage the SaaS acceleration.
2. Choose Organization > Licenses and click Redeem Token.
The Redeem Token dialog box appears.
Redeem Token dialog box
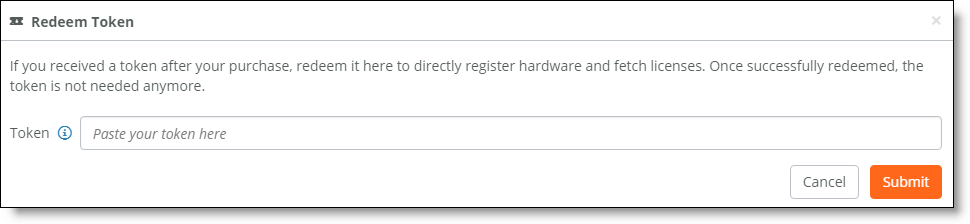
3. Enter the token and click Submit.
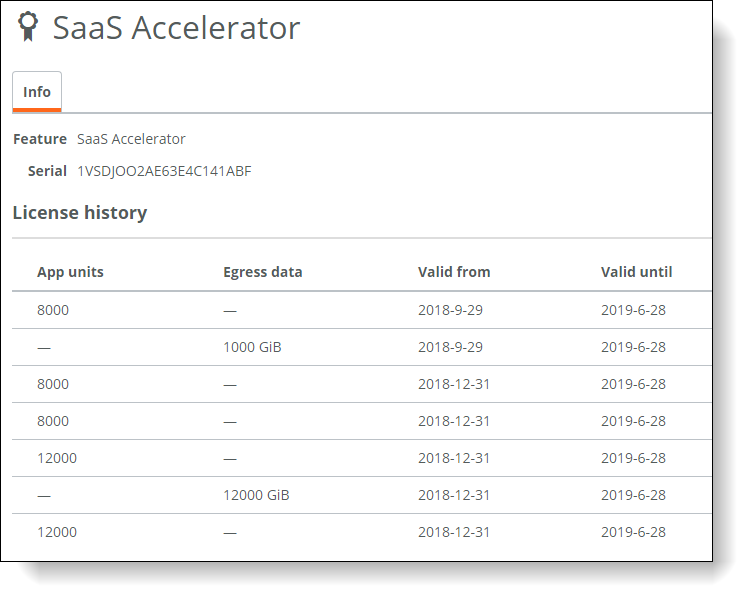
The SaaS Accelerator pages are now available, and you can review your license details on the Organization > Licenses page. Click the license serial number to show the details.
License details
Configuring SSL optimization
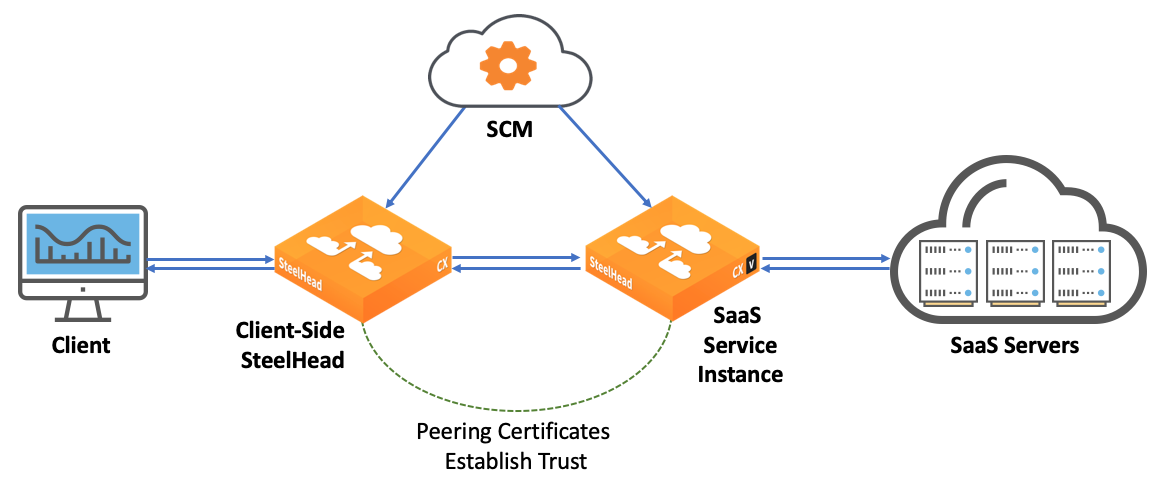
SSL optimization is required for SaaS acceleration, and you need to generate a root CA certificate before you can configure SaaS acceleration. A root CA certificate automatically generates trusted certificates to sign optimized TLS/SSL traffic.
SCM uses the root CA certificate to sign peering and proxy certificates, which it pushes to the SaaS service cluster. When a client-side SteelHead or SteelFusion Edge is moved to the SCM whitelist, SCM pushes the peering certificate signed by its root CA to the client-side SteelHead or SteelFusion Edge and the client-side appliance uploads its peering certificate to SCM, which SCM pushes to the service cluster. This establishes the trust relationship between the client-side SteelHead or SteelFusion Edge and the SaaS service cluster.
You also need to install the certificate from SCM on each client system to complete the trust relationship.
SSL optimization with peering certificates
If there are any changes to the root CA certificate, SCM automatically updates the client-side SteelHead or SteelFusion Edge and the SaaS service cluster to maintain the trust relationship.
SCM users with read-only permissions are not allowed to generate certificates or configure SaaS acceleration.
To enable automatic signing and generate a root CA certificate
1. In SCM, choose Optimization > SSL Optimization and click Generate Root CA Certificate.
The Generate Root CA Certificate dialog box appears.
Generate Root CA Certificate dialog box
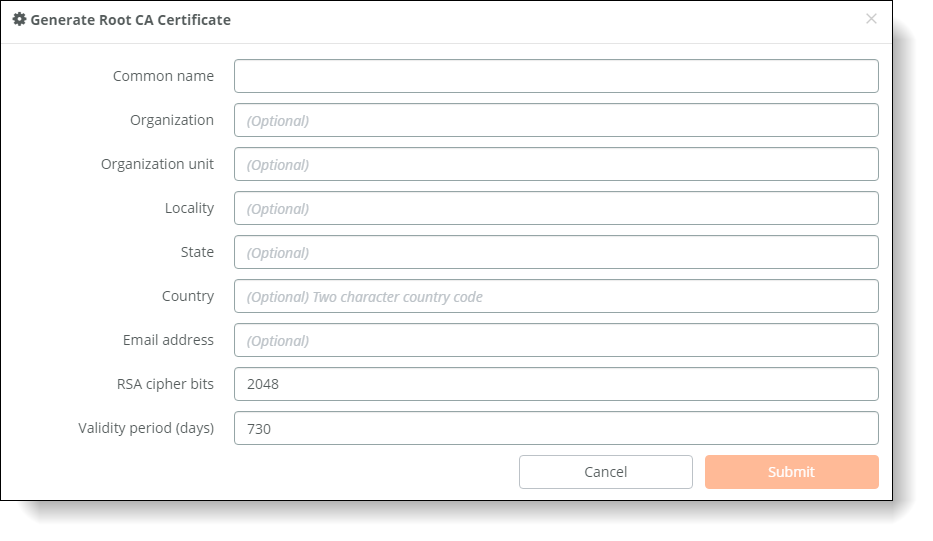
2. Provide the following information.
Field | Description |
Common name | Specify the common name of the root CA certificate. |
Organization | Optionally, specify the organization name (for example, the company). |
Organization unit | Optionally, specify the organization unit name (for example, the section or department). |
Locality | Optionally, specify the city. |
State | Optionally, specify the state. |
Country | Optionally, specify the country (2-letter code only). |
Email address | Optionally, specify the email address of the contact person. |
RSA cipher bits | Select the key length from the drop-down list. The default value is 2048. |
Validity period (days) | Specify how many days the root CA certificate is valid. The default value is 730 days (two years). |
3. Click Submit.
SCM creates the root CA certificate.
4. Copy or download the root CA certificate from SCM and install it in end-user client systems.
Copy or download the root CA certificate
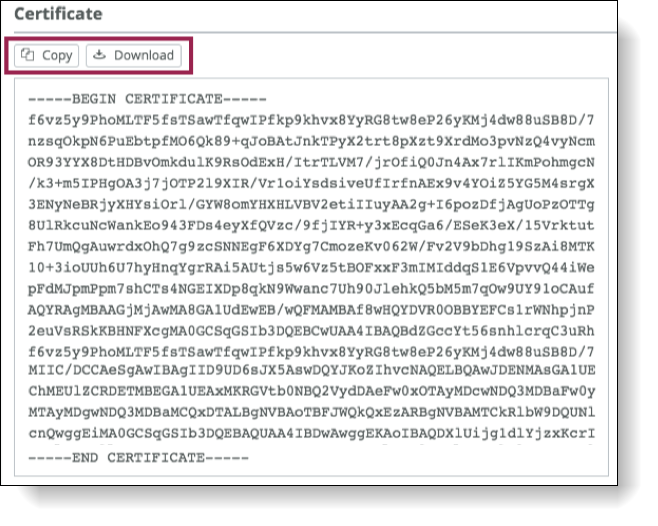
An active Root Certificate Authority (CA) enables clients to accelerate SaaS traffic when SaaS applications are configured on the SaaS Accelerator page. The root CA certificate needs to be deployed into the Trusted Root Certification Authority certificate store on your clients and then your clients can automatically use certificates issued by this trusted root CA to accelerate encrypted SaaS traffic.
To delete the certificate
1. In SCM, choose Optimization > SSL Optimization.
2. Click Delete Root CA Certificate.
You are prompted to confirm this action.
3. Click Confirm.
The root CA certificate is removed from the system and new SaaS connections will not be accelerated.
Configuring SaaS applications for acceleration
After you have licensed the SaaS Accelerator and configured SSL optimization, you can set up acceleration for SaaS applications.
To configure SaaS applications for acceleration
1. In SCM, choose Optimization > SaaS Accelerator and click Accelerate Application.
The Accelerate Application pane appears.
Configuring applications for SaaS acceleration

2. Select the application from the drop-down list.
3. Select the region from the drop-down list.
For best performance, select the region closest to the data for the SaaS application. Once you deploy to a specific region, you cannot change it unless you delete the deployed application and set it up again with a different region.
4. Enter the number of Active Users.
Each application has a minimum and maximum number of users. SCM provides guidelines for the limits as you type numbers in the field.
SCM uses the number of users to calculate the capacity of service instances in the SaaS service cluster based on the type of application.
SCM calculates the user limit based on the number of users, the application, and the available AppUnits.
Note: We recommend that you select number of users carefully for your business needs. Once deployed, you can change the number of users, however, when you change the number of users, the acceleration feature is unavailable for up to 30 minutes while the service cluster updates.
5. Click Submit.
This creates the SaaS service cluster dedicated to accelerating traffic for this application.
Deployment can take up to 20 minutes, and you cannot edit the configuration while the configuration is in process.
When deployed, you see the SaaS application, the service endpoint, and service status. The service status appears as a green check mark when deployed and ready for optimization.
Status for deployed application
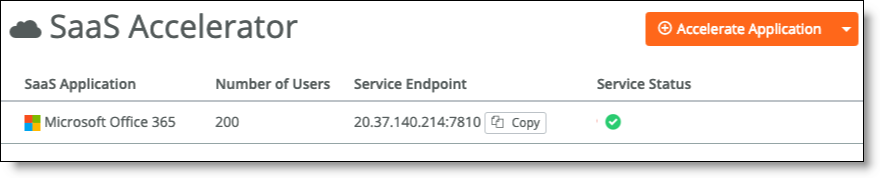
6. As needed, open port 7810 for the service endpoint IP address on your firewall.
The SaaS service cluster and client-side SteelHeads or SteelFusion Edges need to be able to connect to this location.
To stop SaaS acceleration for an application
1. Choose Optimization > SaaS Accelerator and click the application to stop accelerating.
2. From the Actions drop-down list, select Terminate SaaS acceleration.
3. When prompted, click Confirm.
When you terminate SaaS acceleration for an application, you remove the SaaS service cluster that was deployed in the cloud to support the acceleration.
Configuring SaaS acceleration on the client-side SteelHead or SteelFusion Edge
When you have configured SCM for SaaS acceleration, you can configure client-side SteelHead or SteelFusion Edge.
To configure a SteelHead or SteelFusion Edge for SaaS acceleration
1. In SCM, choose Optimization > SaaS Client Appliances and copy the registration token.
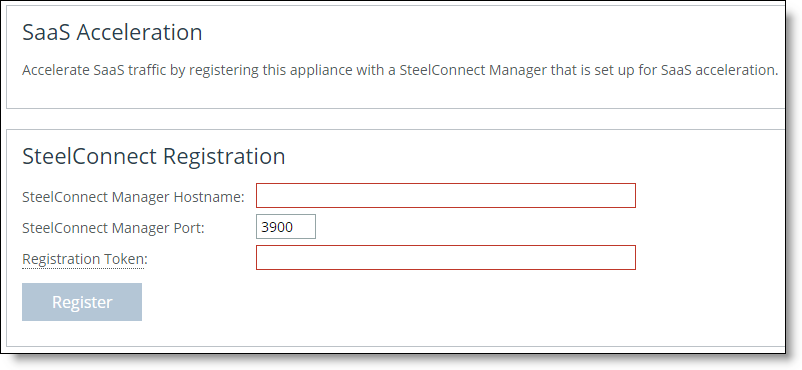
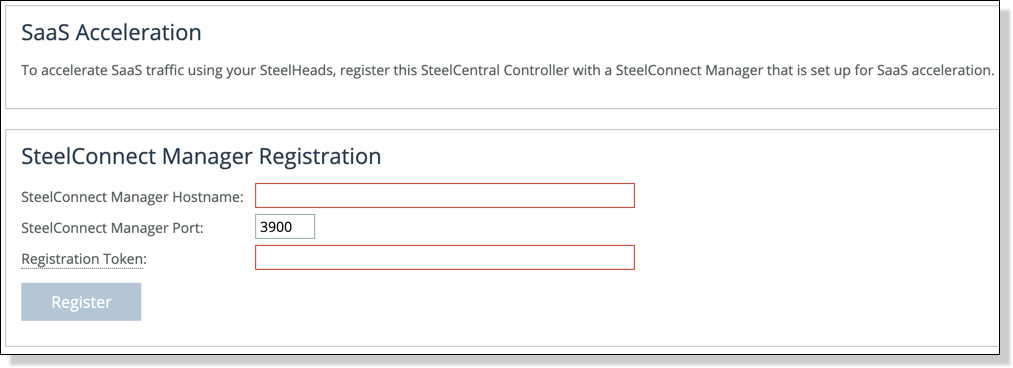
2. On the SteelHead or SteelFusion Edge, choose Optimization > SaaS: SaaS Accelerator and add these values:
–SteelConnect Manager Hostname.
–SteelConnect Manager Port. The client-side SteelHead or SteelFusion Edge uses port 3900 from the primary interface to communicate with SCM and the port needs to be open on the branch firewall. The field for the port number is editable but we do not recommend changing the value.
–Registration Token. Paste the registration token you copied in
Step 1 into this field.
SaaS Acceleration registration page
3. Click Register.
When the registration process completes, the registration details and a helpful list of remaining configuration tasks appear on the page. Completed tasks are prefaced by a check mark.
A new SaaS Acceleration section appears on the page, and you can view the current status and monitor acceleration status.
4. Enable SSL optimization on the SteelHead or SteelFusion Edge.
Choose Optimization > SSL Main Settings, and in the General SSL Settings area select Enable SSL Optimization and click Apply.
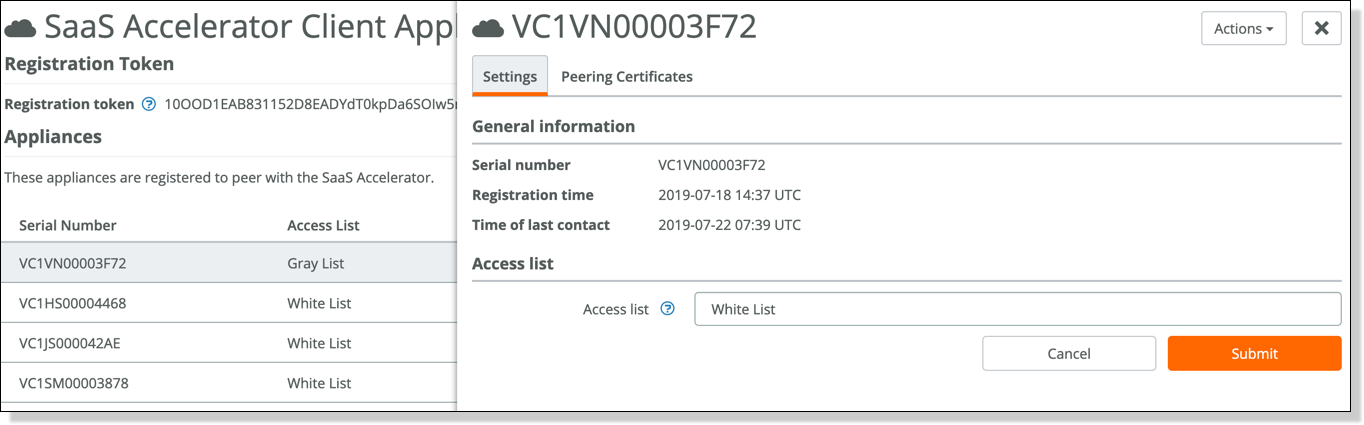
5. In SCM, move this appliance to the whitelist.
Newly added appliances always appear on the graylist in the Access List column. You need to move their status to the whitelist to allow acceleration.
Choose Optimization > SaaS Client Appliances and select the appliance serial number to display the details pane.
Under Access List and Notes, select Whitelist from the Access list drop-down list and click
Submit. For more information, see
Controlling appliance access.
6. Enable SaaS acceleration on this client-side appliance. Choose Optimization > SaaS: SaaS Accelerator, select Enable Acceleration, and click Apply.
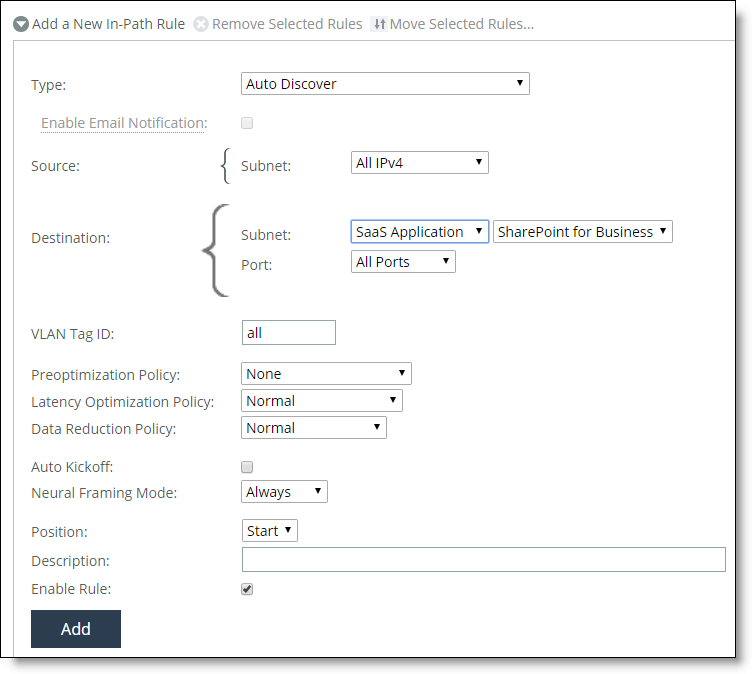
7. Add an in-path rule to accelerate SaaS applications.
The in-path rule is application based and lets the client-side SteelHead connect to the service endpoint of the SaaS service cluster deployed for the selected application.
Choose Optimization > Network Services: In-Path Rules and click Add a New In-Path Rule. For the Source subnet, choose All IPv4. For the Destination Subnet, choose SaaS Application. A second menu appears to the right. In the second menu, choose a SaaS application for acceleration. (Note: Only applications set up for SaaS acceleration on SCM appear in the list.) Click Add.
SaaS in-path rule
For more information about in-path rules, see the SteelHead User Guide.
8. Click Save to Disk to save your settings permanently.
Canceling SaaS acceleration
If you want to pause SaaS acceleration, from the Optimization > SaaS: SaaS Accelerator page on the SteelHead clear Enable Acceleration and click Apply. When paused, all related in-path rules are ignored.
If you want to permanently cancel SaaS acceleration for this appliance and remove the settings, click Deregister. This also removes all related in-path rules.
As another option, you can move the appliance to the blacklist on SCM. When you move an appliance to the blacklist, SCM removes the peering CA that it uploaded from the appliance and stops acceleration. For details, see
“Controlling appliance access” on page 34.Configuring SaaS acceleration on multiple SteelHeads and SteelFusion Edges using SCC
In SCC 9.9.1 and later, you can configure SaaS acceleration on managed SteelHeads and SteelFusion Edges. SaaS Accelerator requires an additional license, but the license is not installed on the SCC, SteelHeads, and SteelFusion Edges; it is installed on SCM.
We strongly recommend that you configure and push SaaS acceleration policies from an SCC to the SteelHeads and SteelFusion Edges, particularly in large scale deployments and production networks with multiple appliances.
To accelerate SaaS application traffic using your managed SteelHeads and SteelFusion Edges, register your SCC with an SCM that is set up for SaaS acceleration. After registering the SCC with SCM, register selected SteelHeads and SteelFusion Edges or a group of SteelHeads and SteelFusion Edges with SCM.
To configure SteelHeads and SteelFusion Edges for SaaS acceleration using SCC
1. On SCM, choose Optimization > SaaS Client Appliances and copy the registration token.
2. On the SCC, choose Administration > SaaS: SteelConnect Manager Registration and add these values:
–SteelConnect Manager Hostname.
–SteelConnect Manager Port. The SCC uses port 3900 to communicate with SCM, and the port needs to be open on the firewall. The field for the port number is editable but we do not recommend changing the value.
–Registration Token. Paste the registration token you copied in
Step 1 to this field.
SteelConnect Manager Registration page
3. Click Register.
When the registration process completes, the registration details appear on the page.
A new SaaS Acceleration Status section also appears on the page where you can view the current access list status and a list of applications set up for SaaS acceleration on SCM.
4. On SCM, move this SCC to the whitelist.
Newly added appliances always appear on the graylist in the Access List column. You need to change their status to the whitelist to allow acceleration.
Note: You can safely ignore the No certificates uploaded error message appearing in the Peering Certificates Status column for the SCC appliance. To accelerate SaaS application traffic, only peering certificates for SteelHeads and SteelFusion Edges are uploaded to SCM when the appliances register with SCM. Peering certificates allow a client-side SteelHead or SteelFusion Edge to establish trust relationship and peer with SaaS service cluster to accelerate the SaaS traffic.
To move their status to the whitelist:
–Choose Optimization > SaaS Client Appliances and click the appliance serial number to display the details panel.
–Under Access List, select Whitelist from the Access List drop-down menu and click Submit.
Note: Without moving the SCC to the whitelist on SCM, you cannot push a policy with in-path rules for SaaS applications from the SCC to the managed SteelHeads. For more details about the access lists, see the Controlling appliance access.
Moving an appliance to the whitelist on SCM
5. On the SCC, choose Administration > SaaS: SteelConnect Manager Registration and click Refresh Data under the SaaS Acceleration Status section. Make sure the access list status of the SCC is Whitelist. You can also view a list of applications set up for SaaS acceleration on SCM and their respective service endpoints.
Note: If you set up new applications for SaaS acceleration on SCM, perform Step 5 on the SCC to view the latest list of SaaS applications set up for acceleration. 6. Register SteelHeads and SteelFusion Edges with SCM.
If you plan to use SCC policies to accelerate SaaS application traffic, make sure the SCC, the SteelHeads, and SteelFusion Edges are registered with the same SCM. After registering the SCC with SCM, register the selected appliances or a group of appliances with SCM.
To register SteelHeads and SteelFusion Edges with SCM:
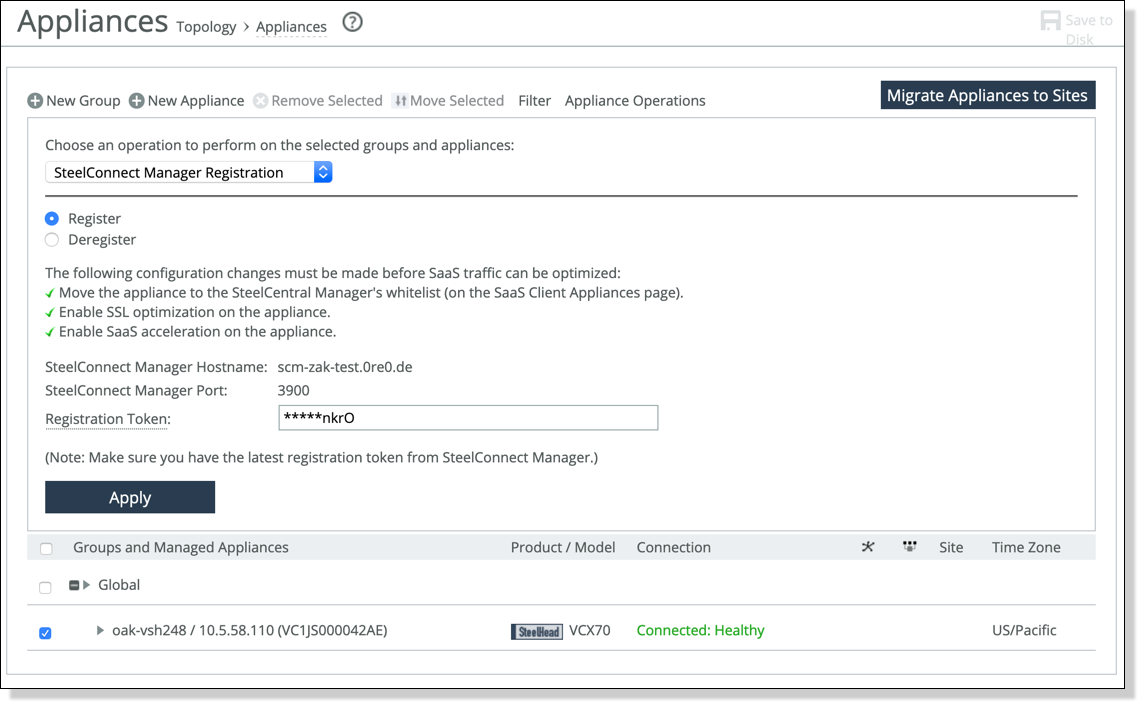
–Choose Manage > Topology: Appliances and select SteelHeads and SteelFusion Edges or a group of SteelHeads and SteelFusion Edges you plan to register with SCM.
–Click Appliance Operations, and select SteelConnect Manager Registration from the Choose an operation to perform on the selected groups and appliances drop-down list.
–Select Register, make sure you have the latest registration token from SCM in the Registration Token text field and click Apply.
Note: The SteelHeads and SteelFusion Edges use port 3900 to communicate with SCM and the port needs to be open on the branch firewall. The field for the port number is editable but we do not recommend changing the value.
Registering appliances with SCM
For more details about registering SteelHeads with SCM using SCC, see the SteelCentral Controller for SteelHead User Guide.
7. Move the SteelHeads and SteelFusion Edges to the whitelist on SCM.
Newly added appliances always appear on the graylist in the Access List column. You need to change their status to the whitelist to allow acceleration. For details about moving an appliance to the whitelist, see
Step 4. For more information about the access lists, see
Controlling appliance access.
8. Enable SSL optimization in the SCC policies that include SaaS acceleration.
To enable SSL optimization:
–Choose Manage > Services: Policies, open the policy, and Click + Add/Remove Pages.
–Under Optimization, select SSL Main Settings and click Apply.
–In the Editing Policy page, click SSL Main Settings, click Include to include the policy, select Enable SSL optimization, and click Apply.
For more details, see the SteelCentral Controller for SteelHead User Guide.
9. Enable SaaS acceleration in the SCC policies to configure SaaS acceleration for groups of SteelHead and SteelFusion Edge clients.
To enable SaaS acceleration:
–Choose Manage > Services: Policies, open the policy, and Click + Add/Remove Pages.
–Under Optimization, select SaaS Accelerator and click Apply.
–In the Editing Policy page, click SaaS Accelerator, click Include to include the policy, select Enable Acceleration, and click Apply.
Enabling SaaS acceleration in SCC policy

10. Add an in-path rule to each policy for which you want SaaS acceleration enabled.
The in-path rule associates the IP address of the SaaS service cluster in the cloud (supplied by SCM) with the accelerated application.
To enable SaaS acceleration:
–Choose Manage > Services: Policies, open the policy, and Click + Add/Remove Pages.
–Under Optimization, select In-Path Rules and click Apply.
–In the Editing Policy page, click In-Path Rules, click Include to include the policy, and click Add a New In-Path Rule to expand the page.
–For the Source Subnet, choose IPv4 or All IPv4.
–For the Destination Subnet, choose SaaS Application.
–A second drop-down list appears to the right. In the second drop-down list, select a SaaS application for acceleration and click Add.
Only applications set up for SaaS acceleration on SCM appear in the list.
For more details, see the SteelCentral Controller for SteelHead User Guide.
Note: At the initial release of SteelHead 9.9.1, you need to configure a unique in-path rule for each Microsoft Office 365 application, such as SharePoint and Exchange Online. An upcoming release of SteelConnect Manager will let you define a single in-path rule for all Office 365 traffic. When available, the Office 365 option will automatically appear as an option for a SaaS application in-path rule.
SaaS in-path rule
11. Click Save to Disk to save your settings permanently.
Canceling SaaS acceleration
To pause SaaS acceleration on managed SteelHeads and SteelFusion Edges, on the SCC, choose Manage > Services: Policies and open the policy. In the Editing Policy page, click SaaS Accelerator, clear Enable Acceleration, and click Apply.
For the configuration to take effect, apply the updated policy to the respective SteelHeads and SteelFusion Edges.
To cancel SaaS acceleration on selected SteelHeads and SteelFusion Edges, deregister the appliances from SCM. For more details about deregistering SteelHeads and SteelFusion Edges, see the SteelCentral Controller for SteelHead User Guide.
Configuring SaaS acceleration on SteelHead Mobile
When you have configured SCM for SaaS acceleration, you can configure the Mobile Controller and create a client policy to accelerate SteelHead Mobile client SaaS traffic.
To configure the Mobile Controller for SaaS acceleration
1. In SCM, choose Optimization > SaaS Client Appliances and copy the registration token.
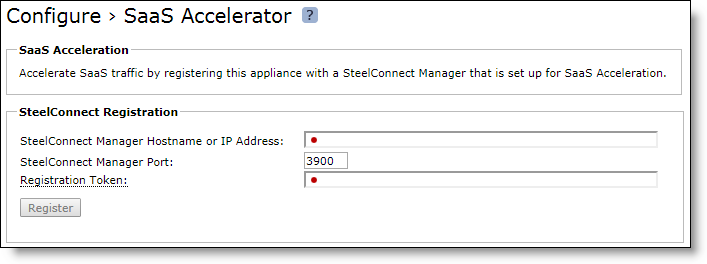
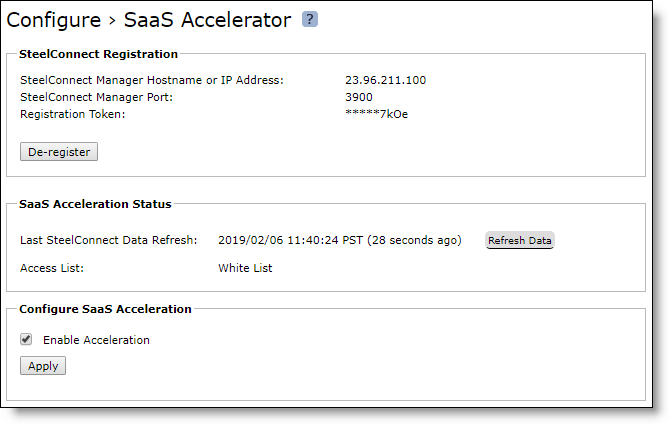
2. On the Mobile Controller, choose Configure > SaaS Accelerator and add these values:
–SteelConnect Manager Hostname or IP Address.
–SteelConnect Manager Port. The Mobile Controller uses port 3900 from the primary interface to communicate with SCM, and the port needs to be open on the branch firewall. The field for the port number is editable but we do not recommended changing the value.
–Registration Token. Paste the registration token you copied in Step 1 into this field.
SaaS Accelerator registration page
3. Click Register.
4. In SCM, move this Mobile Controller to the whitelist.
Newly added appliances appear on the graylist in the Access List column.
Moving an appliance to the whitelist
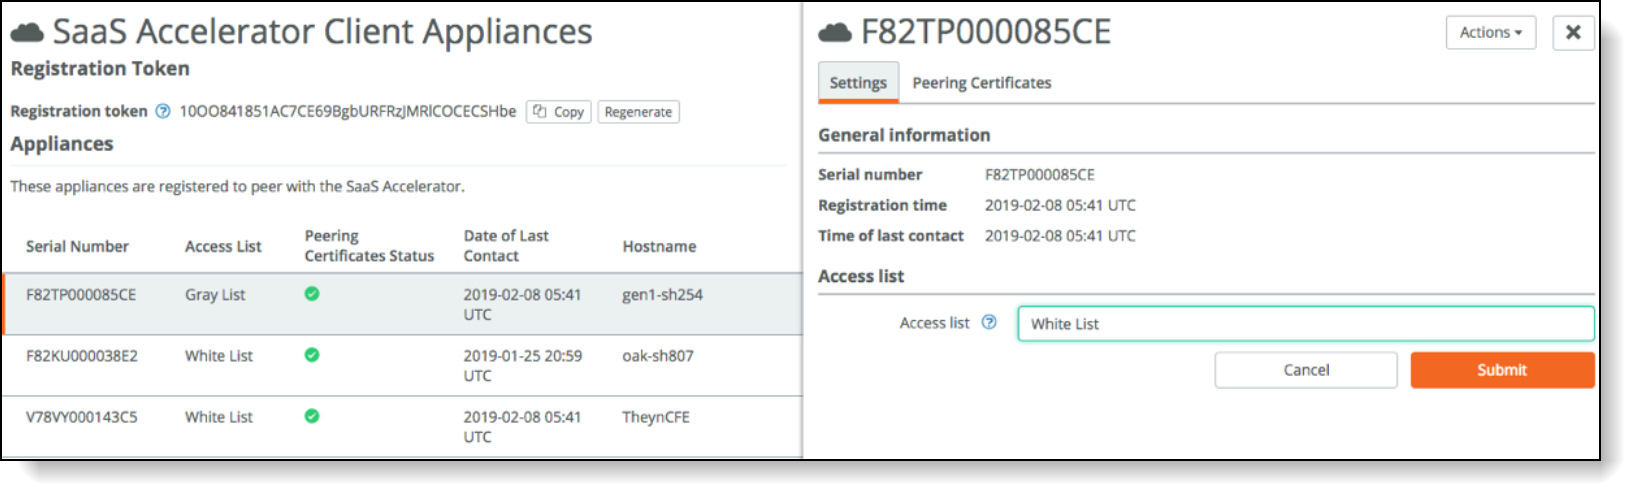
To move their status to the whitelist:
–Choose Optimization > SaaS Client Appliances and click the serial number of the Mobile Controller to display the details pane.
–Under Access List and Notes, select Whitelist from the Access list drop-down list and click Submit.
You cannot enable SaaS acceleration without moving the Mobile Controller to the whitelist. In SCM, if a Mobile Controller is moved from the whitelist to the blacklist, SaaS acceleration stops working. For more information about the access lists, see
Controlling appliance access.
5. Enable SaaS acceleration on the Mobile Controller. Choose Configure > SaaS Accelerator and in the Configure SaaS Acceleration section, select Enable Acceleration and click Apply.
Configuring SaaS acceleration
When you click Apply, be patient. It can take several minutes to start acceleration.
6. Enable SSL optimization on the Mobile Controller policies that include SaaS acceleration.
Choose Manage > Policies and open the policy and select the SSL tab. Then select the Enable SSL Optimization check box and the Enable SSL Proxy Support check box.
You cannot enable SaaS acceleration without enabling SSL. If SSL was disabled after SaaS acceleration was enabled, SaaS acceleration will stop working.
For details, see the SteelCentral Controller for SteelHead Mobile User Guide.
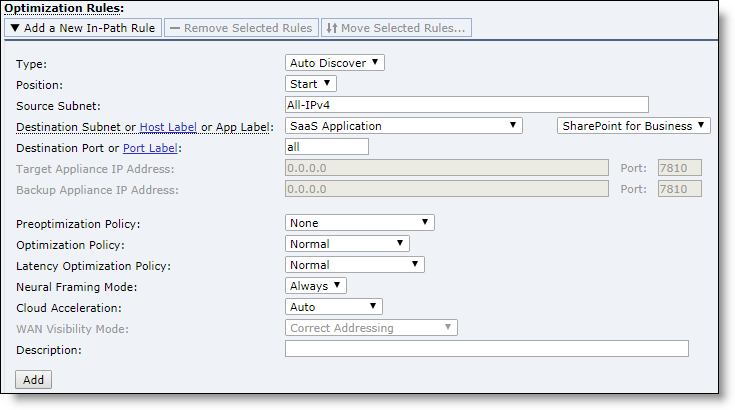
7. On the Mobile Controller, add an in-path rule to each policy for which you want SaaS acceleration enabled.
The in-path rule is application based and lets the Mobile Controller connect to the service endpoint of the SaaS service cluster deployed for the selected application.
–Choose Manage > Policies and select the In-Path Rules tab and click Add a New In-Path Rule.
–For the Destination Subnet, choose SaaS Application.
–A second menu appears to the right. In the second menu, select a SaaS application for acceleration. Only applications set up for SaaS acceleration on SCM appear in the list.
–Click Add.
See the SteelCentral Controller for SteelHead Mobile User Guide for more information.
SaaS in-path rule
8. Enable SaaS acceleration in a policy to configure SaaS acceleration for groups of SteelHead Mobile clients. Choose Manage > Policies and open a policy to configure and select the SaaS Acceleration tab.
A helpful list of remaining configuration tasks appears on the page. Completed tasks are prefaced by a check mark.
Enabling SaaS acceleration for a policy
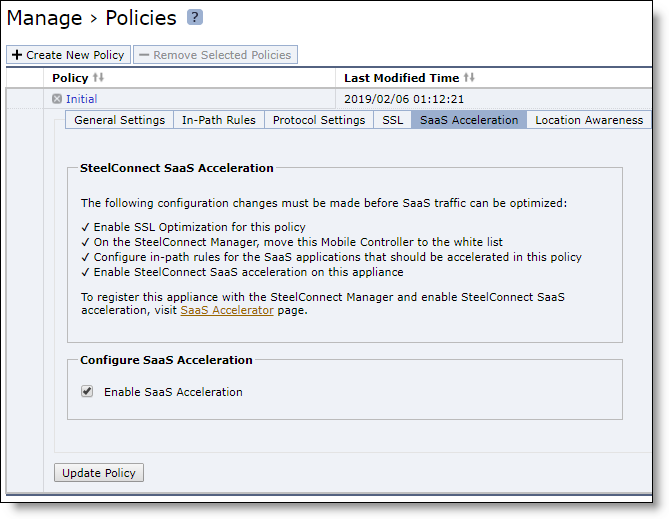
Select Enable SaaS Acceleration and click Update Policy.
You cannot enable SaaS acceleration in a policy without enabling SaaS acceleration in the Mobile Controller.
9. Click Save to Disk to save your settings permanently.
Canceling SaaS acceleration
If you want to pause SaaS acceleration, from the Configure > SaaS Accelerator page on the Mobile Controller clear Enable Acceleration and click Apply. When cleared, all related in-path rules are ignored.
If you want to permanently cancel SaaS acceleration for this appliance and remove the settings, click Deregister. This also removes all related in-path rules.
As another option, you can move the Mobile Controller to the blacklist on SCM. When you move an appliance to the blacklist, SCM removes the peering CA that it uploaded from the appliance and stops acceleration. For details, see
“Controlling appliance access” on page 34.Controlling appliance access
When a client-side SteelHead registers with SCM, the SteelHead is added to the access list on the SaaS Client Appliances page. An entry appears in the peering list with the appliance serial number, access list status, peering certificate status, date of last contact, and notes. The access lists are designated by these categories:
•Graylist - Indicates a SteelHead of unknown status. This list serves as a temporary holding place for all registered SteelHeads that are attempting to establish SaaS acceleration. You can move these appliances to the whitelist or blacklist, but you cannot move appliances to the graylist.
•Whitelist - Indicates a trusted SteelHead or Mobile Controller. When you move an appliance to the whitelist, the appliance’s peering certificate is copied to the SaaS service cluster and other peer appliances. Once an appliance has been whitelisted, subsequent peering CA uploads automatically replace the older peering CA and changes are pushed out to the SaaS service cluster and SCM managed SteelHeads.
•Blacklist - Indicates untrusted SteelHeads and Mobile Controllers. When you select blacklist for a peer in a whitelist or graylist, SCM removes the peering CA that it uploaded from the appliance and stops acceleration. You can move appliances between the whitelist and the blacklist. (Note: Connections are expected to fail for approximately an hour when moved from the blacklist to the whitelist.)
When you have configured SteelHead appliances and Mobile Controllers to use the SaaS acceleration service, you need to move those systems to the whitelist on SCM to indicate trust and allow acceleration.
To change the access list status for an appliance
1. In SCM, choose Optimization > SaaS Client Appliances.
2. Select the row for the appliance to change.
The appliance settings pane appears.
Changing access list status
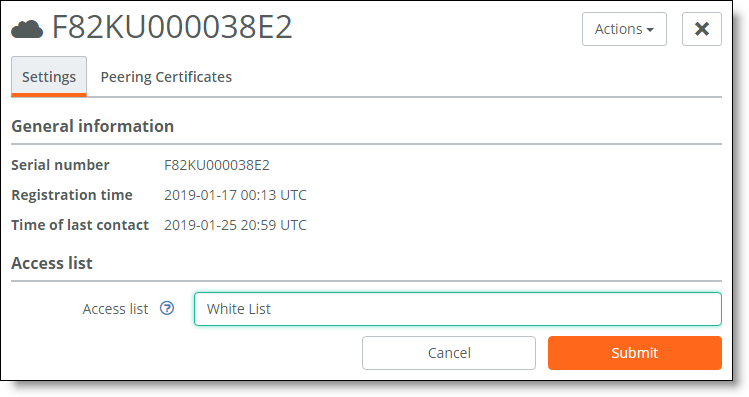
3. From the Access list drop-down list, select the type of list for the appliance.
4. Click Submit.
Resizing a SaaS service cluster
You can resize a SaaS service cluster from SCM.
To resize a SaaS service cluster
1. Choose Optimization > SaaS Accelerator and select the application row.
The application settings pane appears.
2. In the application settings, change the number of users.
This adjusts the capacity of the cluster without changing the service endpoint. This operation can take up to 30 minutes.
When you resize a service cluster, the cache is cleared (all traffic will be cold) and proxy and peer certificates will be auto-signed again.
Deleting appliances from SCM
If you no longer want an appliance to be part of your SaaS acceleration service, you can permanently remove an appliance from the SCM configuration. This is a permanent alternative to blacklisting.
Tip: The preferred method is to deregister from the client appliance. When you do this, SCM automatically removes the appliance and updates its configuration.
To delete an appliance from SCM SaaS acceleration
1. Choose Optimization > SaaS Client Appliances and select the appliance row.
The appliance pane appears.
2. From the Actions drop-down list, select Delete this appliance.
3. When prompted, click Confirm.
You should also deregister this appliance (using the client’s web interface) after deleting the appliance from SCM.
Configuration through the CLI
You can configure SaaS acceleration through the CLI as well as the web interface. These are the primary commands:
•show service saas-accel
•show service saas-accel applications
•service saas-accel register scm <scm-domain-name> token <token-value>
•service saas-accel enable
•in-path rule auto-discover dst-app <app-name> rulenum start
•no service saas-accel register
The Mobile Controller supports these additional commands:
•policy id <id> in-path rule auto-discover dst-app <app-name>
•policy id <id> ssl enable
•policy id <id> saas-accel enable
For more information, see the Riverbed Command-Line Interface Reference Manual.