Installing the SCC
This chapter includes these sections:
Checking your inventory
Check your shipment to ensure that it contains these items:
• The SCC
• One standard Ethernet straight-through cable
• One serial null-modem cable
• One or two power cables (depending on your order)
Aside from country-specific requirements, all systems ship with the same power cable. The power cable has an IEC 60320 C13 plug on one end (to connect to the SCC) and a country-specific plug that fits the wall socket for that country. If a system has two power supplies, it ships with two suitable cables.
You must always connect the SCC using either the cable in the accessories box or another cable that’s approved for use by the IEC in the country in which the appliance is connected.
You can’t connect an SCC directly to multiphase outlets. You must use a rack PDU or power strip that provides the appropriate three-prong outlet (hot/neutral/ground). For details, go to Knowledge Base article
S13425.
• One Phillips screwdriver
• One mounting kit
If any items are damaged or missing, notify Riverbed Support at
https://support.riverbed.com for replacement or repair.
Preparing your site for installation
Before you install the SCC, make sure that your site meets these requirements:
• It is a standard electronic environment where the ambient temperature doesn’t exceed
40
° C (104
° F) and the relative humidity doesn’t exceed 80% (noncondensing). For detailed information, see
Appliance Technical Specifications. • Ethernet connections are available within the standard Ethernet limit.
• There’s available space on a two-post or four-post 19-inch rack. For details about installing the SteelHead to a rack, see the Rack Installation Guide or the printed instructions that were shipped with the system.
• A clean power source is available, dedicated to computer devices and other electronic equipment.
• The rack is a standard 19-inch Telco-type mounting rack.
Note: If your rack requires special mounting screws, contact your rack manufacturer.
The SCC is completely assembled, with all the equipment parts in place and securely fastened. The SCC is ready for installation with no further assembly required.
SCC ports
Port | Description |
Console | Connects the serial cable to a terminal device. You establish a serial connection to a terminal emulation program for console access to the configuration wizard and the SteelHead CLI. |
Primary
(PRI) | The management interface that connects the SCC to a LAN switch. This management interface enables you to connect to the SCC Management Console and the SCC CLI. The primary and auxiliary ports can’t share the same network subnet. |
Auxiliary (AUX) | An optional port that provides an additional management interface for a secondary network. You can’t have the primary and auxiliary ports on the same subnet. The auxiliary and in-path interfaces can’t share the same network subnet. |
Completing the configuration checklist
Be prepared to provide values for the parameters listed in this checklist.
Appliance | Parameter | Your value |
SCC | Hostname | |
IP address | |
Netmask | |
Default gateway | |
DNS server | |
Domain name | |
Remote SteelHeads | Serial number | |
Version | |
IP address or hostname | |
User name | |
Password | |
Powering on the system
In European electrical environments, you must ground (earth) the green/yellow tab on the power cord to prevent electrical shock.
To power on the system
1. If your system has a master power switch, ensure that it is in the off position on the rear of the SCC.
2. Plug the AC power cord into the SCC.
Note: If your model has multiple power supplies, you must plug in all the power cords or you will hear an alarm.
Figure: Connecting the power

3. Plug the AC power cord into an uninterrupted AC power source.
4. Press the system power switch on. If the SCC doesn’t immediately power on, press the power switch off, and then press the power switch on again.
Securing the power cord on desktop systems
The model 1000 includes a power cord retention module. You can install this module to reduce the risk of accidentally unplugging the power.
To install the power cord retention module
1. Push the retention module into the socket near the power connection.
The socket is to the left of the power supply.
2. Attach the retention fastener to the module and tighten it around the power cable.
Figure: Attaching the power cord
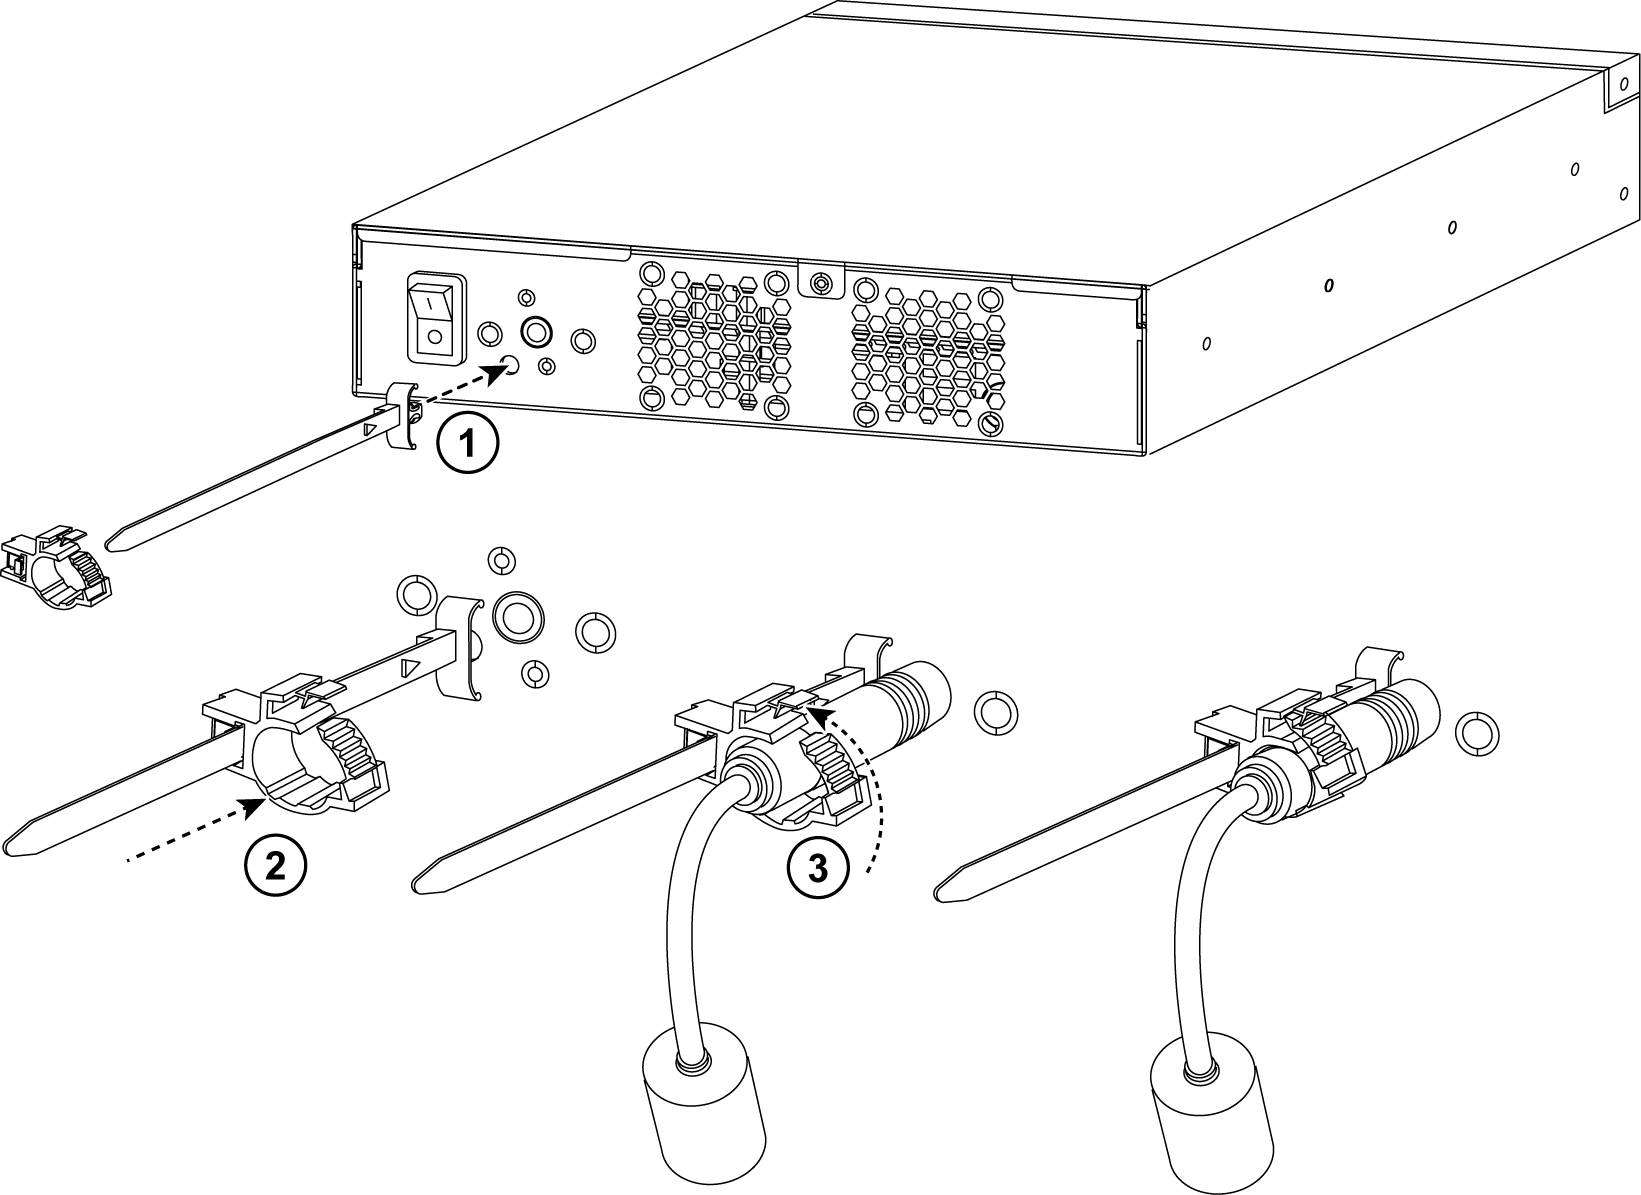
The retention module doesn’t prevent accidental pulls from removing the power cord, but it does provide increased protection.
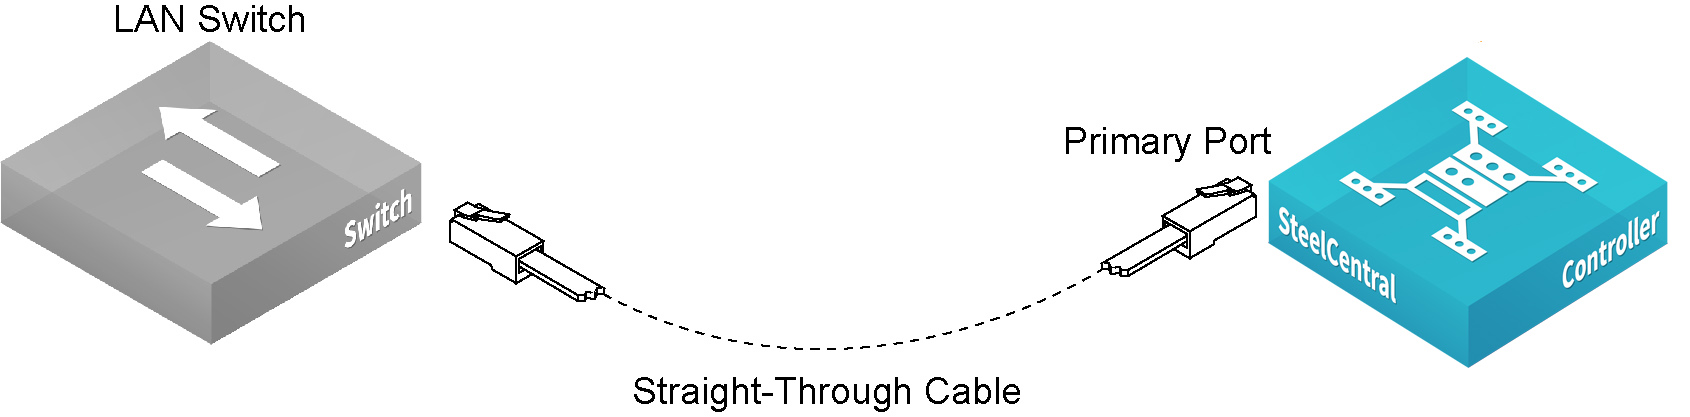
Connecting the SCC to your network
To connect the SCC to your network
• Plug the straight-through cable into the primary port of the SteelHead and the LAN switch. This can be any port on your LAN switch configured to connect to a host.
Figure: Connecting the primary port and LAN switch
Running the configuration wizard
To access the configuration wizard and the SCC CLI, you establish a serial connection using a terminal emulator program.
To run the configuration wizard
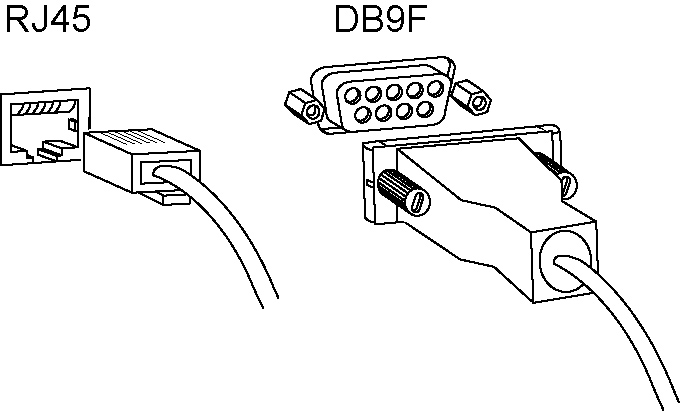
1. Plug the serial cable into the console port and a terminal.
Depending on your appliance, the console port is either a DB9F port or an RJ45 port. (For port details for your appliance model, see the specification appendix in the installation guide for your product.)
The appropriate console cable ships with your appliance.
Figure: Connecting to the SCC
2. Start your terminal emulation program, such as Tera Term Pro. The terminal device must have these settings:
– Baud rate: 9600 bps
– Data bits: 8
– Parity: none
– Stop bits: 1
– vt100 emulation
– No flow control
If you’re using the SCC with a terminal server, the terminal server must use hardware flow control for the port connected to the SCC.
We recommend that you connect the console port to a device that logs output. Even though this isn’t a requirement, it can help you to identify problems with the system.
3. Log in as administrator user (admin) and enter the default password (password). For example:
login as: admin
Sent username "admin"
password: password
The configuration wizard automatically starts after you’ve entered the login and default password. After you’ve established a connection, you configure the SCC using the configuration wizard.
4. Complete the configuration wizard steps as described in this table.
Note: Press Enter to enter the default value. If you mistakenly answer no, you can start the configuration wizard by entering configuration jump-start at the system prompt.
Note: Press ? for help. Press Ctrl+B to go back to the previous step.
Wizard Prompt | Description |
Step 1: Host Name? | Enter the hostname for the SCC. |
Step 2: Use DHCP? | You’re given the option to enable the DHCP to automatically assign an IP address to the primary interface for the SCC. We recommend that you don’t set DHCP. The default value is no. |
Step 3: Primary IP address? | Enter the IP address for the SCC. |
Step 4: Netmask? | Enter the netmask for the network on which the SCC is to reside. |
Step 5: Default gateway? | Enter the default gateway for the network on which the SCC is to reside. |
Step 6: Primary DNS server? | Enter the primary DNS server for the network on which the SCC is to reside. |
Step 7: Domain name? | Enter the domain name for the network on which the SCC is to reside. If you set a domain name, you need not specify the domain names when you set up remote appliances to be managed by the SCC. Note: When you configure DNS server settings, map riverbedcmc to the IP address for the SCC. |
Step 8: Admin password? | We strongly recommend that you change the default password at this time. The password must contain at least six characters. The default administrator password is password. |
5. Confirm your settings:
You have entered the following information:
1. Hostname: minna
2. Use DHCP: no
3. Primary IP address: 10.0.0.74
4. Netmask: 255.255.0.0
5. Default gateway: 10.0.0.1
6. Primary DNS server: 10.0.0.2
7. Domain name: example.com
8. Admin password: xxxyyy
To change an answer, enter the step number to return to.
Otherwise hit <enter> to save changes and exit.
Choice:
The SCC configuration wizard automatically saves your initial configuration settings.
6. To log out of the system, enter this command at the system prompt:
# exit
7. If your model has a front bezel, replace the bezel on the SCC.
To restart the configuration wizard
• Enter these commands at the system prompt:
> enable
# configure terminal
(config) # configuration jump-start
For detailed information about the CLI, see the Riverbed Command-Line Interface Reference Manual.
Verifying your connections to the system
Perform this task to verify that you’ve properly connected the SCC.
To verify you’re connected to the SCC
1. Verify that you can connect to the CLI using one of these devices:
• An ASCII terminal or emulator that can connect to the serial console. It must have these settings: 9600 baud, 8 bits, no parity, 1 stop bit, vt100, and no flow control.
• A computer with a Secure Shell (SSH) client that’s connected to the SCC primary port.
2. At the system prompt, enter this command:
ssh admin@<host>.<domain>
or
ssh admin@<ip-address>
3. You’re prompted for the administrator password. This is the password you set in the configuration wizard.
4. At the system prompt, ping from the management interface:
ping -I <primary-ip-address> <primary-default-gateway>
5. At the system prompt, ping from the in-path default gateway:
ping -I <in-path-ip-address> <in-path-default-gateway>
HTTPS communication channel
In SCC 9.0 and later, and SteelHeads running RiOS 9.0 and later, there’s a second, full-duplex-persistent communication channel established between the SteelHead and the SCC. This channel is:
• HTTPS based.
• initiated by the SteelHead to the SCC.
• established using a certificate-based authentication mechanism.
• independent of and coexists with the current SSH-based communication channel.
• used to manage the new features introduced with RiOS 9.0, specifically, path selection, QoS, and secure transport.
By default, a SteelHead automatically connects to the SCC using the hostname riverbedcmc.
You can view the status of these two communication channels on the SteelHeads using the show scc CLI command:
amnesiac > show scc
Auto-registration: Enabled
HTTPS connection (to the CMC):
Status: Connected
Hostname: bravo-123
SSH connection (from the CMC):
Status: Connected
Hostname: bravo-123 (10.0.0.1)
You must establish these two communication channels to the same SCC for a SteelHead to be fully manageable by the SCC. Make sure that your DNS system points the hostname riverbedcmc to the correct SCC that’s managing the appliance.
To change the SCC hostname, run the scc hostname <hostname> CLI command in configuration mode:
scc hostname <hostname>
Connecting to the SCC Management Console
After you configure the SCC, you can check and modify your configuration settings and view performance reports and system logs in the SCC Management Console. You can connect to the SCC Management Console through any supported web browser.
To connect to the SCC Management Console, you must know the host, domain, and administrator password that you assigned in the configuration wizard.
Note: Cookies and JavaScript must be enabled in your web browser.
Note: Before you begin, clear your browser cache and cookies to ensure the user interface displays correctly.
To connect to the SCC Management Console
1. Enter the URL for the SCC in the location box of your browser:
<protocol>://<host>.<domain>
<protocol> is http or https. The secure HTTPS uses the SSL protocol to ensure a secure environment. When you connect using HTTPS, you’re prompted to inspect and verify the SSL certificate. This is a self-signed certificate used to provide encrypted web connections to the SCC.
<host> is the IP address or hostname you assigned the SCC during initial configuration. If your DNS server maps the IP address to a name, you can specify the DNS name.
<domain> is the full domain name for the SCC.
The SCC Login page appears.
2. In the text box, specify the user login: admin, monitor, a login from a RADIUS or a TACACS+ database, or a previously configured RBM account.
The default login is admin. Users with administrator privileges can configure and administer the SCC. Users with monitor privileges can view SCC reports but they can’t configure the system.
3. In the Password text box, specify the password you assigned in the configuration wizard of the SCC.
The SCC is shipped with password as the default password.
4. Click Log In to log in to display the dashboard.