Complex QoS Configuration
This chapter describes how to configure QoS with multiple remote sites and hierarchical classes. It includes this task:
Configuring QoS with remote sites and hierarchical classes
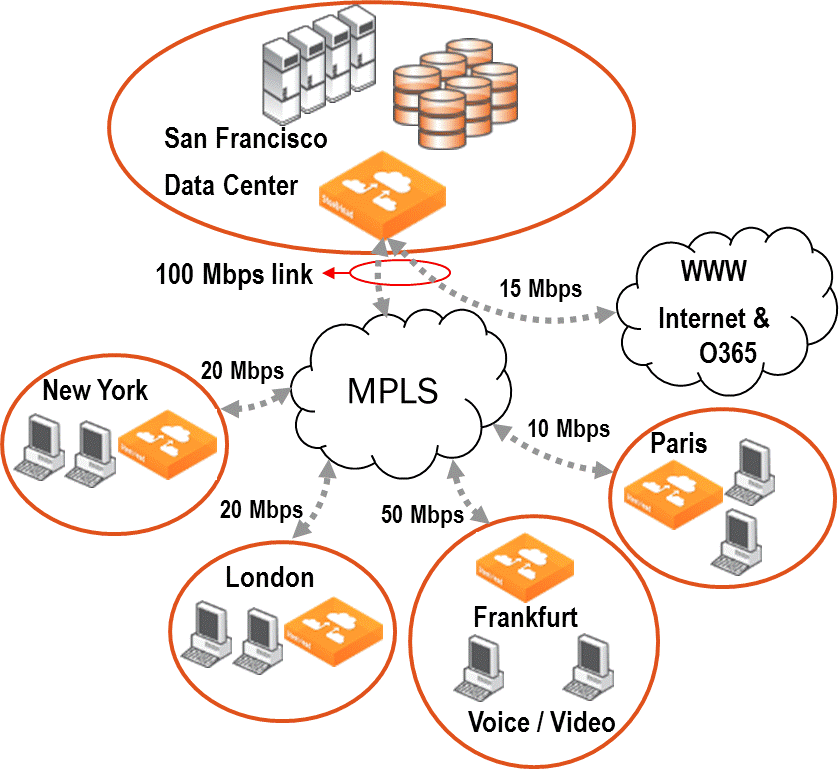
In this example, there's a data center in San Francisco that connects through the MPLS network at 100 Mbps to four sites:
• New York connects with 20 Mbps (20000 kbps).
• London connects with 20 Mbps (20000 kbps).
• Paris connects with 10 Mbps (10000 kbps).
• Frankfurt connects with 50 Mbps (50000 kbps).
The San Francisco data center also connects directly to the internet and MS Office 365 traffic at 15 Mbps.
You can see these sites in this network diagram. It also shows a defined network, MPLS, to which the sites are connected.
Figure: SteelHead configuration example
Remember, it's the data center SteelHead in San Francisco that you’re configuring. So San Francisco is the local site. It’s uplinks need to know the gateways to the networks. In this example, it also shapes the traffic to the internet. There are three objectives with this example:
• For New York, London, and Paris, protect VoIP traffic.
• For Frankfurt, reserve 50 Mbps. Frankfurt has a videoconferencing system and it wants to guarantee 15Mbps of bandwidth for it. For the 15 Mbps, 5 Mbps are guaranteed for voice and 10 Mbps are guaranteed for video.
• For the internet, protect MS-Office 365 traffic from users browsing the internet.
This diagram shows the QoS class hierarchy.
Figure: QoS class hierarchy
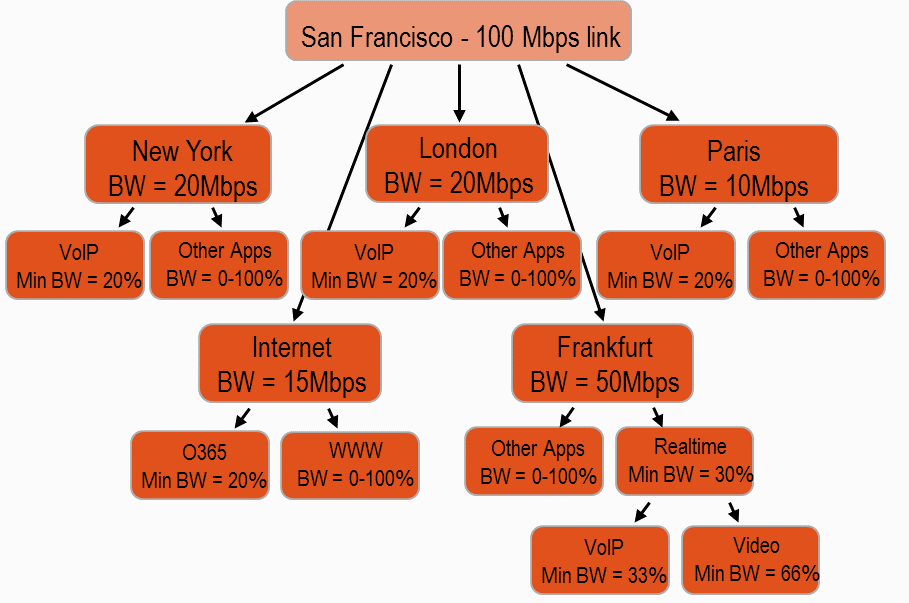
For New York, London, and Paris, it's a flat configuration. For Frankfurt, you have to split the videoconferencing traffic into voice and video traffic and, therefore, you need an additional level of hierarchy. For MS Office 365 traffic, you need to use inbound QoS because the internet traffic is mostly downloading content and it is more likely to be congested.
For a detailed description of this example, see the SteelHead Deployment Guide.
Defining applications
The first task is to check if applications are defined in the Application Flow Engine (AFE) so that they can be used in QoS rules.
You need to made sure these applications are defined:
• RTP-Audio - To protect voice traffic for the New York, London, Paris, and Frankfurt sites.
• RTP-Video - To protect videoconferencing traffic for the Frankfurt site.
• Office-365 - To protect the Internet traffic from browsing.
If they aren’t defined, you must create a custom application. For detailed information, see the SteelHead Management Console User’s Guide.
To verify that an application is defined in the AFE
1. Choose Networking > App Definitions: Applications, and click Add to display the New Application pop-up window.
2. Under Application Layer Protocol, specify the first three letters of the application name you want to check.
Figure: Checking if an application is defined in the AFE
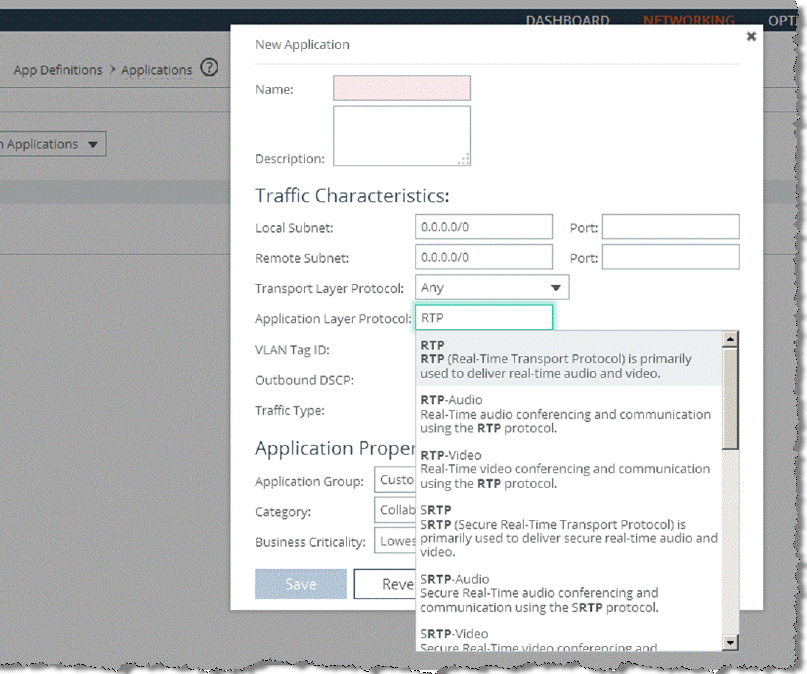
The applications RTP-Audio, RTP-Video, and Office 365 are already defined in the AFE. Since the applications are defined you don’t need to configure a custom application. When you configure a real-life QoS environment, you would most likely use application groups so that you can apply QoS rules to multiple applications at the same time.
Creating QoS profiles
The next step is to configure the QoS profile that contains the QoS classes and rules for traffic going to a site. You can assign a single QoS profile to many sites, and you can use it to configure inbound and outbound QoS.
For the example QoS scenario, you must create three QoS profiles:
• ProtectVoIP - This profile has two classes (VoIP and OtherApps) for the sites New York, London, and Paris.
• VideoConf - This profile has two classes (VideoConf and OtherApps) and two subclasses (Voice and Video) for Frankfurt to protect video and voice traffic.
• Office365 - This profile has two classes (Office365 and OtherApps) to protect MS Office365 traffic from internet browsing traffic.
To define a QoS profile for New York, London, and Paris
1. Choose Networking > Network Services: Quality of Service, and click Add a QoS Profile to display the New Profile pop-up window.
Figure: Add a profile name

2. Type ProtectVoIP in the Profile Name text box, and click Save to display the Protect VoIP profile in the QoS Profiles table.
Figure: QoS Profile table with ProtectVoIP QoS profile
3. Click Edit to display the QoS Profile Details page for the ProtectVoIP profile. This is where you configure QoS classes and rules. An empty profile always starts with the Root class, which represents the bandwidth of the uplink of a site.
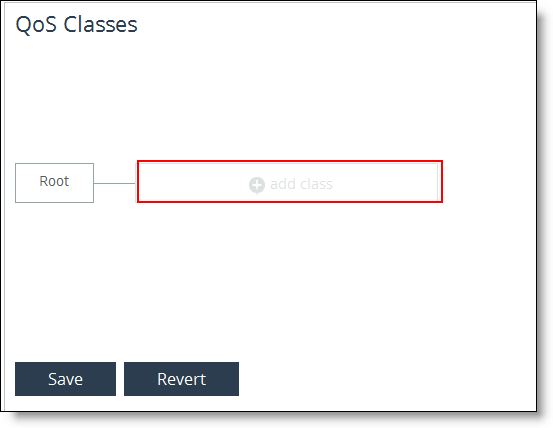
4. Under QoS Classes, click Edit, and click the + add class box to display the New Class pop-up window.
Figure: The + Add Class box
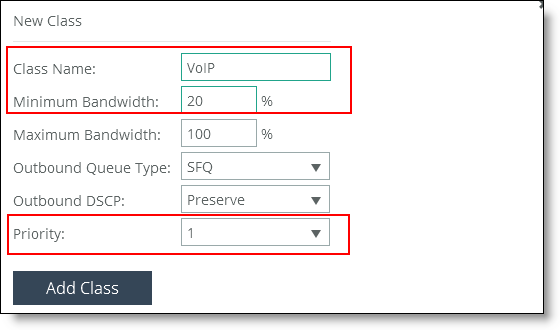
5. To define the class for the VoIP traffic, complete these fields:
– Class Name: Type VoIP.
– Minimum Bandwidth: Type 20.
– Priority: Select 1 from the drop-down list for Real Time traffic.
Figure: Creating the VoIP class
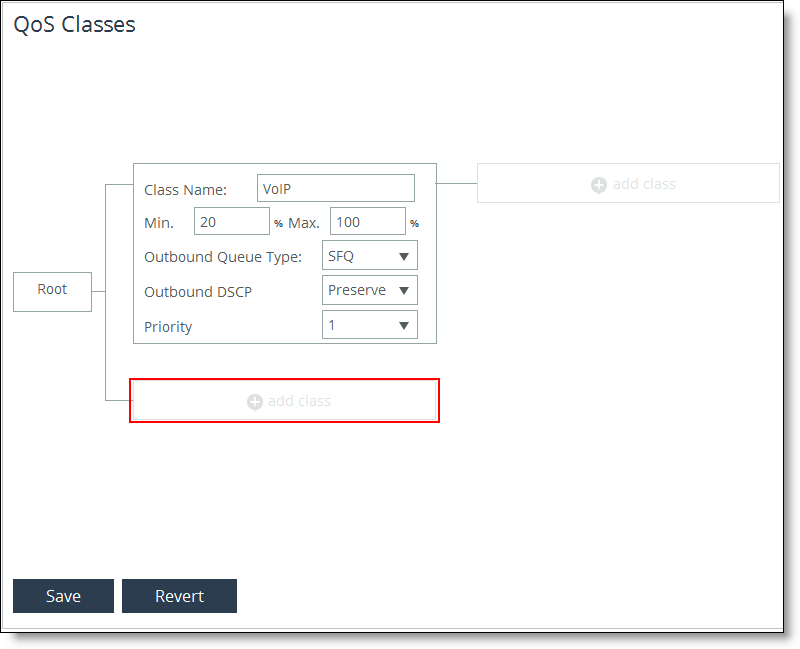
6. Click Add Class to display the new class in the QoS hierarchy.
Now you define the OtherApps class for all the remaining traffic.
7. Click the + add class box directly below the VoIP class you just created. This selection creates the OtherApps class at the same hierarchical level as the VoIP class.
Figure: Adding a class at the same hierarchical level
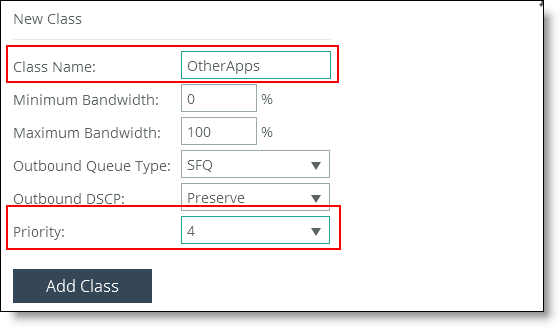
8. Complete these fields:
– Class Name: Type OtherApps.
– Priority: Select 4 from the drop-down list.
Figure: Creating the OtherApps class
9. Click Add Class to display it in the QoS classes hierarchy.
10. Click Save.
After you have defined the classes, you define the rules for them. QoS rules are defined in the same page as QoS classes, which is the QoS Profile Details page.
11. Under QoS Rules, click Add a Rule to display the New QoS Rule pop-up window.
12. In the Application or Application Group drop-down list, type RTP- to display the RTP-Audio application and select it.
Figure: Add New RTP-Audio rule
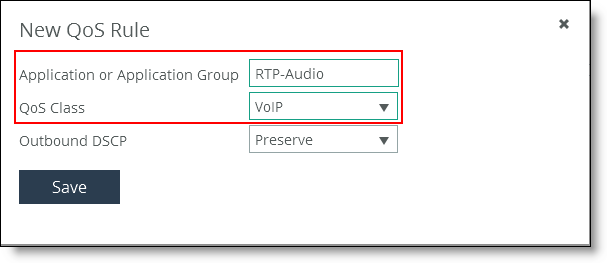
13. Select VoIP from the QoS Class drop-down list, and click Save to display the rule in the QoS Rules table.
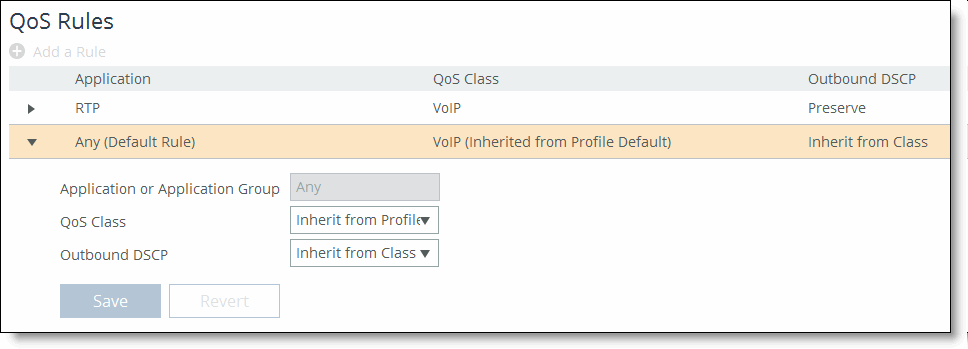
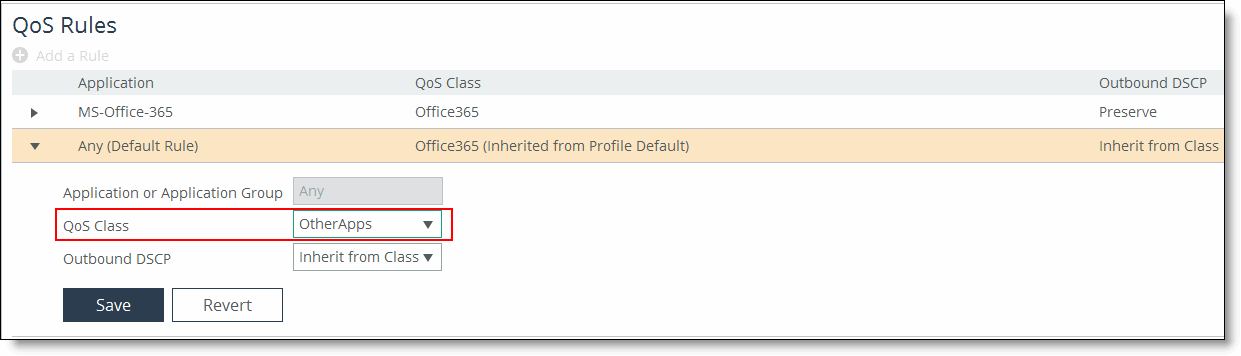
Now you need to edit the Default rule to point it to the OtherApps class you created.
14. To expand the Any (Default Rule) click the arrow (>) next to the Any (Default Rule) name.
15. Select OtherApps from the QoS Class the drop-down list, and click Save.
Figure: Changing the QoS class
The QoS Profile for New York, London, and Paris is now ready to use.
The Frankfurt site requires an additional level of hierarchy (that is, subclasses) for the videoconferencing traffic and also has different bandwidth requirements. To simplify the configuration process, you can use the existing PrioritizeVoIP profile as a template and modify it accordingly.
To create a QoS Profile for Frankfurt
1. To quickly return to the Quality of Service page, select Quality of Service from the breadcrumbs at the top of the QoS Profile Details page.
Figure: Navigating using breadcrumbs

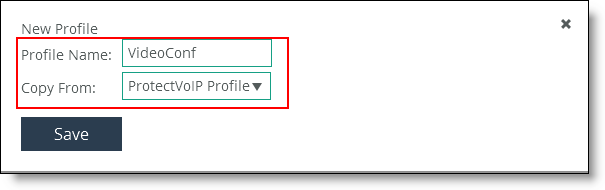
2. Under QoS Profiles, click Add a QoS Profile to display the New Profile pop-up window. Instead of configuring everything from scratch, you can use the ProtectVoIP profile as a template and edit it later.
3. Complete these fields:
– Profile Name: Type VideoConf.
– Copy From: Select ProtectVoIP Profile from the drop-down list.
Figure: Defining the VideoConf profile using the ProtectVoIP as a template
4. Click Save to display the VideoConf profile in the QoS Profiles table.
Now you edit the VideoConf profile. Again you start with configuring the classes but before you can do that, you must make sure that no rule is using the class that you want to change.
5. In the QoS Profiles table, click Edit for the VideoConf profile to display the QoS Profile Details page.
You need to edit the RTP-Audio class to point to the OtherApps class. This is temporary; you’ll change it later.
6. Click the arrow (>) next to the RTP-Audio rule name to expand the page.
Figure: Editing the RTP-Audio rule
7. Because a parent class can’t have a QoS rule assigned to it, under QoS Classes select OtherApps from the drop-down list, and click Save. This setting is temporary; you'll change it later.
Now you can edit the VideoConf Profile without getting an error message.
8. Under QoS Classes, click Edit to display the QoS Classes pane.
Figure: ProtectVoIP Class as a template
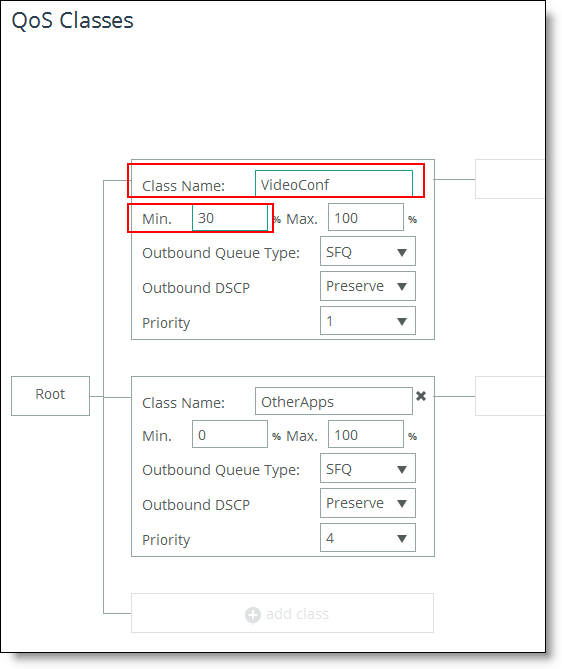
9. To change the VoIP class to handle videoconferencing traffic, change these fields:
– Class Name: Type VideoConf.
– Min: Type 30 to change the minimum bandwidth to 30%, which is 15 Mbps.
Now you need to build the next level of hierarchy for the VideoConf class, the subclasses.
10. Under QoS Classes, click the + add class box to the right of the VoIP class to display the Add Class pop-up window.
Figure: Adding subclasses to the VideoConf class
11. To create the Voice subclass, complete these fields:
– Class Name: Type Voice.
– Minimum Bandwidth: Type 33, which is 5 Mbps.
– Priority: Select 1 from the drop-down list to correspond to real-time traffic.
Figure: Defining the Voice subclass
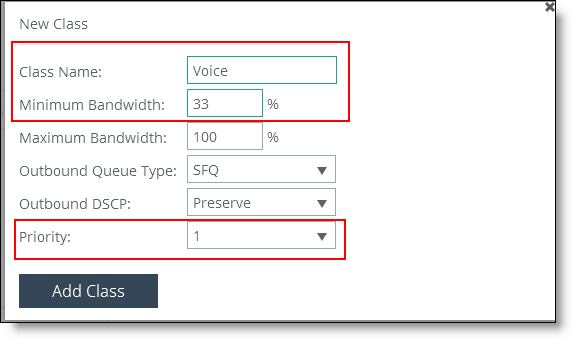
12. Click Add Class to add the subclass to the hierarchy.
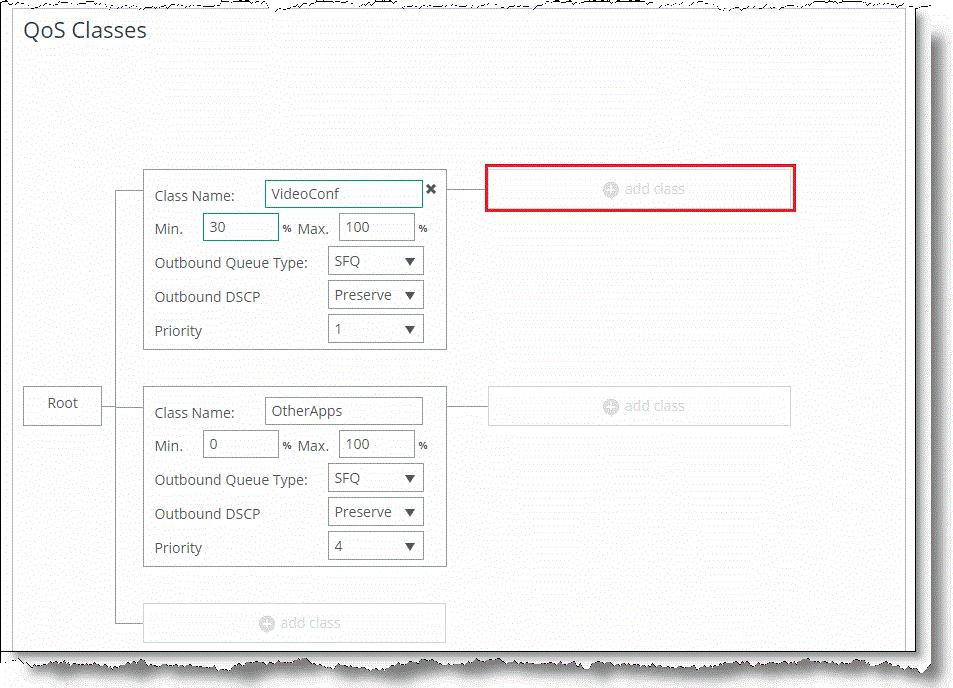
Now you need to add a subclass below the Voice subclass and to the right of the VideoConf class.
13. Click the + add class box below the Voice subclass to display the New Class pop-up window.
Figure: Adding a subclass at the same hierarchical level
14. To define the Video subclass, complete these fields:
– Class Name: Type Video.
– Minimum Bandwidth: Type 66, which is 10 Mbps.
– Priority: Select 2 from the drop-down list to correspond to Interactive traffic.
Figure: Adding the Video
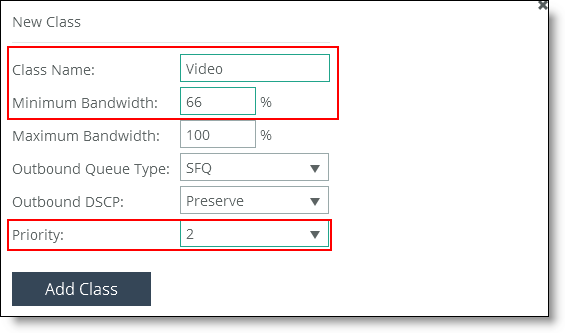
subclass
15. Click Add Class to add the Video subclass to the QoS class hierarchy.
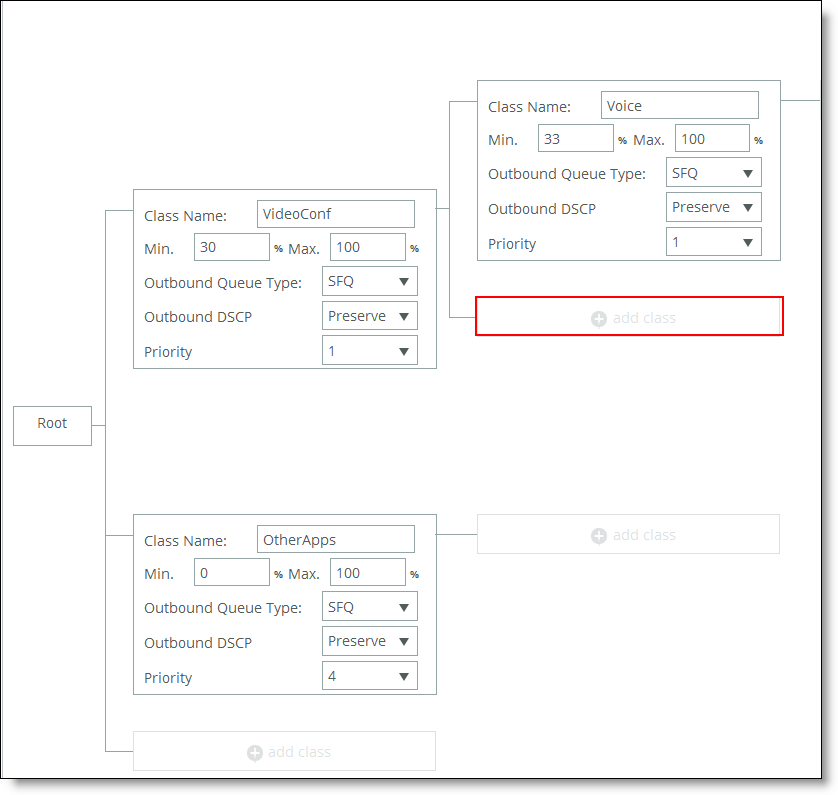
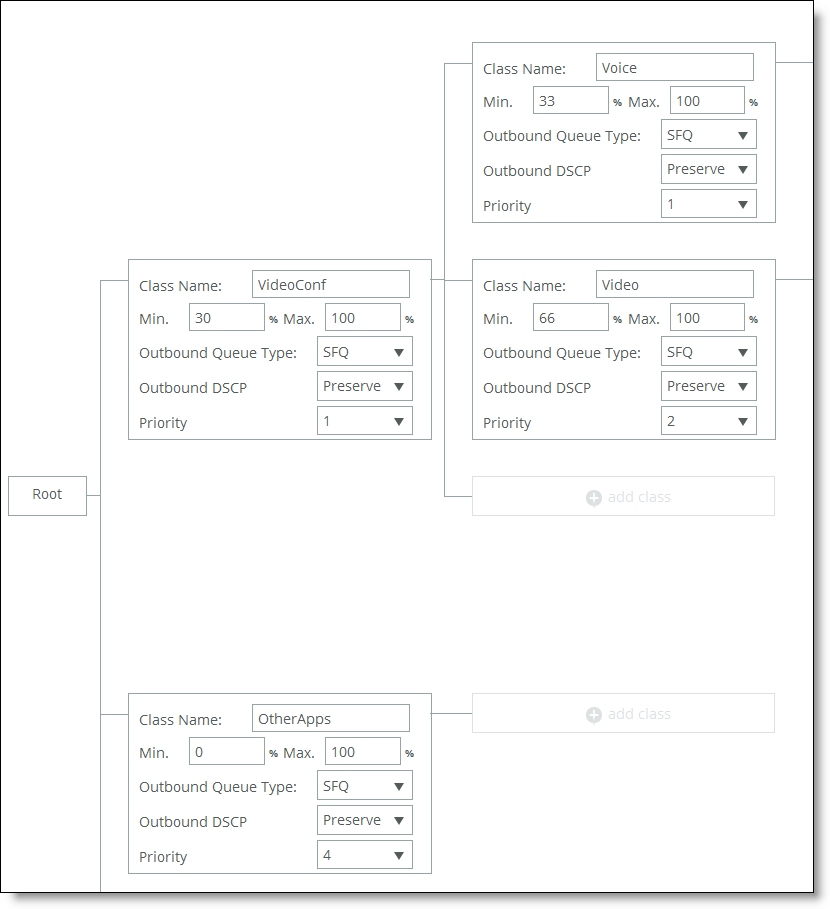
Your QoS class configuration looks like this.
Figure: Finished QoS class configuration
16. Click Save.
Next you define the rules for the VideoConf class. You already have one for RTP-Audio but you temporarily changed it to point to the wrong class. Let's edit it and point it to the Voice class. You also need to define a rule for Video class and point it to the Video class.
To define rules for the VideoConf class
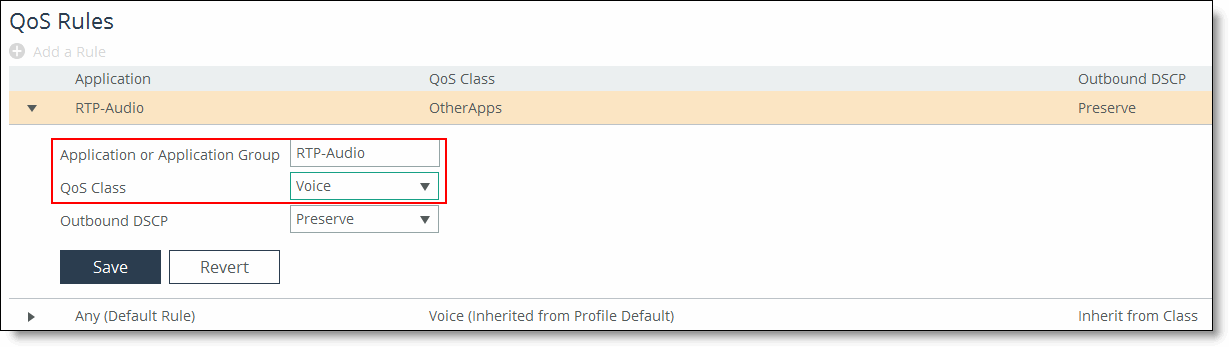
1. Scroll down to QoS rules, click the arrow (>) next to the RTP-Audio rule name to expand the page.
2. Select Voice from the QoS Class drop-down list, and click Save.
Figure: Changing RTP-Audio rule to point to the voice class
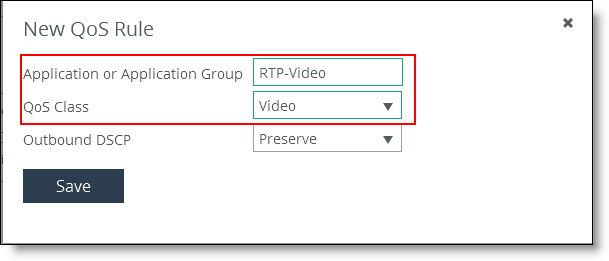
3. To define the rule for RTP-Video to point to the Voice class, under QoS Rules, click Add a Rule to display the New QoS Rule pop-up window.
4. In the Application or Application Group drop-down list, type RTP- to display the RTP-Video application and select it.
5. Select Video from the QoS Class drop-down list, and click Save to display the rule in the QoS Rules table.
Figure: Add New RTP-Video rule
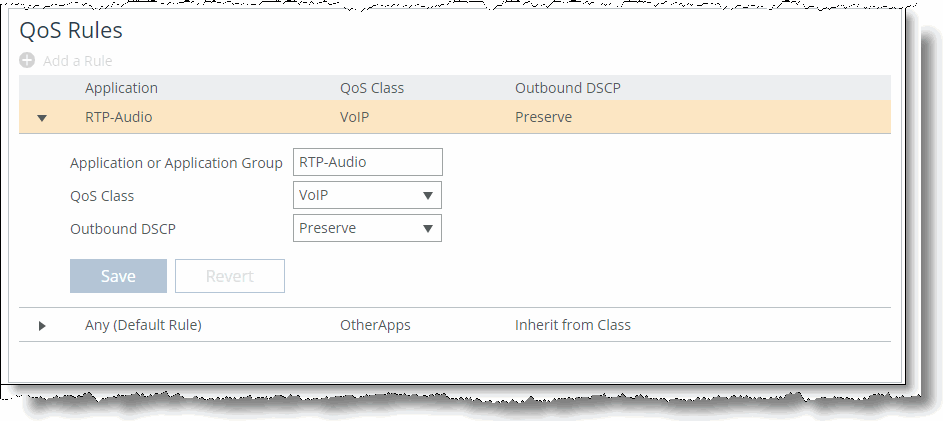
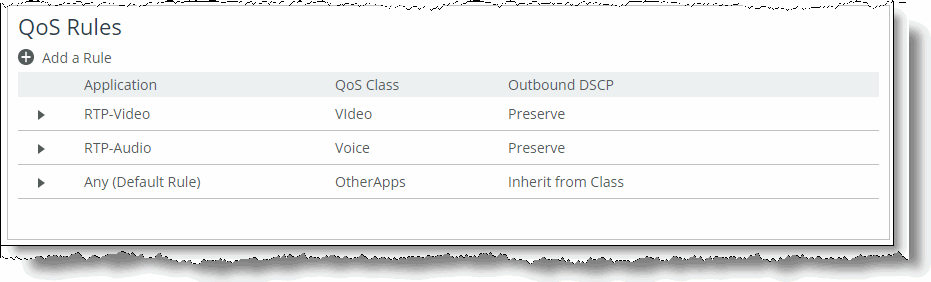
6. Make sure the Any (Default Rule) points to the OtherApps class. The Qos Rules table looks like this figure.
Figure: Finished QoS Rules table
The QoS profile for Frankfurt is now ready to use.
Next you configure the QoS profile to protect MS Office 365 traffic. Setting up a QoS profile is the same for inbound and outbound QoS in RiOS 9.x. Internet traffic usually generates more incoming than outgoing traffic so that’s why you’re protecting the incoming MS Office 365 traffic from the incoming internet browsing traffic.
To create the Office365 QoS profile
1. To quickly return to the Quality of Service page, select Quality of Service from the breadcrumbs at the top of the QoS Profile Details page.
Figure: Navigating using breadcrumbs
2. Under QoS Profiles, click Add a QoS Profile to display the New Profile pop-up window.
3. Type Office365 in the Profile Name text box, and click Save.
Figure: Defining the Office365 profile

4. Under QoS Profiles, click Edit for the Office365 profile to display the QoS Profile Details page.
5. Under QoS Classes, click Edit and click the + add class box to display the New Class pop-up window.
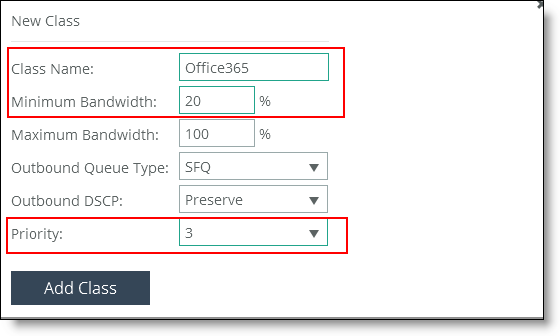
6. To protect MS Office 365 traffic from internet browsing, complete these fields:
– Class Name: Type Office365.
– Minimum Bandwidth: Type 20.
– Priority: Select 3 from the drop-down list, which corresponds to business critical traffic.
Figure: Defining the Office365 class
7. Click Add Class.
Now you define the OtherApps class at the same hierarchical level for all the remaining traffic.
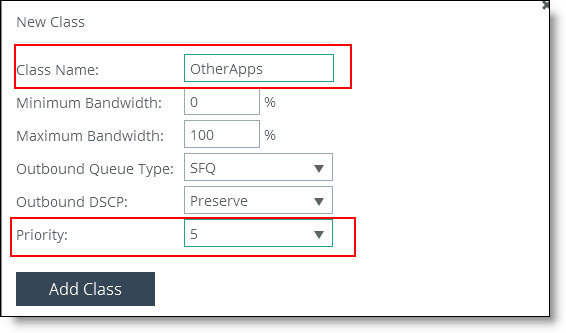
8. Click the + add class box directly below the Office365 class you just created. This selection creates the OtherApps class at the same hierarchical level as the Office365 class.
9. Complete these fields:
– Class Name: Type OtherApps.
– Priority: Select 5 from the drop-down list, which corresponds to low priority traffic.
Figure: Creating the OtherApps class
10. Click Add Class to display it in the QoS classes hierarchy.
11. Click Save.
Next you define the QoS rules for the Office365 class.
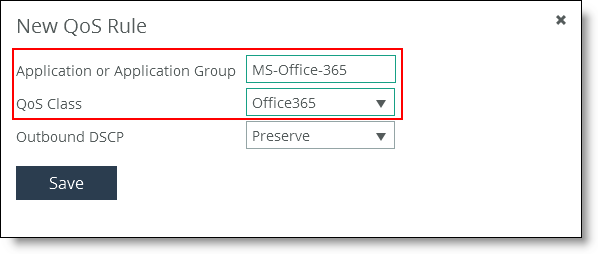
12. Under QoS Rules, and click Add a Rule to display the New QoS Rule pop-up window.
13. In the Application or Application Group drop-down list, type MS-Office to display the MS-Office-365 application and select it.
14. Select Office365 from the QoS Class drop-down list and click Save to display the rule in the QoS Rules table.
Figure: Adding the Office-365 rule
Now you need to edit the Default rule to point it to the OtherApps class you created.
15. Click the arrow (>) next to the Any (Default Rule) name to expand the page.
16. Select OtherApps from the QoS Class the drop-down list, and click Save.
Figure: Changing the QoS class
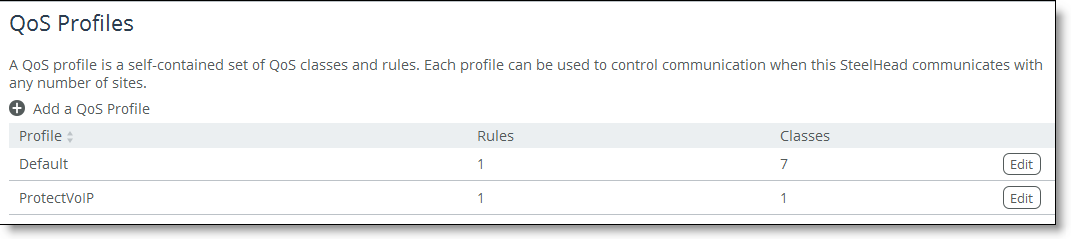
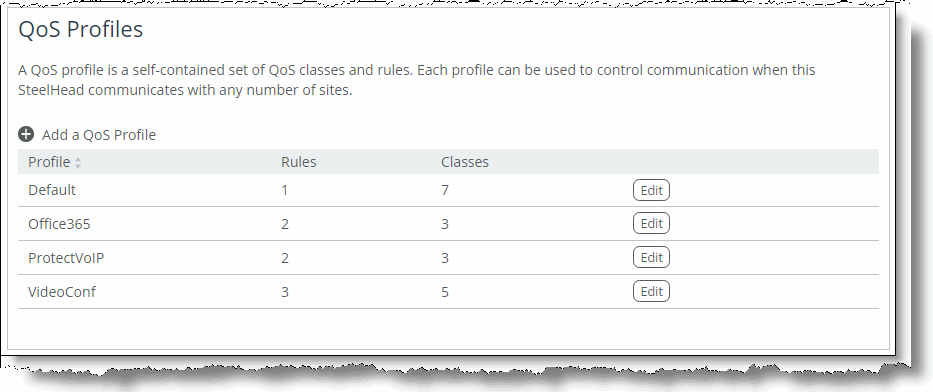
All the QoS profiles for the example are now configured. It looks like this.
Figure: Configured QoS profiles
Next you'll configure the topology. Remember, the topology consists of networks and sites. You'll start with the network.
Configuring the topology
The network topology already contains a network called MyWAN. This is the default network.
A Network has these settings associated with it:
• Name - The name of your network.
• Public network - This setting tells the SteelHead if the network is a public or a private network. (The public network option only takes effect if you configure secure transport using the SCC.)
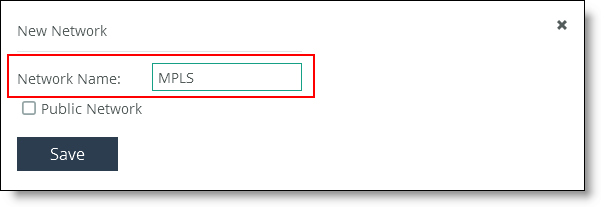
To define a network you can choose to either rename the MyWAN network to something else or to add a new network. It doesn't really make a difference. For this example, you add a new network, MPLS.
To define networks
1. Choose Networking > Topology: Sites & Networks to display the Sites & Networks page.
2. Click Add a Network to display the New Network pop-up window.
3. Type MPLS in the Network Name text box, and click Save.
Figure: Defining a network
Next you create the sites. The Local site and the Default Site come with a default configuration. Remember that these two are special sites. The Local site represents the SteelHead you’re connected to and actively configuring and the Default site is the catch-all for traffic not going to configured sites. You start with the Local site in San Francisco, which is connected to the MPLS network at 100 Mbps.
To create the San Francisco site
1. Under Sites, for the Local site click Edit Site to display the Edit an Existing Site pop-up window. The local site is the SteelHead you’re connected to.
2. Complete these fields:
– Site Name: Type San Francisco.
– Subnets: Type 1.1.1.0/24. (This IP address only applies to the example.)
Figure: Creating the San Francisco site
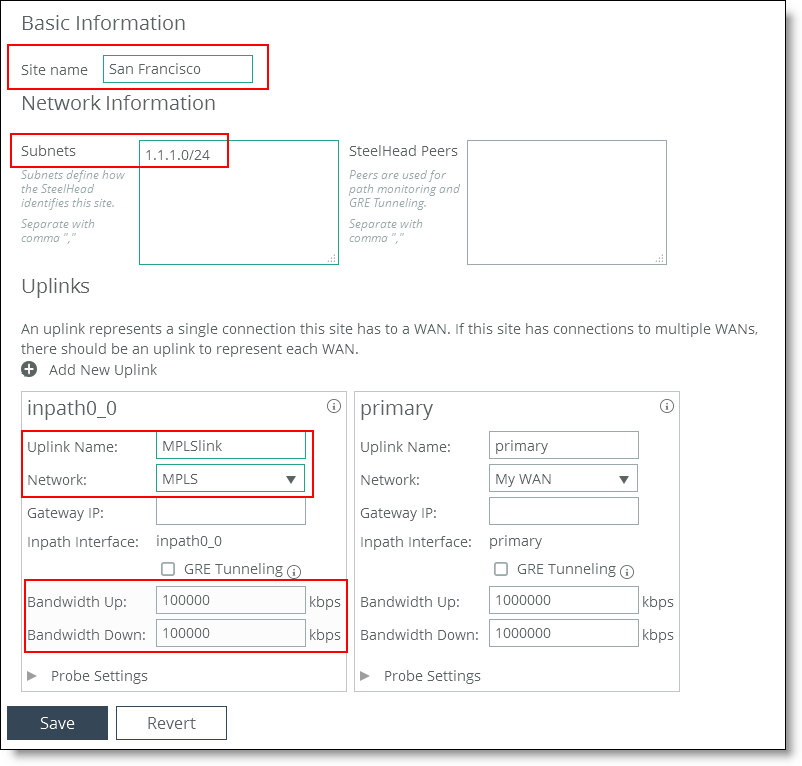
The SteelHead you’re configuring has two interfaces that can be used for QoS: the inpath0_0 and the primary interface. By default both are connected to the MyWAN network. In this example, the SteelHead is deployed in-path, so you configure the inpath0_0 interface. You don’t need to configure the primary interface.
1. Under Uplinks, for the inpath0_0 interface complete these fields:
– Uplinks Name: Replace the name with MPLSlink.
– Network: Select MPLS from the drop-down list.
– Bandwidth Up: Type 100000, which is 100 Mbps.
– Bandwidth Down: Type 100000, which is 100 Mbps.
2. Click Save.
Because the local site is the site in which the SteelHead you’re configuring is physically located, you can’t assign any QoS profiles to the local site.
Next you configure the remote sites. New York, London, and Paris is where you want to protect VoIP.
1. Under Sites, click Add a Site to display the Creating a Site pop-up window.
2. Complete these fields:
– Site Name: Type New York.
– Subnets: Type 2.2.2.0/24. (The IP address only applies to this example.)
– Inbound QoS Profile: Select ProtectVoIP from the drop-down list.
– Outbound QoS Profile: Select ProtectVoIP from the drop-down list.
3. Under Uplinks, click Add a New Uplink to expand the page.
– Uplinks Name: For the inpath0_0, replace the name with MPLSlink.
– Network: Select MPLS from the drop-down list.
– Bandwidth Up: Type 20000, which is 20 Mbps.
– Bandwidth Down: Type 20000, which is 20 Mbps.
Figure: The New York site
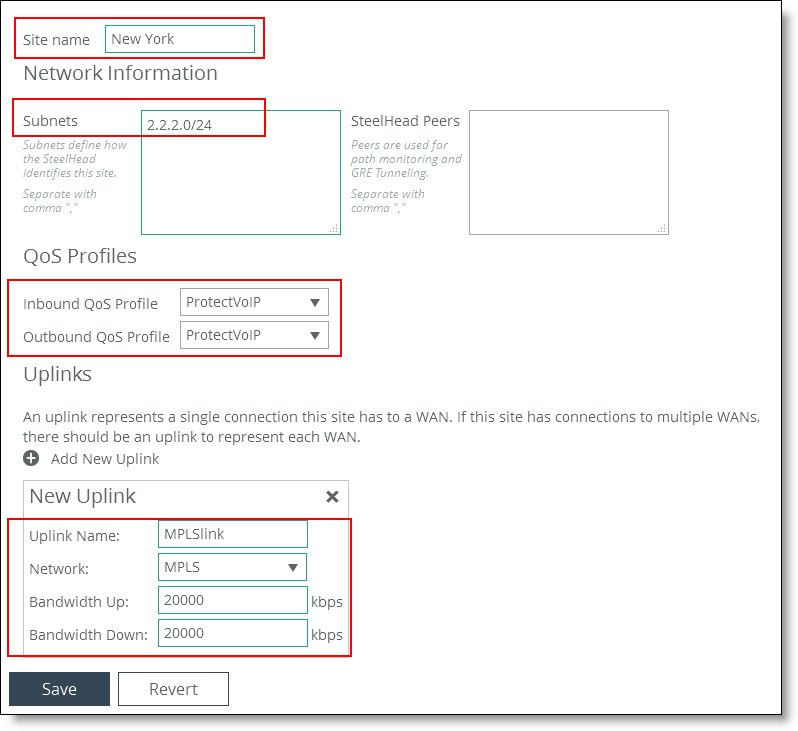
4. Click Save.
5. Repeat the same process for the New York, London, and Paris sites.
The sites New York, London, and Paris, use the PrioritizeVoIP QoS profile. Remember to configure the correct up and down bandwidths for the sites. That is, New York and London are 20 Mbps (20000 kbps), but Paris is 10 Mbps (10000 kbps).
6. Configure the Frankfurt site.
Use the same procedure as above. The differences are the bandwidth and the QoS profile. Select 50Mbps (50000 kbps) as the up and down bandwidth and assign the VideoConf profile as inbound and outbound QoS profile.
Lastly, configure the Default site to protect MS Office 365 traffic from internet browsing. Internet traffic in general isn’t bound to a specific site, which is why you need to use the default site.
7. Under Sites, for the Default site click Edit Site to display the Edit Site pop-up window.
8. Complete these fields.
– Inbound QoS Profile: Type Office365.
– Uplinks Name: Type MPLSlink.
– Network: Select MPLS from the drop-down list.
– Bandwidth Up: Type 15000.
– Bandwidth Down: Type 15000.
Figure: Default site configuration
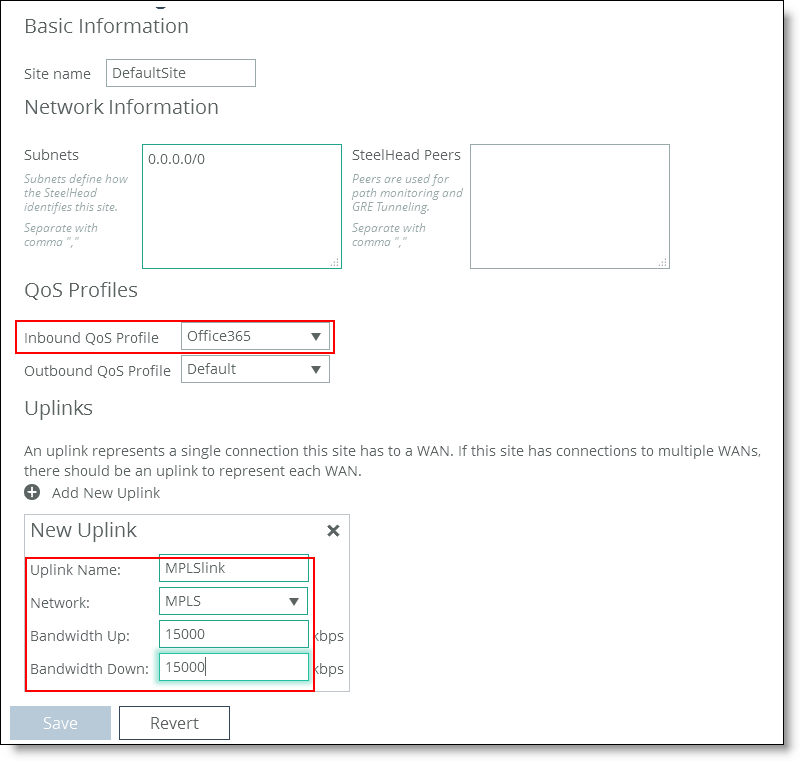
9. Click Save.
Note: The Default site is used for all unknown traffic, which in this example is the internet.
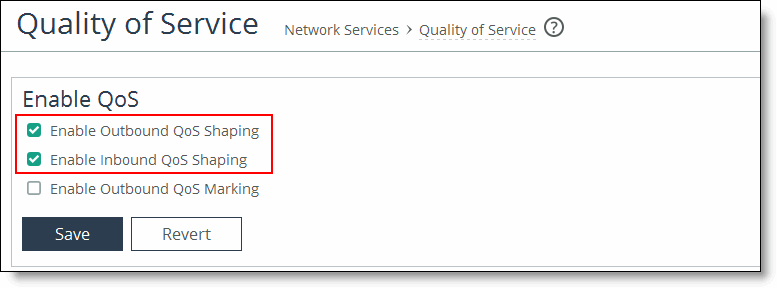
Enabling QoS on the SteelHead
The last task of the QoS configuration is to enable QoS. Remember that a SteelHead QoS is session based and that it needs to see the session setup to be able to classify traffic. If you enable QoS, existing sessions will be classified into the default class. That's why the best practice is to enable QoS during nonbusiness hours.
To enable QoS
1. Choose Networking > Network Services: Quality of Service to display the Quality of Service page.
2. Select Enable Outbound QoS Shaping, select Enable Inbound QoS Shaping, and click Save.
Figure: Enable QoS shaping
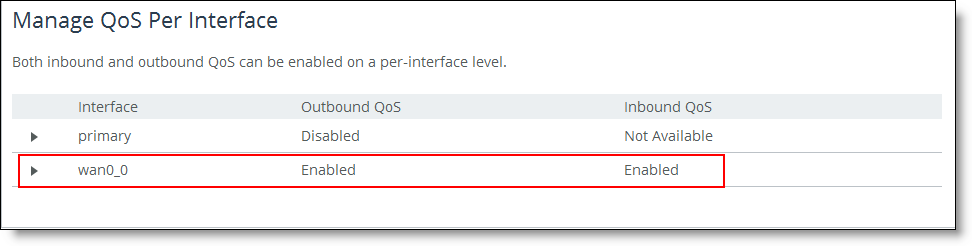
3. Under Manage QoS Per Interface, make sure the wan0_0 interface is enabled for inbound and outbound QoS (by default).
Figure: Making Sure the wan0_0 Interface is enabled
You view a summary in the Quality of Service page. Use this page to quickly check what is configured for QoS and if it is configured correctly.