Installing SteelHead-v on VMware ESXi
SteelHead-v is supported on the VMware ESXi hypervisor. For detailed information about ESXi or any other VMware products, see the VMware documentation.
Your hardware must be compatible with ESXi to deploy SteelHead-v. To ensure hardware compatibility, go to
http://www.vmware.com/resources/compatibility/search.php.
Basic steps for installing SteelHead-v on ESXi
Task | Reference |
1. Confirm that your ESXi environment has the resources necessary to run the SteelHead-v model you want to deploy. | |
2. Obtain the SteelHead-v package from Support. | |
3. Gather network settings for the configuration wizard. | |
4. Provision a virtual machine and install the SteelHead-v image, which automatically configures the SteelHead-v to the default model (VCX10) specifications. | |
5. Configure network settings as needed. | |
6. Power on the virtual machine, start the SteelHead-v, and log in. | |
Obtaining the SteelHead-v for ESXi software package
SteelHead-v is provided by Riverbed as a software image that contains the VMX and VMDK files necessary to create the virtual machine.
The SteelHead-v image is an installable OVA package. OVA is a platform-independent, efficient, extensible, and open packaging distribution format. The OVA package provides the complete default specification for SteelHead-v, including its required virtual disks, CPU, memory, networking, and storage. To install a SteelHead-v model other than the default model, you first install the default and then upgrade it to a higher model. The default model is a VCX10.
The OVA is a compressed .tar.gz package that quickly creates a virtual machine with predefined settings. It contains these files:
• OVF file—Provides the XML description of SteelHead-v.
• Two VMDK files—One file contains the management system (the smaller VMDK) and the other contains the RiOS data store. The separate files let you resize the RiOS data store without losing any data in the management partitions.
• Manifest file—Contains the SHA1 checksum of the OVF and VMDK.
• VMX file—Contains the primary configuration.
You can download the OVA package from the Support site at
https://support.riverbed.com. Access to the software downloads requires registration.
Installing SteelHead-v with a Riverbed NIC
In RiOS 8.0.3 and later, you can configure bypass support using the VMware Direct Path feature on ESXi 5.0 and later virtual hosts. This feature allows SteelHead-v to directly control the physical bypass card. The procedure for configuring bypass support for ESXi 5.0 and later is documented in the Network and Storage Card Installation Guide.
In RiOS 8.6 and later, some SteelHead-v models support a Two-Port 10-GbE Multimode Fiber NIC (direct I/O only).
You must use a Riverbed-branded NIC. SteelHead-v supports only Riverbed-issued NICs. If you currently use a Riverbed-branded NIC with ESXi, you can use the same card if you want to upgrade the ESXi version.
Using pass-through devices requires that a memory reservation be made for the full amount of allocated memory. This reservation is done automatically initially, but if a model upgrade requires more memory, you must manually increase the reservation before powering on the virtual machine.
Completing the preconfiguration checklist
This section lists the parameters you must specify as you complete the initial configuration of SteelHead-v. Be prepared to provide values for the network settings listed in this checklist when prompted by the configuration wizard.
Network setting | Your value |
Hostname | |
IP address | |
Netmask | |
Default gateway | |
DNS Server | |
Domain Name | |
Installing SteelHead-v on an ESXi virtual machine
This section describes how to install SteelHead-v on an ESXi virtual machine using the ESXi web client interface (client version 1.25.0, ESXi version 6.5.0). Other VMware products, such as VMware vCenter, also enable you to manage and install software images on ESXi virtual machines.
The installation package contains predefined hardware requirements and configuration for the default model SteelHead-v, which is model VCX10. Do not open or modify any of the files in the package. The package files use several gigabytes of disk space (the package itself is less than 1 GB).
If you want to run a SteelHead-v model other than the default model, you must first install the default model and upgrade it to a higher one.
If you want to install SteelHead-v on ESXi 5.0 or later and use a bypass NIC, see the Network and Storage Card Installation Guide.
To install SteelHead-v
1. Log in to your account on the Riverbed Support site.
2. Choose Software & Documentation > SteelHead.
3. Select SteelHead CX/GX in the navigation pane on the left.
The SteelHead CX/GX page appears.
4. Select the Software tab, and then select a major version from the Display Version menu. All options are displayed for major versions (for example, 9.9.0); the option you want might not appear if a minor release (for example, 9.7.1a) is selected.
5. Find the Next Generation Virtual SteelHead VCX Software Image (OVA) entry.
6. Click the Software link to download the OVA software installation package and note the download location.
7. Using a browser, navigate to the web interface for your ESXi instance and log in.
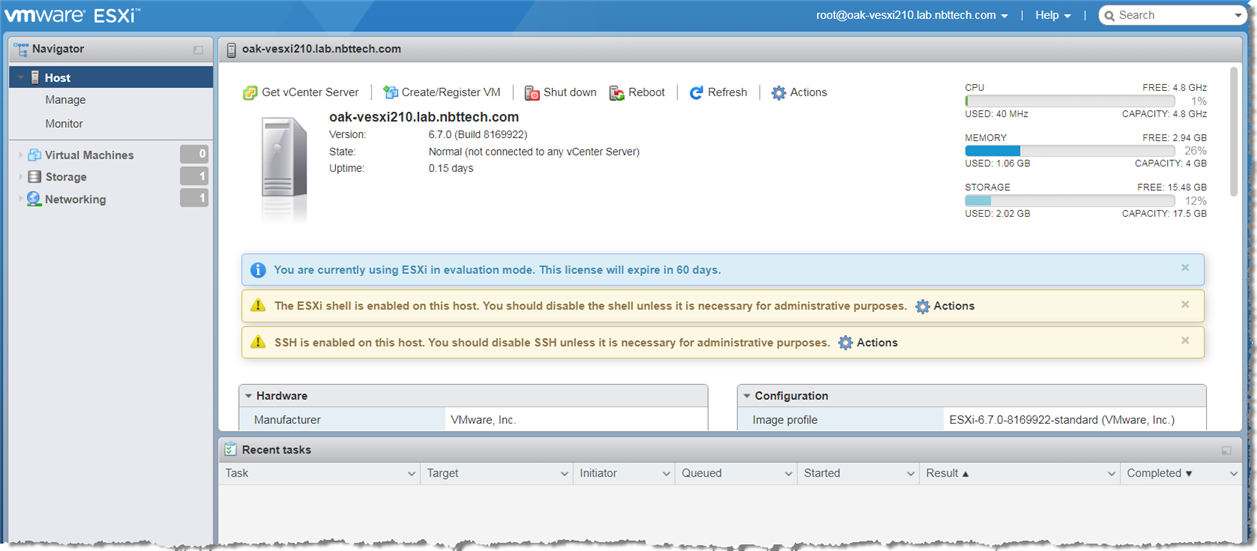
8. Select Host from the navigation pane on the left.
VMware ESXi web console > Host page
9. Click Create/Register VM.
The Select creation type page of the New Virtual Machine wizard appears.
ESXi New virtual machine wizard > Select creation type page

10. Select Deploy a virtual machine from an OVF or OVA file, and then click Next.
The Select OVF and VMDK files page of the New Virtual Machine wizard appears.
ESXi New virtual machine wizard > Select OVF and VMDK files page

11. Enter a display name for the virtual appliance.
12. Drag and drop the OVA file you downloaded in
Step 6 onto the area labeled Click to select files or drag/drop, or click that area to open a file browser that you can use to select the OVA file.
If you want to remove a file from that area, click the X next to the file.
ESXi New virtual machine wizard > Select OVF and VMDK files page with OVA file selected
13. Click Next.
The Select storage page of the New Virtual Machine wizard appears.
ESXi New virtual machine wizard > Select storage page

14. Select a storage resource to serve as the ESXi datastore for the virtual machine’s configuration files and all of its virtual disks.
– The standard installation puts both VMDKs on a single ESXi host datastore. The datastore that holds the VMDKs can be modified later in the install process.
– Make sure that the ESXi datastore you select has enough capacity for the OVA package to install.
– You can install the smaller VMDK containing the management disk on an ESXi datastore backed by any type of storage media.
– We recommend that you put the larger VMDK containing the RiOS data store on an ESXi datastore backed by the fastest available storage media. That ESXi datastore should have enough room to expand to the size required by the SteelHead-v model.
– Do not share host physical disks (such as SCSI or SATA disks) among virtual machines. Select an unshared physical disk to host the RiOS data store.
– Never delete the first VMDK. It contains the virtual appliance’s operating system.
15. Click Next.
The OVA file is unpacked and its contents extracted. After that process is complete, the Deployment options page of the New Virtual Machine wizard appears.
ESXi New virtual machine wizard > Deployment options page
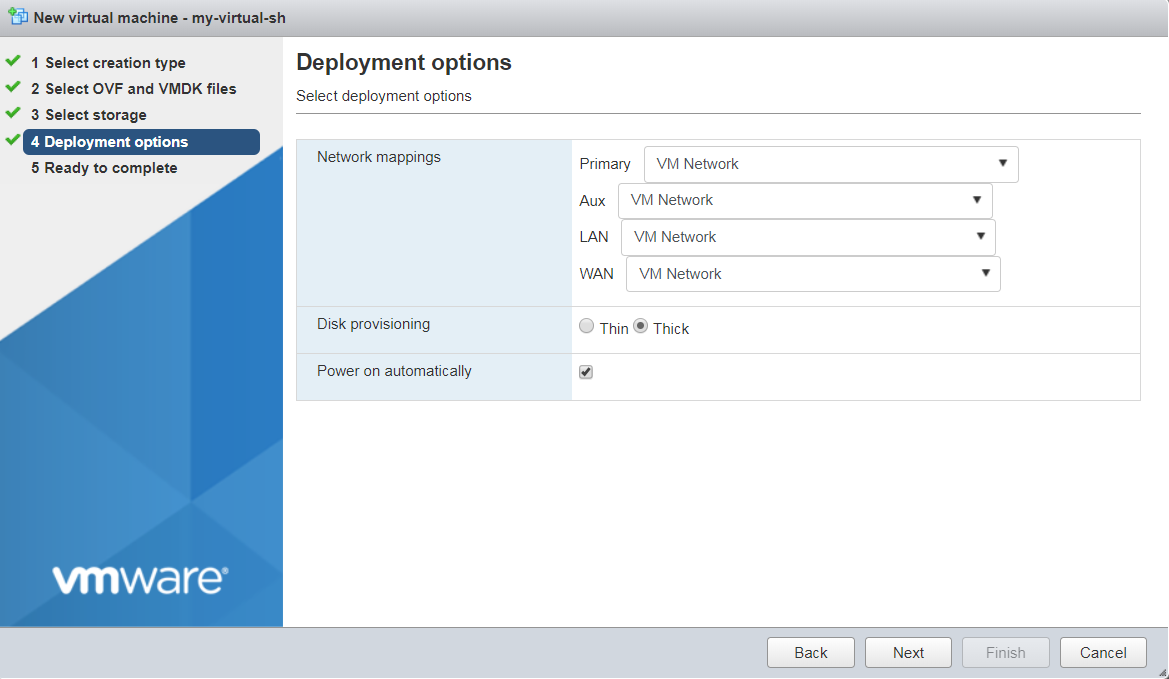
16. In the Network mappings section, select a network from the drop-down list to map the Primary, Aux, LAN, and WAN interfaces (source) to network interfaces on the host virtual machine (destination).
If you have installed a Riverbed NIC, you must map the LAN source network to the pg-vmnic3 port label and the WAN source network to the pg-vmnic2 port label.
Make sure that you map each source to a unique destination. If a source interface is mapped to the same destination as another source, an error message appears. Mapping multiple sources to the same destination can create a loop in the system and might make your ESXi host unreachable. For details, see
SteelHead-v deployment guidelines.17. In the Disk provisioning section, select Thick.
The thick provisioning format preallocates the specified amount of storage.
18. Select the Power on automatically check box.
19. Click Next.
The Ready to complete page of the New Virtual Machine wizard appears.
ESXi New virtual machine wizard > Ready to complete page

20. Verify the deployment settings and click Finish.
The virtual machine is created and the SteelHead-v image is installed and configured with the specified settings.
Specifying virtual switch settings for in-path deployments
Enable promiscuous mode on the virtual switches that connect LAN and WAN interfaces. Promiscuous mode is mandatory for in-path deployments and ensures that all traffic, except traffic specifically intended for the virtual machine, reaches the SteelHead-v.
To set promiscuous mode for in-path deployments
1. Open the vSphere client.
2. In the left pane, select the hostname or IP address.
3. Select the Configuration tab.
4. In the Hardware section, select Networking.
A list of virtual switches appears.
Configuration tab
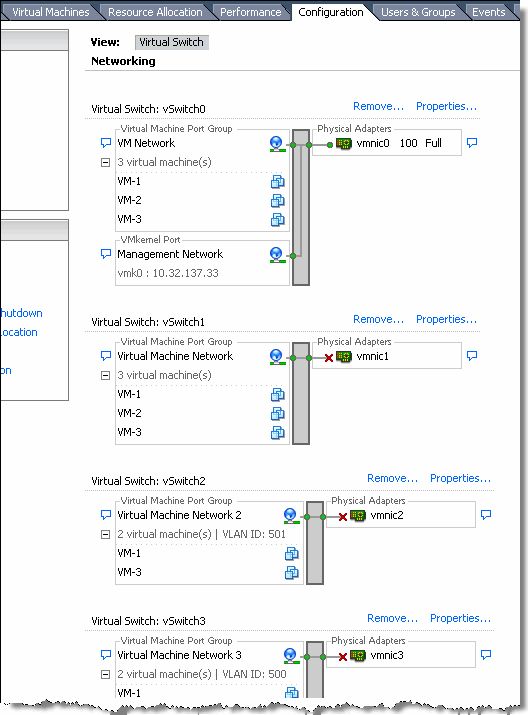
5. To the right of the first virtual switch on the tab, select Properties.
A vSwitch Properties dialog box appears.
6. From the Configuration list, select the vSwitch configuration and click Edit.
7. Select the Security tab.
8. In the Promiscuous Mode drop-down list, select Accept and click OK.
You return to the Properties dialog box.
9. From the Configuration list, select the Port Group configuration and click Edit.
10. Select the Security tab for the port group.
11. In the Promiscuous Mode drop-down list, select Accept and click OK.
The screen returns to the Properties dialog box.
12. Repeat the process for each in-path virtual NIC.