Network Device Management Rules
This chapter provides a summary of the Network Device Management (NDM) security rules and the procedures for ensuring security compliance. It includes these sections:
As a supplement to this guide, consult Securing SteelHeads in the SteelHead Deployment Guide 9.1 or later. This guide provides additional guidance regarding security best practices for SteelHead deployments.
Account Management
This section includes these rules:
Ensuring Automated Support for Account Management
Rule Title: RiOS must provide automated support for account management functions.
STIG ID: RICX-DM-000001
Rule ID: SV-77279r1_rule Severity: CAT II
Vuln ID: V-62789 Class: Unclass
Account management functions include:
• assignment of group or role membership.
• identifying account type.
• specifying user access authorizations (i.e., privileges).
• account removal, update, or termination.
• administrative alerts.
The network device must be configured to automatically provide account management functions, and these functions must immediately enforce the organization's current account policy.
All accounts used for access to the network device are privileged or system-level accounts. Therefore, if account management functions are not automatically enforced, an attacker could gain privileged access to a vital element of the network security architecture.
This control does not include emergency administration accounts that provide access to the network device components in case of network failure. There must be only one such locally defined account.
All other accounts must be defined. All other accounts must be created and managed on the site's authentication server (for example, RADIUS, LDAP, or Active Directory). This requirement is applicable to account management functions provided by the network device application. If the function is provided by the underlying OS or an authentication server, it must be secured using the applicable security guide or STIG.
Verifying Automated Support for Account Management
Verify that RiOS provides automated support for account management.
Verifying User Permissions
To verify automated support for account management
1. Connect to the Management Console.
2. Choose Administration > Security: User Permissions to display the User Permissions page.
3. Verify that the user permissions are defined. If the account management is not set, this is a security vulnerability finding.
Configuring Automated Support for Account Management
Configure RiOS to provide automated support for account management.
Adding Role-Based Accounts
To configure automated support for account management
1. Choose Administration > Security: User Permissions to display the User Permissions page.
2. Click Add a New Account to expand the page.
3. Set the values of Roles and Permissions according to the privilege level and in compliance with the applicable policy.
4. Click Save at the top of the page to save these settings permanently.
Control | Description |
Account Name | Specify a name for the role-based account. |
Password | Specify a password in the text box, and then retype the password for confirmation. |
Enable Account | Select the check box to enable the new account. |
Administrator | Configures a system administrator role. This role allows permission for all other RBM roles, including creating, editing, and removing user accounts. The system administrator role allows you to add or remove a system administrator role for any other user, but not for yourself. Read-only permission is not allowed for this role. |
User | Configures a role that determines whether the user: • has permission to view current configuration settings but not change them (Read-Only). • has permission to view settings and make configuration changes for a feature (Read/Write). • cannot view or save settings or configuration changes for a feature (Deny). |
General Settings | Configures per-source IP connection limit and the maximum connection pooling size. |
Network Settings | Configures host and network interface settings, including DNS cache settings and hardware assist rules. |
QoS | Enforces QoS policies. |
Path Selection | Configures path selection. |
Optimization Service | Configures alarms, performance features, SkipWare, HS-TCP, and TCP optimization. |
In-Path Rules | Configures TCP traffic for optimization and determines how to optimize traffic by setting in-path rules. This role includes WAN visibility to preserve TCP/IP address or port information. For details about WAN visibility, see the SteelHead Deployment Guide. |
CIFS Optimization | Configures CIFS optimization settings (including SMB-signing) and Overlapping Open optimization. |
HTTP Optimization | Configures enhanced HTTP optimization settings: URL learning, Parse and Prefetch, Object Prefetch Table, keep-alive, insert cookie, file extensions to prefetch, and the ability to set up HTTP optimization for a specific server subnet. |
Oracle Forms Optimization | Optimizes Oracle E-business application content and forms applications. |
MAPI Optimization | Optimizes MAPI and sets Exchange and NSPI ports. |
NFS Optimization | Configures NFS optimization. |
Notes Optimization | Configures Lotus Notes optimization. |
Citrix Optimization | Configures Citrix optimization. |
SSL Optimization | Configures SSL support and the secure inner channel. |
Replication Optimization | Configures the SRDF/A, FCIP, and SnapMirror storage optimization modules. |
Proxy File Service (PFS) | Configures the PFS. |
Riverbed Services Platform (RSP) | Configures functionality into a virtualized environment on the client Steelhead appliance. The functionality can include third-party packages such as a firewall security package, a streaming video server, or a package that provides core networking services (for example, DNS and DHCP). This role includes permission to install VMware tools and add subnet side rules. For details, see the RSP User’s Guide. |
SteelFusion Edge Storage Service | Configures branch storage services on SteelFusion Edge appliances (the branch storage services are only available on a SteelHead EX appliance). |
Security Settings | Configures security settings, including RADIUS and TACACS authentication settings and the secure vault password. |
Basic Diagnostics | Customizes system diagnostic logs, including system and user log settings, but does not include TCP dumps. |
TCP Dumps | Customizes TCP dump settings and allows use of the Shark function for detailed packet analysis through Cascade Pilot. |
Reports | Sets system report parameters. |
Domain Authentication | Allows joining a Windows domain and configuring Windows domain authentication. |
Citrix Acceleration | Configures Citrix optimization. |
Add | Adds your settings to the system. |
Remove Selected Accounts | Select the check box next to the name and click Remove Selected. |
Ensuring Local Shared and Group Account Credentials Are Terminated
Rule Title: RiOS must terminate local shared and group account credentials, such as the Admin account, when members who know the account password leave the group.
STIG ID: RICX-DM-000002
Rule ID: SV-77325r1_rule Severity: CAT II
Vuln ID: V-62835 Class: Unclass
If shared or group account credentials are not terminated when individuals leave the group, the user that left the group can still gain access even though they are no longer authorized.
A shared or group account credential is a shared form of authentication that allows multiple individuals to access the network device using a single account. There might also be instances when specific user actions need to be performed on the network device without unique administrator identification or authentication. Examples include system accounts, account of last resort, accounts used for testing/maintenance, and shared secrets that are configured on the administrator's workstation.
When users with knowledge of the account of last resort or default accounts are no longer authorized, account credentials must be changed in accordance with the DoD policy.
Verifying Local Shared and Group Account Credentials Are Terminated
Verify local shared and group account credentials, such as the Admin account, when members who know the account password leave the group.
To verify local shared and group account credentials are terminated
1. Connect to the Management Console.
2. Type admin in the Username text box.
3. Type password in the Password text box.
4. Click Log In. If login occurs and administrative access is allowed, this is a security vulnerability finding.
Terminating Local Shared and Group Account Credentials
Terminate local shared and group account credentials, such as the Admin account, when members who know the account password leave the group.
To terminate local shared and group account credentials
1. Connect to the Management Console.
2. Type admin in the Username text box.
3. Type password in the Password text box.
4. Click Log In. If login occurs and administrative access is allowed, this is a security vulnerability finding.
5. Choose Administration > My Account to display the My Account page.
6. Select the Change Password check box.
7. Type and confirm the new password.
8. Click Apply.
9. On the top right-hand side of the page, click Logout to exit the current session.
10. Reconnect to the Management Console.
11. Log in as the admin user.
12. Type the new password and click Log In. Verify that the administrator obtains access to the Management Console Home Page.
13. On the top right-hand side of the page, click Logout to exit the current session.
Ensuring that the Monitor and Shark Accounts Are Disabled
Rule Title: RiOS must disable the local monitor and shark accounts so they cannot be used as shared accounts by users.
STIG ID: RICX-DM-000003
Rule ID: SV-77327r1_rule Severity: CAT II
Vuln ID: V-62837 Class: Unclass
The monitor and shark accounts are default group accounts with shared credentials. Monitor and shark accounts are not enabled by default, but cannot be deleted because these network tools are designed to look for that account. Monitor is a read-only account for auditor's configuration management. Shark is used to access packet captures. If the credentials for these accounts are changed, the function of the system will not be adversely impacted.
Verifying that the Monitor and Shark Accounts are Disabled
Verify that the local monitor and shark accounts are disabled so they cannot be used as shared accounts by users.
To verify that the monitor account is disabled
1. Connect to the Management Console.
2. Choose Administration > Security: User Permissions to display the User Permissions page.
3. Click monitor to expand the page.
4. Verify that the Enable Account check box is selected. If the check box is not selected, this is a security vulnerability finding.
To verify that the shark account is disabled
1. Connect to the Management Console.
2. Choose Administration > Security: User Permissions to display the User Permissions page.
3. Under Role-Based Accounts, click shark to expand the page.
4. Make sure all the shark permissions are set to Deny. If all privileges for the shark account are not set to Deny, this is a security vulnerability finding.
Disabling the Monitor and Shark Accounts
Disable the local monitor and shark accounts so they cannot be used as shared accounts by users.
To disable the monitor account
1. Connect to the Management Console.
2. Choose Administration > Security: User Permissions to display the User Permissions page.
3. Click monitor to expand the page.
4. Make sure that the Enable Account check box is not selected.
5. Click Apply.
6. Click Save at the top of the page to save these setting permanently.
To disable the shark account
1. Connect to the Management Console.
2. Choose Administration > Security: User Permissions to display the User Permissions page.
3. Under Role-Based Accounts, click shark to expand the page.
4. Above the Deny column, click Select All to disable the shark account.
5. Click Apply.
6. Click Save at the top of the page to save these setting permanently.
Ensuring the Correct Privilege Level for Administrators
Rule Title: RiOS must enforce the assigned privilege level for each administrator and authorizations for access to all commands relative to the privilege level in accordance with applicable policy for the device.
STIG ID: RICX-DM-000017
Rule ID: SV-77345r1_rule Severity: CAT II
Vuln ID: V-62855 Class: Unclass
To mitigate the risk of unauthorized access to sensitive information by entities that have been issued certificates by DoD-approved PKIs, all DoD systems must be properly configured to incorporate access control methods that do not rely solely on the possession of a certificate for access. Successful authentication must not automatically give an entity access to an asset or security boundary. Authorization procedures and controls must be implemented to ensure each authenticated entity also has a validated and current authorization. Authorization is the process of determining whether an entity, once authenticated, is permitted to access a specific asset. Network devices use access control policies and enforcement mechanisms to implement this requirement.
Access control policies include identity-based policies, role-based policies, and attribute-based policies. Access enforcement mechanisms include access control lists, access control matrices, and cryptography. These policies and mechanisms must be employed by the network device to control access between administrators (or processes acting on behalf of administrators) and objects (for example, device commands, files, records, processes) in the network device.
Verifying that Administrators Have the Correct Security Privileges
Verify that RiOS is configured to the assigned privilege level for each administrator.
Configuring Correct Security Privileges for Administrators
Configure RiOS to enforce assigned privilege level for each administrator.
System Auditing (Logging)
This section includes these rules:
Generating Log Events When Accounts Are Created
Rule Title: RiOS must automatically generate a log event when accounts are created.
STIG ID: RICX-DM-000007
Rule ID: SV-77329r1_rule Severity: CAT III
Vuln ID: V-62839 Class: Unclass
Upon gaining access to a network device, an attacker will often first attempt to create a persistent method of reestablishing access. One way to accomplish this is to create a new account. Notification of account creation helps to mitigate this risk. Auditing account creation provides the necessary reconciliation that account management procedures are being followed. Without this audit trail, personnel without the proper authorization might gain access to critical network nodes.
Verifying Log Events are Generated When Accounts Are Created
Verify that RiOS is configured to generate log events when accounts are created.
To verify that log events are generated when accounts are created
1. Connect to the Management Console.
2. Choose Administration > Security: User Permissions to display the User Permissions page.
3. Click Add a New Account to expand the page.
4. Create a user account as described in this table.
Control | Description |
Account Name | Specify a name for the role-based account. |
Password | Specify a password in the text box, and then retype the password for confirmation. |
Enable Account | Select the check box to enable the new account. |
User | Configures a role that determines whether the user: • has permission to view current configuration settings but not change them (Read-Only). • has permission to view settings and make configuration changes for a feature (Read/Write). • cannot view or save settings or configuration changes for a feature (Deny). |
Add | Adds your settings to the system. |
5. Choose Reports > Diagnostics: System Logs to display the System Logs page.
6. Type the account name in the Filter text box and click Go.
7. Choose Administration > Security: User Permissions to display the User Permissions page.
8. To delete the account, select the check box next to the account name and click Remove Selected Accounts.
9. Choose Reports > Diagnostics: System Logs to display the System Logs page.
10. Type the account name in the Filter text box and click Go. If no event record for the account appears in the event log, this is a security vulnerability finding.
Generating Log Events When Accounts Are Created
Configure RiOS to generate log events when accounts are created.
Setting System Logs to Info
To generate log events when accounts are created
1. Connect to the Management Console.
2. Choose Administration > System Settings: Logging to display the Logging page.
3. Under Logging Configuration, select Info from the Minimum Severity drop-down list.
4. To prevent log files from being overwritten, increase the Maximum Number of Log Files to a value that reflects what is needed for your deployment.
5. Click Apply.
6. Click Save at the top of the page to save these setting permanently.
Generating Log Events When Accounts Are Modified
Rule Title: RiOS must automatically create log events when accounts are modified.
STIG ID: RICX-DM-000008
Rule ID: SV-77331r1_rule Severity: CAT III
Vuln ID: V-62841 Class: Unclass
Because the accounts in the network device are privileged or system-level accounts, account management is vital to the security of the network device. Account management by a designated authority ensures access to the network device is being controlled in a secure manner by granting access to only authorized personnel with the appropriate and necessary privileges. Auditing account modification along with an automatic notification to appropriate individuals will provide the necessary reconciliation that account management procedures are being followed. If modifications to management accounts are not audited, reconciliation of account management procedures cannot be tracked.
Verifying Log Events Are Generated When Accounts Are Modified
Verify that RiOS is configured to generate log events when accounts are modified.
Generating Log Events When Accounts Are Modified
Configure RiOS to generate log events when accounts are modified.
The actual level for these messages is Notification; however, other settings in this STIG call for the Info level and only one can be selected.
Generating Log Events When Accounts Are Disabled
Rule Title: RiOS must automatically generate a log event when accounts are disabled.
STIG ID: RICX-DM-000009
Rule ID: SV-77333r1_rule Severity: CAT III
Vuln ID: V-62843 Class: Unclass
Account management, as a whole, ensures access to the network device is being controlled in a secure manner by granting access to only authorized personnel. Auditing account disabling actions will support account management procedures. When device management accounts are disabled, user or service accessibility might be affected. Auditing also ensures authorized active accounts remain enabled and available for use when required.
Verifying Log Events Are Generated When Accounts Are Disabled
Verify that RiOS is configured to generate log events when accounts are disabled.
Generating Logging Events When Accounts Are Disabled
Configure RiOS to generate log events when accounts are disabled.
Generating Log Events When Accounts Are Removed
Rule Title: RiOS must automatically generate log events for accounts that are removed.
STIG ID: RICX-DM-000010
Rule ID: SV-77335r1_rule Severity: CAT III
Vuln ID: V-62845 Class: Unclass
Account management, as a whole, ensures access to the network device is being controlled in a secure manner by granting access to only authorized personnel. Auditing account removal actions will support account management procedures. When device management accounts are terminated, user or service accessibility might be affected. Auditing also ensures authorized active accounts remain enabled and available for use when required.
Verifying Log Events Are Generated When Accounts Are Removed
Verify that RiOS is configured to generate log events when accounts are removed.
Generating Log Events When Accounts Are Removed
Configure RiOS to generate log events when accounts are removed.
Generating Log Events When Privileged Commands Are Executed
Rule Title: RiOS must generate log events when privileged commands are executed.
STIG ID: RICX-DM-000023
Rule ID: SV-77347r1_rule Severity: CAT III
Vuln ID: V-62857 Class: Unclass
Misuse of privileged commands, either intentionally or unintentionally by authorized users, or by unauthorized external entities that have compromised information system accounts, is a serious and ongoing concern and can have significant adverse impacts on organizations. Auditing the use of privileged commands is one way to detect such misuse and identify the risk from insider threats and the advanced persistent threat.
Verifying Log Events Are Generated When Commands Are Executed
Verify the device generates log events when commands are executed.
Adding Remote Logging Servers
To verify log events are generated when commands are executed
1. Connect to the Management Console.
2. Choose Administration > System Settings: Logging to display the Logging page.
3. Under Logging Configurations, verify Minimum Severity is set to Info.
4. If the Standard Mandatory DoD Notice and Consent Banner does not exist on this page, this is a security vulnerability finding.
Generating Log Events When Commands Are Executed
Since all commands on the device are privileged commands, the following procedures ensure execution of commands are sent to the Syslog server.
To generate log events when commands are executed
1. Connect to the Management Console.
2. Choose Administration > System Settings: Logging to display the Logging page.
3. Under Logging Configurations, select Info from the Minimum Severity drop-down list.
4. Under Remote Log Servers, click Add a New Log Server to expand the page.
5. Type the server IP address and click Add to add the server.
6. Repeat
Step 3 through
Step 5 for the backup system log server.
7. Click Save at the top of the page to save these setting permanently.
Generating Log Events of Privileged Commands
Rule Title: RiOS must generate audit records (log events) containing the full-text recording of privileged commands.
STIG ID: RICX-DM-000049
Rule ID: SV-77389r1_rule Severity: CAT II
Vuln ID: V-62899 Class: Unclass
Reconstruction of harmful events or forensic analysis is not possible if audit records do not contain enough information.
Organizations consider limiting the additional audit information to only that information explicitly needed for specific audit requirements. The additional information required is dependent on the type of information (i.e., sensitivity of the data and the environment within which it resides). At a minimum, the organization must audit full-text recording of privileged commands. The organization must maintain audit trails in sufficient detail to reconstruct events to determine the cause and impact of the security compromise.
Verifying Log Events Are Generated for Privileged Commands
Verify that RiOS is configured to generate audit records (log events) containing the full-text recording of privileged commands.
Generating Log Events for Privileged Commands
Configure RiOS to generate audit records (log events) containing the full-text recording of privileged commands.
Protecting Audit Information
Rule Title: RiOS must protect audit information from any type of unauthorized read access.
STIG ID: RICX-DM-000061
Rule ID: SV-77413r1_rule Severity: CAT II
Vuln ID: V-62923 Class: Unclass
Audit information includes all information (for example, audit records, audit settings, and audit reports) needed to successfully audit information system activity.
If audit data were to become compromised, then competent forensic analysis and discovery of the true source of potentially malicious system activity is difficult, if not impossible, to achieve. In addition, access to audit records provides information an attacker could use to his or her advantage.
To ensure the veracity of audit data, the information system and/or the network device must protect audit information from any and all unauthorized read access.
This requirement can be achieved through multiple methods, which will depend upon system architecture and design. Commonly employed methods for protecting audit information include least privilege permissions as well as restricting the location and number of log file repositories.
Additionally, network devices with user interfaces to audit records should not allow for the unfettered manipulation of or access to those records through the device interface. If the device provides access to the audit data, the device becomes accountable for ensuring audit information is protected from unauthorized access.
Verifying the System Is Protecting Audit Information
Verify that RiOS is configured to protect audit information from any type of unauthorized read access.
To verify the system is protecting audit information
1. Connect to the Management Console.
2. Choose Administration > Security: User Permissions to display the User Permissions page.
3. Under Role-Based Accounts, select the user that must have modified permissions to expand the page.
4. Verify that the Basic Diagnostics option is set to Deny. If the control Basic Diagnostics is not set according to the authorization level of the user, this is a security vulnerability finding.
Configuring the System to Protect Audit Information
Configure RiOS to protect audit information from any type of unauthorized read access.
Modifying Basic Diagnostics Option to Deny
To configure the system to protect audit information
1. Connect to the Management Console.
2. Choose Administration > Security: User Permissions to display the User Permissions page.
3. Under Role-Based Accounts, select the user that must have modified permissions to expand the page.
4. Set Basic Diagnostics to Deny.
5. Click Apply.
6. Click Save at the top of the page to save these setting permanently.
Protecting Audit Information from Unauthorized Modification
Rule Title: RiOS must protect audit information from unauthorized modification.
STIG ID: RICX-DM-000062
Rule ID: SV-77415r1_rule Severity: CAT II
Vuln ID: V-62925 Class: Unclass
Audit information includes all information (for example, audit records, audit settings, and audit reports) needed to successfully audit network device activity.
If audit data were to become compromised, then forensic analysis and discovery of the true source of potentially malicious system activity is impossible to achieve.
To ensure the veracity of audit data, the network device must protect audit information from unauthorized modification.
This requirement can be achieved through multiple methods, which will depend upon system architecture and design. Some commonly employed methods include ensuring log files receive the proper file system permissions and limiting log data locations.
Network devices providing a user interface to audit data will leverage user permissions and roles identifying the user accessing the data and the corresponding rights that the user enjoys in order to make access decisions regarding the modification of audit data.
Verifying Audit Information Is Protected from Unauthorized Modification
Verify that RiOS is configured to protect audit information from unauthorized modification.
Configuring the System to Protect Audit Information from Unauthorized Modification
Configure RiOS to protect audit information from unauthorized modification.
Protecting Audit Information from Unauthorized Deletion
Rule Title: RiOS must protect audit information from unauthorized deletion.
STIG ID: RICX-DM-000063
Rule ID: SV-77417r1_rule Severity: CAT II
Vuln ID: V-62927 Class: Unclass
Audit information includes all information (for example, audit records, audit settings, and audit reports) needed to successfully audit information system activity.
If audit data were to become compromised, then forensic analysis and discovery of the true source of potentially malicious system activity is impossible to achieve.
To ensure the veracity of audit data, the network device must protect audit information from unauthorized deletion. This requirement can be achieved through multiple methods, which will depend upon system architecture and design. Some commonly employed methods include ensuring log files receive the proper file system permissions using file system protections, restricting access, and backing up log data to ensure log data is retained.
Network devices providing a user interface to audit data will leverage user permissions and roles identifying the user accessing the data and the corresponding rights the user enjoys in order to make access decisions regarding the deletion of audit data.
Verifying Audit Information Is Protected from Unauthorized Deletion
Verify that RiOS is configured to protect audit information from unauthorized deletion.
Configuring the System to Protect Audit Information from Unauthorized Deletion
Configure RiOS to protect audit information from unauthorized deletion.
Protecting Audit Tools from Unauthorized Access
Rule Title: RiOS must protect audit tools from unauthorized access.
STIG ID: RICX-DM-000064
Rule ID: SV-77419r1_rule Severity: CAT II
Vuln ID: V-62929 Class: Unclass
Protecting audit data also includes identifying and protecting the tools used to view and manipulate log data. Therefore, protecting audit tools is necessary to prevent unauthorized operation on audit data.
Network devices providing tools to interface with audit data will leverage user permissions and roles identifying the user accessing the tools and the corresponding rights the user enjoys in order to make access decisions regarding the access to audit tools.
Audit tools include, but are not limited to, vendor-provided and open source audit tools needed to successfully view and manipulate audit information system activity and records. Audit tools include custom queries and report generators.
Verifying Audit Tools Are Protected from Unauthorized Access
Verify that RiOS is configured to protect audit tools from unauthorized access.
Configuring the System to Protect Audit Tools from Unauthorized Access
Configure RiOS to protect audit tools from unauthorized access.
Protecting Audit Tools from Unauthorized Deletion
Rule Title: RiOS must protect audit tools from unauthorized deletion.
STIG ID: RICX-DM-000066
Rule ID: SV-77421r1_rule Severity: CAT II
Vuln ID: V-62931 Class: Unclass
Protecting audit data also includes identifying and protecting the tools used to view and manipulate log data. Therefore, protecting audit tools is necessary to prevent unauthorized operations on audit data.
Network devices providing tools to interface with audit data will leverage user permissions and roles identifying the user accessing the tools and the corresponding rights the user enjoys in order to make access decisions regarding the access to audit tools.
Audit tools include, but are not limited to, vendor-provided and open source audit tools needed to successfully view and manipulate audit information system activity and records. Audit tools include custom queries and report generators.
Verifying Audit Tools Are Protected from Unauthorized Deletion
Verify that RiOS is configured to protect audit tools from unauthorized deletion.
Configuring the System to Protect Audit Tools from Unauthorized Deletion
Configure RiOS to protect audit tools from unauthorized deletion.
Generating Audit Records
Rule Title: RiOS must provide audit record generation capability for DoD-defined auditable events within the network device.
STIG ID: RICX-DM-000071
Rule ID: SV-77423r1_rule Severity: CAT II
Without the capability to generate audit records, it would be difficult to establish, correlate, and investigate the events relating to an incident or identify those responsible for one.
Audit records can be generated from various components within the network device (for example, process, module). Certain specific device functionalities might be audited as well. The list of audited events is the set of events for which audits are to be generated. This set of events is typically a subset of the list of all events for which the system is capable of generating audit records.
The DoD has defined the list of events for which the device will provide an audit record generation capability as the following:
• Successful and unsuccessful attempts to access, modify, or delete privileges, security objects, security levels, or categories of information (for example, classification levels);
• Access actions, such as successful and unsuccessful log in attempts, privileged activities or other system level access, starting and ending time for user access to the system, concurrent log ins from different workstations, successful and unsuccessful accesses to objects, all program initiations, and all direct access to the information system; and
• All account creation, modification, disabling, and termination actions.
Verifying If the System Is Generating Audit Records
Verify that RiOS is configured to off-load audit records (logs) onto a different system than the system being audited.
To verify if the system is generating audit records
1. Connect to the Management Console.
2. Choose Administration > System Settings: Logging to display the Logging page.
3. Under Remote Log Servers verify the list contains IP addresses for all available log servers. If no servers are listed or some are missing, this is a security vulnerability finding.
4. Under Per-Process Logging, verify if a process or severity is listed. (Per-process logging only affects the system log, not the user type facilities.) If a filter has been added in Per-Process Logging that prevents the capture of DoD-defined auditable events, this is a security vulnerability finding.
Configuring the System to Generate Audit Records
Configure RiOS to off-load audit records onto a different system than the system being audited.
Adding a Log Server
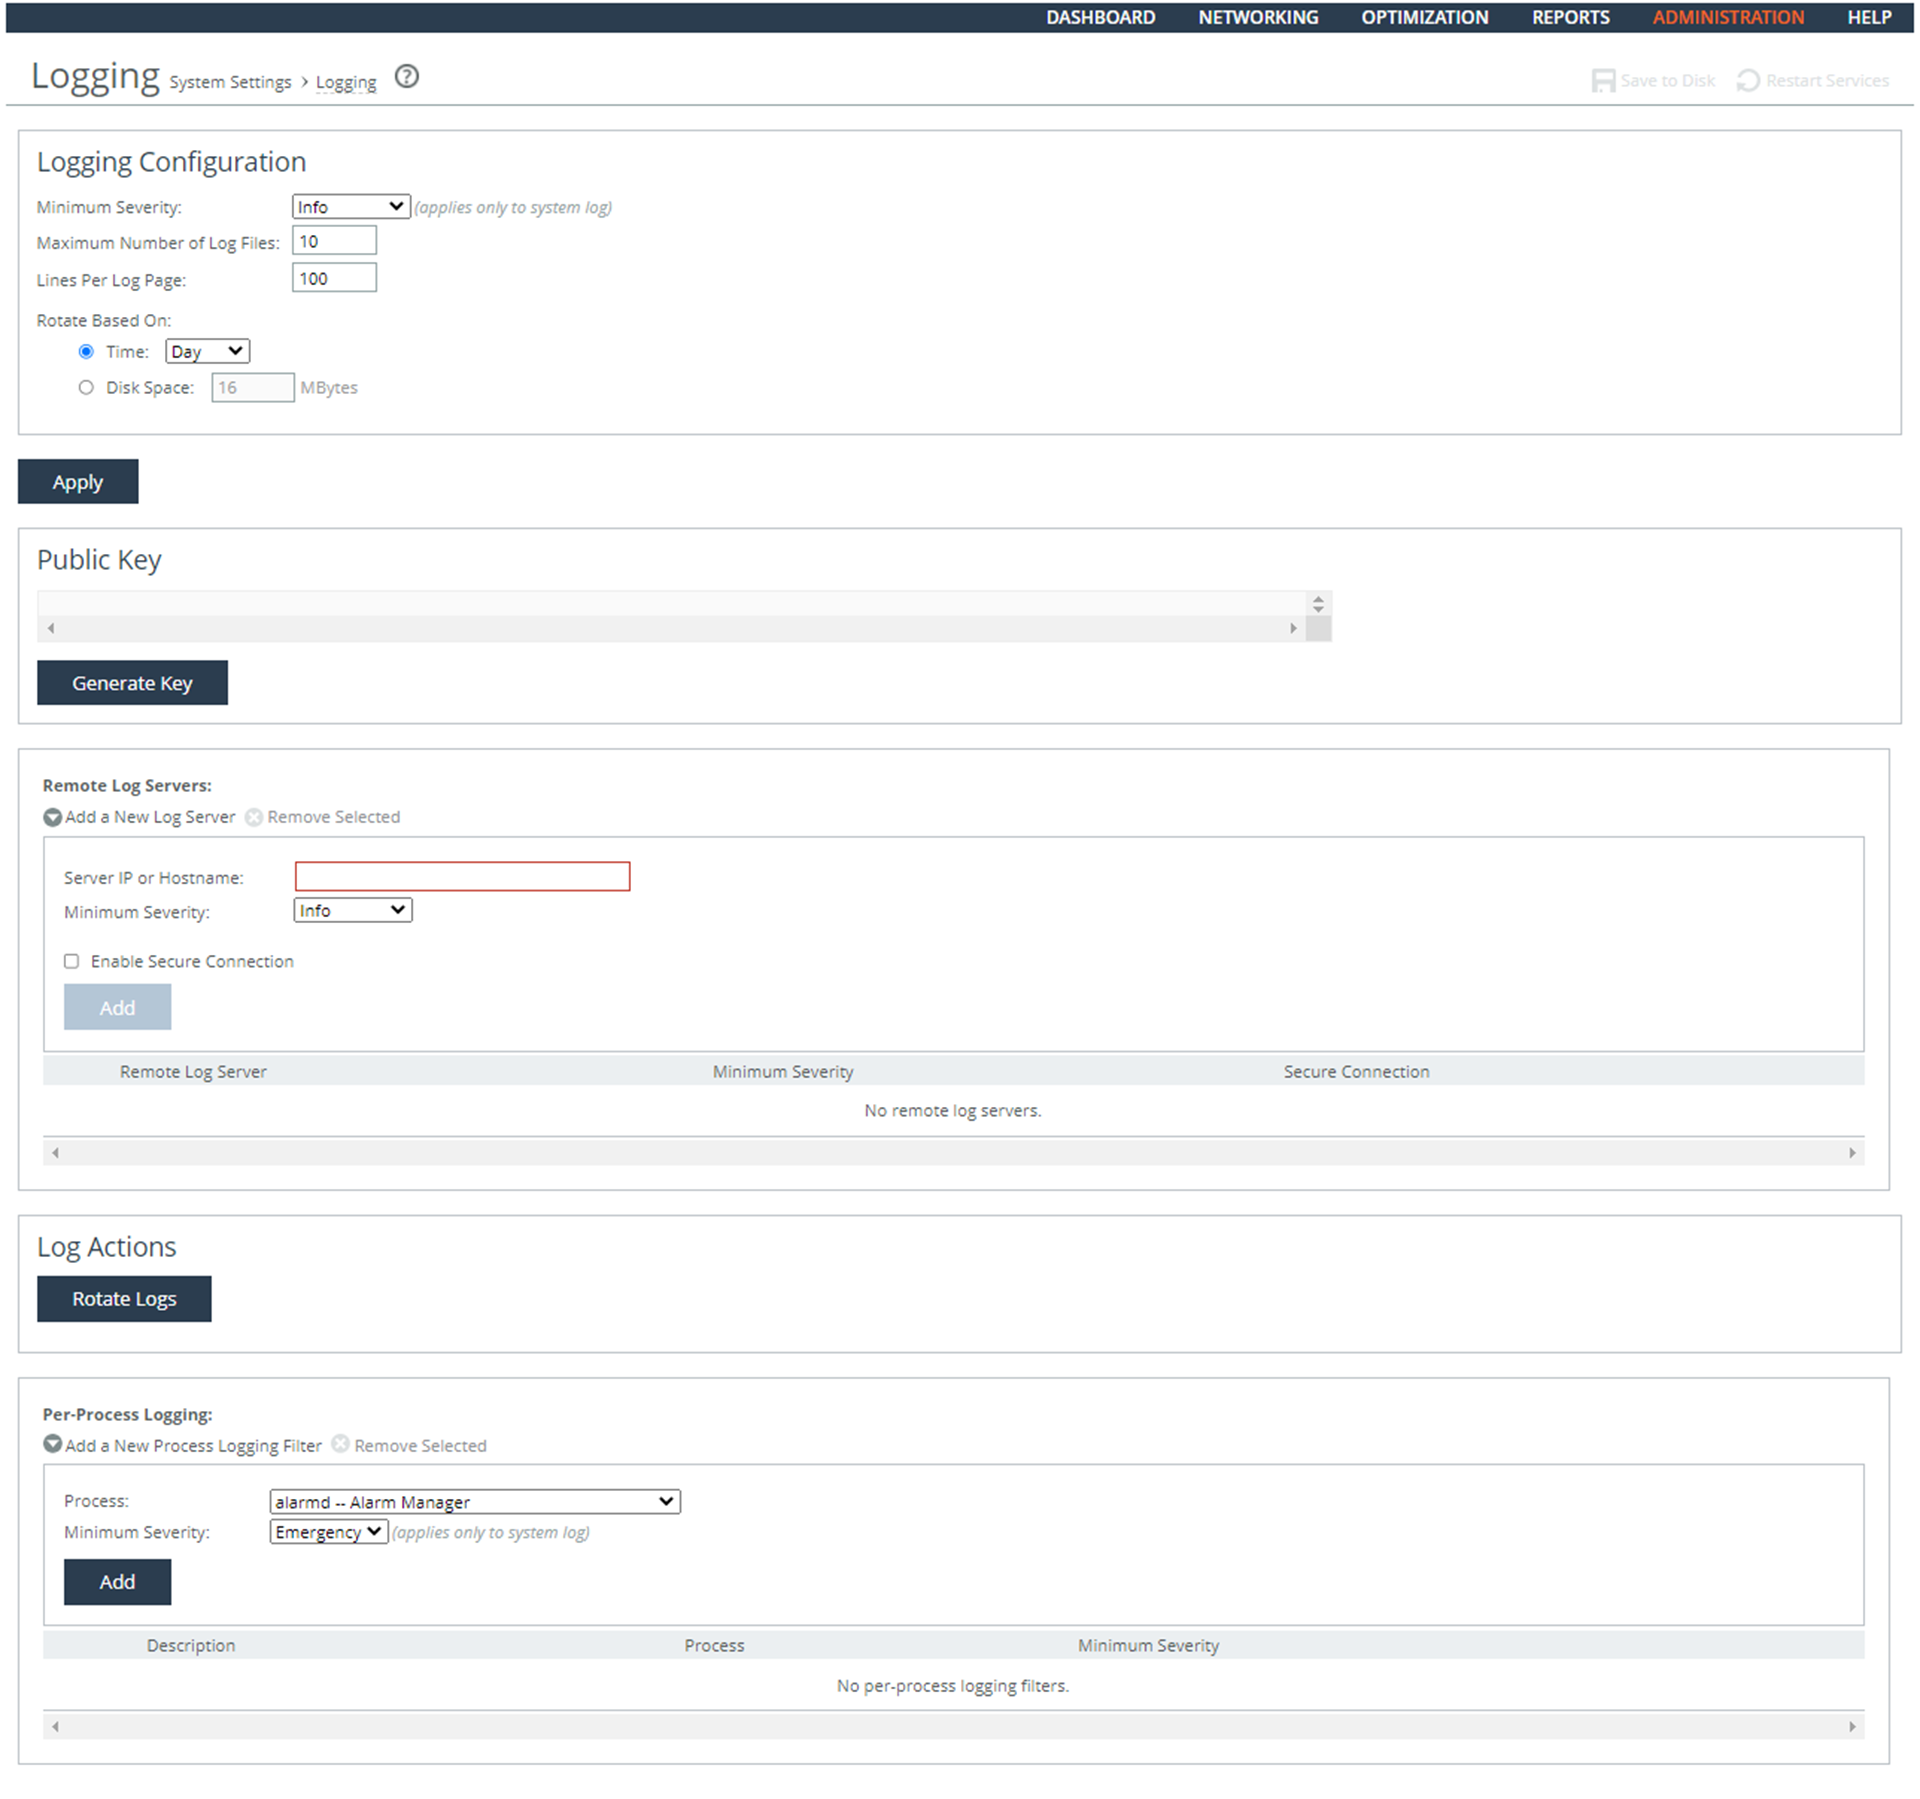
To configure the system to generate audit records
1. Connect to the Management Console.
2. Choose Administration > System Settings: Logging to display the Logging page.
3. Click Add a New Log Server to expand the page.
4. Set Server IP to the IP address of the remote log server.
5. Select Info from the Minimum Severity drop-down list.
6. Click Add.
7. Under Per-Processing Logging, if any of the filtered processes violate the capture of DoD-defined auditable events, select the check box next to the name and click Remove Selected.
8. Click Apply.
9. Click Save at the top of the page to save these settings permanently.
Ensuring Auditable Events Are Configured by the ISSM
Rule Title: RiOS must allow only the ISSM (or individuals or roles appointed by the ISSM) to select which auditable events are to be logged.
STIG ID: RICX-DM-000072
Rule ID: SV-77425r1_rule Severity: CAT II
Vuln ID: V-62935 Class: Unclass
Without the capability to restrict which roles and individuals can select which events are audited, unauthorized personnel might be able to prevent the auditing of critical events. Misconfigured audits might degrade the system's performance by overwhelming the audit log. Misconfigured audits might also make it more difficult to establish, correlate, and investigate the events relating to an incident or identify those responsible for one.
Verifying the System Restricts Permissions on Auditable Events
Verify that RiOS restricts permission to select auditable event to authorized administrators.
To verify the system restricts permissions
1. Connect to the Management Console.
2. Choose Administration > Security: User Permissions to display the User Permissions page.
3. Verify that Deny is selected for Basic Diagnostics, TCP Dumps, and Reports permissions. If Deny is not set for users who are not authorized access to configure auditable events, this is a security vulnerability finding.
Configuring the System to Restrict Permissions on Auditable Events
Configure RiOS permission for auditable events.
To configure the system restricts permissions
1. Connect to the Management Console.
2. Choose Administration > Security: User Permissions to display the User Permissions page.
3. Under Role Based Accounts, select a user to expand the page.
4. Select Deny for Basic Diagnostics, TCP Dumps, and Reports user permissions.
5. Click Save at the top of the page to save these settings permanently.
Alerts and Events
This section includes these rules:
Generating SNMP Alerts When Local Accounts Are Created
Rule Title: RiOS must generate alerts that can be forwarded to the administrators and ISSO when local accounts are created.
STIG ID: RICX-DM-000011
Rule ID: SV-77337r1_rule Severity: CAT II
Vuln ID: V-62847 Class: Unclass
An authorized insider or individual who maliciously creates a local account could gain immediate access from a remote location to privileged information on a critical security device. Sending an alert to the administrators and ISSO when this action occurs greatly reduces the risk that accounts will be secretly created.
RiOS can be configured to send an SNMP trap to the SNMP server. It also sends a message to the Syslog and the local log. Either of these methods results in an alert that can be forwarded to authorized accounts.
Verifying That Administrators Have the Correct Security Privileges
Verify that RiOS captures an SNMP trap for user creation events that can be sent to the ISSO and designated administrators by the SNMP server.
To verify that administrators have the correct privilege level
1. Connect to the Management Console.
2. Choose Administration > Security: User Permissions to display the User Permissions page.
3. Verify that the privilege level is correct for each administrator. If the privilege level settings are not in accordance with applicable policy, this is a security vulnerability finding.
Configuring the Correct Security Privileges for Administrators
Configure RiOS to capture an SNMP trap for user creation events that can be sent to the information system security officer (ISSO) and designated administrators by the SNMP server.
To configure security privileges for administrators
1. Connect to the Management Console.
2. Choose Administration > Security: User Permissions to display the User Permissions page.
3. Click Add a New Account to expand the page.
4. Set the values of Roles and Permissions according to the privilege level in accordance with applicable policy.
Control | Description |
Account Name | Specify a name for the role-based account. |
Password | Specify a password in the text box, and then retype the password for confirmation. |
Enable Account | Select the check box to enable the new account. |
Administrator | Configures a system administrator role. This role allows permission for all other RBM roles, including creating, editing, and removing user accounts. The system administrator role allows you to add or remove a system administrator role for any other user, but not for yourself. Read-only permission is not allowed for this role. |
User | Configures a role that determines whether the user: • has permission to view current configuration settings but not change them (Read-Only). • has permission to view settings and make configuration changes for a feature (Read/Write). • cannot view or save settings or configuration changes for a feature (Deny). |
General Settings | Configures per-source IP connection limit and the maximum connection pooling size. |
Network Settings | Configures host and network interface settings, including DNS cache settings and hardware assist rules. |
QoS | Enforces QoS policies. |
Path Selection | Configures path selection. |
Optimization Service | Configures alarms, performance features, SkipWare, HS-TCP, and TCP optimization. |
In-Path Rules | Configures TCP traffic for optimization and how to optimize traffic by setting in-path rules. This role includes WAN visibility to preserve TCP/IP address or port information. For details about WAN visibility, see the Steelhead Appliance Deployment Guide. |
CIFS Optimization | Configures CIFS optimization settings (including SMB-signing) and Overlapping Open optimization. |
HTTP Optimization | Configures enhanced HTTP optimization settings: URL learning, Parse and Prefetch, Object Prefetch Table, keep-alive, insert cookie, file extensions to prefetch, and the ability to set up HTTP optimization for a specific server subnet. |
Oracle Forms Optimization | Optimizes Oracle E-business application content and forms applications. |
MAPI Optimization | Optimizes MAPI and sets Exchange and NSPI ports. |
NFS Optimization | Configures NFS optimization. |
Notes Optimization | Configures Lotus Notes optimization. |
Citrix Optimization | Configures Citrix optimization. |
SSL Optimization | Configures SSL support and the secure inner channel. |
Replication Optimization | Configures the SRDF/A, FCIP, and SnapMirror storage optimization modules. |
Proxy File Service (PFS) | Configures the PFS. |
Riverbed Services Platform (RSP) | Configures functionality into a virtualized environment on the client Steelhead appliance. The functionality can include third-party packages such as a firewall security package, a streaming video server, or a package that provides core networking services (for example, DNS and DHCP). This role includes permission to install VMware tools and add subnet side rules. For details, see the RSP User’s Guide. |
Granite Branch (SteelFusion Edge) Storage Service | Configures branch storage services on SteelFusion Edge appliances (the branch storage services are only available on a Steelhead EX appliance). |
Security Settings | Configures security settings, including RADIUS and TACACS authentication settings and the secure vault password. |
Basic Diagnostics | Customizes system diagnostic logs, including system and user log settings, but does not include TCP dumps. |
TCP Dumps | Customizes TCP dump settings and allows use of the Shark function for detailed packet analysis through Cascade Pilot. |
Reports | Sets system report parameters. |
Domain Authentication | Allows joining a Windows domain and configuring Windows domain authentication. |
Citrix Acceleration | Configures Citrix optimization. |
Add | Adds your settings to the system. |
Remove Selected Accounts | Select the check box next to the name and click Remove Selected. |
5. Click Apply.
6. Click Save at the top of the page to save these setting permanently.
Generating SNMP Alerts When Accounts Are Modified
Rule Title: RiOS must generate alerts that can be forwarded to the administrators and ISSO when accounts are modified.
STIG ID: RICX-DM-000012
Rule ID: SV-77339r1_rule Severity: CAT III
Vuln ID: V-62849 Class: Unclass
Once an attacker establishes initial access to a system, the attacker often attempts to create a persistent method of reestablishing access. One way to accomplish this is for the attacker to simply modify an existing account. Notification of account modification is one method for mitigating this risk. A comprehensive account management process will ensure an audit trail that documents the modification of device administrator accounts and notifies administrators and Information System Security Officers (ISSO). Such a process greatly reduces the risk that accounts will be secretly modified and provides logging that can be used for forensic purposes.
The network device must generate the alert. Notification might be done by a management server.
Verifying Servers Are Configured as Trap Receivers
Verify that RiOS uses automated mechanisms to alert security personnel to threats identified by authoritative sources.
To verify SNMP settings
1. Connect to the Management Console.
2. Choose Administration > System Settings: SNMP Basic to display the SNMP Basic page.
3. Under Trap Receivers, verify that the host servers in your deployment are listed in the table. If there are no Host Servers defined in Trap Receivers, this is a security vulnerability finding.
Configuring Servers as Trap Receivers
Configure RiOS to use automated mechanisms to alert security personnel to threats identified by authoritative sources.
To configure servers as trap receivers
1. Connect to the Management Console.
2. Choose Administration > System Settings: SNMP Basic to display the SNMP Basic page.
3. Click Add a New Trap Receiver to expand the page.
Adding Trap Receivers
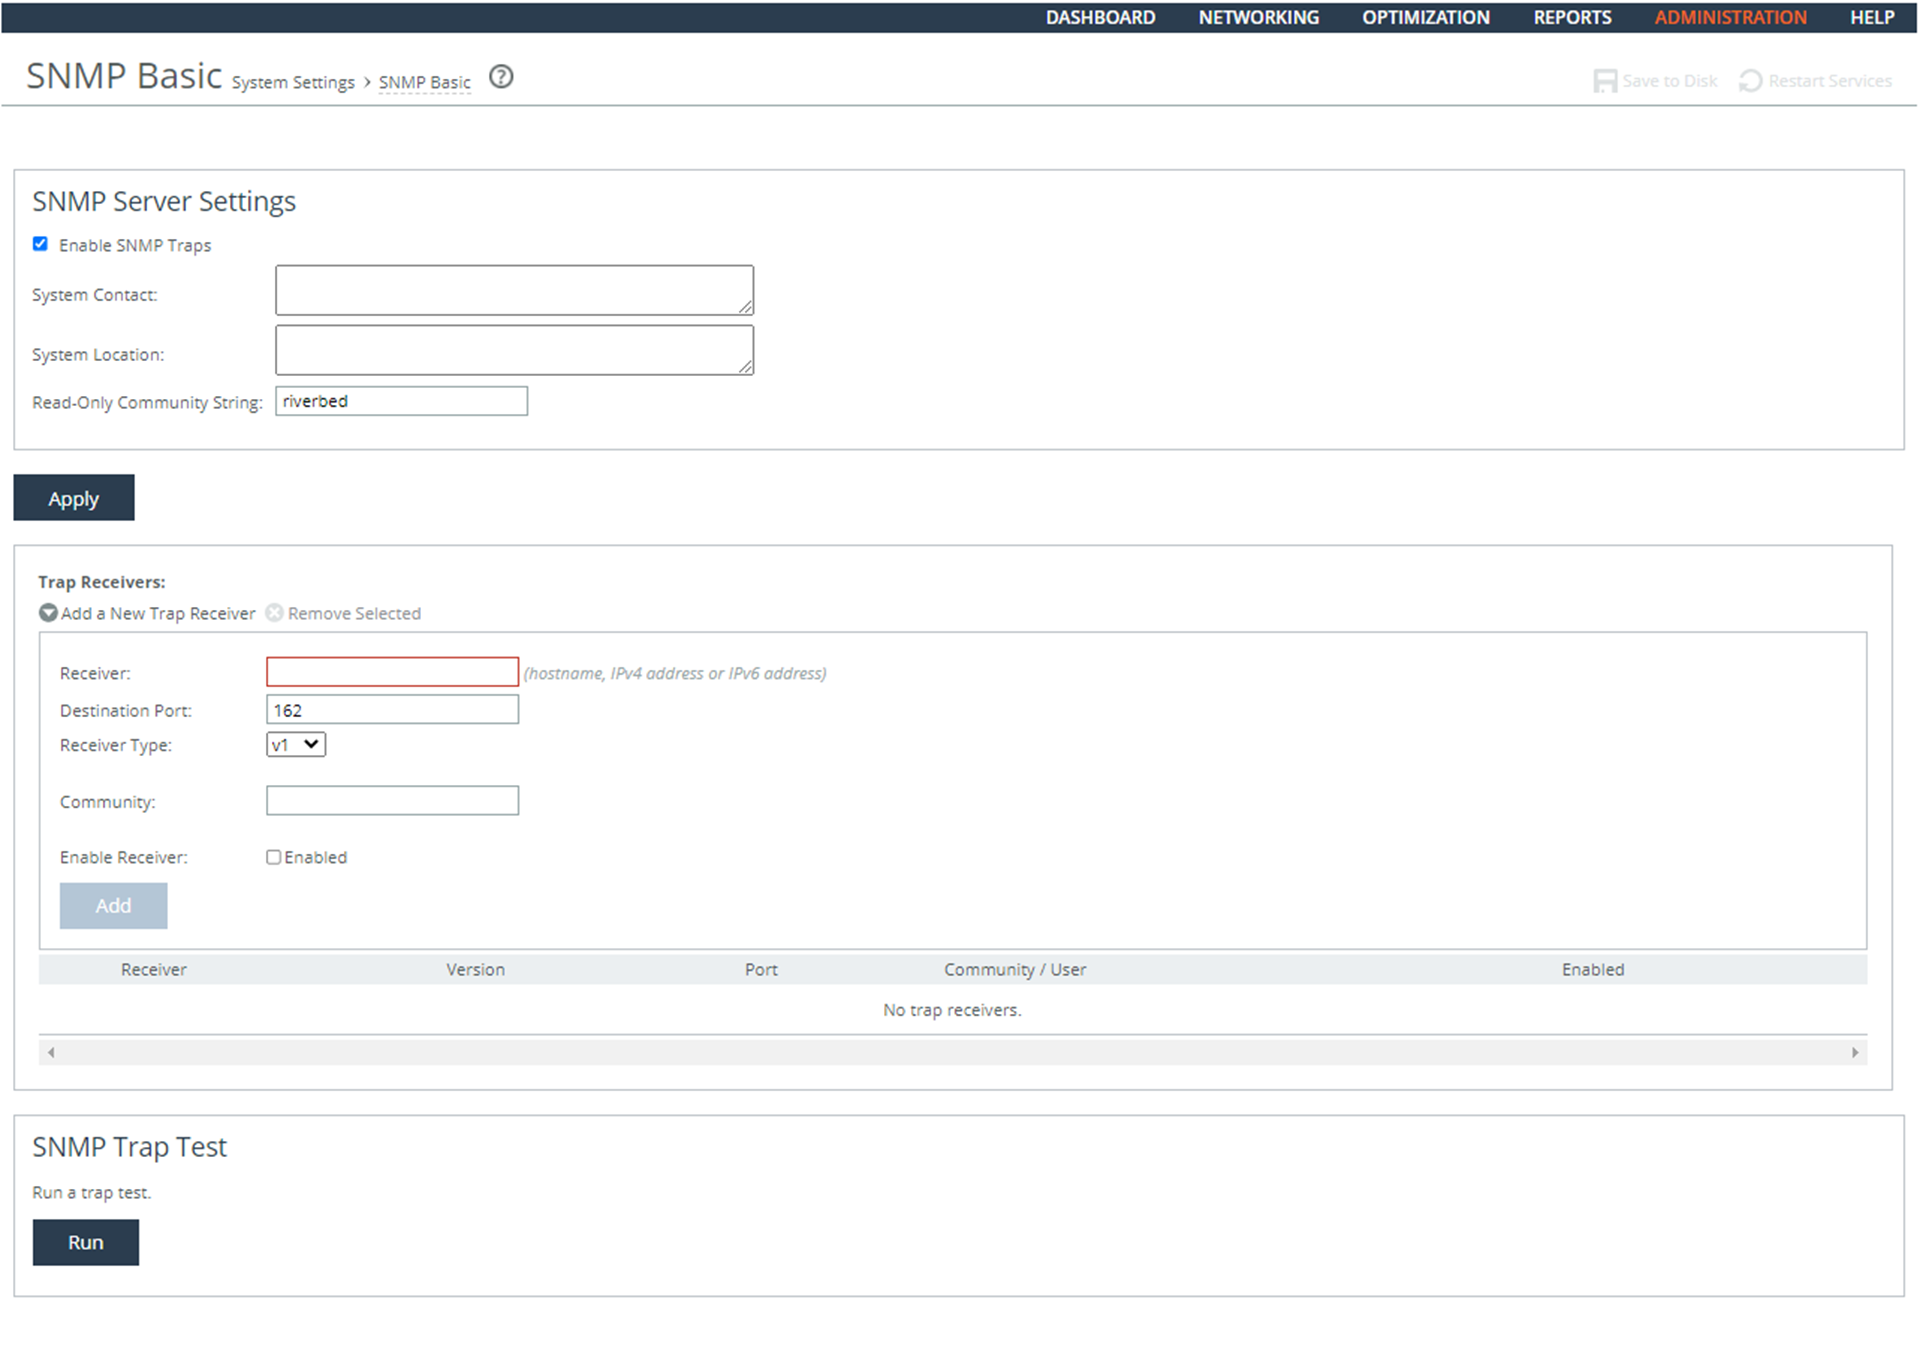
4. Complete the configuration as described in this table.
Control | Description |
Receiver | Specify the destination IPv4 or IPv6 address or hostname for the SNMP trap. |
Destination Port | Specify the destination port the receiver is listening on. |
Receiver Type | Select SNMP v3 (user-based security model). |
Remote User | Specify a remote username on the trap receiver. |
Authentication | Optionally, select Supply a Key to use while authenticating users. |
Authentication Protocol | Select an authentication method from the drop-down list: • SHA - Specifies the Secure Hash Algorithm, a set of related cryptographic hash functions. SHA is considered to be the successor to MD5. |
Security Level | Determines whether a single atomic message exchange is authenticated. Select this level from the drop-down list: • AuthPriv - Authenticates packets using AES 128 and DES to encrypt messages for privacy. A security level applies to a group, not to an individual user. |
Privacy Protocol | Select the AES protocol from the drop-down list. AES uses the AES128 algorithm. |
Privacy | Select Same as Authentication Key to use while authenticating users. The default setting is Same as Authentication Key. |
MD5/SHA Key | Specify a unique authentication key. The key is either a 32-hexadecimal digit MD5 or a 40-hexadecimal digit SHA digest created using md5sum or sha1sum. |
Privacy MD5/SHA Key | Specify the privacy authentication key. The key is either a 32-hexadecimal digit MD5 or a 40-hexadecimal digit SHA digest created using md5sum or sha1sum. |
Enable Receiver | Select to enable the new trap receiver. Clear to disable the receiver. |
Add | Adds a new trap receiver to the list. |
Remove Selected | Select the check box next to the name and click Remove Selected. |
5. Click Save at the top of the page to save these settings permanently.
Generating SNMP Alerts When Accounts Are Disabled
Rule Title: RiOS must generate alerts that can be forwarded to the administrators and ISSO when accounts are disabled.
STIG ID: RICX-DM-000013
Rule ID: SV-77341r1_rule Severity: CAT III
Vuln ID: V-62851 Class: Unclass
When application accounts are disabled, administrator accessibility is affected. Accounts are used for identifying individual device administrators or for identifying the device processes themselves.
In order to detect and respond to events that affect administrator accessibility and device processing, devices must audit account disabling actions and, as required, notify the appropriate individuals so they can investigate the event. Such a capability greatly reduces the risk that device accessibility will be negatively affected for extended periods of time and also provides logging that can be used for forensic purposes.
Verifying Servers Are Configured as Trap Receivers
Verify that RiOS uses automated mechanisms to alert security personnel to threats identified by authoritative sources.
Configuring Servers as Trap Receivers
Configure RiOS to use automated mechanisms to alert security personnel to threats identified by authoritative sources.
Generating SNMP Alerts When Accounts Are Removed
Rule Title: RiOS must generate alerts that can be forwarded to the administrators and ISSO when accounts are removed.
STIG ID: RICX-DM-000014
Rule ID: SV-77343r1_rule Severity: CAT III
Vuln ID: V-62853 Class: Unclass
When application accounts are removed, administrator accessibility is affected. Accounts are utilized for identifying individual device administrators or for identifying the device processes themselves.
In order to detect and respond to events that affect administrator accessibility and device processing, devices must audit account removal actions and, as required, notify the appropriate individuals so they can investigate the event. Such a capability greatly reduces the risk that device accessibility will be negatively affected for extended periods of time and also provides logging that can be used for forensic purposes.
Verifying Servers Are Configured as Trap Receivers
Verify that RiOS uses automated mechanisms to alert security personnel to threats identified by authoritative sources.
Configuring Servers as Trap Receivers
Configure RiOS to use automated mechanisms to alert security personnel to threats identified by authoritative sources.
Generating Email Alerts
Rule Title: RiOS must generate an email alert for all log in failure events requiring alerts.
STIG ID: RICX-DM-000053
Rule ID: SV-77391r1_rule Severity: CAT II
Vuln ID: V-62901 Class: Unclass
It is critical for the appropriate personnel to be aware if a system is at risk of failing to process audit logs as required. Without a real-time alert, security personnel might be unaware of an impending failure of the audit capability and system operation might be adversely affected.
Alerts provide organizations with urgent messages. Real-time alerts provide these messages immediately (i.e., the time from event detection to alert occurs in seconds or less).
Verifying the System Is Generating Email Alerts
Verify that RiOS is configured to generate an immediate real-time alert for all audit failure events requiring real-time alerts.
To verify the system is generating email alerts
1. Connect to the Management Console.
2. Choose Administration > System Settings: Email to display the Email page.
Email Settings
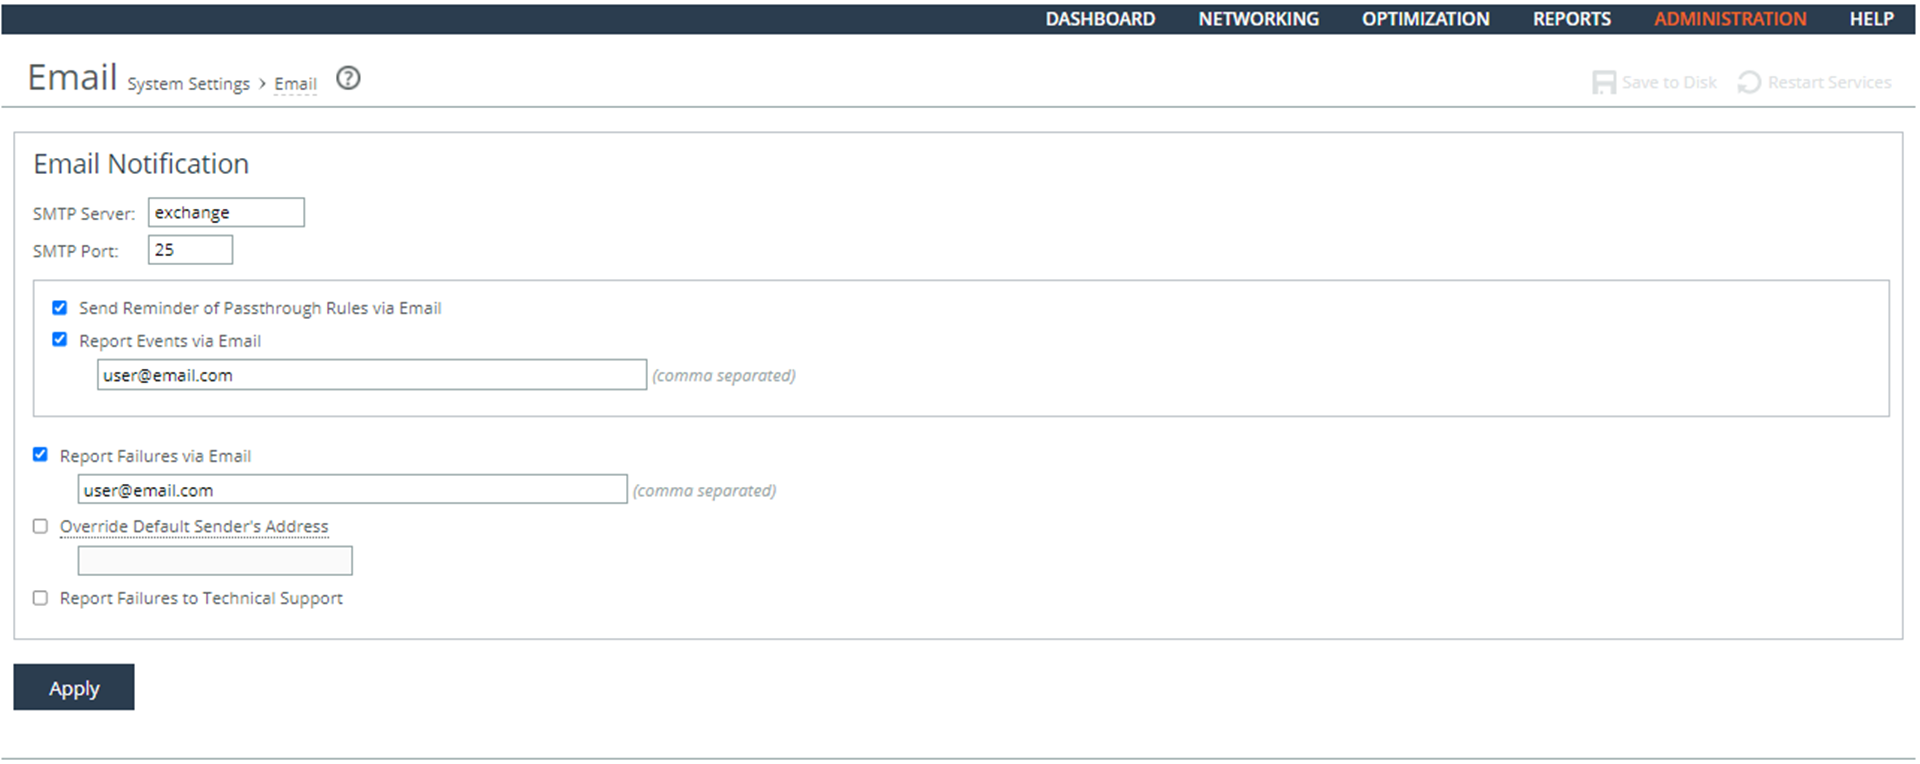
3. Verify that an SMTP Server is defined.
4. Verify that an SMTP Port is defined.
5. Verify that the Report Events via Email and the Report Failures via Email check boxes are selected and that at least one email address is defined for each. If no email accounts are defined, this is a security vulnerability finding.
Configuring the System Is Generating Email Alerts
Configure RiOS to generate an immediate real-time alert for all audit failure events requiring real-time alerts.
To configure the system to generate email alerts
1. Connect to the Management Console.
2. Choose Administration > System Settings: Email to display the Email page.
Configuring Email Alerts
3. Type an SMTP Server name and port number.
4. Select the Report Events via Email and the Report Failures via Email check boxes and specify least one email address for each.
5. Click Apply.
6. Click Save at the top of the page to save your settings permanently.
Ensuring SNMP Alerts Are Generated if Logging Fails
Rule Title: RiOS must alert the ISSO and the system administrator (SA), at a minimum, in the event of an audit processing failure.
STIG ID: RICX-DM-000054
Rule ID: SV-77407r1_rule Severity: CAT II
Vuln ID: V-62917 Class: Unclass
It is critical for the appropriate personnel to be aware if a system is at risk of failing to process audit logs as required. Without this notification, the security personnel might be unaware of an impending failure of the audit capability and system operation might be adversely affected.
Audit processing failures include software/hardware errors, failures in the audit capturing mechanisms, and audit storage capacity being reached or exceeded.
Verifying Servers Are Configured as Trap Receivers
Verify that RiOS uses automated mechanisms to alert security personnel to threats identified by authoritative sources.
Configuring Host Servers Are Configured as Trap Receivers
Configure RiOS to use automated mechanisms to alert security personnel to threats identified by authoritative sources.
System Administration
This section includes these rules:
Ensuring Limited Login Attempts
Rule Title: RiOS must enforce the limit of three (3) consecutive invalid login attempts by a user during a 15-minute time period for device console access.
STIG ID: RICX-DM-000024
Rule ID: SV-77349r1_rule Severity: CAT II
Vuln ID: V-62859 Class: Unclass
By limiting the number of failed login attempts, the risk of unauthorized system access through user password guessing, otherwise known as brute-forcing, is reduced.
Verifying the System Is Configured for a Limited Number of Login Attempts
Verify that RiOS is configured to limit the number of invalid login attempts during a 15 minute period to 3.
To verify whether login attempts are restricted
1. Connect to the Management Console.
2. Choose Administration > Security: Password Policy to display the Password Policy page.
3. Verify that the Maximum unsuccessful logins before account lockout text box is set to 3.
4. Verify that the Wait before account unlock text box is set to 900 seconds.
5. If these settings are missing or incorrect, this is a security vulnerability finding.
Configuring the System for a Limited Number of Log In Attempts
Configure RiOS to limit the number of invalid log in attempts during a 15 minute period to 3.
To configure the system for a limited number of log in attempts
1. Connect to the Management Console.
2. Choose Administration > Security: Password Policy to display the Password Policy page.

Configuring a Password Policy
3. Set the Login Attempts Before Lockout text box to 3.
4. Set the Timeout for the User Login After Lockout (seconds) text box to 900 seconds.
5. Click Apply.
6. Click Save at the top of the page to save these setting permanently.
Ensuring Limited Login Attempts for Web-Based Management
Rule Title: RiOS must enforce the limit of three consecutive invalid login attempts by a user during a 15-minute time period for web-based management access.
STIG ID: RICX-DM-000025
Rule ID: SV-77351r1_rule Severity: CAT II
Vuln ID: V-62861 Class: Unclass
By limiting the number of failed login attempts, the risk of unauthorized system access through user password guessing, otherwise known as brute-forcing, is reduced.
Verifying the System Is Configured for a Limited Number of Login Attempts
Verify that RiOS is configured to limit the number of invalid login attempts during a 15-minute period to 3.
Configuring the System for a Limited Number of Login Attempts
Configure RiOS to limit the number of invalid login attempts during a 15-minute period to 3.
Ensuring the System Locks After Three Unsuccessful Login Attempts
Rule Title: RiOS must automatically lock the account until the locked account is released by an administrator when three unsuccessful login attempts in 15 minutes are exceeded.
STIG ID: RICX-DM-000026
Rule ID: SV-77353r1_rule Severity: CAT II
Vuln ID: V-62863 Class: Unclass
By limiting the number of failed login attempts, the risk of unauthorized system access through user password guessing, otherwise known as brute-forcing, is reduced. Limits are imposed by locking the account.
Verifying the System Locks After Three Login Attempts
Verify that RiOS is configured to limit the number of invalid login attempts during a 15-minute period to 3.
Configuring the System to Lock After Three Login Attempts
Configure RiOS to limit the number of invalid login attempts during a 15-minute period to 3.
Ensuring the Login Message Displays the DoD Notice
Rule Title: RiOS must display the Standard Mandatory DoD Notice and Consent Banner before granting access to the device.
STIG ID: RICX-DM-000027
Rule ID: SV-77355r1_rule Severity: CAT II
Vuln ID: V-62865 Class: Unclass
Display of the DoD-approved use notification before granting access to the network device ensures privacy and security notification verbiage used is consistent with applicable federal laws, Executive Orders, directives, policies, regulations, standards, and guidance.
System use notifications are required only for access through login interfaces with human users.
Verifying the System Displays the DoD Notice as the Login Message
Verify that RiOS is configured to display the Standard Mandatory DoD Notice and Consent Banner before granting access to the device.
To verify the login message
1. Connect to the Management Console.
2. Choose Administration > System Settings: Announcements to display the Announcements page.
3. Verify that the Standard Mandatory DoD Notice and Consent Banner is contained in the loin message. If the DoD notice and consent banner do not appear on this page, this is a security vulnerability finding.
Configuring the System Displays the DoD Notice as the Log in Message
Configure RiOS to display the Standard Mandatory DoD Notice and Consent Banner before granting access to the device.
To configure the login message
1. Connect to the Management Console.
2. Choose Administration > System Settings: Announcements to display the Announcements page.
Login Message
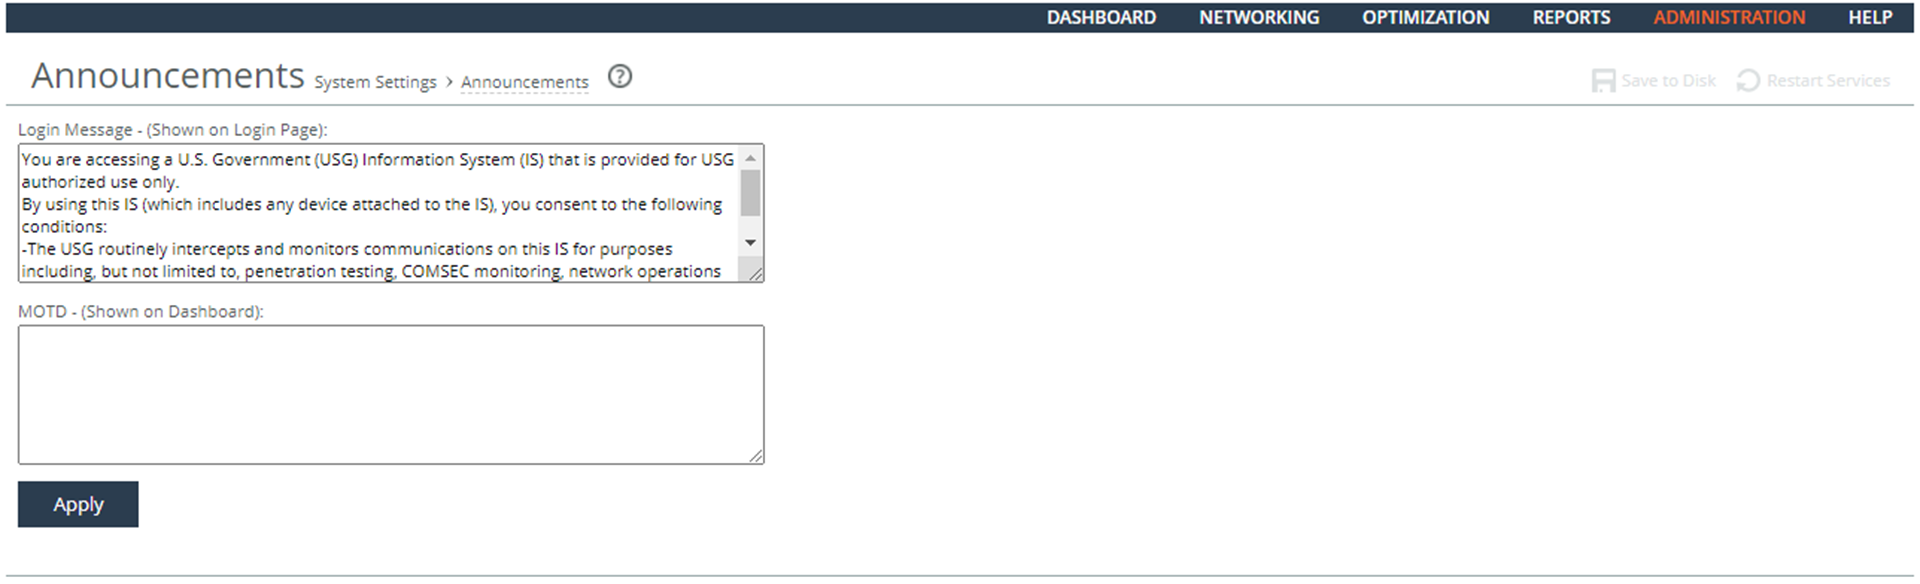
3. Cut and past the DoD banner into the Login Message text box:
You are accessing a U.S. Government (USG) Information System (IS) that is provided for USG-authorized use only.
By using this IS (which includes any device attached to this IS), you consent to the following conditions:
-The USG routinely intercepts and monitors communications on this IS for purposes including, but not limited to, penetration testing, COMSEC monitoring, network operations and defense, personnel misconduct (PM), law enforcement (LE), and counterintelligence (CI) investigations.
-At any time, the USG might inspect and seize data stored on this IS.
-Communications using, or data stored on, this IS are not private, are subject to routine monitoring, interception, and search, and might be disclosed or used for any USG-authorized purpose.
-This IS includes security measures (e.g., authentication and access controls) to protect USG interests--not for your personal benefit or privacy.
-Notwithstanding the above, using this IS does not constitute consent to PM, LE or CI investigative searching or monitoring of the content of privileged communications, or work product, related to personal representation or services by attorneys, psychotherapists, or clergy, and their assistants. Such communications and work product are private and confidential. See User Agreement for details.
4. Click Apply.
5. Click Save at the top of the page to save these setting permanently.
Limiting Concurrent Sessions for Each Administrator
Rule Title: RiOS must limit the number of concurrent sessions to one for each administrator account and/or administrator account type.
STIG ID: RICX-DM-000034
Rule ID: SV-77357r1_rule Severity: CAT II
Vuln ID: V-62867 Class: Unclass
Device management includes the ability to control the number of administrators and management sessions that manage a device. Limiting the number of allowed administrators and sessions per administrator is helpful in limiting risks related to DoS attacks.
This requirement addresses concurrent sessions for administrative accounts and does not address concurrent sessions by a single administrator through multiple administrative accounts. The maximum number of concurrent sessions should be defined based upon mission needs and the operational environment for each system.
Recommended best practice for authentication and authorization is to leverage an AAA server (for example, TACACS or RADIUS). Password of Last Resort is not affected by this requirement.
This is a hidden CLI command. Access to the Management Console is not affected by this command.
Verifying Concurrent Sessions are Limited
Verify that RiOS is configured to limit the number of concurrent sessions to one for each administrator account and/or administrator account type. This requirement does not apply to the Admin account.
To verify concurrent sessions are limited
1. Connect to the CLI and enter these commands:
enable
show username <user-other-than-admin> detailed
2. Verify that Maximum Logins option is set to 1. If it is not set to 1, this is a security vulnerability finding.
Configuring Limited Concurrent Sessions
Configure the number of concurrent sessions to an organization define number for each administrator account and/or administrator type account.
To configure concurrent sessions to be limited
• Connect to the CLI and enter these commands.
enable
configuration terminal
authentication policy user <username> max-logins 1
write memory
Ensuring Administrator Sessions Are Terminated
Rule Title: RiOS must automatically terminate a network administrator session after organization-defined conditions or trigger events requiring session disconnect.
STIG ID: RICX-DM-000039
Rule ID: SV-77387r1_rule Severity: CAT II
Vuln ID: V-62897 Class: Unclass
Automatic session termination addresses the termination of administrator-initiated logical sessions in contrast to the termination of network connections that are associated with communications sessions (i.e., network disconnect). A logical session (for local, network, and remote access) is initiated whenever an administrator (or process acting on behalf of a user) accesses a network device. Such administrator sessions can be terminated (and thus terminate network administrator access) without terminating network sessions.
Session termination terminates all processes associated with an administrator's logical session except those processes that are specifically created by the administrator (that is, session owner) to continue after the session is terminated.
Conditions or trigger events requiring automatic session termination can include, for example, organization-defined periods of user inactivity, targeted responses to certain types of incidents, and time-of-day restrictions on information system use. These conditions will vary across environments and network device types.
Verifying Administrator Sessions Are Terminated
Verify that RiOS is configured to terminate a network administrator's session after a trigger event such as inactivity timeout.
To verify administrator sessions are terminated
1. Connect to the CLI and enter these commands:
enable
show web
2. Verify that the Inactivity Timeout option is set to the organizations defined condition. If no triggers are required by the organization, this is a security vulnerability finding.
Configuring Administrator Sessions to Terminate
Configure RiOS to automatically terminate a network administrator's session after a trigger event such as an inactivity timeout.
To configure administrator sessions to terminate
• Connect to the CLI and enter these commands:
enable
configuration terminal
web auto-logout <organization defined condition in minutes>
write memory
Ensuring Time Stamps Are Mapped to Coordinated Universal Time
Rule Title: RiOS must record time stamps for audit records that can be mapped to Coordinated Universal Time (UTC).
STIG ID: RICX-DM-000059
Rule ID: SV-77411r1_rule Severity: CAT II
Vuln ID: V-62921 Class: Unclass
If time stamps are not consistently applied and there is no common time reference, it is difficult to perform forensic analysis.
Time stamps generated by the application include date and time. Time is commonly expressed in Coordinated Universal Time (UTC), a modern continuation of Greenwich Mean Time (GMT), or local time with an offset from UTC.
Verifying the System Is Configured for UTC
Verify that RiOS is configured to UTC.
To verify the system is configured for UTC
1. Connect to the Management Console.
2. Choose Administration > System Settings: Date and Time to display the Date and Time page.
3. Under Date and Time, verify that UTC is selected in the Time Zone drop-down list. If UTC is not selected this is a security vulnerability finding.
Configuring the System for UTC
Configure RiOS enable UTC.
To configure the system for UTC
1. Connect to the Management Console.
2. Choose Administration > System Settings: Date/Time to display the Date and Time page.
Configuring NTP Servers
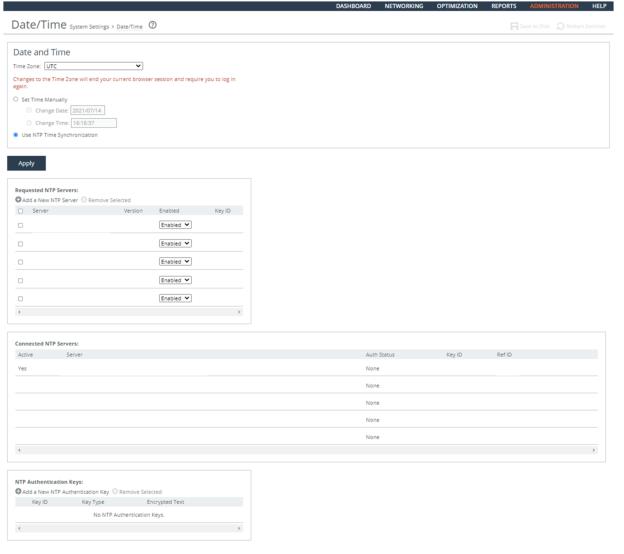
3. Select UTC in the Time Zone drop-down list.
4. Click Apply.
5. Click Save at the top of the page to save these settings permanently.
Ensuring System Clocks are Secure
Rule Title: RiOS must be configured to synchronize internal information system clocks with the primary and secondary time sources located in different geographic regions using redundant authoritative time sources.
STIG ID: RICX-DM-000082
Rule ID: SV-77427r1_rule Severity: CAT II
Vuln ID: V-62937 Class: Unclass
The loss of connectivity to a particular authoritative time source will result in the loss of time synchronization (free-run mode) and increasingly inaccurate time stamps on audit events and other functions.
Multiple time sources provide redundancy by including a secondary source. Time synchronization is usually a hierarchy; clients synchronize time to a local source while that source synchronizes its time to a more accurate source. The network device must utilize an authoritative time server and/or be configured to use redundant authoritative time sources. This requirement is related to the comparison done in CCI-001891.
DoD-approved solutions consist of a combination of a primary and secondary time source using a combination or multiple instances of the following: a time server designated for the appropriate DoD network (NIPRNet/SIPRNet); United States Naval Observatory (USNO) time servers; and/or the Global Positioning System (GPS). The secondary time source must be located in a different geographic region than the primary time source.
Verifying System Clocks are Secure
Verify that RiOS is configured to synchronize internal information system clocks with the primary and secondary time sources located in different geographic regions.
To verify the system clocks are secure
1. Connect to the Management Console.
2. Choose Administration > System Settings: Date and Time to display the Date and Time page.
3. Under Requested NTP Servers, verify that at least two servers are configured. If no NTP servers are visible, this is a security vulnerability finding.
Configuring System Clocks for Security
Configure RiOS to synchronize internal information system clocks with the primary and secondary time sources located in different geographic regions.
To configure the system clocks for security
1. Connect to the Management Console.
2. Choose Administration > System Settings: Date/Time to display the Date and Time page.
3. Click Add a New NTP Server to expand the page.
4. Select Use NTP Time Synchronization and click Apply.
Adding NTP Servers
5. Configure two NTP servers by completing the configuration as described in this table.
Control | Description |
Add a New NTP Server | Displays the controls to add a server. |
Hostname or IP Address | Specify the hostname or IP address for the NTP server. You can connect to an NTP public server pool. For example, 0.riverbed.pool.ntp.org. When you add an NTP server pool, the server is selected from a pool of time servers. |
Version | Select the NTP server version from the drop-down list: 3 or 4. |
Enabled/Disabled | Select Enabled from the drop-down list to connect to the NTP server. |
Key ID | Specify the MD5 or SH1 key identifier to use to authenticate the NTP server. The valid range is from 1 to 65534. The key ID must appear on the trusted keys list. |
Add | Adds the NTP server to the server list. |
Remove Selected | Select the check box next to the name and click Remove Selected. |
6. Click Save at the top of the page to save these settings permanently.
Ensuring Logging of System Changes
Rule Title: RiOS must generate a log event for the enforcement actions used to restrict access associated with changes to the device.
STIG ID: RICX-DM-000085
Rule ID: SV-77429r1_rule Severity: CAT II
Vuln ID: V-62939 Class: Unclass
Without auditing the enforcement of access restrictions against changes to the device configuration, it will be difficult to identify attempted attacks, and an audit trail will not be available for forensic investigation for after-the-fact actions.
Enforcement actions are the methods or mechanisms used to prevent unauthorized changes to configuration settings. Enforcement action methods might be as simple as denying access to a file based on the application of file permissions (access restriction). Audit items might consist of lists of actions blocked by access restrictions or changes identified after the fact.
For RiOS, all configuration changes authorized or unauthorized are logged in the system logs. Log entries include the user that initiated the configuration change for accountability.
Verifying Logging of Changes to the System
Verify that RiOS is configured to audit the enforcement actions used to restrict access associated with changes to the device.
Configuring Logging of Changes to the System
Configure RiOS to audit the enforcement actions used to restrict access associated with changes to the device.
Ensuring Secure Passwords
Rule Title: RiOS must enable the password authentication control policy to ensure password complexity controls and other password policy requirements are enforced.
STIG ID: RICX-DM-000091
Rule ID: SV-77431r1_rule Severity: CAT II
Vuln ID: V-62941 Class: Unclass
Password complexity, or strength, is a measure of the effectiveness of a password in resisting attempts at guessing and brute-force attacks.
Verifying Passwords Are Secured
Verify authentication policy is enabled.
To verify that a password policy is configured
1. Connect to the Management Console.
2. Choose Administration > Security: Password Policy to display the Password Policy page.
3. Verify the Enable Account Control check box is selected. If the check box is selected, this is a security vulnerability finding.
Configuring a Password Policy
Enable RiOS authentication policy.
To configure a password policy
1. Connect to the Management Console.
2. Choose Administration > Security: Password Policy to display the Password Policy page.
3. Select the Enable Account Control check box.
Setting Password Policy
4. Set the user account values.
5. Click Apply.
6. Click Save at the top of the page to save these settings permanently.
Ensuring the System Backs Up Configuration Files
Rule Title: RiOS must back up the system configuration files when configuration changes are made to the device.
STIG ID: RICX-DM-000100
Rule ID: SV-77441r1_rule Severity: CAT II
Vuln ID: V-62951 Class: Unclass
Information system backup is a critical step in maintaining data assurance and availability. Information system and security-related documentation contains information pertaining to system configuration and security settings. If this information were not backed up, and a system failure were to occur, the security settings would be difficult to reconfigure quickly and accurately. Maintaining a backup of information system and security-related documentation provides for a quicker recovery time when system outages occur.
This control requires the network device to support the organizational central backup process for user account information associated with the network device. This function might be provided by the network device itself; however, the preferred best practice is a centralized backup rather than each network device performing discrete backups.
Verifying the System Backs Up Configuration Files
Verify that RiOS is backed up when system configuration changes are made to the device by interviewing the site representative and checking any existing backup log. Evidence might also be provided by the date of the last back up.
To verify the system backs up configuration files
1. Connect to the Management Console.
2. Choose Administration > Configurations to display the Configurations page.
3. Verify that the table for Configuration and Date contains backup configurations. If there are no entries under Configuration and Date, this is a security vulnerability finding.
Configuring the System to Back Up Configuration Files
When changes are made to the system configuration, use the following procedure for backing up the device.
To configure the system backs up configuration files
1. Connect to the Management Console.
2. Choose Administration > System Settings: Configurations to display the Configurations page.
Managing Configurations
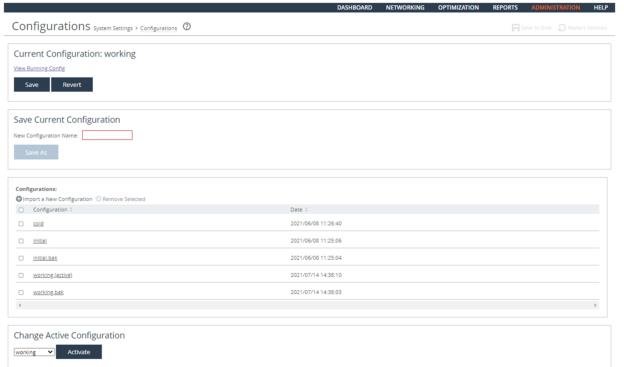
3. Set the value of New Configuration Name to the naming standards for the organization backups.
4. Click Save.
5. Under Configurations, verify that the saved configuration is listed with the current date and time.
Ensuring the System Implements Replay-Resistant Authentication
Rule Title: RiOS must implement replay-resistant authentication mechanisms for network access to privileged accounts.
STIG ID: RICX-DM-000106
Rule ID: SV-77443r1_rule Severity: CAT II
Vuln ID: V-62953 Class: Unclass
A replay attack might enable an unauthorized user to gain access to the application. Authentication sessions between the authenticator and the application validating the user credentials must not be vulnerable to a replay attack.
An authentication process resists replay attacks if it is impractical to achieve a successful authentication by recording and replaying a previous authentication message.
Techniques used to address this security issue include protocols using nonces (for example, numbers generated for a specific one-time use) or challenges (for example, TLS, WS_Security). Additional techniques include time-synchronous or challenge-response one-time authenticators.
Verifying the System Implements Replay-Resistant Authentication
Verify that RiOS is configured to implement replay resistant authentication mechanisms for network access to privileged accounts.
To verify the system implements replay-resistant authentication
1. Connect to the CLI and enter these commands:
enable
show config full
2. Press the spacebar to scroll through the configuration and verify that these commands are contained in the configuration:
no web http enable
web https enable
no web ssl protocol sslv3
no web ssl protocol tlsv1
web ssl protocol tlsv1.1
web ssl protocol tlsv1.2
If all of the above configurations are not defined as listed, this is a security vulnerability finding.
Configuring the System Implements Replay-Resistant Authentication
Configure RiOS to implement replay resistant authentication mechanisms for network access to privileged accounts.
To configure the system implements replay-resistant authentication
• Connect to the CLI and enter these commands:
enable
configuration terminal
no web http enable
web https enable
no web ssl protocol sslv3
no web ssl protocol tlsv1
web ssl protocol tlsv1.1
web ssl protocol tlsv1.2
write memory
exit
Ensuring the System Authenticates Endpoint Devices
Rule Title: RiOS must authenticate network management endpoint devices before establishing a local, remote, and/or network connection using bidirectional authentication that is cryptographically based.
STIG ID: RICX-DM-000109
Rule ID: SV-77445r1_rule Severity: CAT II
Vuln ID: V-62955 Class: Unclass
Without authenticating devices, unidentified or unknown devices might be introduced, thereby facilitating malicious activity. Bidirectional authentication provides stronger safeguards to validate the identity of other devices for connections that are of greater risk.
A local connection is any connection with a device communicating without the use of a network. A network connection is any connection with a device that communicates through a network (for example, local area or wide area network, Internet). A remote connection is any connection with a device communicating through an external network (for example, the Internet).
Because of the challenges of applying this requirement on a large scale, organizations are encouraged to only apply the requirement to those limited number (and type) of devices that truly need to support this capability. For network device management, this has been determined to be network management device addresses, SNMP authentication, and NTP authentication.
Verifying the System Authenticates Endpoint Devices
Verify that RiOS is configured to authenticate network management endpoint devices before establishing a local, remote, and/or network connection using bidirectional authentication that is cryptographically based (network management portion of the requirement).
To verify the system authenticates endpoint devices
1. Connect to the CLI and enter these commands:
enable
show configuration full
2. Press the spacebar to scroll through the configuration and verify that these commands are contained in the configuration:
no telnet-server enable
ssh server enable
web enable
no web http enable
web https enable
If any one of the above settings is missing from the configuration, this is a security vulnerability finding.
Configuring the System Authenticates Endpoint Devices
Configure RiOS to Authenticate network management endpoint devices before establishing a local, remote, and/or network connection using bidirectional authentication that is cryptographically based (network management portion of the requirement).
To configure the system to authenticate endpoint devices
• Connect to the CLI and enter these commands:
enable
show configuration full
no telnet-server enable
ssh server enable
ssh server allowed-cyphers aes128-cbc,3des-cbc,aes192-cbc,aes256-cbc,aes128-ctr,aes192-ctr,aes256-ctr
web enable
no web http enable
web https enable
write memory
exit
exit
Ensuring Centrally Managed Authentication Settings
Rule Title: RiOS must employ automated mechanisms to centrally manage authentication settings.
STIG ID: RICX-DM-000092
Rule ID: SV-77433r1_rule Severity: CAT II
Vuln ID: V-62943 Class: Unclass
The use of authentication servers or other centralized management servers for providing centralized authentication services is required for network device management. Maintaining local administrator accounts for daily usage on each network device without centralized management is not scalable or feasible. Without centralized management, it is likely that credentials for some network devices will be forgotten, leading to delays in administration, which itself leads to delays in remediating production problems and in addressing compromises in a timely fashion.
Verifying Centrally Managed Authentication Settings
Verify that RiOS is configured to employ automated mechanisms to centrally manage authentication settings.
To verify centrally managed authentication
1. Connect to the Management Console.
2. Choose Administration > Security: TACACS+ to display the TACACS+ page.
3. Verify that TACACS+ Servers has at least one server defined. Verify that TACACS+ Servers has at least one server defined. f no servers exist in the TACACS+ Servers list, this is a security vulnerability finding.
— or —
4. Choose Administration > Security: RADIUS to display the RADIUS page.
5. Verify that RADIUS Servers has at least one server defined. If no servers exist in the RADIUS Servers list, this is a security vulnerability finding.
Configuring Centrally Managed Authentication
Configure RiOS to employ automated mechanisms to centrally manage authentication settings.
To configure centrally managed authentication settings
1. Connect to the Management Console.
2. Choose Administration > Security: TACACS+ to display the TACACS+ page.
3. Click Add a TACACS+ Server to expand the page.
Adding a TACACS+ Server
4. Under Default TACACS+ Settings, configure a Global Default Key as described in this table.
Control | Description |
Set a Global Default Key | Enable a global server key for the server. |
Global Key | Specify the global server key to the required value. |
Confirm Global Key | Confirms the global server key. |
Timeout | Optionally, specify the time-out period in seconds (1 to 60). The default value is 3. |
Retries | Optionally, specify the number of times you want to allow the user to retry authentication. Valid values are from 0 to 5. The default is 1. |
5. Click Apply.
6. Under TACACS+ Servers, add a TACACS+ server as described in this table.
Control | Description |
Hostname or IP Address | Specify the hostname or server IP address. |
Authentication Port | Specify the port for the server. The default value is 49. |
Authentication Type | Select either PAP or ASCII as the authentication type. The default value is PAP. |
Override the Global Default Key | Specify this option to override the global server key for the server. |
Server Key | Specify the override server key. |
Confirm Server Key | Confirm the override server key. |
Timeout | Specify the time-out period in seconds (1 to 60). The default is 3. |
Retries | Specify the number of times you want to allow the user to retry authentication. Valid values are from 0 to 5. The default is 1. |
Enabled | Enables the new server. |
7. Click Add.
8. Click Save at the top of the page to save these settings permanently.
— or —
1. Choose Administration > Security: RADIUS to display the RADIUS page.
2. Click Add a RADIUS Server to expand the page.
Adding a RADIUS Server
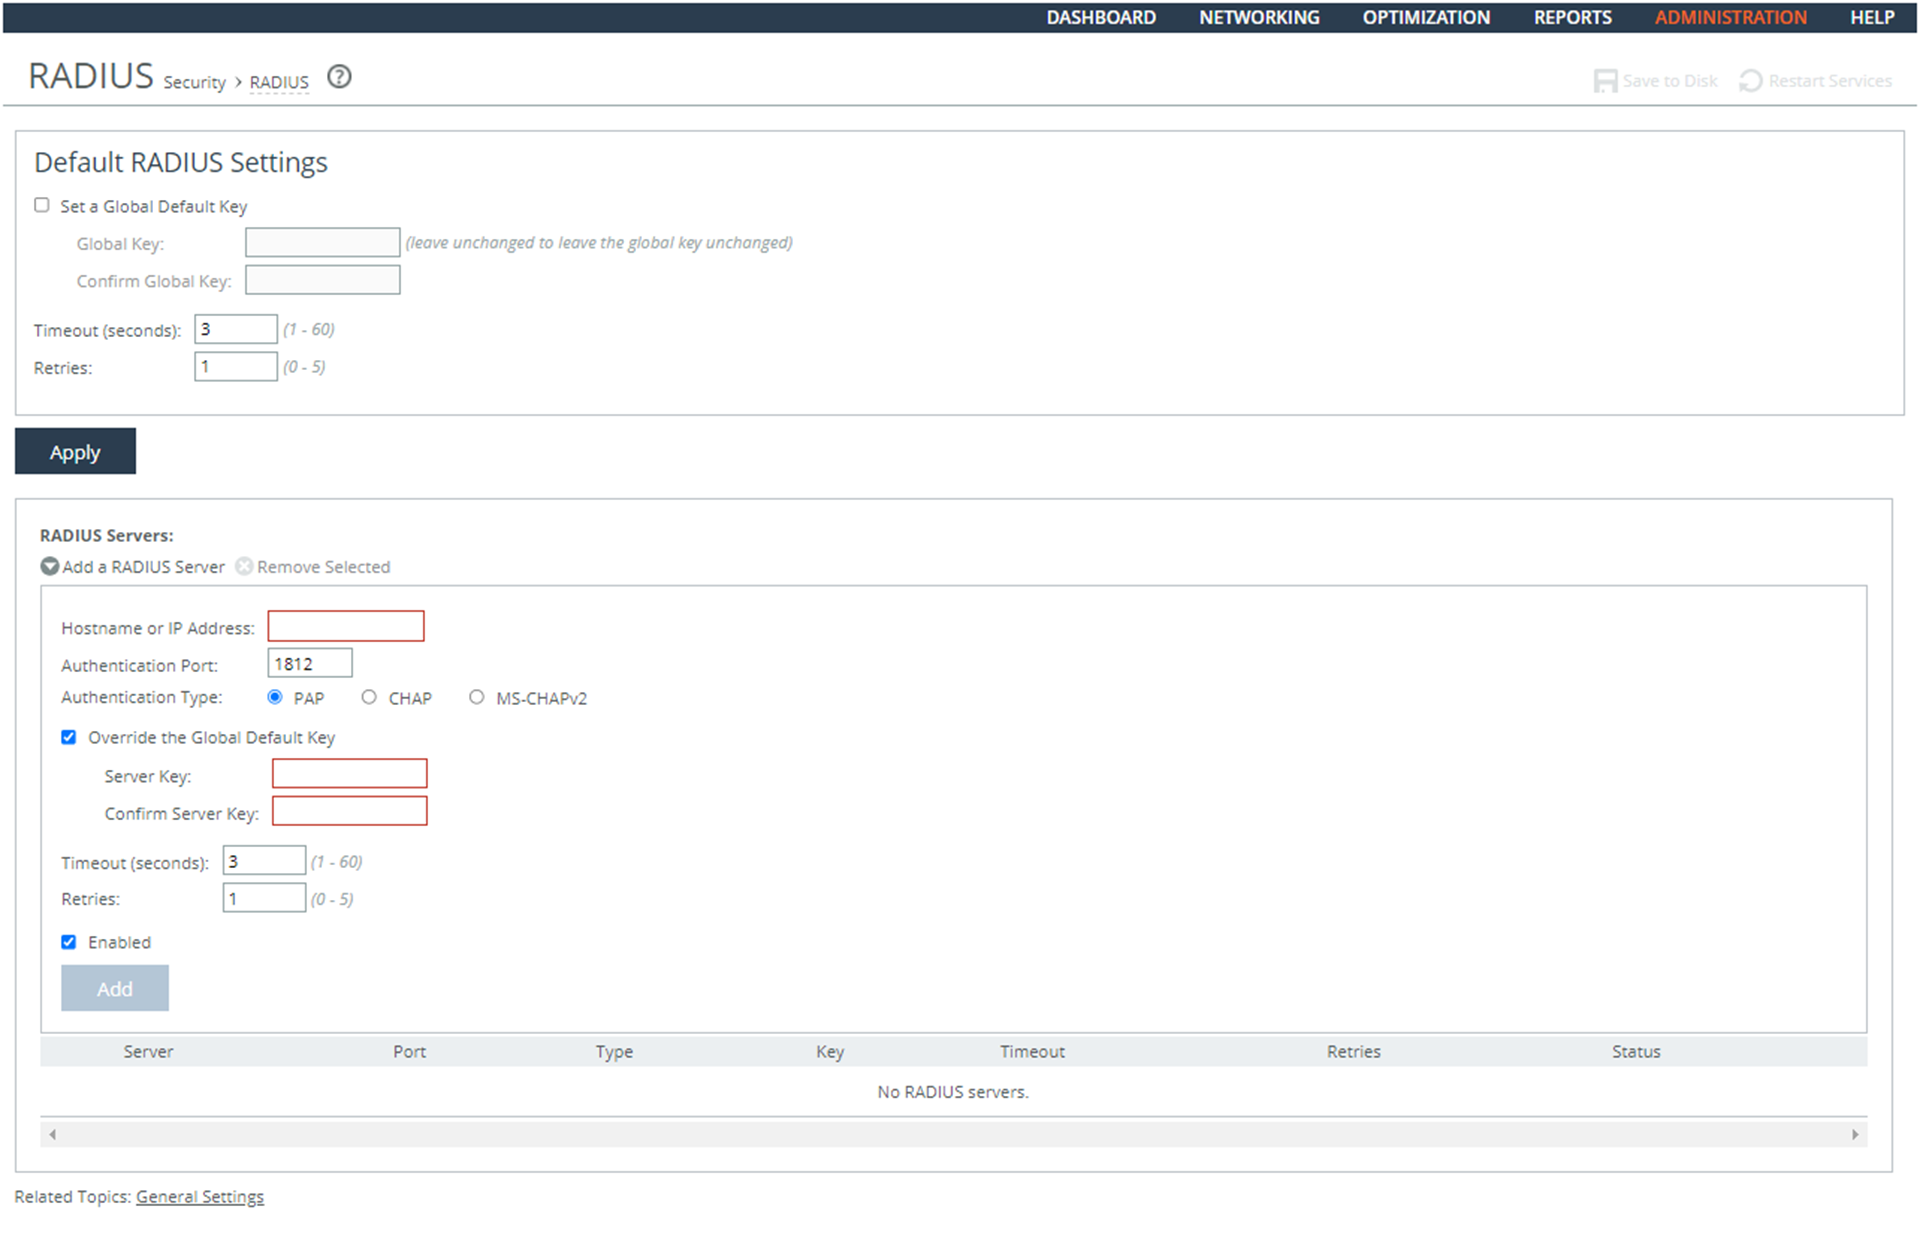
3. Under Default RADIUS Settings, configure a Global Default Key as described in this table.
Control | Description |
Set a Global Default Key | Enable a global server key for the RADIUS server. |
Global Key | Specify the global server key to the required value. |
Confirm Global Key | Confirm the global server key. |
Timeout | Specify the time-out period in seconds (1 to 60). The default value is 3. |
Retries | Specify the number of times you want to allow the user to retry authentication. The default value is 1. |
4. Click Apply.
5. Under RADIUS Servers, add a RADIUS server as described in this table.
Control | Description |
Add a RADIUS Server | Displays the controls for defining a new RADIUS server. |
Hostname or IP Address | Specify the hostname or server IP address. RiOS does not support IPv6 server IP addresses. |
Authentication Port | Specify the port for the server. |
Authentication Type | Select this authentication type: • CHAP - Challenge-Handshake Authentication Protocol (CHAP), which provides better security than PAP. CHAP validates the identity of remote clients by periodically verifying the identity of the client using a three-way handshake. This validation happens at the time of establishing the initial link and might happen again at any time. CHAP bases verification on a user password and transmits an MD5 sum of the password from the client to the server. |
Override the Global Default Key | Overrides the global server key for the server. • Server Key - Specify the override server key. • Confirm Server Key - Confirm the override server key. |
Timeout | Specify the time-out period in seconds (1 to 60). The default value is 3. |
Retries | Specify the number of times you want to allow the user to retry authentication. Valid values are from 0 to 5. The default value is 1. |
Enabled | Enables the new server. |
6. Click Add.
7. Click Save at the top of the page to save these settings permanently.
Ensuring Authentication Settings Are Applied
Rule Title: RiOS must employ automated mechanisms to centrally apply authentication settings.
STIG ID: RICX-DM-000093
Rule ID: SV-77435r1_rule Severity: CAT II
Vuln ID: V-62945 Class: Unclass
The use of authentication servers or other centralized management servers for providing centralized authentication services is required for network device management. Maintaining local administrator accounts for daily usage on each network device without centralized management is not scalable or feasible. Without centralized management, it is likely that credentials for some network devices will be forgotten, leading to delays in administration, which itself leads to delays in remediating production problems and in addressing compromises in a timely fashion.
Verifying That Authentication Settings Are Centrally Applied
Verify that RiOS is configured to employ automated mechanisms to centrally apply authentication settings.
Configuring the System to Centrally Apply Authentication Settings
Configure RiOS to employ automated mechanisms to centrally apply authentication settings.
Ensuring Authentication Settings Are Centrally Verified
Rule Title: RiOS must employ automated mechanisms to centrally verify authentication settings.
STIG ID: RICX-DM-000094
Rule ID: SV-77437r1_rule Severity: CAT II
Vuln ID: V-62947 Class: Unclass
The use of authentication servers or other centralized management servers for providing centralized authentication services is required for network device management. Maintaining local administrator accounts for daily usage on each network device without centralized management is not scalable or feasible. Without centralized management, it is likely that credentials for some network devices will be forgotten, leading to delays in administration, which itself leads to delays in remediating production problems and in addressing compromises in a timely fashion.
Verifying That Authentication Settings Are Centrally Verified
Verify that RiOS is configured to employ automated mechanisms to centrally verify authentication settings.
Configuring the System to Centrally Verify Authentication Settings
Configure RiOS to employ automated mechanisms to centrally verify authentication settings.
Ensuring the System Prohibits Use of Nonsecure Functions
Rule Title: RiOS must be configured to prohibit the use of all unnecessary and/or nonsecure functions, ports, protocols, and/or services, as defined in the PPSM CAL and vulnerability assessments.
STIG ID: RICX-DM-000096
Rule ID: SV-77439r1_rule Severity: CAT II
Vuln ID: V-62949 Class: Unclass
In order to prevent unauthorized connection of devices, unauthorized transfer of information, or unauthorized tunneling (i.e., embedding of data types within data types), organizations must disable unused or unnecessary physical and logical ports/protocols on information systems.
Network devices are capable of providing a wide variety of functions and services. Some of the functions and services provided by default might not be necessary to support essential organizational operations. Additionally, it is sometimes convenient to provide multiple services from a single component (for example, email and web services); however, doing so increases risk over limiting the services provided by any one component.
To support the requirements and principles of least functionality, the network device must support the organization’s requirements providing only essential capabilities and limiting the use of ports, protocols, and/or services to only those required, authorized, and approved to conduct official business or to address authorized quality of life issues.
Verifying the System Prohibits Use of Nonsecure Functions
Verify that RiOS is configured to prohibit the use of all unnecessary and/or nonsecure functions, ports, protocols, and/or services as defined in the PPSM CAL and vulnerability assessments.
To verify the system prohibits use of nonsecure functions
1. Connect to the Management Console.
2. Choose Administration > Security: Management ACL to display the Management ACL page.
Managing ACL
Page
3. Verify that the Enable Management ACL check box is selected.
4. Verify that the list contains all unnecessary and/or nonsecure functional, ports, protocols, and/or services as defined in the PPSM CAL and vulnerability assessments. If no PPSM CAL or vulnerability assessment information is presented on this page or Enable Management ACL is not checked, this is a security vulnerability finding.
Configuring the System to Prohibit Use of Nonsecure Functions
Configure RiOS to prohibit the use of all unnecessary and/or nonsecure functions, ports, protocols, and/or services, as defined in the PPSM CAL and vulnerability assessments.
To configure the system to prohibit use of nonsecure functions
1. Connect to the Management Console.
2. Choose Administration > Security: Management ACL to display the Management ACL page.
3. Click Add a New Rule to expand the page.
Managing ACL
Page
4. Select the Enable Management ACL check box.
5. Add rules so that the list contains unnecessary and/or nonsecure functional, ports, protocols, and/or services as defined in the PPSM CAL and vulnerability assessments.
Control | Description |
Action | Select one of these rule types from the drop-down list: • Allow - Allows a matching packet access to the SteelHead. This is the default action. • Deny - Denies access to any matching packets. |
Service | Optionally, select Specify Protocol, or HTTP, HTTPS, SOAP, SNMP, SSH, Telnet. When specified, the Destination Port is dimmed. |
Protocol | (Appears only when Service is set to Specify Protocol.) Optionally, select All, TCP, UDP, or ICMP from the drop-down list. The default setting is All. When set to All or ICMP, the Service and Destination Ports are dimmed. |
Source Network | Optionally, specify the source subnet of the inbound packet; for example, 1.2.3.0/24. |
Destination Port | Optionally, specify the destination port of the inbound packet, either a single port value or a port range of port1-port2, where port1 must be less than port2. Leave it blank to specify all ports. |
Interface | Optionally, select an interface name from the drop-down list. Select All to specify all interfaces. |
Description | Optionally, describe the rule to facilitate administration. |
Rule Number | Optionally, select a rule number from the drop-down list. By default, the rule goes to the end of the table (just above the default rule). SteelHeads evaluate rules in numerical order starting with rule 1. If the conditions set in the rule match, then the rule is applied, and the system moves on to the next packet. If the conditions set in the rule do not match, the system consults the next rule. For example, if the conditions of rule 1 do not match, rule 2 is consulted. If rule 2 matches the conditions, it is applied, and no further rules are consulted. The default rule, Allow, which allows all remaining traffic from everywhere that has not been selected by another rule, cannot be removed and is always listed last. |
Log Packets | Tracks denied packets in the log. By default, packet logging is enabled. |
Add | Adds the rule to the list. The Management Console redisplays the Rules table and applies your modifications to the running configuration, which is stored in memory. |
Remove Selected | Select the check box next to the name and click Remove Selected. |
Move Selected | Moves the selected rules. Click the arrow next to the desired rule position; the rule moves to the new position. |
6. Click Save at the top of the page to save these settings permanently.
Ensuring the System Authenticates SNMP Servers Before Establishing a Connection
Rule Title: RiOS must authenticate SNMP servers before establishing a local, remote, and/or network connection using bidirectional authentication that is cryptographically based.
STIG ID: RICX-DM-000110
Rule ID: SV-77447r1_rule Severity: CAT II
Vuln ID: V-62957 Class: Unclass
Without authenticating devices, unidentified or unknown devices might be introduced, thereby facilitating malicious activity. Bidirectional authentication provides stronger safeguards to validate the identity of other devices for connections that are of greater risk.
A local connection is any connection with a device communicating without the use of a network. A network connection is any connection with a device that communicates through a network (for example, local area or wide area network, Internet). A remote connection is any connection with a device communicating through an external network (for example, the Internet).
Because of the challenges of applying this requirement on a large scale, organizations are encouraged to only apply the requirement to those limited number (and type) of devices that truly need to support this capability. For network device management, this has been determined to be network management device addresses, SNMP authentication, and NTP authentication.
Verifying the System Authenticates SNMP Servers Before Establishing a Connection
Verify that RiOS is configured to authenticate SNMP servers before establishing a local, remote, and/or network connection using bidirectional authentication that is cryptographically based (SNMP portion of the requirement).
Configuring the System to Authenticate SNMP Servers Before Establishing a Connection
Configure RiOS to authenticate SNMP servers before establishing a local, remote, and/or network connection using bidirectional authentication that is cryptographically based (SNMP portion of the requirement).
Ensuring the System Authenticates NTP Servers
Rule Title: RiOS must authenticate NTP servers before establishing a local, remote, and/or network connection using bidirectional authentication that is cryptographically based.
STIG ID: RICX-DM-000111
Rule ID: SV-77449r1_rule Severity: CAT II
Vuln ID: V-62959 Class: Unclass
Without authenticating devices, unidentified or unknown devices might be introduced, thereby facilitating malicious activity. Bidirectional authentication provides stronger safeguards to validate the identity of other devices for connections that are of greater risk.
A local connection is any connection with a device communicating without the use of a network. A network connection is any connection with a device that communicates through a network (for example, local area or wide area network, Internet). A remote connection is any connection with a device communicating through an external network (for example, the Internet).
Because of the challenges of applying this requirement on a large scale, organizations are encouraged to only apply the requirement to those limited number (and type) of devices that truly need to support this capability. For network device management, this has been determined to be network management device addresses, SNMP authentication, and NTP authentication.
Verifying the System Authenticates NTP Servers
Verify that RiOS is configured to authenticate NTP servers before establishing a local, remote, and/or network connection using bidirectional authentication that is cryptographically based (NTP portion of the requirement).
To verify the system clocks are secure
1. Connect to the Management Console.
2. Choose Administration > System Settings: Date and Time to display the Date and Time page.
3. Under Requested NTP Servers, verify that at least two servers are configured. If no NTP servers are visible, this is a security vulnerability finding.
Configuring the System to Authenticate NTP Servers
Configure RiOS to authenticate NTP servers before establishing a local, remote, and/or network connection using bidirectional authentication that is cryptographically based (NTP portion of the requirement).
To configure the system to authenticate NTP servers
1. Connect to the Management Console.
2. Choose Administration > System Settings: Date/Time to display the Date and Time page.
Authenticating NTP Servers
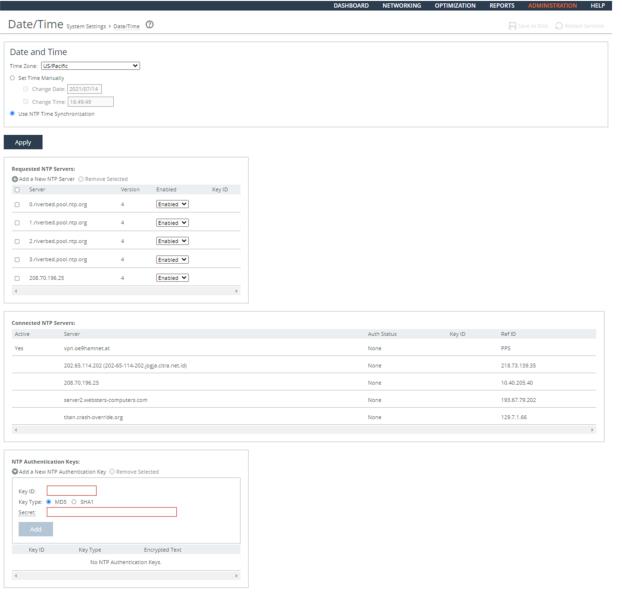
3. Select the Use NTP Time Synchronization check box.
4. Click Add a New NTP Authentication Key to expand the page.
5. Configure two NTP servers by completing the configuration as described in this table.
Control | Description |
Hostname or IP Address | Specify the hostname or IP address for the NTP server. You can connect to an NTP public server pool. For example, 0.riverbed.pool.ntp.org. When you add an NTP server pool, the server is selected from a pool of time servers. |
Version | Select the NTP server version from the drop-down list: 3 or 4. |
Enabled/Disabled | Select Enabled from the drop-down list to connect to the NTP server. |
Key ID | Specify the MD5 or SH1 key identifier to use to authenticate the NTP server. The valid range is from 1 to 65534. The key ID must appear on the trusted keys list. |
Add | Adds your servers. |
6. Click Add a New NTP Authentication Key to expand the page.
7. Complete the configuration as described in this table.
Control | Description |
Key ID | Specify the key ID. The valid range is from 1 to 65534. |
Key Type | Select the authentication key type: MD5 or SHA1. |
Secret | Specify the shared secret. You must configure the same shared secret for both the NTP server and the NTP client. The MD5 shared secret: • is limited to 16 alphanumeric characters or less, or exactly 40 characters hexadecimal. • cannot include spaces or pound signs (#). • cannot be empty. • is case sensitive. The SHA1 shared secret: • is limited to exactly 40 characters hexadecimal. • cannot include spaces or pound signs (#). • cannot be empty. • is case sensitive. The secret appears in the key list as its MD5 or SHA1 hash value. |
Add | Adds the authentication key to the trusted keys list. |
8. Click Save at the top of the page to save these settings permanently.
Ensuring the Correct Password Length
Rule Title: RiOS must enforce a minimum 15-character password length.
STIG ID: RICX-DM-000114
Rule ID: SV-77451r1_rule Severity: CAT II
Vuln ID: V-62961 Class: Unclass
Password complexity, or strength, is a measure of the effectiveness of a password in resisting attempts at guessing and brute-force attacks. Password length is one factor of several that helps to determine strength and how long it takes to crack a password.
The shorter the password, the lower the number of possible combinations that need to be tested before the password is compromised. Use of more characters in a password helps to exponentially increase the time and/or resources required to compromise the password.
Verifying the Correct Password Length
Verify that RiOS is configured to enforce a minimum 15-character password length.
To verify the correct password length
1. Connect to the Management Console.
2. Choose Administration > Security: Password Policy to display the Date and Time page.
3. Verify that the Minimum Password Length is set to 15. If the Minimum Password Length is not set to 15, this is a security vulnerability finding.
Configuring the Correct Password Length
Verify that RiOS is configured to enforce a minimum 15-character password length.
Setting the Password Length
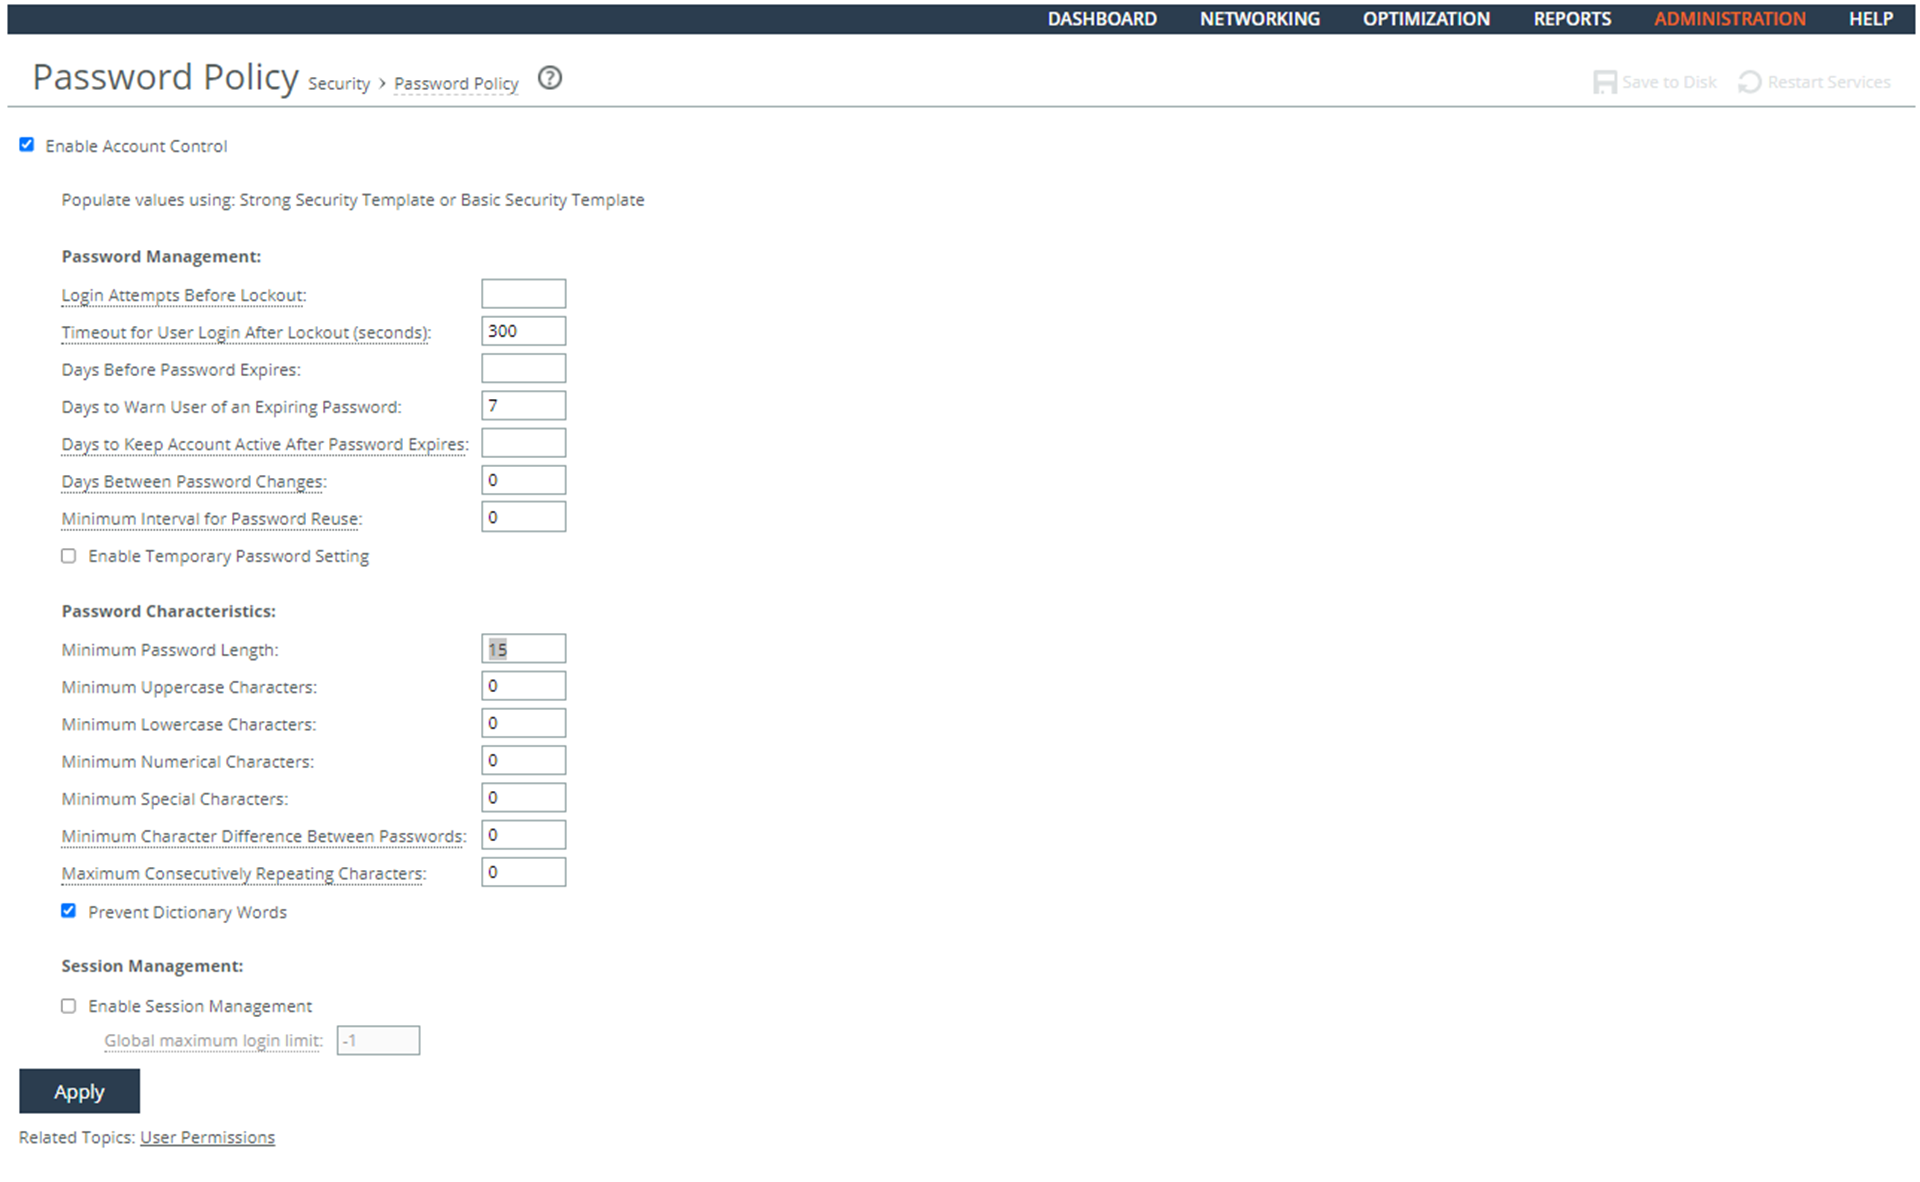
To configure the correct password length
1. Connect to the Management Console.
2. Choose Administration > Security: Password Policy to display the Password Policy page.
3. Specify the value of the Minimum Password Length text box to 15.
4. Click Apply
5. Click Save at the top of the page to save these settings permanently.
Ensuring Passwords Have an Uppercase Character
Rule Title: RiOS must enforce password complexity by requiring that at least one uppercase character be used.
STIG ID: RICX-DM-000115
Rule ID: SV-77453r1_rule Severity: CAT II
Vuln ID: V-62963 Class: Unclass
Use of a complex passwords helps to increase the time and resources required to compromise the password. Password complexity, or strength, is a measure of the effectiveness of a password in resisting attempts at guessing and brute-force attacks.
Password complexity is one factor of several that determines how long it takes to crack a password. The more complex the password is, the greater the number of possible combinations that need to be tested before the password is compromised.
Ensuring Passwords Have an Uppercase Character
Verify that RiOS is configured to enforce password complexity that requires at least one uppercase character.
Setting the Password to Require an Uppercase Character
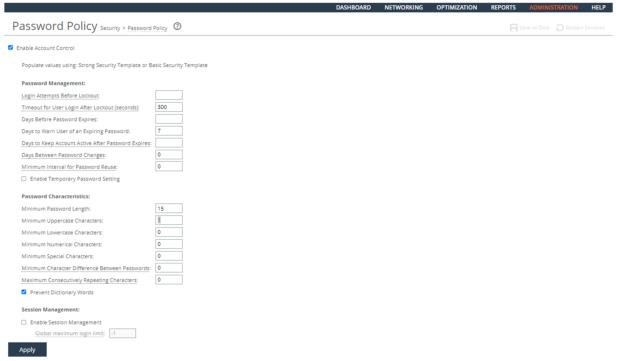
To verify passwords have an uppercase character
1. Connect to the Management Console.
2. Choose Administration > Security: Password Policy to display the Password Policy page.
3. Verify that the Minimum Uppercase Characters is set to 1. If the Minimum Uppercase Characters is not set to 1, this is a security vulnerability finding.
Configuring Passwords to Have and Uppercase Character
Configure RiOS to enforce password complexity that requires at least one uppercase character.
To configure passwords to have an uppercase character
1. Connect to the Management Console.
2. Choose Administration > Security: Password Policy to display the Password Policy page.
3. Specify the value of the Minimum Uppercase Characters text box to 1.
4. Click Apply.
5. Click Save at the top of the page to save these settings permanently.
Ensuring Passwords Have a Lowercase Character
Rule Title: RiOS must enforce password complexity by requiring that at least one lowercase character be used.
STIG ID: RICX-DM-000116
Rule ID: SV-77455r1_rule Severity: CAT II
Vuln ID: V-62965 Class: Unclass
Use of a complex password helps to increase the time and resources required to compromise the password. Password complexity, or strength, is a measure of the effectiveness of a password in resisting attempts at guessing and brute-force attacks.
Password complexity is one factor of several that determines how long it takes to crack a password. The more complex the password, the greater the number of possible combinations that need to be tested before the password is compromised.
Ensuring Passwords Have a Lowercase Character
Verify that RiOS is configured to enforce password complexity that requires at least one lowercase character.
To verify passwords have a lowercase character
1. Connect to the Management Console.
2. Choose Administration > Security: Password Policy to display the Password Policy page.
3. Verify that the Minimum Uppercase Characters is set to 1. If the Minimum Lowercase Characters is not set to 1, this is a security vulnerability finding.
Configuring Passwords to Have a Lowercase Character
Configure RiOS to enforce a password complexity that requires at least one lowercase character.
Setting the Password to Require a Lowercase Character
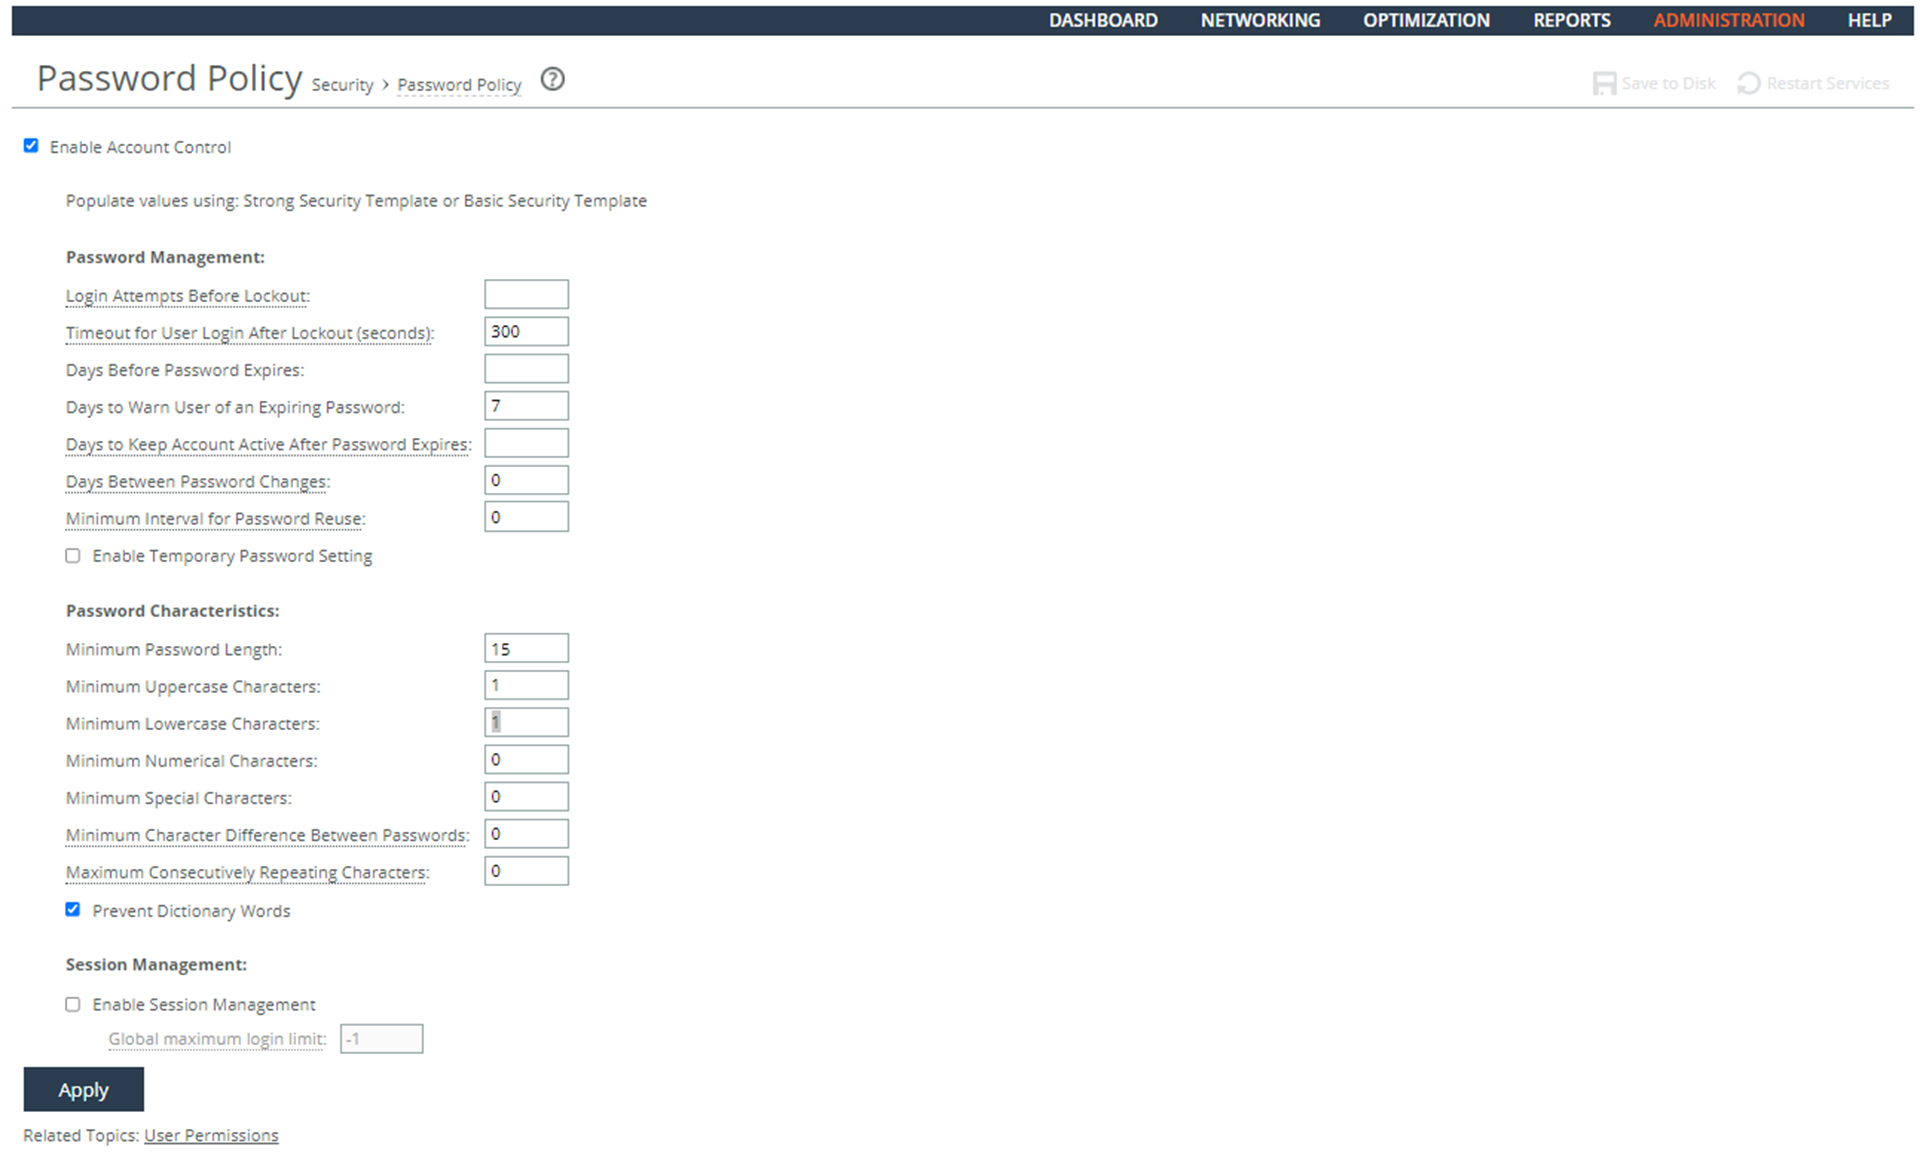
To configure passwords to have a lowercase character
1. Connect to the Management Console.
2. Choose Administration > Security: Password Policy to display the Password Policy page.
3. Specify the value of the Minimum Lowercase Characters text box to 1.
4. Click Apply.
5. Click Save at the top of the page to save these settings permanently.
Ensuring Passwords Have a Numeric Character
Rule Title: RiOS must enforce password complexity by requiring that at least one numeric character be used.
STIG ID: RICX-DM-000117
Rule ID: SV-77457r1_rule Severity: CAT II
Vuln ID: V-62967 Class: Unclass
Use of a complex password helps to increase the time and resources required to compromise the password. Password complexity, or strength, is a measure of the effectiveness of a password in resisting attempts at guessing and brute-force attacks.
Password complexity is one factor of several that determines how long it takes to crack a password. The more complex the password, the greater the number of possible combinations that need to be tested before the password is compromised.
Ensuring Passwords Have a Numeric Character
Verify that RiOS is configured to enforce password complexity that requires at least one numeric character.
To verify passwords have a numeric character
1. Connect to the Management Console.
2. Choose Administration > Security: Password Policy to display the Password Policy page.
3. Verify that the Minimum Numerical Characters is set to 1. If the Minimum Numerical Characters is not set to 1, this is a security vulnerability finding.
Configuring Passwords to Have a Numerical Character
Configure RiOS to enforce a password complexity that requires at least one numerical character.
Setting the Password to Require a Numerical Character

To configure passwords to have a numerical character
1. Connect to the Management Console.
2. Choose Administration > Security: Password Policy to display the Password Policy page.
3. Specify the value of the Minimum 1umerical Characters text box to 1.
4. Click Apply.
5. Click Save at the top of the page to save these settings permanently.
Ensuring Passwords Have a Special Character
Rule Title: RiOS must enforce password complexity by requiring that at least one special character be used.
STIG ID: RICX-DM-000118
Rule ID: SV-77459r1_rule Severity: CAT II
Vuln ID: V-62969 Class: Unclass
Use of a complex password helps to increase the time and resources required to compromise the password. Password complexity, or strength, is a measure of the effectiveness of a password in resisting attempts at guessing and brute-force attacks.
Password complexity is one factor of several that determines how long it takes to crack a password. The more complex the password, the greater the number of possible combinations that need to be tested before the password is compromised.
Ensuring Passwords Have a Special Character
Verify that RiOS is configured to enforce password complexity that requires at least one special character.
To verify passwords have a special character
1. Connect to the Management Console.
2. Choose Administration > Security: Password Policy to display the Password Policy page.
3. Verify that the Minimum Special Characters is set to 1. If the Minimum Special Characters is not set to 1, this is a security vulnerability finding.
Configuring Passwords to Have a Special Character
Configure RiOS to enforce a password complexity that requires at least one special character.
Setting the Password to Require a Special Character

To configure passwords to have a special character
1. Connect to the Management Console.
2. Choose Administration > Security: Password Policy to display the Password Policy page.
3. Specify the value of the Minimum Special Characters text box to 1.
4. Click Apply.
5. Click Save at the top of the page to save these settings permanently.
Ensuring at Least 15 Password Characters Are Changed
Rule Title: RiOS must require that when a password is changed, the characters are changed in at least 15 of the positions within the password.
STIG ID: RICX-DM-000119
Rule ID: SV-77461r1_rule Severity: CAT II
Vuln ID: V-62971 Class: Unclass
If the application allows the user to consecutively reuse extensive portions of passwords, this feature increases the chances of password compromise by increasing the window of opportunity for attempts at guessing and brute-force attacks.
The number of changed characters refers to the number of changes required with respect to the total number of positions in the current password. In other words, characters might be the same within the two passwords; however, the positions of the like characters must be different.
Ensuring at Least 15 Password Characters Are Changed
Verify that RiOS is configured to require that when a password is changed, the characters are changed in at least 15 of the positions within the password.
To verify least 15 password characters are changed
1. Connect to the Management Console.
2. Choose Administration > Security: Password Policy to display the Password Policy page.
3. Verify that the Minimum Character Difference Between Passwords is set to 15. If the Minimum Character Difference Between Passwords is not set to 15, this is a security vulnerability finding.
Configuring Passwords That at Least 15 Password Characters Are Changed
Configure RiOS to require that when a password is changed, the characters are changed in at least 15 of the positions within the password.
Setting the Password Change Requirements

To configure passwords so that at least 15 password characters are changed
1. Connect to the Management Console.
2. Choose Administration > Security: Password Policy to display the Password Policy page.
3. Specify the value of the Minimum Character Difference Between Passwords text box to 15.
4. Click Apply.
5. Click Save at the top of the page to save these settings permanently.
Ensuring Passwords Enforce 60-Day Maximum Lifetime
Rule Title: RiOS must enforce a 60-day maximum password lifetime restriction.
STIG ID: RICX-DM-000123
Rule ID: SV-77463r1_rule Severity: CAT II
Vuln ID: V-62973 Class: Unclass
Any password, no matter how complex, can eventually be cracked. Therefore, passwords need to be changed at specific intervals.
One method of minimizing this risk is to use complex passwords and periodically change them. If the network device does not limit the lifetime of passwords and force users to change their passwords, there is the risk that the passwords could be compromised.
This requirement does not include emergency administration accounts, which are meant for access to the network device in case of failure. These accounts are not required to have maximum password lifetime restrictions.
Ensuring Passwords Enforce 60-Day Maximum Lifetime
Verify that RiOS is configured to enforce a 60-day maximum password lifetime restriction.
Setting the Password Expiration

To verify passwords enforce 60-day maximum lifetime
1. Connect to the Management Console.
2. Choose Administration > Security: Password Policy to display the Password Policy page.
3. Verify that the Days Before Password Expires is set to 60, If the Days Before Password Expires is not set to 60, this is a security vulnerability finding.
Configuring Passwords to Enforce 60-Day Maximum Lifetime
Configure RiOS to enforce a 60-day maximum password lifetime.
To configure passwords to enforce 60-day maximum lifetime
1. Connect to the Management Console.
2. Choose Administration > Security: Password Policy to display the Password Policy page.
3. Specify the value of the Days Before Password Expires text box to 60.
4. Click Apply.
5. Click Save at the top of the page to save these settings permanently.
Prohibiting Password Reuse for Five Generations
Rule Title: RiOS must prohibit password reuse for a minimum of five generations.
STIG ID: RICX-DM-000124
Rule ID: SV-77465r1_rule Severity: CAT II
Vuln ID: V-62975 Class: Unclass
Password complexity, or strength, is a measure of the effectiveness of a password in resisting attempts at guessing and brute-force attacks.
To meet password policy requirements, passwords need to be changed at specific policy-based intervals.
If the network device allows the user to consecutively reuse their password when that password has exceeded its defined lifetime, the end result is a password that is not changed as per policy requirements.
Verifying Password Is Not Reused for Five Generations
Verify that RiOS is configured to prohibit password reuse for a minimum of five generations.
To verify passwords password is not reused for five generations
1. Connect to the Management Console.
2. Choose Administration > Security: Password Policy to display the Password Policy page.
3. Verify that the Minimum Interval for Password Reuse is set to 5. If the Minimum Interval for Password Reuse is not set to 5, this is a security vulnerability finding.
Configuring Passwords to Not Be Reused for Five Generations
Configure RiOS to prohibit password reuse for a minimum of five generations.
Setting the Password Length
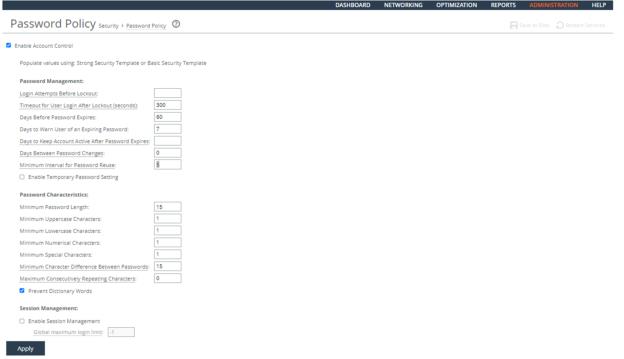
To configure passwords to not be reused for five generations
1. Connect to the Management Console.
2. Choose Administration > Security: Password Policy to display the Password Policy page.
3. Specify the value of the Minimum Interval for Password Reuse text box to 5.
4. Click Apply.
5. Click Save at the top of the page to save these settings permanently.
Ensure the System is Using FIPS 140-2 Cryptographic Modules
Rule Title: RiOS must use mechanisms meeting the requirements of applicable federal laws, Executive Orders, directives, policies, regulations, standards, and guidance for authentication to a cryptographic module.
STIG ID: RICX-DM-000130
Rule ID: SV-77467r1_rule Severity: CAT II
Vuln ID: V-62977 Class: Unclass
Unapproved mechanisms that are used for authentication to the cryptographic module are not verified and therefore cannot be relied upon to provide confidentiality or integrity, and DoD data might be compromised.
Network devices using encryption are required to use FIPS-compliant mechanisms for authenticating to cryptographic modules.
FIPS 140-2 is the current standard for validating that mechanisms used to access cryptographic modules utilize authentication that meets DoD requirements.
Note that adding the FIPS 140-2 licenses incurs a cost from the vendor for support for FIPS mode/module.
Verifying the System Is Using FIPS 140-2 Cryptographic Modules
Verify that RiOS is licensed to use FIPS 140-2 cryptographic modules.
To verify the system is using FIPS 140-2 cryptographic modules
1. Connect to the CLI and enter these commands.
enable
config terminal
show licenses
2. Verify the FIPS License has been installed.
3. At the system prompt, enter:
show web ssl cipher
4. Verify that the web ssl cipher string is:
TLSv1.2+FIPS:kRSA+FIPS:!eNULL:!aNULL
If a FIPS license is not present and the web SSL cipher string is not set properly, this is a security vulnerability finding.
Configuring the System to Use FIPS 140-2 Cryptographic Modules
Configure RiOS to be licenses to use FIPS 140-2 cryptographic modules.
To configure the system to use FIPS 140-2 cryptographic modules
1. Connect to the CLI and enter these commands.
enable
config terminal
license install <license-string>
web ssl cipher TLSv1.2+FIPS:kRSA+FIPS:!eNULL:!aNULL
write memory
2. To verify the FIPS License has been installed, at the system prompt, enter:
show licenses
show web ssl cipher
Ensuring Maintenance Functions Are Restricted
Rule Title: RiOS performing maintenance functions must restrict use of these functions to authorized personnel only.
STIG ID: RICX-DM-000133
Rule ID: SV-77469r1_rule Severity: CAT II
Vuln ID: V-62979 Class: Unclass
There are security-related issues arising from software brought into the network device specifically for diagnostic and repair actions (for example, a software packet sniffer installed on a device in order to troubleshoot system traffic, or a vendor installing or running a diagnostic application in order to troubleshoot an issue with a vendor-supported device). If maintenance tools are used by unauthorized personnel, they might accidentally or intentionally damage or compromise the system.
This requirement addresses security-related issues associated with maintenance tools used specifically for diagnostic and repair actions on organizational network devices. Maintenance tools can include hardware, software, and firmware items. Maintenance tools are potential vehicles for transporting malicious code, either intentionally or unintentionally, into a facility and subsequently into organizational information systems. Maintenance tools can include, for example, hardware/software diagnostic test equipment and hardware/software packet sniffers. This requirement does not cover hardware/software components that might support information system maintenance yet are a part of the system (for example, the software implementing ping, ls, ipconfig, or the hardware and software implementing the monitoring port of an Ethernet switch).
Verifying That Maintenance Functions Are Restricted
Verify that RiOS is configured so that performing maintenance functions is restricted to authorized personnel only.
To verify maintenance functions are restricted
1. Connect to the Management Console.
2. Choose Administration > Security: User Permissions to display the User Permissions page.
3. Verify that only authorized personnel have the permissions to perform maintenance functions. If user permissions for authorized personnel are not set to authorize maintenance functions, this is a security vulnerability finding.
Configuring the System so that Maintenance Functions Are Restricted
Configure RiOS to restrict use of maintenance functions to authorized personnel only.
To configure the system so that maintenance functions are restricted
1. Connect to the Management Console.
2. Choose Administration > Security: User Permissions to display the User Permissions page.
3. Under Role Based Accounts, click Add New User Account to expand the page.
4. Set User Permissions of authorized personnel to allow performance of maintenance functions
5. Click Add.
6. Click Save at the top of the page to save these settings permanently.
Ensuring Nonlocal Maintenance Is Restricted
Rule Title: Applications used for nonlocal maintenance sessions must implement cryptographic mechanisms to protect the integrity of nonlocal maintenance and diagnostic communications.
STIG ID: RICX-DM-000134
Rule ID: SV-77471r1_rule Severity: CAT II
Vuln ID: V-62981 Class: Unclass
This security issue requires the use of secure protocols instead of their unsecured counterparts, such as SSH instead of telnet, SCP instead of FTP, and HTTPS instead of HTTP. If unsecured protocols (lacking cryptographic mechanisms) are used for sessions, the contents of those sessions will be susceptible to manipulation, potentially allowing alteration and hijacking of maintenance sessions.
Verifying Nonlocal Maintenance Is Restricted
Verify that RiOS is configured to implement cryptographic mechanisms to protect the integrity of nonlocal maintenance and diagnostic communications.
To verify that nonlocal maintenance is restricted
1. Connect to the CLI and enter these commands:
enable
show configuration full
2. Press the space-bar to scroll through the configuration and verify that these commands are listed:
no telnet-server enable
ssh server enable
web enable
no web http enable
web https enable
If any one of the above settings is missing from the configuration, this is a security vulnerability finding.
Configuring the System so That Nonlocal Maintenance Is Restricted
Configure RiOS to implement cryptographic mechanisms to protect the integrity of nonlocal maintenance and diagnostic communications.
To configure the system so that nonlocal maintenance is restricted
• Connect to the CLI and enter these commands:
enable
config terminal
no telnet-server enable
ssh server enable
ssh server allowed-cyphers aes128-cbc, 3des-cbc,aes192-cbc,aes256-cbc,aes128-ctr,aes192-ctr,aes256-ctr
web enable
no web http enable
web https enable
write memory
exit
exit
Ensuring Applications Implement Cryptographic Mechanisms
Rule Title: Applications used for nonlocal maintenance sessions must implement cryptographic mechanisms to protect the confidentiality of nonlocal maintenance and diagnostic communications.
STIG ID: RICX-DM-000135
Rule ID: SV-77473r1_rule Severity: CAT II
Vuln ID: V-62983 Class: Unclass
This requires the use of secure protocols instead of their unsecured counterparts, such as SSH instead of telnet, SCP instead of FTP, and HTTPS instead of HTTP. If unsecured protocols (lacking cryptographic mechanisms) are used for sessions, the contents of those sessions will be susceptible to eavesdropping, potentially putting sensitive data (including administrator passwords) at risk of compromise and potentially allowing hijacking of maintenance sessions.
Verifying Applications Implement Cryptographic Mechanisms
Verify that RiOS is configured to implement cryptographic mechanisms to protect the confidentiality of nonlocal maintenance and diagnostic communications.
Configuring Applications to Implement Cryptographic Mechanisms
Configure RiOS to implement cryptographic mechanisms to protect the confidentiality of nonlocal maintenance and diagnostic communications.
Ensuring the System Terminates Network Connections
Rule Title: RiOS must terminate all network connections associated with a device management session at the end of the session, or the session must be terminated after 10 minutes of inactivity except to fulfill documented and validated mission requirements.
STIG ID: RICX-DM-000137
Rule ID: SV-77475r1_rule Severity: CAT II
Vuln ID: V-62985 Class: Unclass
Terminating an idle session within a short time period reduces the window of opportunity for unauthorized personnel to take control of a management session enabled on the console or console port that has been left unattended. In addition, quickly terminating an idle session will also free up resources committed by the managed network element.
Terminating network connections associated with communications sessions includes, for example, de-allocating associated TCP/IP address/port pairs at the operating system level, or de-allocating networking assignments at the application level if multiple application sessions are using a single, operating system-level network connection. This does not mean that the device terminates all sessions or network access; it only ends the inactive session and releases the resources associated with that session.
Verifying the System Terminates Network Connections
Verify that RiOS is configured to terminate a device management session at the end of the session, or after 10 minutes of inactivity.
Setting Web Termination
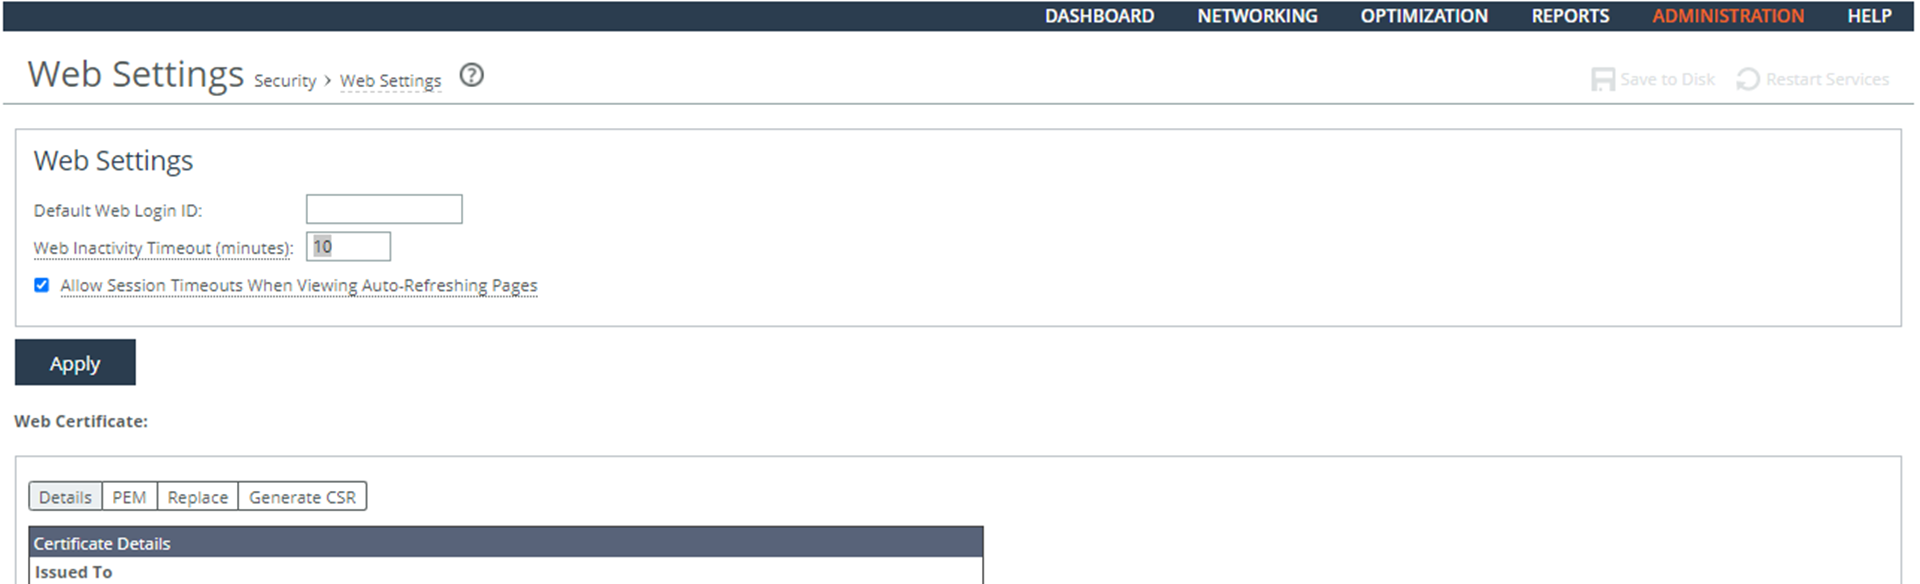
To verify the system terminates network connections
1. Connect to the Management Console.
2. Choose Administration > Security: Web Settings to display the Web Settings page.
3. Verify that Web Inactivity Timeout (minutes) is set to 10. If Inactivity Timeout or Web Inactivity Timeout (minutes) is not set to 10, this is a security vulnerability finding.
Configuring the System to Terminate Network Connections
Configure RiOS to terminate a device management session at the end of the session, or after 10 minutes of inactivity.
To verify the system terminates network connections
1. Connect to the Management Console.
2. Choose Administration > Security: Web Settings to display the Web Settings page.
3. Specify the Web Inactivity Timeout (minutes) to 10.
4. Click Apply.
5. Click Save at the top of the page to save these settings permanently.
Ensuring the System Obtains Approved Public Key Certificates
Rule Title: RiOS must obtain its public key certificates from an appropriate certificate policy through an approved service provider.
STIG ID: RICX-DM-000138
Rule ID: SV-77477r1_rule Severity: CAT II
Vuln ID: V-62987 Class: Unclass
For user certificates, each organization obtains certificates from an approved, shared service provider, as required by OMB policy. For federal agencies operating a legacy public key infrastructure cross-certified with the Federal Bridge Certification Authority at medium assurance or higher, this Certification Authority will suffice.
Verifying the System Obtains Approved Public Key Certificates
Verify that RiOS is configured to obtain its public key certificates from an appropriate certificate policy through an approved service provider.
To verify the system obtains approved public key certificates
1. Connect to the Management Console.
2. Choose Optimization > SSL: Certificate Authorities to display the Certificate Authorities page.
3. Verify that DoD Root Certificates are listed on this page. If no DoD Root CA Certificates are listed on this page, this is a security vulnerability finding.
Configuring the System to Obtain Approved Public Key Certificates
Configure RiOS to use public key certificates from an appropriate certificate policy through an approved service provider.
Adding Certificate Authorities
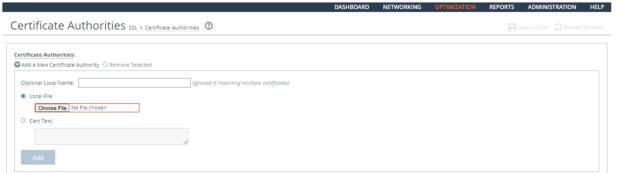
To configure the system to obtain approved public key certificates
1. Connect to the Management Console.
2. Choose Optimization > SSL: Certificate Authorities to display the Certificate Authorities page.
3. Click Add a New Certificate Authority to expand the page.
4. Select Local File and click Browse.
5. Navigate to your local DoD CA Root Certificates and select a certificate.
6. Click Add.
7. Repeat
Step 3 through
Step 6 to add all the remaining DoD CA Root Certificates.
8. Click Save at the top of the page to save these settings permanently.
Ensuring the System Generates Unique Session Identifiers
Rule Title: RiOS must generate unique session identifiers using a FIPS 140-2 approved random number generator.
STIG ID: RICX-DM-000141
Rule ID: SV-77479r1_rule Severity: CAT II
Vuln ID: V-62989 Class: Unclass
Sequentially generated session IDs can be easily guessed by an attacker. Ensuring unique session identifiers are randomly generated helps to protect against brute-force attacks to determine future session identifiers.
Unique session IDs address man-in-the-middle attacks, including session hijacking or insertion of false information into a session. If the attacker is unable to identify or guess the session information related to pending application traffic, they will have more difficulty in hijacking the session or otherwise manipulating valid sessions.
This requirement applies to devices that use a web interface for device management. The recommended best practice is that the FIPS license be installed and used.
Verifying the System Generates Unique Session Identifiers
Verify that RiOS is configured to generate unique session identifiers using a FIPS 140-2 approved random number generator.
To verify the system generates unique session identifiers
1. Connect to the CLI and enter these commands:
enable
configuration terminal
show fips status
2. Verify that FIPS Mode: Enabled is displayed on the console. If FIPS Mode: Enabled is not displayed on the console, this is a security vulnerability finding.
Configuring the System to Generate Unique Session Identifiers
Configure RiOS to generate unique session identifiers using a FIPS 140-2 approved random number generator.
To configure the system to generate unique session identifiers
1. Connect to the CLI and enter these commands:
enable
configuration terminal
fips enable
write memory
reload
show fips status
2. Verify that FIPS Mode: Enabled is displayed on the screen.
Ensuring the System Protects Against Denial of Service Attacks
Rule Title: RiOS must protect against or limit the effects of all known types of Denial of Service (DoS) attacks on the network device management network by employing organization-defined security safeguards.
STIG ID: RICX-DM-000143
Rule ID: SV-77481r1_rule Severity: CAT II
Vuln ID: V-62991 Class: Unclass
DoS is a condition when a resource is not available for legitimate users. When this occurs, the organization either cannot accomplish its mission or must operate at degraded capacity.
This requirement addresses the configuration of network devices to mitigate the impact of DoS attacks that have occurred or are ongoing on device availability. For each network device, known and potential DoS attacks must be identified and solutions for each type implemented. A variety of technologies exist to limit or, in some cases, eliminate the effects of DoS attacks (for example, limiting processes or restricting the number of sessions the device opens at one time). Employing increased capacity and bandwidth, combined with service redundancy, might reduce the susceptibility to some DoS attacks.
The security safeguards cannot be defined at the DoD level because they vary according to the capabilities of the individual network devices and the security controls applied on the adjacent networks (for example, firewalls performing packet filtering to block DoS attacks).
Verifying the System Protects Against Denial of Service Attacks
Verify that RiOS is configured to protect against or limit the effects of all know types of Denial of Service (DoS) attacks on the device management network.
To verify the system protects against denial of service attacks
1. Connect to the Management Console.
2. Choose Administration > Security: Management ACL to display the Management ACL page.
3. Verify that the Enable Management ACL check box is selected.
4. Verify that there is a rule to limit management access from authorized devices and that the interface is set to other than an in-path interface.
If Management ACLs are not defined to limit access to identified or known devices and/or a management interface is not defined that is different from the in-path interface and/or Enable Management ACL is not checked, this is a security vulnerability finding.
Configuring the System to Protect Against Denial of Service Attacks
Configure RiOS to protect against or limit the effects of all known types of Denial of Service (DoS) attacks on the network device management network.
Adding Management ACL Rules
To configure the system to protect against denial of service attacks
1. Connect to the Management Console.
2. Choose Administration > Security: Management ACL to display the Management ACL page.
3. Click Add a New Rule to expand the page.
4. Select the Enable Management ACL check box.
5. Add rules so that the list contains unnecessary and/or nonsecure functional, ports, protocols, and/or services as defined in the PPSM CAL and vulnerability assessments.
Control | Description |
Action | Select the Allow rule type from the drop-down list. |
Service | Specify HTTPS. |
Source Network | Specify the Management device network: for example, 1.2.3.0/24. |
Interface | Select an interface used for network management from the drop-down list. |
Description | Set to enable ease of management. |
Add | Adds the rule to the list. The Management Console redisplays the Rules table and applies your modifications to the running configuration, which is stored in memory. |
6. Click Add a New Rule to expand the page and repeat all actions for SSH.
7. Click Apply.
8. Click Save at the top of the page to save these settings permanently.
Ensuring the System Generates Alerts to Security Personnel
Rule Title: RiOS must generate an alert that can be sent to security personnel when threats identified by authoritative sources (for example, chief technology officers) and in accordance with Chairman of the Joint Chiefs of Staff Manuals (CJCSM) 6510.01B occur.
STIG ID: RICX-DM-000144
Rule ID: SV-77483r1_rule Severity: CAT II
Vuln ID: V-62993 Class: Unclass
By immediately displaying an alarm message, potential security violations can be identified more quickly even when administrators are not logged into the network device. An example of a mechanism to facilitate this would be through the utilization of SNMP traps.
Verifying the System Generates Alerts to Security Personnel
Verify that RiOS uses automated mechanisms to alert security personnel to threats identified by authoritative sources.
Configuring the System to Generate Alerts to Security Personnel
Configure RiOS to use automated mechanisms to alert security personnel to threats identified by authoritative sources.
Ensuring Applications Only Reveal Error Messages to Authorized Personnel
Rule Title: The application must reveal error messages only to authorized individuals (ISSO, ISSM, and SA).
STIG ID: RICX-DM-000145
Rule ID: SV-77485r1_rule Severity: CAT II
Vuln ID: V-62995 Class: Unclass
Only authorized personnel should be aware of errors and the details of the errors. Error messages are an indicator of an organization's operational state. Additionally, sensitive account information must not be revealed through error messages to unauthorized personnel or their designated representatives.
Verifying the System Restricts Error Messages
Verify that RiOS is configured to reveal error messages only to authorized individuals (ISSO, ISSM, and SA).
Configuring the System Restricts Error Messages
Verify that RiOS is configured to reveal error messages only to authorized individuals (ISSO, ISSM, and SA).