About Amazon AWS deployments
While the Cloud Portal makes it easy to provision appliances, you may want to manually deploy them if:
• you are provisioning appliances in the AWS in the GovCloud (US) region.
• you are provisioning appliances in the AWS in the China region.
• you have multiple AWS accounts and need appliances in more than one region.
• you are provisioning CCX-SUB-PERF-TIER models.
Riverbed Support needs to grant you access to the Riverbed AMIs. Ensure that your Riverbed Support representative has this information so that they can enable your AWS account with permission to view and launch the appropriate private AMIs.
If you have multiple accounts, ensure you provide the ID for the account associated with your target regions.
Your Riverbed AMIs will be accessible under your EC2 dashboard > Images > AMIs > Private AMIs.
To migrate your appliance configuration from an M4 to M5 instance, upgrade your M4 instance to the same version running on your M5 instance, export the configuration from the appliance on the M4 instance, and then import the configuration to a newly installed appliance on the M5 instance. Appliance tier and version must match between exported and imported configuration.
Deploying on AWS Marketplace
To complete this process you must provide an Amazon Machine Image (AMI), security group, key pair, and one-time token. Have this information at hand before beginning the process.
1. Log in to your AWS account, and navigate to the EC2 dashboard.
2. Select AMIs in the Images section of the navigation pane. Select Public Images from the drop-down menu to the left of the search bar. Choose the Riverbed SteelHead AMI and launch it.
3. Select an instance type and configure it. For advanced details, under User Data, select As Text and enter this information into the text field:
ds=/dev/xvdq
appname=MarketplaceDeployedSteelHead
lshost=cloudportal.riverbed.com
rvbd_dshost=cloudportal.riverbed.com
lott=XXXXXXXX-XXXX-XXXX-XXXX-XXXXXXXXXXXX
where:
ds—The device node in which the appliance expects the data store EBS volume to appear. Due to changes in EC2 architecture, set this to /dev/xvdq.
appname—Name of the appliance.
lshost—Fully qualified domain name of the licensing server. This name is usually the Cloud Portal.
rvbd_dshost—Fully qualified domain name of the discovery server. This name is usually the Cloud Portal.
lott—One-time token used to redeem the license. You obtain this token on the Cloud Portal. Apply the token to the appliance through its Management Console.
4. Add storage. Optionally, add tags. You might find tags useful if you want to group resources together.
5. Choose a security group for the virtual appliance. To connect together the Cloud Accelerator, the Discovery Agent, and the client-side appliances, configure the security group so that the appliance allows
– incoming UDP connections from the Discovery Agent on port 7801 to 7850.
– incoming TCP connections from client-side appliances on ports 7800, and 7810 to 7850 for acceleration.
– CLI and Management Console access on ports 22, 80, and 443.
– TCP connections between the Cloud Accelerator and client-side appliances.
6. Review the instance details, and then launch it.
7. Create, and then attach a data store disk. This disk is in addition to the root volume. We recommend solid-state drives. Ensure that the availability zone is set to the zone where the appliance resides. Under Instance, select instance-id > Device and enter /dev/xvdq and attach the disk.
Deploying on AWS Virtual Private Cloud
Amazon Virtual Private Cloud (VPC) provides logically isolated virtual networks that you configure and control. Each virtual private network is isolated from other networks in AWS. You can specify an IP address range of your choice, and add subnets, gateways, and security groups to your VPC.
Amazon VPC provides various levels of security. At the highest level, you connect to the VPC through a VPN tunnel. Less secure traffic can access private subnets through an internet gateway. You can also configure a VPC with both a VPN gateway and an internet gateway to enable some instances to receive internet traffic (for example, web servers), whereas others could remain unexposed (for example, database servers).
This section describes how to deploy an appliance using different levels of security and includes configuration caveats.
VPC with VPN connections to data centers
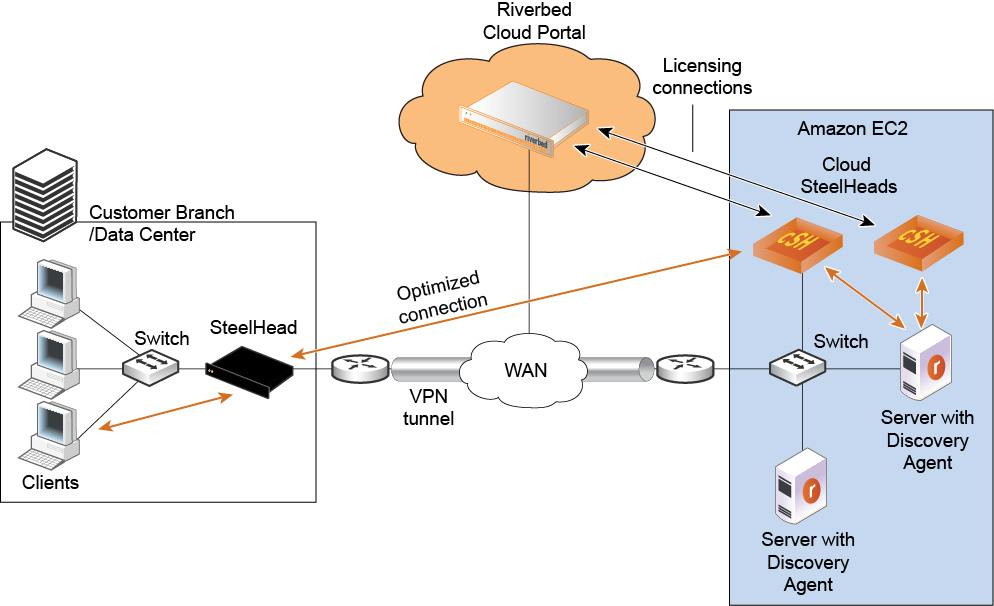
In this scenario, the appliance has a single IP address from the pool of private VPC addresses. Therefore, there is no special configuration required to deploy the appliance. As long as you connect the appliance to the Cloud Portal, autodiscovery and auto-reconfiguration work; that is, when instances change their IP addresses, the portal automatically detects them.
Figure: Using Amazon VPC through a VPN tunnel without NAT shows how to deploy appliances and servers in a VPC with a VPN connection. In this network, servers in Amazon use private IP addresses, and the VPN tunnel provides an extension of your network into AWS.
Using Amazon VPC through a VPN tunnel without NAT
VPC without VPN connections to data centers
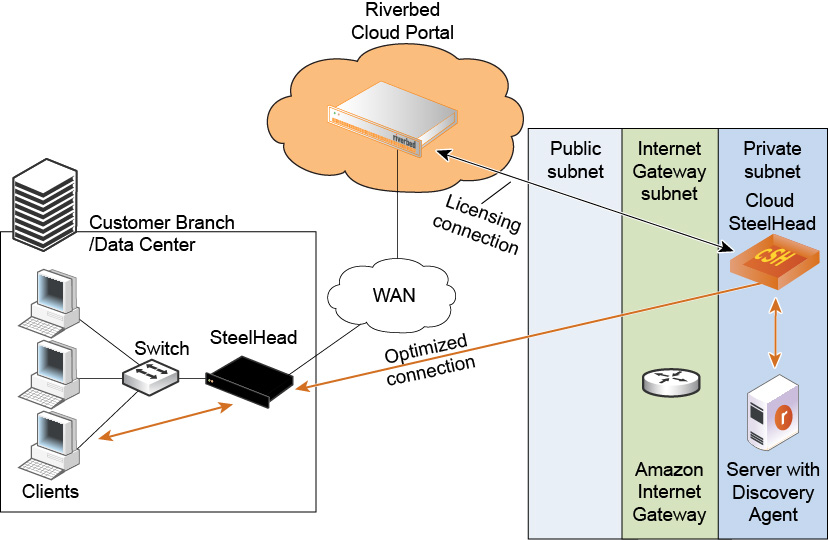
When you use a VPC without a VPN connection, you access the Amazon VPC through the Amazon internet gateway that translates the private IP addresses in the VPC to public IP addresses. In this scenario, the Cloud Portal detects the private IP address of appliances and the Discovery Agent. It also detects the elastic IP address that you manually configure using the AWS console. Ensure that you configure ACLs and security groups so that the appliance can communicate with the Cloud Portal.
Figure: Using Amazon VPC through the internet with NAT shows how to deploy appliances and servers in a VPC without a VPN connection.
Using Amazon VPC through the internet with NAT
VPC through internet with NAT
Configure a VPC without an IPsec tunnel by modifying the security group of the AWS EC2 instances running the Discovery Agent. Add the public IP address of the machines that access the server from outside the VPC, such as the virtual appliances in the customer data center. Add the security group of the Cloud Accelerator (enable access to all ports). On the security group, configure these settings:
• Add the public IP address of the machines that access the server from outside the VPC, such as the virtual appliances in the customer data center.
• Enable access to port 7800 and port 7810 for TCP.
Add the private IP addresses of all local AWS instances running the Discovery Agent, allowing access to all ports for TCP and UDP.
VPC through VPN without NAT
Configure a VPC through the VPN by modifying the security group of the AWS EC2 instances running the Discovery Agent.
Add the private IP address of the remote server for the ports used by the application to accelerate. Add the security group of the appliance (enable access to all ports). On the security group, add the public IP address of the remote appliance and enable it to access port 7800 and port 7810.