Configuring SteelFusion Core in iSCSI Mode
This chapter describes how to install and configure Core in iSCSI/block mode. It includes these sections:
For details about installing Core-v, see
Installing Core-v. Read and follow the safety guidelines described in the Safety and Compliance Guide. Failure to follow these safety guidelines can result in damage to the equipment.
Choosing a network deployment
The Core is typically deployed on a LAN, with communication between appliances taking place over a private WAN or VPN. Because communication between Edges and the Core typically takes place over a secure WAN, it is not necessary to configure company firewalls to support Core-specific ports.
To configure your firewall to support Core-specific ports, see
Firewall requirements.
For detailed information about your deployment options and best practices for deploying SteelFusion Core, see the SteelFusion Design Guide.
Before you begin the installation and configuration process, you must select a network deployment.
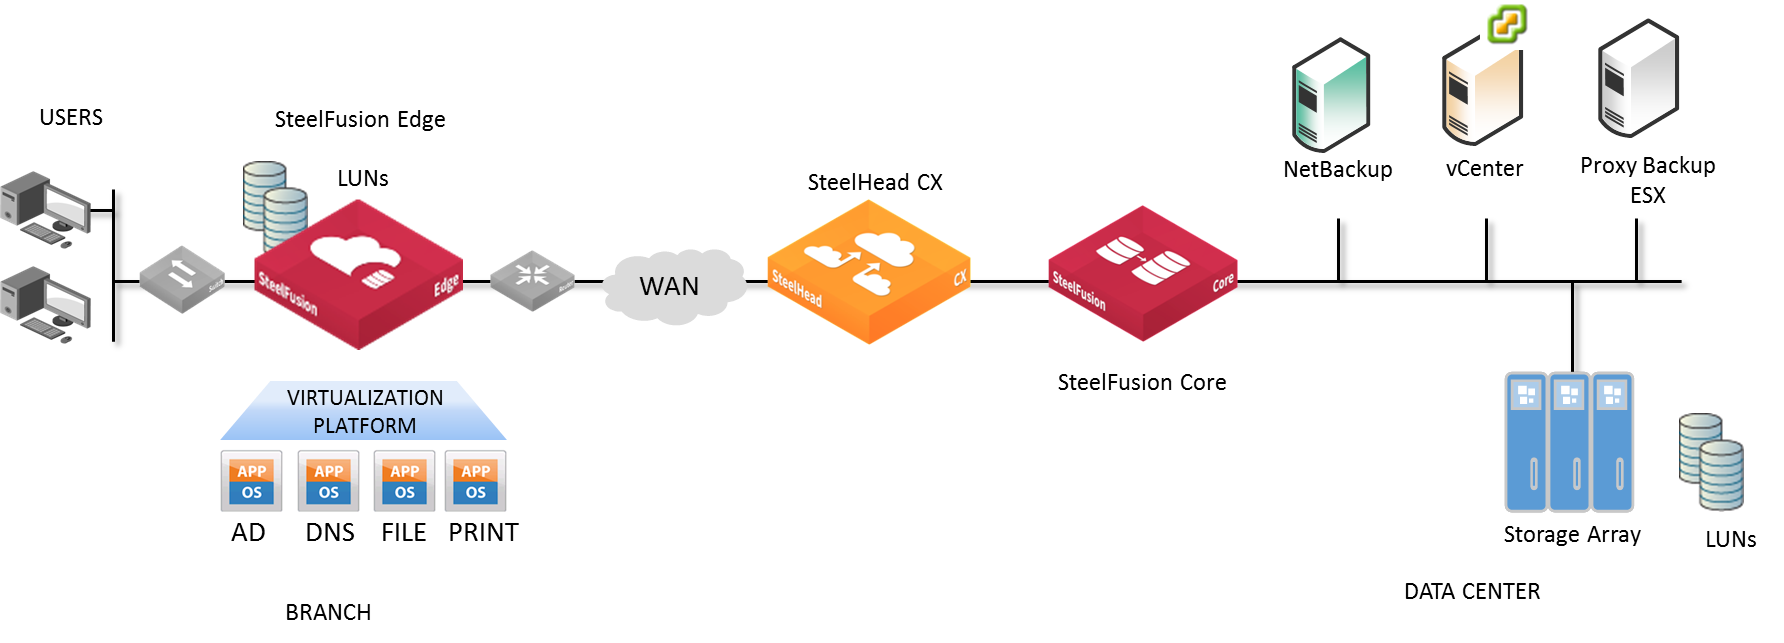
Typical SteelFusion deployment
Checking your inventory
Your shipping carton contains the following items:
•SteelFusion Core
•One standard Ethernet straight-through cable
•One serial null-modem cable
•One or two power cables (depending on your order)
Aside from country-specific requirements, all systems ship with the same power cable. The power cable has an IEC 60320 C13 plug on one end (to connect to the Core) and a country-specific plug that fits the wall socket for that country. If a system has two power supplies, it ships with two suitable cables.
You must always connect the Core using either the cable in the accessories box or another cable that is approved for use by the IEC in the country in which the appliance is connected.
•One Phillips-head screwdriver
•One mounting kit
•Documentation kit
If any items are damaged or missing, notify Riverbed Support at
https://support.riverbed.com for replacement or repair.
Preparing your site for installation
The Core is shipped completely assembled with all the equipment parts in place and securely fastened.
Before you install the Core, make sure that your site meets the following requirements:
•Ethernet connections are available within the standard Ethernet limit.
•There is available space on a four-post 19-inch rack. For details about installing the Core to a rack, see the Rack Installation Guide or the printed instructions that were shipped with the system.
•A clean power source is available, dedicated to computer devices and other electronic equipment.
•The rack is a standard 19-inch Telco-type mounting rack.
We recommend that you use a four-post mounting rack for 2U systems.
If your rack requires special mounting screws, contact your rack manufacturer.
Core ports
This table summarizes the ports used to connect the Core to your network.
Port | Description |
Console | Connects the serial cable to a terminal device. You establish a serial connection to a terminal emulation program for console access to the configuration wizard and the Core CLI. |
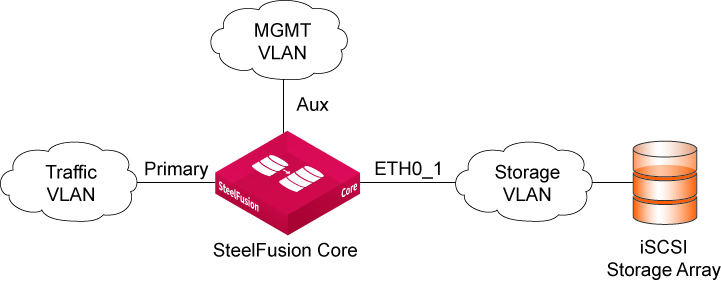
Primary (PRI) | The PRI connects the Core to a VLAN switch through which users connect to the Management Console and the Core CLI. This port is also typically used for communication with Edges. Note: The primary and auxiliary ports cannot share the same network subnet. |
Auxiliary (AUX) | The AUX port connects the Core to the management VLAN. Note: The primary and auxiliary ports cannot share the same network subnet. |
ETH0_1 through ETH0_3 | Connects the ETH0_1, ETH0_2, ETH0_3 ports of the Core and the LAN switch using a straight-through cable. Note: If Core is deployed between two switches, all ports must be connected with straight-through cables. |
Core ports
NIC interface naming conventions
The interface names for the network interface cards are a combination of the slot number and the port pairs (<slot>_<pair>, <slot>_<pair>). For example, if a four-port network interface card is located in slot 1 of your appliance, the interface names are ETH1_0, ETH1_1, ETH1_2, and ETH1_3, respectively. Alternatively, if the network interface card is located in slot 2 of your appliance, the interface names are ETH2_0, ETH2_1, ETH2_2, and ETH2_3, respectively.
For detailed information about installing additional NICs, see the Network and Storage Card Installation Guide.
Powering on the Core
This section describes how to connect the AC power and how to power on the system.
In European electrical environments you must ground (earth) the green/yellow tab on the power cord to avoid the risk of electrical shock.
To power on the system
1. Ensure that the system and master power switch is in the off position on the rear of the Core.
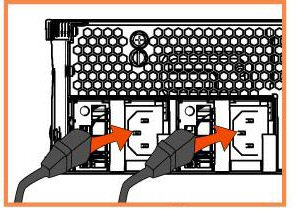
2. Plug the AC power cords into the Core.
Connecting the AC power
3. Plug the AC power cord into an uninterrupted AC power source.
4. Press the master power switch on the Core for 4 to 6 seconds.
If Core does not immediately power on, press the system power switch again.
5. Check the status lights on the Core.
The system takes about 2 to 5 minutes to boot.
Configuring the Core
In a physical out-of-path deployment, the Core is not in the direct path between the client and the server.
Configuration wizard
The configuration wizard automatically starts when you log in to the CLI for the first time.
The following rules apply to the configuration wizard:
•Click Enter to enter the default value.
•Click the ? icon for help.
•Press Ctrl+B to go back to the previous step.
If you quit the configuration wizard, you can restart it from the Core CLI. You must be in configuration mode to restart the configuration wizard.
To run the configuration wizard
1. Plug the serial cable into the Serial/Console port and a terminal.
2. Start your terminal emulation program, such as Tera Term Pro.
The terminal device must have the following settings:
•Baud rate: 9600 bps
•Data bits: 8
•Parity: none
•Stop bits: 1
•VT100 emulation
•No flow control
We recommend that you connect the console port to a device that logs output. Even though this connection is not a requirement, it can help you to identify problems with the system.
3. Log in as administrator user (admin) and enter the default password (password). For example:
login as: admin
Sent username "admin"
password: password
The configuration wizard automatically starts after you have entered the login and default password. After you have established a connection, you configure the Core using the configuration wizard.
4. To start the configuration wizard, enter yes at the system prompt.
Do you want to use the configuration wizard for initial configuration? yes
5. Complete the configuration wizard steps as described in this table.
Wizard prompt | Description | Example |
Step 1: Host name? | Enter the hostname for the Core. | hostname? amnesiac |
Step 2: Use DHCP on the primary interface? | You are given the option to enable the DHCP to automatically assign an IP address to the primary interface for the Core. We recommend that you do not set DHCP. The default value is yes. | Use DHCP? no |
Step 3: Primary IP address? | Enter the IP address for the Core. | Primary IP address? 10.64.8.42 |
Step 4: Netmask? | Enter the netmask address. | Netmask? 255.255.x.x |
Step 5: Default gateway? | Enter the default gateway for the Core. | Default gateway? 10.x.8.x |
Step 6: Primary DNS server? | Enter the primary DNS server IP address. | Primary DNS server? 10.64.x.x |
Step 7: Domain name? | Enter the domain name for the network where the Core is to reside. If you set a domain name, you can enter hostnames in the system without the domain name. | Domain name? zuk.lab.nbttech.com |
Step 8: Admin password? | We strongly recommend that you change the default administrator password at this time. The password must be a minimum of six characters. The default administrator password is password. | Admin password? xxxyyy |
The system confirms your settings.
You have entered the following information:
1. Hostname: amnesiac
2. Use DHCP on primary interface: no
3. Primary IP address: 10.64.8.42
4. Netmask: 255.255.x.x
5. Default gateway: 10.x.8.x
6. Primary DNS server: 10.64.x.x
7. Domain name: zuk.lab.nbttech.com
8. Admin password: xxxyyy
To change an answer, enter the step number to return to.
Otherwise hit <enter> to save changes and exit.
Choice:
The Core’s configuration wizard automatically saves your configuration settings.
6. To log out of the system, enter the exit command at the system prompt:
amnesiac > exit
To restart the configuration wizard
•Enter the following set of commands at the system prompt:
amnesiac > enable
amnesiac > # configure terminal
amnesiac > (config) # configuration jump-start
For detailed information about the CLI, see the Riverbed Command-Line Interface Reference Manual.
Connecting Core to your network
You use standard Ethernet straight-through cables to connect to your network in an out-of-path configuration. Make sure that you use the correct cable to establish your network connections:
•Straight-through cable - Primary and Ethernet ports on the appliance to the LAN switch.
To connect to your network
•Plug the straight-through cable into the primary port of the Core and the LAN switch.
This port can be any one on your LAN switch configured to connect to a host.
Connecting the primary port to the LAN switch

Connecting to the SteelFusion Core Management Console
After you configure the Core, you can check and modify your configuration settings and view performance reports and system logs in the Management Console. You can connect to the Management Console through any supported web browser.
To connect to the SteelFusion Core Management Console, you must know the host, domain, and administrator password that you assigned in the configuration wizard.
Cookies and JavaScript must be enabled in your web browser.
To connect to the SteelFusion Core Management Console
1. Specify the URL for the SteelFusion Core Management Console in the location box of your web browser:
<protocol>://<host>.<domain>
–<protocol> is http or https. HTTPS uses the SSL protocol to ensure a secure environment. If you use HTTPS to connect, you are prompted to inspect and verify the SSL key.
–<host> is the hostname you assigned to the Core during initial configuration. If your DNS server maps that IP address to a name, you can specify the DNS name.
–<domain> is the full domain name for the Core.
Alternatively, you can specify the IP address instead of the host and domain.
The SteelFusion Core Management Console appears, displaying the Sign In page.
Sign in page
2. In the Username text box, type the user login.
The default login is admin. Users with administrative (admin) privileges can configure and administer the Core. Users with monitor privileges can view the Core reports, user logs, and change their own password. A monitor user cannot make configuration changes.
3. In the Password text box, type the password you assigned in the Core’s configuration wizard. (Core is shipped with the default password: password.)
4. Click Sign In to display the Home page.
The Home page summarizes the current status of your system.
Viewing version information
You can view version information by logging in to the CLI and entering the show version all command.
For example:
amnesiac > show version all
Product name: rbt_dva
Product release: 4.0.0
Build ID: #40_2
Build date: 2015-02-16 17:30:28
Build arch: x86_64
Built by: root@basel
Uptime: 14d 21h 0m 46s
Product model: 3500
System memory: 334 MB used / 3611 MB free / 3945 MB total
Number of CPUs: 2
CPU load averages: 0.00 / 0.01 / 0.00
Configuring the Core with Edges
This section describes the procedures for configuring the connection between the Core and the iSCSI targets, and the Core and the Edges. It includes these sections:
Prerequisites
Before you can connect an Edge to the Core, ensure the following conditions and procedures have been completed:
•Assign an IP address or hostname to the Core.
•Determine the iSCSI Qualified Name (IQN) to be used for the Core.
When you configure the Core, you will set this value in the initiator configuration.
•Set up your storage array:
–Register the Core IQN.
–Configure the iSCSI portal, targets, and LUNs, with the LUNs assigned to the Core IQN.
•Assign an IP address or hostname to the Edge.
Configuring the Edge
Before you configure the Core, we recommend that you configure branch storage on the Edge. All hypervisor storage is provided by RiOS through iSCSI using Riverbed BlockStream technology. A hypervisor has no local disks for storage. When a Core is connected to the Edge, you can use it to manage remote storage at your data center. This configuration allows future expandability.
This section shows you how to:
•connect the Edge to the Core by assigning a self-identifier for the Edge functionality.
•configure storage to allow space for the Edge blockstore.
•configure the Core.
Connecting the Edge to the Core
You configure connectivity to the Core in the Edge’s Storage page. The Edge module virtually presents one or more iSCSI targets in the branch that can be used by services and systems running both within the hypervisor as well as externally to the Edge. Edge features the BlockStream, which is essentially an on-disk local cache that mirrors the complete persistent storage on the Core-side LUN(s).
The Core must be running version 3.6 or later.
To connect an Edge to a Core
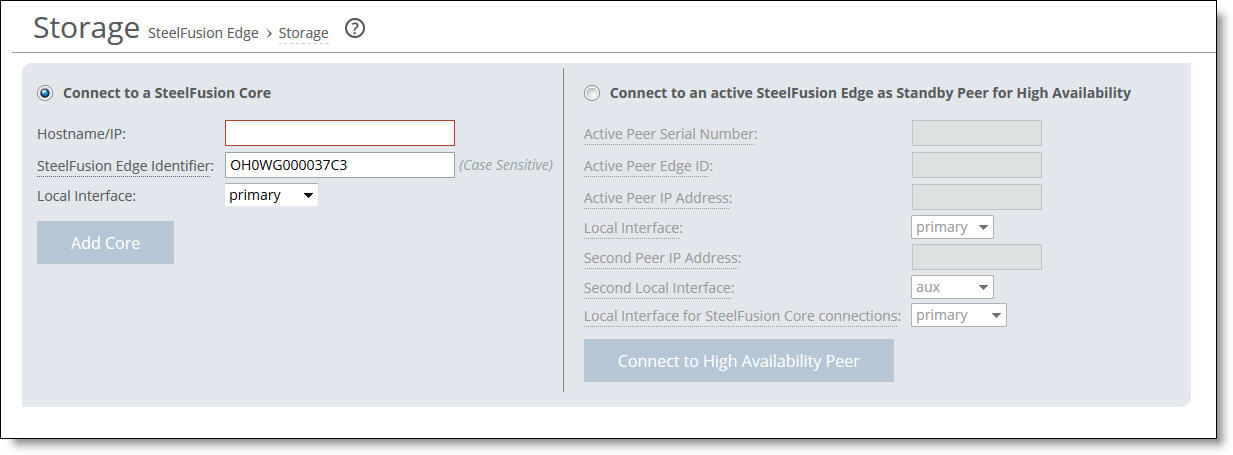
1. On the Edge, choose Storage > Storage Edge Configuration to display the Storage page.
2. Use the controls to complete the configuration as described in this table.
Control | Description |
Hostname/IP | Specify the Core’s hostname or IP address. |
SteelFusion Edge Identifier | Specify a value by which the current appliance can be recognized by the Core. You may use any value: for example, the appliance’s hostname. Note: The Edge identifier is case sensitive. Note: If failover is configured, both appliances must use the same self-identifier. In this case, you can use a value that represents the group of appliances. |
Local Interface | A drop-down list of currently configured local interfaces for the current Edge to use when connecting to the Core. Click Add Interface to add another interface. |
Add Core | Click to add the Core configuration. |
Configuring storage
You can configure the disk storage to allow space for the Edge blockstore using the Hypervisor Installer on the Edge. Free disk space is divided between the hypervisor and the Edge blockstore. For details on the Hypervisor Installer, see “Using the Hypervisor Installer” in the SteelFusion Edge User Guide.
Configuring the Core
This section describes the procedures for configuring the Core using the SteelFusion Core Management Console.
After initial setup, you can further modify the Core configuration using the relevant pages in the SteelFusion Core Management Console.
This section describes the following tasks:
Performing initial configuration with the Settings Wizard
The SteelFusion Core Management Console provides the Settings Wizard, which enables you to quickly configure your network, time zone, and initiator settings, and to map LUNs to Edges.
You can modify all the settings performed in the Settings Wizard elsewhere in the SteelFusion Core Management Console, as indicated in each of the procedures.
The first time you log in to the Core appliance, the Settings Wizard displays automatically. You can also access it manually.
Configuring network settings
The Settings Wizard enables you to quickly configure basic network and time zone settings.
To set the initial network configuration
1. Choose Configure > Wizards: Initial Setup to display the Settings Wizard.
Settings Wizard - System Settings page
2. Configure the System Settings using the controls described in this table.
Control | Description |
Hostname | Specify the IP address or hostname of the Core. Note: After initial configuration, this setting can be modified in the Configure > Networking: Host Settings page in the SteelFusion Core Management Console. |
DNS Server IP Address | Specify the IP address for the primary name server. Note: After initial configuration, this setting can be modified in the Configure > Networking: Host Settings page in the SteelFusion Core Management Console. |
Obtain IPv4 Address Automatically | Specify this option to automatically obtain the IPv4 address from a DHCP server. A DHCP server must be available so that the system can request the IP address from it. Note: After initial configuration, this setting can be modified in the Configure > Networking: Host Settings page in the SteelFusion Core Management Console. |
Specify IPv4 Address Manually | Specify this option if you do not use a DHCP server to set the IP address. Specify the following settings: •IPv4 Address - Specify an IPv4 address. •IPv4 Subnet Mask - Specify a subnet mask. •Default IPv4 Gateway - Specify the primary gateway IP address. The primary gateway must be in the same network as the primary interface. Note: After initial configuration, this setting can be modified in the Configure > Networking: Management Interfaces page in the SteelFusion Core Management Console. |
Time Zone | Select the time zone from the drop-down list. Note: After initial configuration, this setting can be modified in the Configure > Networking: Management Interfaces page in the SteelFusion Core Management Console. |
3. Click Next to save the settings and display the Confirmation page.
The Confirmation page summarizes the settings you configured in the preceding pages.
Settings Wizard - Confirmation page
4. Click Back to go back and modify the settings or click Save and Apply to complete this set of configuration settings.
The Finish page displays.
Mapping LUNs to Edges
The LUN mapping pages enable you to quickly add LUNs, Edges, and iSCSI portals and targets to the Core configuration.
To map LUNs to Edges
1. Choose Configure > Wizards: LUN Mapping to display the LUN Mapping Wizard.
LUN Mapping Wizard
2. In the iSCSI Initiator Name field, specify the iSCSI Qualified Name (IQN) determined in
Prerequisites.
3. Click Next.
The Before You Begin page displays prerequisites already discussed in this guide.
4. Click Next to display the Specify Portal page.
LUN Mapping Wizard - Specify Portal page
5. Specify the iSCSI portal using the controls described in this table.
Control | Description |
Select from known Portals | From the IP address drop-down list, select a previously configured iSCSI portal. Appliances that appear in this list are independently configured in the Configure > Storage Array: iSCSI, Initiators, MPIO page. |
Add new Portal | Specify the IP address and port for the intended iSCSI portal. |
6. Click Next to display the Manage Targets page.
LUN Mapping Wizard - Manage Targets page
7. Select and add targets from the top panel, which displays the targets discovered on the portal selected in the previous page.
8. Click Next to display the Mount LUNs page.
LUN Mapping Wizard - Mount LUNs page
9. Select and add LUNs from the top panel, which displays the LUNs discovered on the targets selected in the previous page.
10. Click Next to display the Specify SteelFusion Edge page.
LUN Mapping Wizard - Specify SteelFusion Edge page
11. Specify the Edge using the controls described in this table.
Control | Description |
Select from known SteelFusion Edges | From the SteelFusion Edge Identifier drop-down list, select a previously configured Edge. Note: After initial configuration, this setting can be modified in the Configure > Manage: SteelFusion Edges page in the SteelFusion Core Management Console. You can also add more Edges. |
Add new SteelFusion Edge | Specify the hostname for the intended Edge. |
12. Click Next to display the Map LUNs to Edge page.
13. Select and map LUNs from the top panel, which displays the unmapped LUNs, to the Edge selected in one of the preceding pages.
LUN Mapping Wizard - Map LUNs to Edge page
14. Click Next to display the Summary page.
The Summary page displays the settings configured in the LUN settings pages and provides links directly to the related configuration pages.
15. Click Exit to complete the set-up procedure.
Confirming the connection to an Edge
This section describes how to confirm that a specific Edge is communicating with the newly configured Core.
To confirm the connection
2. Choose Storage > Storage Edge Configuration to display the Storage page.
SteelFusion Storage page - without any configuration
SteelFusion Storage page - with Edge high availability configured
Performing additional configuration settings
After performing the initial setup using the Settings Wizard, you can configure additional iSCSI initiators and LUNs, connect to more Edges, configure authentication using Challenge-Handshake Authentication Protocol (CHAP), and set up storage array snapshots.
•Configuring iSCSI settings - You can view and configure the iSCSI initiator, portals, and targets in the iSCSI Configuration page.
The iSCSI initiator settings configure how the Core communicates with one or more storage arrays (targets) through the specified portal configuration. After configuring the iSCSI portal, you can open the portal configuration to configure targets.
•Configuring LUNs - You can configure block disk, iSCSI, and Edge Local LUNs in the LUNs page.
Typically, block disk and iSCSI LUNs are used to store production data. They share the space in the blockstore cache of the associated Edges, and the data is continuously replicated and kept synchronized with the associated LUN in the data center. The Edge blockstore caches only the working set of data blocks for these LUNs; additional data is retrieved from the data center when needed.
Edge Local LUNs are used to store transient and temporary data. Local LUNs also use dedicated space in the blockstore cache of the associated Edges, but the data is not replicated back to the data center LUNs.
•Adding Edges - After you configure the LUNs and Edges for the Core, you can map the LUNs to the Edges to which they are to be exposed.
You complete this mapping through the Edge configuration in the SteelFusion Core Management Console by selecting the Edge configuration from the list in the Configure > Manage: SteelFusion Edges page.
•Configuring snapshots - You can implement block level snapshots for specified storage arrays, configure snapshot schedule policies (which you can be apply to configured LUNs), and configure hosts for snapshot scripting in the Snapshots page.
For details about these configuration procedures, see the SteelFusion Core User Guide.