Enabling REST API access
You enable access to the Riverbed REST API in the Administration > Security: REST API Access page. REST API is enabled by default.
Representational State Transfer (REST) is a framework for API design. REST builds a simple API on top of the HTTP. It is based on generic facilities of the standard HTTP protocol, including the six basic HTTP methods (GET, POST, PUT, DELETE, HEAD, INFO) and the full range of HTTP return codes. You can discover REST APIs by navigating links embedded in the resources provided by the REST API, which follow common encoding and formatting practices.
You can invoke the REST API to enable communication from one Riverbed appliance to another through REST API calls, for example, a SteelCentral NetProfiler retrieving a QoS configuration from a SteelHead.
For all uses you must preconfigure an access code to authenticate communication between parties and to authorize access to protected resources.
The REST API calls are based on the trusted application flow, a scenario where you download and install an application on some host, such as your own laptop. You trust both the application and the security of the host onto which the application is installed.
For example, suppose you install a Python script on a Linux box that queries QoS policies on a SteelHead and prints a summary as text output. You install the script under your home directory and configure the script with credentials to access the SteelHead. Once set up, you can simply log in to the Linux box and run the script. Because you already preconfigured credentials with the SteelHead, you can run the script without any user interaction after logging in. This trusted application flow enables you to schedule execution through cron or chain it with other scripts that process the text data and combine it with other functionality.
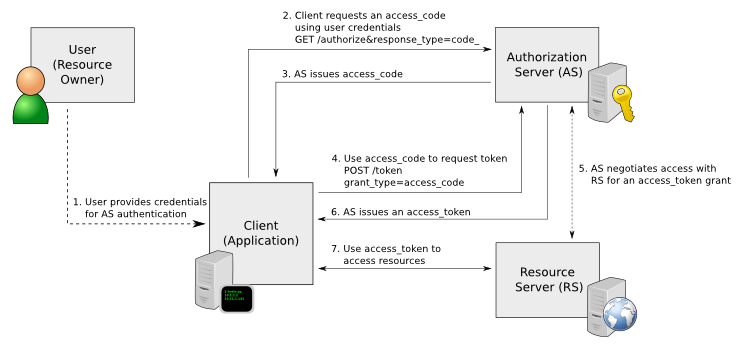
This basic authentication sequence assumes you have already downloaded the Python script and installed it on a Linux box:
REST API Access Authentication Sequence

To enable REST API access
1. Choose Administration > Security: REST API Access to display the REST API Access page.
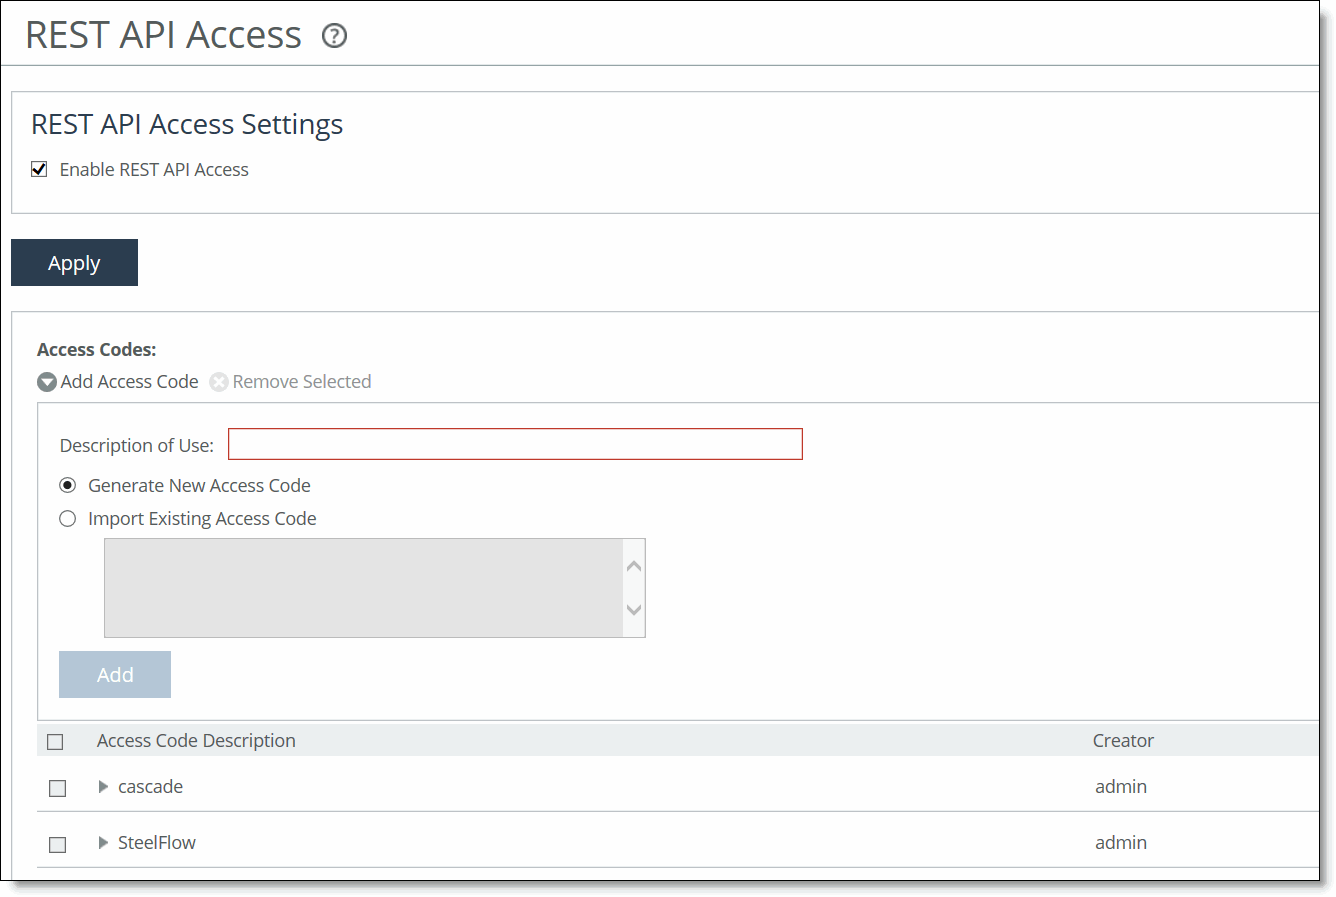
REST API Access page

2. Under REST API Access Settings, select the Enable REST API Access check box.
3. Click Apply to apply your changes to the running configuration.
4. Click Save to Disk to save your settings permanently.
Before an appliance can access the REST API, you must preconfigure an access code for the system to use to authenticate access.
To preconfigure the access code
1. Choose Administration > Security: REST API Access to display the REST API Access page.
2. Click Add Access Code.
3. Under Access Codes, type a description such as the hostname or IP address of the appliance you are using.
4. To create a code, select Generate New Access Code.
To use an existing code, select Import Existing Access Code.
5. Click Add.
The access code description appears in the access code table along with the name of the user who created it.
6. Click the access code description to display the access code.
7. Copy the access code from the text field into a text editor such as Notepad.
To use the access code in your external script
• Copy the access code copied from the Management Console REST API Access page into the configuration file of your external script. The script uses the access code to make a call to the appliance or system to request an access token. The appliance/system validates the access code and returns an access token for use by the script. Generally, the access token is kept by the script for a session only (defined within your script), but note that the script can make many requests using the same access token. These access tokens have some lifetime—usually around an hour—in which they’re valid. When they expire, the access code must fetch a new access token. The script uses the access token to make REST API calls with the appliance or system.


