Predeployment Tasks
This chapter describes predeployment tasks to make sure you can deploy your NetIM properly. We recommend you complete these tasks before deploying NetIM:
Understand the NetIM features and architecture
NetIM provides agentless infrastructure component monitoring to deliver a comprehensive picture of how your infrastructure affects network and application performance and end-user experience.
NetIM offers a broad overview of how the devices on your network are performing to complement your network and application performance management visibility. NetIM supports these functions:
• Real-time monitoring—NetIM leverages multiple approaches (for example, synthetic testing, SNMP, CLI) to identify new and changed infrastructure components.
• Analytics—Measure current performance and identify violations.
• Topology and paths—Visualize and triage issues quickly.
• Troubleshooting—Search-based workflows and on-demand network paths help you quickly identify and troubleshoot infrastructure performance issues.
• Event and alert visibility—Configure alerts based on metric threshold violations, syslog, and traps and use the Alerts page to view, filter, and drill down into details.
• Reporting—Report on infrastructure inventory, configuration, and performance metrics.
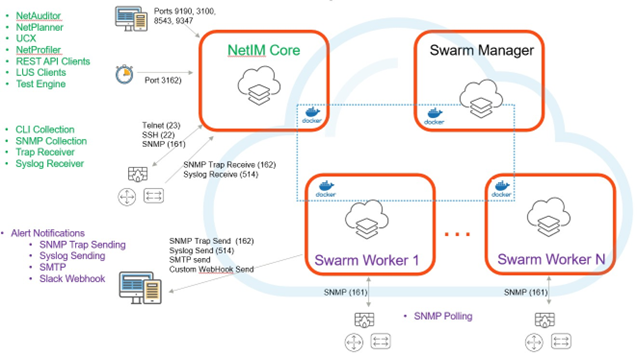
Main architectural components in NetIM deployed on an ESXi with docker swarms
For more details on NetIM features, see the Alluvio NetIM User Guide.
Ensure your hypervisor platform is supported
NetIM supports these hypervisor platforms:
• VMware Hypervisor ESXi 6.5, 6.7, 7.0
• Azure Hypervisor
• Amazon Web Services (AWS) Hypervisor
The NetIM Virtual Appliance OVA is certified for deployment on VMware ESXi. In many cases, NetIM may be successfully deployed on other major hypervisors (for instance, KVM, AHV); however, these other hypervisors have not been quality assured or certified. Further, Riverbed maintains the right to deny support and provide support only on a best-effort basis for deployment on uncertified hypervisors.
Validate the VM deployment
This section provides hypervisor setup recommendations. You need one or more ESXi servers (located in the same data center) with resources to provision at least three virtual machines (VMs). Each VM needs a minimum of four virtual CPUs, 16 GB of RAM, and 175 GB of disk space (75 GB for OS partition and 100 GB for application and persistence partition).
Consider these recommendations when you use the hypervisor implementation process:
• Be cautious when you use VM Snapshots and vMotion.
• Make sure you meet the SSD requirements.
• Ensure you provide the correct NIC capacity.
• Document the IP addressing and subnetting plan.
• Be sure to configure your NTP server.
For more information, see the Alluvio NetIM System and Deployment Requirements Guide.
Select the size of your VMs and follow system and deployment requirements
Each deployment can handle a specific number of devices and interfaces and requires a specific number and size of NetIM components.
To select the compute capacity (CPUs), memory, and storage to deploy NetIM, see the Alluvio NetIM System and Deployment Requirements Guide.
Check additional specifications for deployment
NetIM can be used in different deployment environments and scenarios. See the Alluvio NetIM System and Deployment Requirements Guide for information about these specifications:
• NetIM test engine requirements
• Supported display resolutions
• Polling and SNMP/WMI support
• User authentication
• Supporting browsers
• Riverbed product integrations
• Access to network ports
Understand the use and troubleshooting procedures for credentials, access, and permissions
Accessing the NetIM web interface
1. In a supported web browser, enter the URL for the NetIM web graphical user interface (GUI), as follows:
http://{<fully-qualified-domain-name> | <ip-address>}:8543
For example:
http://netim_server.yourcompany.com:8543
2. Enter your login credentials.
NetIM supports multiple authentication servers, including:
• Local authentication
• SAML 2.0-compliant identity providers
• TACACS+ integration
Logging in to the NetIM UI
Depending on how your NetIM deployment is configured, you may be presented with one or more authentication choices on the NetIM login page.
To log in, first select your authentication choice by selecting the SAML, TACACS+, or Local Authentication tab. Your choice is highlighted in orange. For Local Authentication and TACACS+, enter your login credentials. For SAML, select your SAML server by clicking the appropriate button; you are redirected to your SAML server for login credentials.
See the Alluvio NetIM User Guide for detailed information about:
• User roles and accounts and supported authentication services
• SAML configuration
• TACACS+ configuration
When you install NetIM, you specify the HTTP and HTTPS ports. The default ports are 9190 for HTTP and 8543 for HTTPS. NetIM is configured to use HTTPS by default.
If multiple users are logged in to NetIM with the admin role, a warning message displays in the upper right corner of the UI. Check with the other logged-in admins before making significant changes to avoid conflicts.
Managing device login credentials
NetIM uses several credential types to access information from the devices in your environment. These credentials must be preset on the devices and can be managed under the Global Discovery Settings.
Command-line interface
CLI credentials are used by the NetIM Core appliance to connect to your network devices via Secure Shell (SSH) or Telnet to collect configuration and operational command data. The command outputs are parsed to create a device model and archived for use in auditing and planning workflows facilitated by other Riverbed products. The commands collected are set in predefined device drivers in NetIM. You can also create new or customize existing device drivers.
SNMP
SNMP credentials are used to scan devices for device discovery and poll SNMP performance metrics from your network devices. Device discovery helps to construct the topology information of your network, which is complemented via the CLI.
WMI
Windows Management Instrumentation (WMI) is used for Windows computer/server discovery and to poll WMI-based performance metrics. It uses Windows Remote Management (WinRM) to collect this information over a standard Simple Object Access Protocol (SOAP)-based protocol.
Adding credentials to Global Discovery Settings
You add credentials to the Global Discovery Settings to ensure a broad-based set of credentials.
Device Discovery
Ensure that NetIM contains a comprehensive list of all credentials in preparation for your initial discovery. Adding all credentials ensures that NetIM can fully discover your network.
1. Access the global discovery settings.
2. Log in to the NetIM UI.
3. From the Homepage menu, choose Configure > All Settings.
4. On the All Settings page, under Discover, select Global Discovery Settings.
5. Click Next to go to the credentials settings you want to update.
6. Click Finish on the Login Settings page to save your settings.
Configuring network device access and permissions
Device access and permissions allow NetIM to discover and administer your devices in the network. This section provide several recommendations and best practices for NetIM and devices configurations.
Access control list and firewall best practices
• NetIM Core and Worker node IP addresses must be present in the access control list associated with all network devices being monitored, if applicable. Consider firewall devices as well as host-based firewalls.
• If there are firewall devices between NetIM and the device being monitored, then rules must be added for the NetIM Core and Worker IP addresses to access these devices.
• The NetIM Core requires CLI, WMI, and SNMP protocol access.
• The NetIM Worker requires WMI and SNMP access only.
• NetIM requires root/cimv2 access to Windows computers to collect configuration and performance metrics information.
• NetIM requires privileged-level access to a network device to collect running configuration information and operational commands.
• If SNMP View-Based Access Control Model (VACM) is used on network devices, ensure that it is not limiting access to the SNMP tables NetIM requires for its device modeling and performance metrics collection.
Generating a Vendor MIB Table Report
Perform this predeployment task before registering all the devices you want to monitor. The Vendor MIB Table Report is useful to identify which OIDs NetIM requires access if VACM is implemented on your devices.
When View-Based Access Configuration is configured on devices, your network administrator may ask for a list of SNMP OIDs that NetIM will access for monitoring. To generate a Vendor MIB Table Report that contains this information, complete these steps.
1. Open an SSH connection to the core appliance.
2. Run the start xrdp command.
3. Open a Remote Desktop Protocol (RDP) session to the core using the same credentials as you would for SSH. The default username is netimadmin, and the default password is netimadmin.
4. Run this script from the open terminal session on the desktop:
app.sh VENDOR_REPORT
5. Save the report and use SCP (secure copy) to copy the file from the core file system.
6. Open the file in a browser to review it. Optionally, you can find the specific SNMP OIDs and WMI classes collected and polled in these core appliance files:
– SNMP OIDs
<install_dir>\lib\xml\res\MIBTable.res
<install_dir>\lib\xml\res\DynamicPollingMIBTable.res
– WMI Classes
<install_dir>\lib\xml\res\WmicWmiClasses_dev.res
<install_dir>\lib\xml\res\DynamicPollingWmiClasses_dev.res
Troubleshooting access issues during the initial device directory process
During the initial discovery process, if your NetIM platform does not get the list of expected devices in the network, you need to check diverse NetIM connectivity to those devices.
Remote Connection Utility
You can use the Remote Connection Utility if the NetIM device collection is unsuccessful from the Web UI, even if you have verified that the credentials for the device(s) in NetIM are correct. This tool tests NetIM's ability to access remote devices via SSH or Telnet using its Java-based client libraries.
You must test connectivity with the libraries used by NetIM because NetIM compatibility and interoperability with the customer devices can differ from other third-party libraries used by other clients such as Putty or OpenSSH.
To test remote connectivity
1. SSH to the core appliance.
2. Run the app.sh RemoteConnection command to launch the Remote Connection Utility.
3. Select the library option.
4. Choose Maverick SSH or Apache Telnet, which are the supported libraries used by NetIM. The other libraries are experimental.
5. To test the connection to a specific customer device, enter this information:
– Hostname—Enter the IP address of the device.
– Username—Enter the device username.
– Terminal Type—Enter for dumb.
– Send EOL—Enter for true.
– Enable blinking cursor—Enter for false.
– Password—Enter the password.
The console displays the debug output from the Maverick or Apache’s APIs interacting with the device during the initial handshake and login. Assuming there are no access restrictions, this information is useful for debugging the connection and finding why NetIM cannot log in to a device.
Common reasons why NetIM SSH or Telnet Access fails to connect to a device include:
• You have the wrong credentials, or the credentials contain XML-reserved characters.
• An ACL or a firewall is blocking the connection.
• You have weak or incompatible SSH Ciphers.
• The customer device is limiting concurrent SSH connection attempts.
• The customer device does not have remote access enabled.
MIB Browser Utility
You can use the MIB Browser Utility for debugging null or incomplete SNMP connectivity between NetIM Core/Worker nodes and the customer devices. This tool should also determine how responsive the customer device is to SNMP requests.
Before using the MIB Browser Utility, verify:
• The SNMP credentials are set properly on the customer devices and match the NetIM credentials.
• There are no SNMP or View-Based Access Model restrictions.
To start the MIB Browser Utility
1. Open an SSH session to the Core or Worker node.
2. Run the start xrdp command.
3. Open an RDP session to the Core or Worker.
4. In the terminal windows <<plural?>> from the desktop, <<??>>click the MIB Browser Utility command. <<Tiara, have your SMEs fix this sentence. Some words are missing.>> The MIB browser utility window appears.
Access the MIB Browser Utility
help guide for details on how to use the MIB Browser Utility.
WMI Test Tool
The WMI Test Tool is a diagnostic utility that can be used to validate WMI access to Windows devices.
Perform these steps from a terminal session on the NetIM Core appliance desktop or an SSH client that supports the X-Windows server.
To use the WMI Test Tool
1. Run the app.sh WMITEST command. This command launches the diagnostic utility. WMI-enabled devices already configured in the NetSensor are selectable. You can also add new devices and their credentials. The tool allows you to test WMI Collection (device modeling) and Metrics Polling.
2. If login errors are encountered, use an external WMI Test Utility to rule out an issue with any NetSensor components.
WMI error codes
This table shows the main WMI error codes you can encounter when testing WMI connectivity.
Code | Connection Type | Message |
80041064 | Login | Local credentials must be used. |
80041003 | Login | Access denied. |
80041062 | Login | Privilege not held. |
80041068 | Login | Null security descriptor. |
80042003 | Login | Authorization not privileged. |
8004100E | Polling | Invalid namespace. |