Leveraging Generic Metric Collection Through the NetIM Metric Import REST API
This chapter provides several best practices to leverage Generic Metric Collection (GMC) by using NetIM Metric Import REST API. Best practices include:
• Leverage GMC through the NetIM Metric Import REST API
• Use consistent syntax and structure
• Implement NetIM Metric Import REST API best practices
• Use troubleshooting REST API best practices
Understanding the NetIM Metric Import REST API
The NetIM Metric Import REST API enables you to extend SNMP-based metric polling.
Examples of use cases include:
• the import of metrics from proprietary APIs.
• metrics extracted via SQL DB calls.
• CLI command output parsing.
• JSON/XML file parsing from a repository.
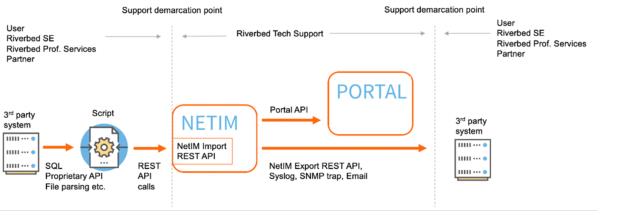
NetIM REST API functional scheme
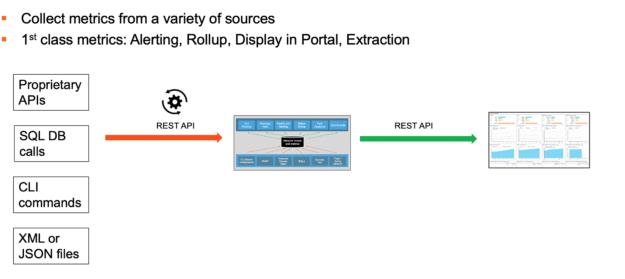
Once these metrics have been imported, they are stored in the NetIM metrics database as any other metrics polled from conventional SNMP polling. That also means that these NetIM Import REST API metrics can be:
• used as an input for Alert/Health profiles.
• displayed in Portal.
• rolled up.
• extracted via the NetIM Export REST API.
Comparing the Generic Metric Collection feature and the Metric Import REST API
This list compares the previous Generic Metric Collection (GMC) feature and the newer NetIM Metric Import REST API:
• Generic Metric Collection (GMC)
– Legacy method
– File-based import using documented file format (.mtr)
– NetIM reads .mtr files from the GMC directory
– Default GMC directory on NetIM Core:
/data1/riverbed/NetIM/op_admin/tmp/vne/generic_metrics/input/
– Credentials required: SSH credentials required to upload files to GMC folder
– A “cleanup” service to remove imported .mtr files
• Metric Import REST API
– New modern REST API method (introduced in NetIM 2.1)
– Documented in the NetIM Help > API Documentation menu
– Credentials required: NetIM user credentials administered from NetIM GUI
The legacy Generic Metric Collection feature (GMC), based on the import of .mtr files, is still available. However, for most use cases we recommend the newer NetIM Metric Import REST API because of the way metrics are imported. The NetIM Metric Import REST API feature leverages a set of APIs within the NetIM swarm exposed by the network-metric import service. These APIs provide a better, more efficient, and more programmatic interface for importing externally produced metric data into the NetIM system.
Importing metrics into the NetIM Metric Import REST API
To import metrics with the NetIM Metric Import REST API, you typically use a script in Perl, Python, PowerShell, Bash, or any scripting language.
The script can run within the NetIM system itself (for example, on the NetIM Core or on the NetIM Worker). The NetIM VMs have Python3 and PowerShell already installed. You may, however, have to install additional modules depending on the modules you import and use in your script. To configure the script to run on one of the NetIM VMs, you need access to the Bash shell. Contact Riverbed Technical Support or your Riverbed Account management team for access.
You can also run the script on an external platform (for example, external Linux or Windows Server).
In general, in order not to overload the NetIM VMs, this is the preferred option if you plan to deploy many scripts feeding several NetIM Metric Import REST API metrics.
You can then choose the script run interval by choosing between two options:
• Run the script in a loop where you add a pause function with the desired interval as parameter.
• Run the script as a cronjob in Linux or in Task Manager in Windows.
You can also run the script using a NetIM Synthetic Test by selecting an External Test Type and then selecting the script and the frequency. The advantage of this approach is that you are able to monitor the success/failure of the script run itself and the time taken to run the script, allowing you to evaluate the minimal frequency you can use for your script.
Scripting for NetIM REST API

Best practices for using the NetIM Metric Import REST API
Licensing
Using the NetIM Import REST API does not consume any license units.
Sizing
If the NetIM Import REST API does not consume any license units, it still uses the capacity of the NetIM system to collect the metrics from the API and storage them. Specific formulas do not exist for resource consumption, so you should inspect how many objects (such as devices or interfaces) will be imported, the number of different metrics, and the time interval used.
Also, consider where to run the script that performs the REST API calls. In the case of a few metrics, you can likely run this on the NetIM Core or NetIM Worker (running script on NetIM Manager is not recommended). In case of a larger deployment, we recommend running the script(s) on an external Linux or Windows server.
Where to display metrics
In general, you have three options for displaying the NetIM Import REST API imported metrics:
• In NetIM itself using, for example, custom views
• In Portal using custom Portal dashboards
• Extracting the NetIM Import REST API imported metrics via NetIM export REST API
The NetIM custom views have been extensively enhanced in recent releases and offer new panel types like Metrics Tables, Gauges, Metric/Attribute values, and so on. This allows new options for displaying the custom metrics directly in NetIM. This can be useful when Portal is not available or when you really want the custom metrics to be well integrated into the already existing out-of-the-box (OOTB) NetIM workflows and views.
Portal offers some more flexibility in terms of display (for example, grouping) and allows metrics at any level (group/device/interface) to be displayed in the same dashboard. Portal also allows for enhanced role-based access control (RBAC) allowing you better control of who and what can see. See the section “Viewing your imported metrics in NetIM and in Portal.”
Extracting the metrics for display in third-party tools is always an option, but it typically requires some scripting efforts.
Supported metric types
NetIM supports numeric (integer, float) and enumerated values.
NetIM does not support other metric types such as Timeticks, IP/MAC addresses, or text strings. Although these types cannot be used as metrics, they can still be used as component identifiers (like indexes) and can be used for grouping, for example in Portal.
Custom MIBs
In some cases, you may be able to use the already existing OOTB metric classes. This could be the case if, for example, you want to import CPU utilization for a device that you can obtain via a REST API call to the device or a device manager but not via SNMP. In this case, you can use the existing metric class “CPU_UTIL” and insert the metrics into this metric class.
In most cases, your customization requires NetIM to learn about new metrics in new metric classes, which can be accomplished by manually inserting custom resource files into the NetIM system.
However, the recommended way to import new metric classes is to:
• Create a new custom MIB file defining the new metric class and its metrics.
• Import the metric file using the User-Defined Metrics (UDM) feature.
Using the above process ensures consistency, and any syntax errors will be caught during the import of the custom MIB. See Chapter 5, “Common Data Collection Challenges in a Multivendor Environment.”
Defining a metric class in a MIB is rather straightforward. It follows the classic ASN.1 (Abstract Syntax Notification) like any other public and proprietary MIB.
Even though you do not use SNMP for polling the metrics, you still use the MIB format and the user-defined metrics (UDMs). The only difference from a classic UDM workflow (polling with SNMP) is that you do not add the new metric class to any polling profile.
Example
You want to collect Microsoft Exchange metrics from an Exchange server using PowerShell and the Microsoft Exchange API (see the section “Examples of usage of NetIM Metric Import REST API.”)
For each mailbox, you want to collect Total Size and Total Available (remaining) Size. These metrics can be obtained in a table from by the PowerShell command as depicted in this screenshot.
Microsoft Exchange metrics from an Exchange server using PowerShell
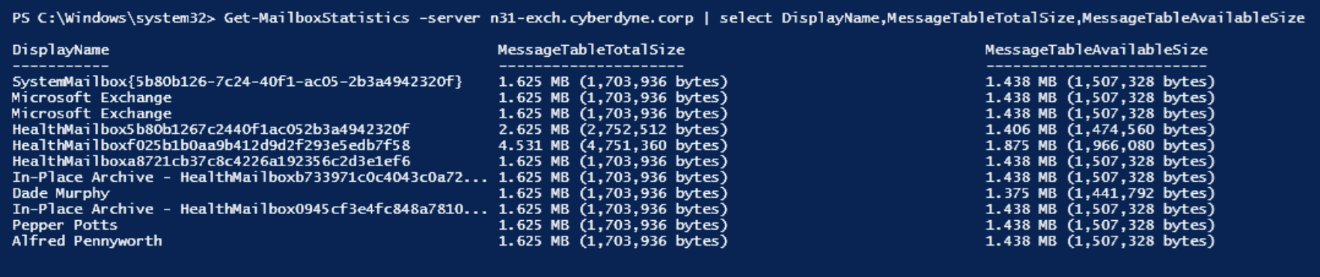
To import these metrics into NetIM, you need to teach NetIM about a new metric class with this table format. DisplayName is the Index for this table.
Mailbox --> MSExchangeMIB mailboxTable |
DisplayName (index) | MessageTableTotalSize | MessageTableAvailableSize |
To teach NetIM about this new metric class, you create a MIB file with this contents defining the metric class:
MSEXCHANGE_METRICS_MIB DEFINITIONS ::= BEGIN
IMPORTS
OBJECT-TYPE, mib-2,
Integer32 FROM SNMPv2-SMI;
host OBJECT IDENTIFIER ::= { mib-2 1000000 }
mailboxTable OBJECT-TYPE
SYNTAX SEQUENCE OF MailboxTableEntry
MAX-ACCESS not-accessible
STATUS current
DESCRIPTION
"xxx"
::= { host 1 }
mailboxTableEntry OBJECT-TYPE
SYNTAX MailboxTableEntry
MAX-ACCESS not-accessible
STATUS current
DESCRIPTION
"xxx"
INDEX { MailboxDisplayName }
::= { mailboxTable 1 }
MailboxTableEntry ::= SEQUENCE {
MailboxDisplayName OCTET STRING,
MessageTableTotalSize Integer32,
MessageTableAvailableSize Integer32,
}
MailboxDisplayName OBJECT-TYPE
SYNTAX OCTET STRING
MAX-ACCESS read-only
STATUS current
DESCRIPTION
"xxx"
::= { mailboxTableEntry 1 }
MessageTableTotalSize OBJECT-TYPE
SYNTAX Integer32 (0..100)
MAX-ACCESS read-only
STATUS current
DESCRIPTION
"xxx"
::= { mailboxTableEntry 2 }
MessageTableAvailableSize OBJECT-TYPE
SYNTAX Integer32 (0..100)
MAX-ACCESS read-only
STATUS current
DESCRIPTION
"xxx"
::= { mailboxTableEntry 3 }
END
Save the contents to a file with the suffix .my or .mib. You import this MIB via the User-Defined Metrics wizard.
NetIM User-Defined Metrics wizard
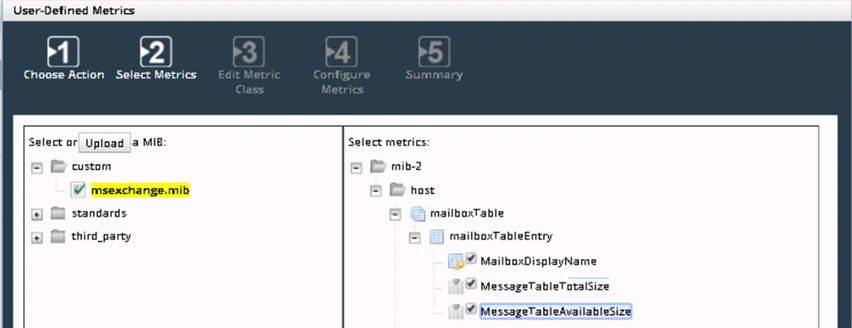
If you want to be able to use a given non-numeric value as an index for grouping in Portal, then make sure to select the option “Component Identifier” for this value.
The new metric class is now ready for being used by the NetIM Metric Import REST API.
Credentials
To use the NetIM Metric Import REST API, you need to create a local user account with ADMIN privileges because the NetIM Metric Import REST API writes to the NetIM system.
NetIM does not support SAML/TACACS accounts. Only Basic Authentication is supported (no support for token-based authentication).
Postman for testing
As preparation for using the NetIM Metric Import REST API and before starting the actual scripting,
Postman is a useful tool for running tests.
Postman is available in a web version as well as a local application. See an example below.
Postman application example
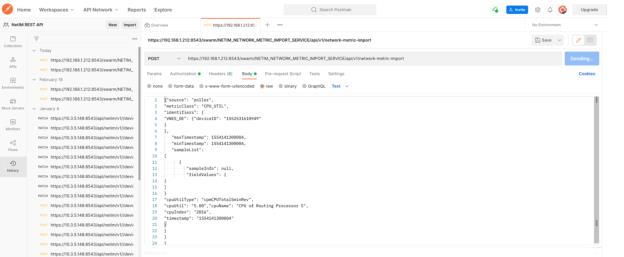
To use Postman for testing
1. Create a workspace.
2. Add the NetIM base endpoint URL. (See the “Using the NetIM Metric Import REST API” section).
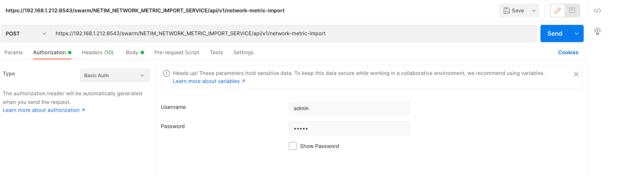
3. Select POST as the method.
4. Select Authentication “Basic Auth” and add credentials. See an example below.
Using a Postman application
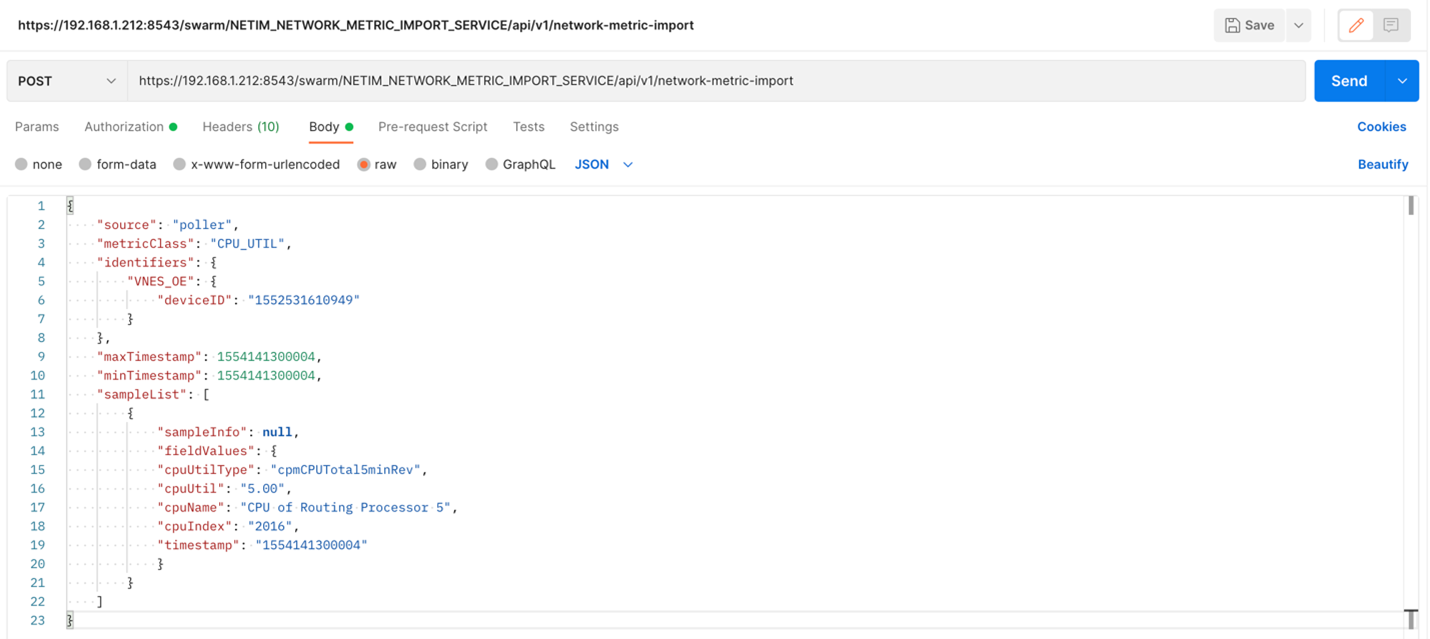
5. Insert the POST Request body (see the “Using the NetIM Metric Import REST API” section below) and click Send.
Using the NetIM Metric Import REST API
A “200 OK” message indicates that the message was received and accepted. You can now check NetIM if the metric was imported.
Custom scripts for NetIM Metric Import REST API
Any scripting language can be used for injecting metrics into NetIM using the NetIM Metric Import REST API. This includes scripting languages like Python, Perl, PowerShell, and Bash.
• We recommend Python because it is relatively easy to learn and many modules are available.
• Because PowerShell contains a lot of primitives that simplify the extraction of metrics and their format, it is often the preferred choice when using Microsoft-based APIs or other proprietary APIs like VMware.
• On the NetIM VM, both Python3 and PowerShell are already installed.
• Bash is advantageous because it is typically available everywhere without any installation requirements.
The NetIM Core VM folder /home/admin/rest_api_examples contains some examples of Python3 utilities that can be used by the script to obtain various useful information such as deviceID for a given device name, metric class ID for a given metric class name, and so on.
Most scripts function like this:
1. Import required modules. For example, HTTP requests, Time function module, OS functions, regex function modules, IPv4 function modules, CLI connection modules (like Paramiko), JSON format modules, and so on.
2. Set variables. For example:
– NetIM Core VM hostname or IP address.
– NetIM credentials.
– List of dictionaries of objects for which metrics should be inserted; for example, devices or interfaces.
– Name of the new metric class (created via User-Defined Metrics).
3. Obtain the device access IDs for the objects (or the devices on which the interfaces are hosted).
4. Obtain the metric class IDs for the new metric class.
5. Format the JSON metric data template header: metric class ID, device access IDs, time stamps.
6. Obtain the new metrics via third-party API or other APIs.
7. Calculate and format the new metric class.
8. Add the new metrics sample as a JSON sample and append to the JSON structure of Step 5 (same format as in Postman example).
9. POST it all to the NetIM Core VM using the primary API endpoint. (See the section “Using the NetIM Metric Import REST API.”
10. Check metrics are being imported for the NetIM Device object or Interface object by selecting the Metrics tab for that object. In the drop-down list, select the metric class and then click Load.
For any information on specific script implementation, contact your Riverbed Account management team.
Using the NetIM Metric Import REST API
API endpoint
For the NetIM Metric Import REST API, the primary API endpoint provided for publishing the metric samples is:
POST <netim-core-protocol>://<netim-core-address>:<netim-core_port>/swarm/NETIM_NETWORK_METRIC_IMPORT_SERVICE/api/v1/network-metric-import
This endpoint requires HTTP Basic Authentication (like all the APIs exposed by NetIM Core).
The body of the request must be provided as type "application/json".
Request structure
This example shows the various structural components that are required for a valid request to the network-metric-import API endpoint:
{
"source": "poller",
"metricClass": "CPU_UTIL",
"identifiers": {
"VNES_OE": {
"deviceID": "1552531610949"
}
},
"maxTimestamp": 1554141300004,
"minTimestamp": 1554141300004,
"sampleList": [
{
"sampleInfo": null,
"fieldValues": {
"cpuUtilType": "cpmCPUTotal5minRev",
"cpuUtil": "5.00",
"cpuName": "CPU of Routing Processor 5",
"cpuIndex": "2016",
"timestamp": "1554141300004"
}
}
]
}
Request structure properties
source
The "source" property is used to identify the collecting source of the data; this could be something like "poller", "wmi", or "external". In most cases use "poller".
metricClass
The "metricClass" property is used to identify the metric class to which the data belongs. Each request to the API endpoint may represent samples from only a single metric class at a time. For information on the metric classes available, see information about the /metric-classes API endpoint available in the NetIM API documentation (under Help in the NetIM web UI). The value provided must be the "identifiers" property for a valid metric class currently provisioned within the system (such as CPU_UTIL or IFC_UTIL).
identifiers
The "identifiers" property is used to provide unique identifying information about the base level object with which the data should be associated. The exact content of this property required depends on the metricClass provided.
For example, if a device "level" metric class, such as DEV_AVL or CPU_UTIL is provided, then only VNES_OE identifying attributes are required. If an interface "level" metric class, such as IFC_UTIL or COS_UTIL, is provided instead, then VNES_OE and VNES_IFC identifying attributes are required.
Although you can publish metric data associated with a group, AppNetwork Path, or synthetic test, this document only discusses the common customer use cases of device and interface-level data association.
Device level
At the device (VNES_OE) level, to uniquely identify the device, the "deviceID" (also known as the "deviceAccessInfoId") must be provided (not the “ID”). The “deviceAccessInfoId” is typically a 13-digit number.
Example:
"identifiers": {
"VNES_OE": {
"deviceID": "1552531610949"
}
}
Interface level
At the interface (VNES_INTERFACE) level, both interface identifying information and its parent device (VNES_OE) must be provided.
The previously described device identifying information applies here.
To identify the interface, various property combinations must be included. These combinations of properties can be provided:
1. ifPreferredName
2. ifName, ifDescr
3. ifIndex, ifPhysicalAddress
These rules are evaluated in priority order. When the first rule that matches identifies the interface.
Example:
"identifiers": {
"VNES_INTERFACE": {
"ifName": "Gi0/1.1",
"ifDescr": "GigabitEthernet0/1.1"
},
"VNES_OE": {
"deviceID": "1552531610949"
}
}
minTimestamp and maxTimestamp
The "minTimestamp" and "maxTimestamp" properties are provided to set the time boundaries for all samples being published.
Both values should be provided as millisecond UTC or "Unix epoch" values.
sampleList
The "sampleList" property is where the actual sample data is to be provided. This property should be provided as an array of sample objects. A maximum of 500 individual sample objects should be provided in any single request. If more than 500 samples are required to be published, they should be separated into separate requests, each containing a maximum of 500 samples.
Sample objects
Each sample object represents a value for one or more fields from the specified metric class corresponding to a single time stamp.
The exact structure of the sample object varies depending on the metric class. However, each sample has some common elements.
Here is a basic example representing a sample of CPU_UTIL data:
{
"sampleInfo": null,
"fieldValues": {
"cpuUtilType": "cpmCPUTotal5minRev",
"cpuUtil": "5.00",
"cpuName": "CPU of Routing Processor 5",
"cpuIndex": "2016",
"timestamp": "1554141300004"
}
}
A sample representing a different CPU metric at the same time might look like this:
{
"sampleInfo": null,
"fieldValues": {
"cpuUtilType": "cpmCPUTotal1minRev",
"cpuUtil": "14.00",
"cpuName": "CPU of Routing Processor 5",
"cpuIndex": "2016",
"timestamp": "1554141300004"
}
}
sampleInfo
The "sampleInfo" property is used to provide meta information about the sample. This property is primarily used when the sample being published represents a nonraw (or "rollup") sample.
If the data represented is "raw" sampling, then the "sampleInfo" property can simply be set to "null" as shown in the above example.
Because the NetIM system provides roll-up capability on all incoming raw metric data, including data provided via these APIs, only raw data should be published. (Configuring the "sampleInfo" property is not discussed further in this document.)
fieldValues
The "fieldValues" property is used to provide values for the fields of the metric class being published.
The structure required is a key-value mapping where the keys should be the identifier of the metric class field that is populated, and the value should be whichever value to be populated, provided always as a string.
The values should be provided as strings even if they represent numeric values. These values are cast properly downstream depending on the definition of the field within the header file.
While not all fields are required to be present to populate a sample for the metric class, the time stamp is always required. The time stamp value should be provided as a millisecond UTC or "Unix epoch" time value. Depending on the definition of the metric class, other fields are also required.
Any fields within the metric class that are marked as "index" == true or "isComponentPart" == true are required for the sample to be properly mapped for persistence.
For example, within the CPU_UTIL metric class you’ll find these field definitions:
<fs:cp name="fields">
<fs:cp name="field_1">
<fs:sp name="name">timestamp</fs:sp>
<fs:sp name="index">true</fs:sp>
<fs:sp name="type">&fs.db.sql.numeric.type;(38)</fs:sp>
<fs:sp name="description">Timestamp of metric data retrieval.</fs:sp>
<fs:sp name="units">&VNE.METRIC.UNITS.MILLISECONDS;</fs:sp>
</fs:cp>
<fs:cp name="field_2">
<fs:sp name="name">cpuIndex</fs:sp>
<fs:sp name="index">true</fs:sp>
<fs:sp name="searchable">true</fs:sp>
<fs:sp name="nameExt">true</fs:sp>
<fs:sp name="type">&fs.db.sql.varchar.type;(50)</fs:sp>
<fs:sp name="displayName">CPU Index Number</fs:sp>
<fs:sp name="description">The physical index of the CPU</fs:sp>
<fs:sp name="isComponentPart">true</fs:sp>
</fs:cp>
<fs:cp name="field_3">
<fs:sp name="name">cpuName</fs:sp>
<fs:sp name="index">false</fs:sp>
<fs:sp name="searchable">true</fs:sp>
<fs:sp name="type">&fs.db.sql.varchar.type;(256)</fs:sp>
<fs:sp name="displayName">Name of CPU</fs:sp>
<fs:sp name="description">User friendly name of CPU</fs:sp>
<fs:sp name="isComponentPart">true</fs:sp>
</fs:cp>
<fs:cp name="field_4">
<fs:sp name="name">cpuUtilType</fs:sp>
<fs:sp name="index">true</fs:sp>
<fs:sp name="searchable">true</fs:sp>
<fs:sp name="nameExt">true</fs:sp>
<fs:sp name="type">&fs.db.sql.varchar.type;(256)</fs:sp>
<fs:sp name="displayName">CPU Utilization Type</fs:sp>
<fs:sp name="description"></fs:sp>
<fs:sp name="isComponentPart">true</fs:sp>
</fs:cp>
</fs:cp>
Where appropriate, the <fs:sp name="description"> is the name of the requested CPU utilization type.
When evaluating a metric class to see what fields are required, it’s important to find fields that contain either of these two property definitions:
<fs:sp name="index">true</fs:sp>
or
<fs:sp name="isComponentPart">true</fs:sp>
If either of these properties are present for the field, then that field is required to be present.
For the CPU_UTIL example, these fields are required in each sample object:
• timestamp
• cpuIndex
• cpuUtilType
Response structure
Besides a purely failed request for some unknown reason, the API responds with HTTP code 200 and a body that provides additional detail about the success of the request. Because the request can be partially successful, you should inspect the contents of the response.
The response body looks something like this:
{
"status": "SUCCESS",
"totalSamples": 2,
"validSamples": 2,
"failedSamplesAndReason": null
}
Response structure properties
status
The "status" property provides a high-level indication of whether the request was successful or not.
totalSamples and validSamples
The "totalSamples" and "validSamples" properties provide more detailed information about whether the request was successful or not. These values indicate the number of samples provided via the "sampleList" request property that were valid and accepted for ingestion into the system.
failedSamplesAndReason
If any of the samples provided via "sampleList" were invalid and not accepted, this field provides additional information about why.
Request examples
These examples show the request body published to the API endpoint for various metric classes at various levels of model association.
This example is for “DEV_AVL”:
• Imports availability metrics for a device with the value of deviceID.
– The deviceID for the NetIM Import REST API can be found on the Browse tab for the device. The value to use is the value of the "deviceAccessInfoId", not the value of "ID".
• The metrics are at the device level.
• There is one single metric sample.
• The metric is "availability" from the metric class "DEV_AVL".
– If a custom metric class is imported with a custom MIB in the User-Defined Metrics wizard, then the format of the metric class is "CM_xxxxxxxxx".
DEV_AVL
{
"source": "poller",
"metricClass": "DEV_AVL",
"identifiers": {
"VNES_OE": {
"deviceID": "1552531610949"
}
},
"maxTimestamp": 1554141031008,
"minTimestamp": 1554141031008,
"sampleList": [{
"sampleInfo": null,
"fieldValues": {
"duration": "919578",
"availability": "100.000",
"timestamp": "1554141031008"
}
}
]
}
This example is for “CPU_AVL”:
• Imports availability metrics for a device with the value of deviceID. The deviceID for the NetIM Import REST API can be found on the Browse tab for the device. You should use the value of "deviceAccessInfoId", not the value of "ID".
• The metrics are at the device level.
• There are 12 metric samples: six for metric "cpmCPUTotal1minRev" and six for metric "cpmCPUTotal5minRev".
• The metric is "cpuUtil" from the metric class “CPU_UTIL”. If a custom metric class is imported with a custom MIB in the User-Defined Metrics wizard, then the format of the metric class is "CM_xxxxxxxxx".
CPU_UTL
{
"source": "poller",
"metricClass": "CPU_UTIL",
"identifiers": {
"VNES_OE": {
"deviceID": "1552531610949"
}
},
"maxTimestamp": 1554141600010,
"minTimestamp": 1554140100043,
"sampleList": [{
"sampleInfo": null,
"fieldValues": {
"cpuUtilType": "cpmCPUTotal5minRev",
"cpuUtil": "5.00",
"cpuName": "CPU of Routing Processor 5",
"cpuIndex": "2016",
"timestamp": "1554141300004"
}
},
{
"sampleInfo": null,
"fieldValues": {
"cpuUtilType": "cpmCPUTotal1minRev",
"cpuUtil": "5.00",
"cpuName": "CPU of Routing Processor 5",
"cpuIndex": "2016",
"timestamp": "1554141300004"
}
},
{
"sampleInfo": null,
"fieldValues": {
"cpuUtilType": "cpmCPUTotal1minRev",
"cpuUtil": "5.00",
"cpuName": "CPU of Routing Processor 5",
"cpuIndex": "2016",
"timestamp": "1554141000015"
}
},
{
"sampleInfo": null,
"fieldValues": {
"cpuUtilType": "cpmCPUTotal1minRev",
"cpuUtil": "5.00",
"cpuName": "CPU of Routing Processor 5",
"cpuIndex": "2016",
"timestamp": "1554141600010"
}
},
{
"sampleInfo": null,
"fieldValues": {
"cpuUtilType": "cpmCPUTotal1minRev",
"cpuUtil": "5.00",
"cpuName": "CPU of Routing Processor 5",
"cpuIndex": "2016",
"timestamp": "1554140700003"
}
},
{
"sampleInfo": null,
"fieldValues": {
"cpuUtilType": "cpmCPUTotal5minRev",
"cpuUtil": "5.00",
"cpuName": "CPU of Routing Processor 5",
"cpuIndex": "2016",
"timestamp": "1554140700003"
}
},
{
"sampleInfo": null,
"fieldValues": {
"cpuUtilType": "cpmCPUTotal5minRev",
"cpuUtil": "5.00",
"cpuName": "CPU of Routing Processor 5",
"cpuIndex": "2016",
"timestamp": "1554141000015"
}
},
{
"sampleInfo": null,
"fieldValues": {
"cpuUtilType": "cpmCPUTotal1minRev",
"cpuUtil": "5.00",
"cpuName": "CPU of Routing Processor 5",
"cpuIndex": "2016",
"timestamp": "1554140100043"
}
},
{
"sampleInfo": null,
"fieldValues": {
"cpuUtilType": "cpmCPUTotal1minRev",
"cpuUtil": "5.00",
"cpuName": "CPU of Routing Processor 5",
"cpuIndex": "2016",
"timestamp": "1554140400016"
}
},
{
"sampleInfo": null,
"fieldValues": {
"cpuUtilType": "cpmCPUTotal5minRev",
"cpuUtil": "5.00",
"cpuName": "CPU of Routing Processor 5",
"cpuIndex": "2016",
"timestamp": "1554140400016"
}
},
{
"sampleInfo": null,
"fieldValues": {
"cpuUtilType": "cpmCPUTotal5minRev",
"cpuUtil": "5.00",
"cpuName": "CPU of Routing Processor 5",
"cpuIndex": "2016",
"timestamp": "1554140100043"
}
},
{
"sampleInfo": null,
"fieldValues": {
"cpuUtilType": "cpmCPUTotal5minRev",
"cpuUtil": "5.00",
"cpuName": "CPU of Routing Processor 5",
"cpuIndex": "2016",
"timestamp": "1554141600010"
}
}
]
}
This example is for "COS_UTIL":
• Imports availability metrics for a device with the value of deviceID.
– The deviceID for the NetIM Import REST API can be found on the Browse tab for the device. The value to use is the value of the "deviceAccessInfoId" and not the value of "ID".
• These metrics are at the interface level, so it is also necessary to provide identifiers for the interfaces. The metrics are at the device level (for example, ifName and ifDescr).
• There are 12 metric samples for different ClassOfService classes.
• The metrics are packetsOut, throughputOut, totalBytes, totalPackets, utilizationOut from the metric class "COS_UTIL".
• If a custom metric class is imported with a custom MIB in the User-Defined Metrics wizard, then the format of the metric class is "CM_xxxxxxxxx".
COS_UTL
{
"source": "poller",
"metricClass": "COS_UTIL",
"identifiers": {
"VNES_INTERFACE": {
"ifName": "Gi0/1.1",
"ifDescr": "GigabitEthernet0/1.1"
},
"VNES_OE": {
"deviceID": "1552531610949"
}
},
"maxTimestamp": 1554141300003,
"minTimestamp": 1554140400001,
"sampleList": [{
"sampleInfo": null,
"fieldValues": {
"duration": "300006",
"packetsOut": "0",
"throughputOut": "0",
"totalBytes": "0",
"className": "CARY-COR01-parent\\class-default\\CARY-COR01-child\\POP3",
"totalPackets": "0",
"utilizationOut": "0.00",
"timestamp": "1554141000008",
"bytesOut": "0"
}
},
{
"sampleInfo": null,
"fieldValues": {
"duration": "300006",
"packetsOut": "16405",
"throughputOut": "145670",
"totalBytes": "5462653",
"className": "CARY-COR01-parent\\class-default\\CARY-COR01-child\\classdefault",
"totalPackets": "16405",
"utilizationOut": "0.15",
"timestamp": "1554141000008",
"bytesOut": "5462653"
}
},
{
"sampleInfo": null,
"fieldValues": {
"duration": "300006",
"packetsOut": "0",
"throughputOut": "0",
"totalBytes": "0",
"className": "CARY-COR01-parent\\class-default\\CARY-COR01-child\\HTTP",
"totalPackets": "0",
"utilizationOut": "0.00",
"timestamp": "1554141000008",
"bytesOut": "0"
}
},
{
"sampleInfo": null,
"fieldValues": {
"duration": "300006",
"packetsOut": "0",
"throughputOut": "0",
"totalBytes": "0",
"className": "CARY-COR01-parent\\class-default\\CARY-COR01-child\\SMTP",
"totalPackets": "0",
"utilizationOut": "0.00",
"timestamp": "1554141000008",
"bytesOut": "0"
}
},
{
"sampleInfo": null,
"fieldValues": {
"duration": "299958",
"packetsOut": "15278",
"throughputOut": "136365",
"totalBytes": "5096669",
"className": "CARY-COR01-parent\\class-default",
"totalPackets": "15278",
"utilizationOut": "0.14",
"timestamp": "1554140400001",
"bytesOut": "5096669"
}
},
{
"sampleInfo": null,
"fieldValues": {
"duration": "299958",
"packetsOut": "0",
"throughputOut": "0",
"totalBytes": "0",
"className": "CARY-COR01-parent\\class-default\\CARY-COR01-child\\SMTP",
"totalPackets": "0",
"utilizationOut": "0.00",
"timestamp": "1554140400001",
"bytesOut": "0"
}
},
{
"sampleInfo": null,
"fieldValues": {
"duration": "300001",
"packetsOut": "0",
"throughputOut": "0",
"totalBytes": "0",
"className": "CARY-COR01-parent\\class-default\\CARY-COR01-child\\POP3",
"totalPackets": "0",
"utilizationOut": "0.00",
"timestamp": "1554140700002",
"bytesOut": "0"
}
},
{
"sampleInfo": null,
"fieldValues": {
"duration": "300001",
"packetsOut": "0",
"throughputOut": "0",
"totalBytes": "0",
"className": "CARY-COR01-parent\\class-default\\CARY-COR01-child\\FTP",
"totalPackets": "0",
"utilizationOut": "0.00",
"timestamp": "1554140700002",
"bytesOut": "0"
}
},
{
"sampleInfo": null,
"fieldValues": {
"duration": "300001",
"packetsOut": "14480",
"throughputOut": "128950",
"totalBytes": "4835645",
"className": "CARY-COR01-parent\\class-default\\CARY-COR01-child\\classdefault",
"totalPackets": "14480",
"utilizationOut": "0.13",
"timestamp": "1554140700002",
"bytesOut": "4835645"
}
},
{
"sampleInfo": null,
"fieldValues": {
"duration": "300001",
"packetsOut": "0",
"throughputOut": "0",
"totalBytes": "0",
"className": "CARY-COR01-parent\\class-default\\CARY-COR01-child\\HTTP",
"totalPackets": "0",
"utilizationOut": "0.00",
"timestamp": "1554140700002",
"bytesOut": "0"
}
},
{
"sampleInfo": null,
"fieldValues": {
"duration": "300001",
"packetsOut": "0",
"throughputOut": "0",
"totalBytes": "0",
"className": "CARY-COR01-parent\\class-default\\CARY-COR01-child\\SMTP",
"totalPackets": "0",
"utilizationOut": "0.00",
"timestamp": "1554140700002",
"bytesOut": "0"
}
},
{
"sampleInfo": null,
"fieldValues": {
"duration": "300001",
"packetsOut": "14480",
"throughputOut": "128950",
"totalBytes": "4835645",
"className": "CARY-COR01-parent\\class-default",
"totalPackets": "14480",
"utilizationOut": "0.13",
"timestamp": "1554140700002",
"bytesOut": "4835645"
}
}
]
}
Viewing your imported Metrics in NetIM and Portal
Verify metrics in the NetIM device or the interface Metrics tab
Always start by verifying that the metrics are imported in the Metrics tab for the object (device or interface) by selecting the Metrics tab for that object. In the drop-down list, select the metric class and then click Load.
Custom metrics in NetIM using Custom Views
NetIM Custom View templates and NetIM Custom view template rules allow you to design new NetIM views for the At-a-Glance Home page, Site/Group Page, Device page, and Interface page. You can add custom panels including the new NetIM Import Metric REST API metrics, and you can specify to which devices these views should be used.
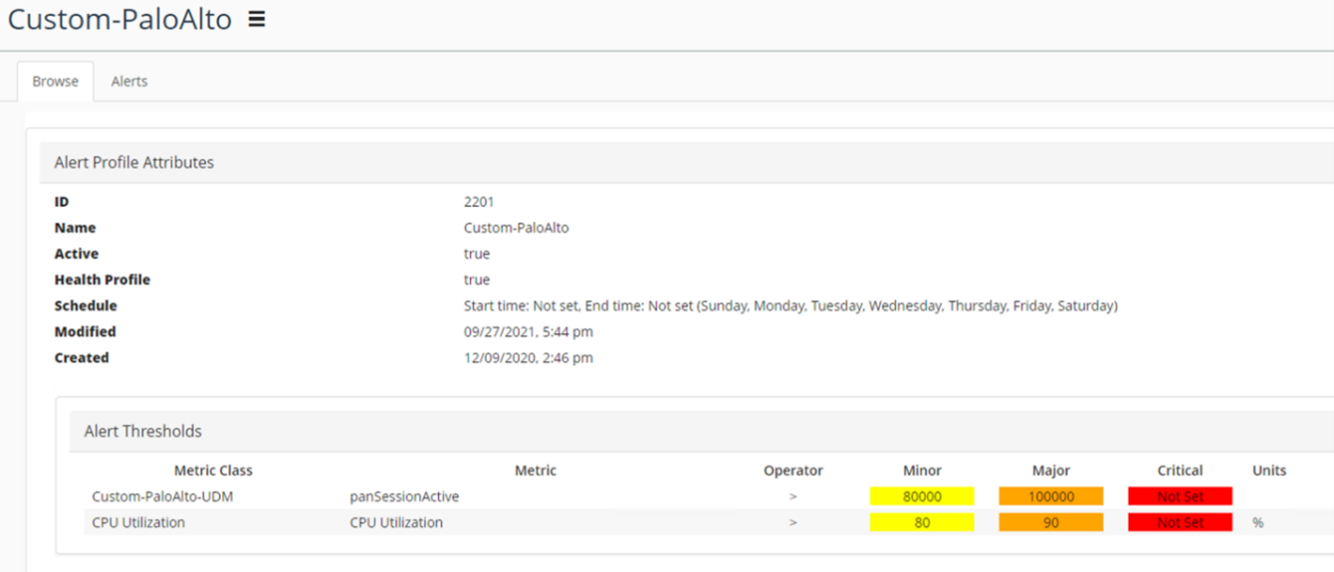
NetIM custom Alert profiles
NetIM allows you to create new Alert profiles and select your new NetIM Import Metric REST API metrics with proper thresholds. A device can have several alert profiles applied.
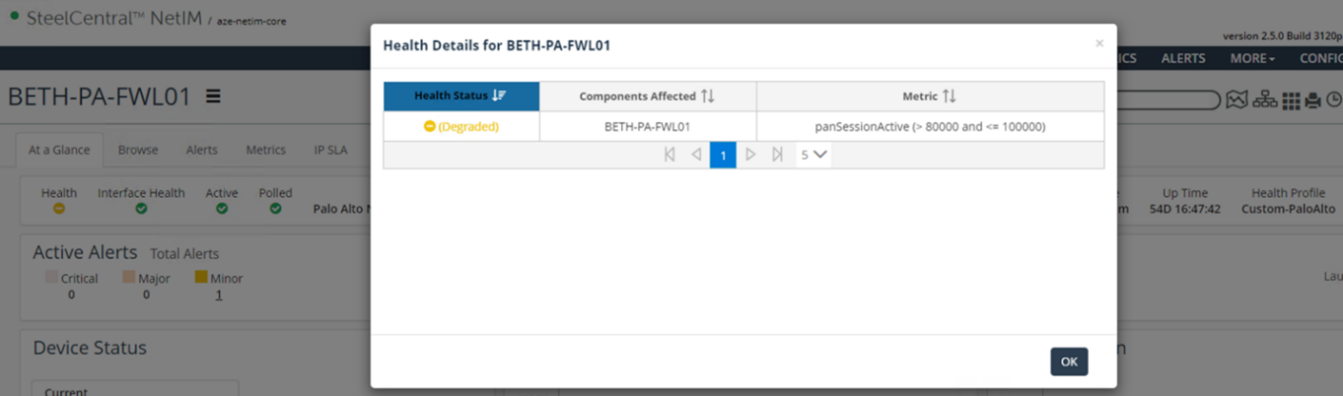
One of these alert profiles can also be enabled as a Health profile. This alert profile the controls the state (red, orange, yellow, green) of the object (device, interface). See the example below.
NetIM Import Custom Metric REST API
Example of a Changing State of the REST API Metric
Custom metrics in NetIM using Portal
You can opt to display the new NetIM Import Metric REST API metrics in custom Portal dashboards.
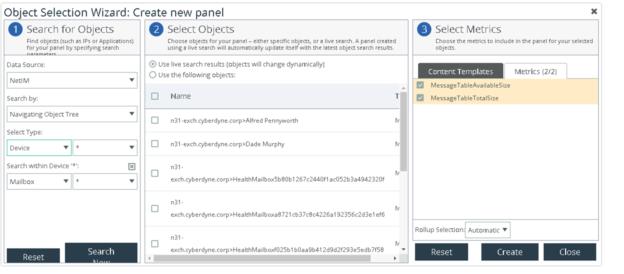
Before you use this option, make sure to restart Portal so it learns about these new metrics. You then start creating the panels in the new dashboard with the Object Selection wizard, like in this example.
Creating a new panel with the Object Selection wizard
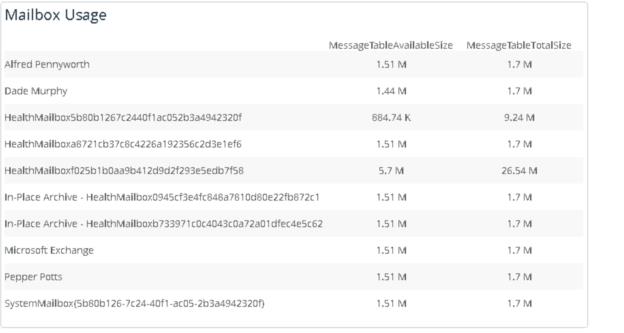
Then format the panel into rows and columns by Metric Display and the index or component identifier like in this table.
NetIM example Mailbox Usage
Troubleshooting best practices
Use the print function
Most script languages allow you to insert print statements in the script. Print statements are useful when debugging your script.
Be patient
Sometimes it can take several minutes before the first metrics are available in the table.
Use the NetIM logs
If a metric does not seem to be imported, inspect the NetIM swarm log for the service “Network Metric Import Service.”
Use the right device ID
At the device (VNES_OE) level, provide the "deviceID" (also known as the "deviceAccessInfoId") to uniquely identify the device (not the "ID"). The "deviceAccessInfoId" is typically a 13-digit number.
Verify metric class names and device names in the script
Verify the variable values inserted in the script. Python (like many other languages) are case sensitive.
NetIM Metric Import REST API and Technical Support
Riverbed Technical Support supports the NetIM Metric Import REST API, which is the API interface with its endpoints. But Riverbed Technical Support does not support the script that is using this API interface.
Script using the NetIM API
NetIM Metric Import REST API Examples
For any of the examples in this section, contact your Riverbed account management team for more information about how these examples were implemented.
VMware guest details
VMware guest details
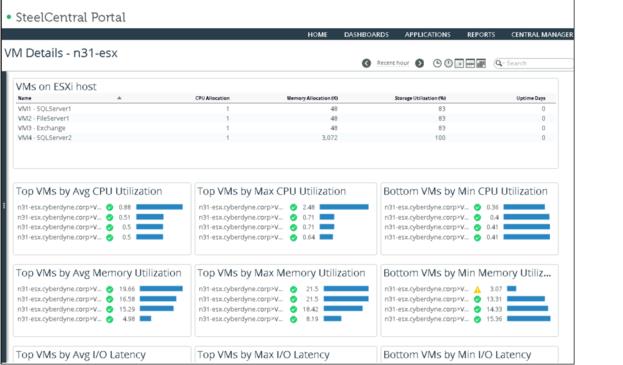
This customization displays and alerts on the VMware ESX server at the VM (Guest level), including details like CPU, Memory, Disk I/O, and Network usage at a per-VM level. For each metric, Max/Min and Average values are provided. All metrics are alertable.
This is how it is made:
1. You create the MIB file defining the VMware per-VM metrics and then import the new MIB to NetIM using the User-Defined Metrics (UDM) feature.
2. Using the new MIB, NetIM discovers the device(s) and represents and depicts the ESX server(s).
3. A PowerShell script collects metrics from the ESX server(s) using the VMware PowerCLI API. No SNMP is used. The VMware PowerCLI is a proprietary PowerShell module with many primitives that renders the collection of these metrics very easy.
4. The PowerShell script organize and format the metrics for injection into NetIM using the format of the User-Defined Metrics defined in Step 1.
5. The PowerShell script injects the metrics into the NetIM object for the ESX server(s) using the legacy GMC (file-based format). The customization and the script were developed before the availability of the newer NetIM Metric Import REST API so it is injecting the legacy GMC file-based format. The metrics are displayed in a custom Dashboard on the Portal Server. The metrics also displayed directly in NetIM on the device view for the ESX server(s) using the NetIM Custom Views feature.
Microsoft Exchange Dashboard
NetIM Microsoft Exchange Dashboard
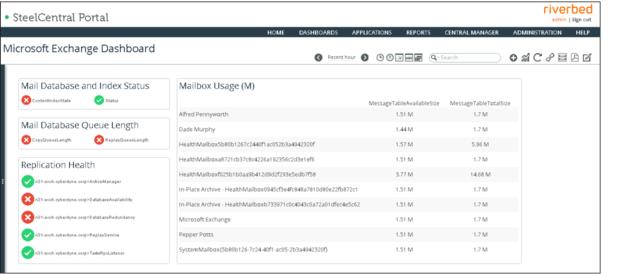
This customization displays and alerts on specific Microsoft Exchange Metrics like DB and Index Status, Queue Length, Replication Health, and Mailbox usage. All metrics are alertable.
This is how it is made:
1. You create a custom MIB file defining the Microsoft Exchange metrics and then import the new MIB into NetIM by using the User-Defined Metrics (UDM) feature.
2. Using the new MIB, NetIM discovers the device(s) and represents and depicts the Exchange server(s).
3. A PowerShell script collects metrics from the Exchange using the Microsoft Exchange Management shell API. No SNMP is used. Windows Remote Management service must run on MS Exchange server. MS Exchange credentials with Membership of Exchange role group “Organization Management” are required.
4. The PowerShell script organizes and formats the metrics for injection into NetIM using the format of the User-Defined Metrics defined in Step 1.
5. The PowerShell script injects the metrics into the NetIM object for the Exchange server(s) using the legacy GMC (file-based format).
The customization and the script were developed before the availability of the newer NetIM Metric Import REST API, so it is injecting the legacy GMC file-based format.
The metrics are displayed in a custom Dashboard on the Portal Server. The metrics could also be displayed directly in NetIM on the device view for the Exchange server using the NetIM Custom Views feature.
BGP route and peer changes
NetIM BGP Route and Peer Changes
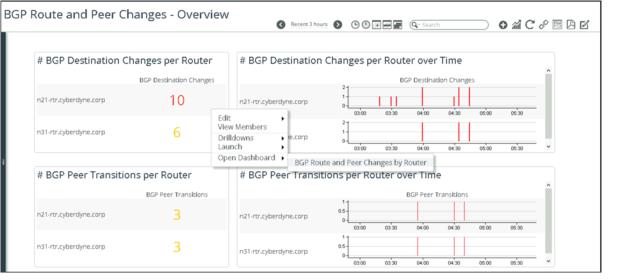
This customization displays BGP Route Flapping and BGP Peer Transitions for BGP Routers. All metrics are alertable.
This customization uses the NetIM REST API in two ways: first to extract polled metrics (export), and then to insert new metrics (import).
NetIM with BGP Route Flapping and BGP Peer Monitoring
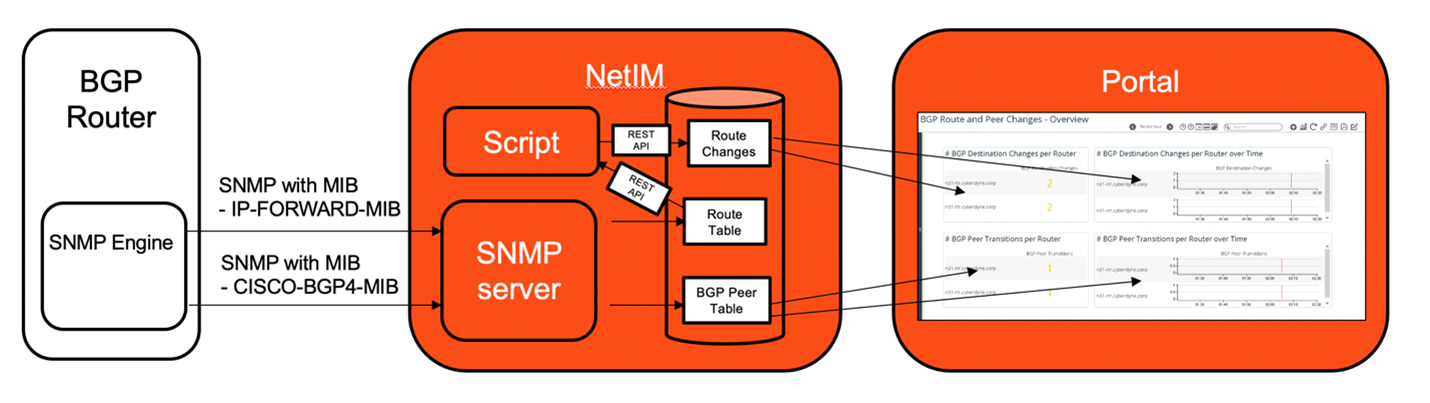
This is how it is made:
1. NetIM with SNMP polls the IPv4 route table. It is based on a UDM created from the MIB IP-FORWARD-MIB that was added to the NetIM polling profile for the BGP router(s).
2. NetIM with SNMP polls the BGP Peer table metrics. It is based on a UDM created from the MIB CISCO-BGP4-MIB that was added to NetIM polling profile for the BGP router(s).
3. You create a custom MIB file defining the Route Flapping metric and then import the new MIB using the User-Defined Metrics (UDM) feature.
4. A Python script extracts the values of the polled IPv4 route table (using the export REST API. Go to Help > API Documentation > Metric Data APIs on the BGP router(s). It checks for BGP routes younger than the polling interval. If it finds any, it inserts these into a new Route Flaps table.
5. The Python scripts organize and format the Route Flaps metrics for injection into NetIM using the format defined by the User-Defined Metrics in Step 3.
6. The Python script injects the metrics into the NetIM object for the BGP Router(s) using the new NetIM Metric Import REST API.
7. The metrics are displayed in a custom Dashboard on the Portal Server. The metrics could also be displayed directly in NetIM on the device view for the BGP Router(s) server using the NetIM Custom Views feature.
VoIP Trunk Utilization
NetIM VoIP Trunk Utilization metrics
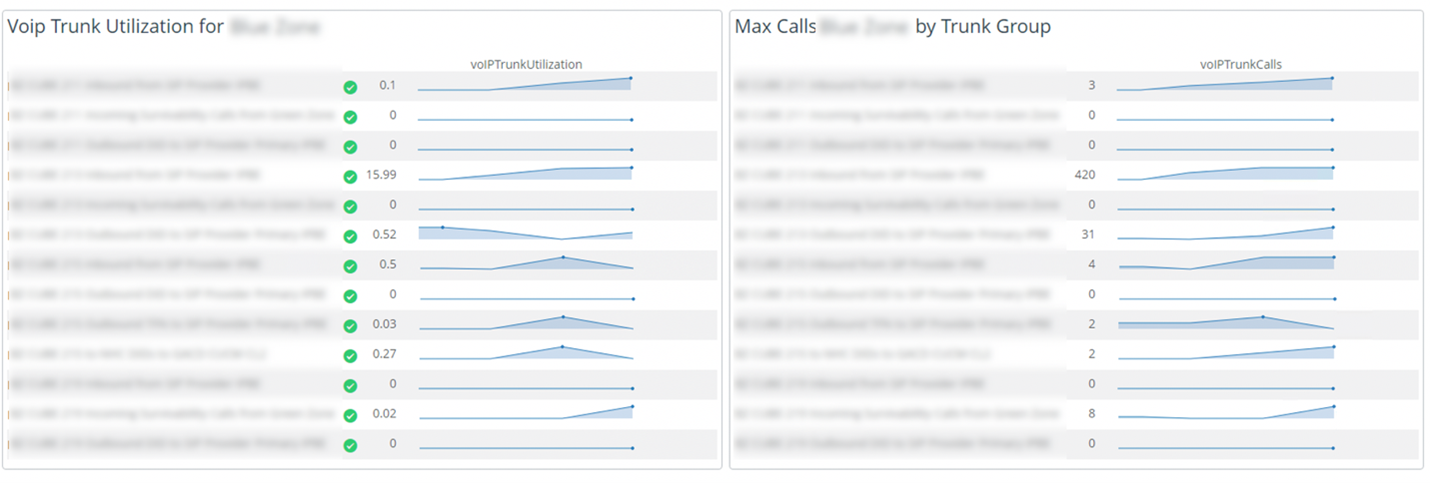
This customization displays VoIP Trunk Utilization at a per-Dial Peer level. It displays average and maximum values for Trunk Utilization and total number of calls. All metrics are alertable.
The Trunk Utilization is based on this formula:

This customization uses the NetIM REST API in two ways: first to extract polled metrics (export), and then to insert new metrics (import).
NetIM with Cisco CUBE Gateway monitoring
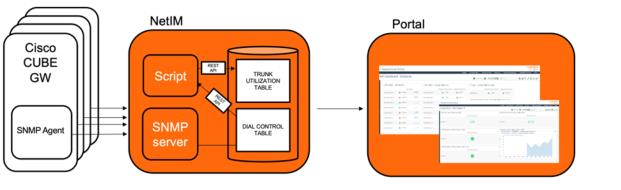
This is how it is made:
1. NetIM polls the Cisco CUBE Gateway devices for the metric dialPeerCtlStatsConnectTime of all dial peers with SNMP. This is the number of accumulated call seconds for all calls in the period. It is based on a UDM created from MIB “DIAL-CONTROL-MIB” that was added to NetIM polling profile for the Cisco CUBE Gateway device(s).
2. You create a MIB file defining the Trunk Utilization metric and then import the new MIB into NetIM using the User-Defined Metrics (UDM) feature.
3. A Python script extracts the values of the polled accumulated call seconds for each dial-peer (using the export REST API. Go to Help > API Documentation > Metric Data APIs) on the Cisco CUBE device(s). It calculates the Trunk Utilization of each dial-peer and inserts this into a new Trunk Utilization table.
4. The Python scripts organize and format the Trunk Utilization metrics for injection into NetIM using the format defined by the User-Defined Metrics in Step 2.
5. The Python script injects the metrics into the NetIM object for the Cisco CUBE device(s) using the new NetIM Metric Import REST API.
6. The metrics are displayed in a custom Dashboard on the Portal Server. The metrics could also be displayed directly in NetIM on the device view for the Cisco CUBE device(s) using the NetIM Custom Views feature.