Figure: Host Settings Page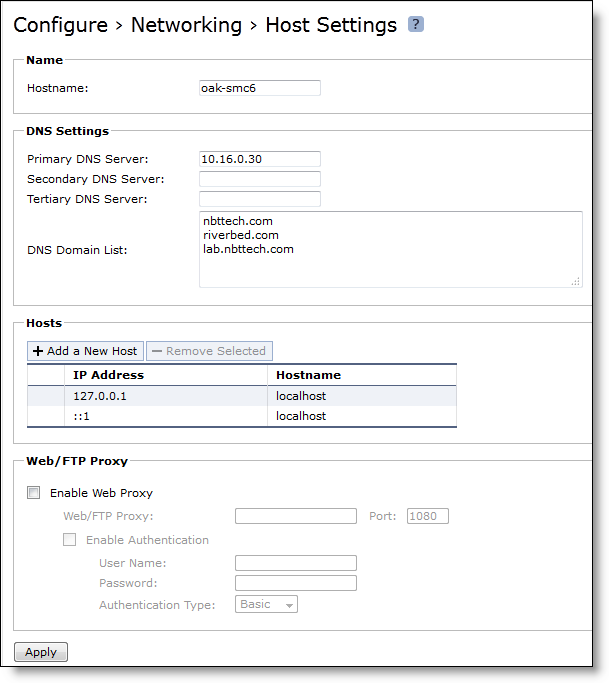
Control | Description |
Primary DNS Server | Specify the IP address for the primary name server. |
Secondary DNS Server | Optionally, specify the IP address for the secondary name server. |
Tertiary DNS Server | Optionally, specify the IP address for the tertiary name server. |
DNS Domain List | Specify an ordered list of domain names. If you specify domains, the system automatically finds the appropriate domain for each of the hosts that you specify in the system. |
Control | Description |
IP Address | Specify the IP address for the host. |
Hostname | Specify a hostname. |
Add | Adds the host. |
Remove Selected | Select the check box next to the name and click Remove Selected. |
Control | Description |
Enable Web Proxy | Provides web proxy access to the Mobile Controller. Enables the Mobile Controller to use a web proxy to contact the Riverbed licensing portal and fetch licenses in a secure environment. You can optionally require user credentials to communicate with the proxy, and you can specify the method used to authenticate and negotiate user credentials. Web proxy access is disabled by default. RiOS supports the following proxies: Squid, Blue Coat Proxy SG, Microsoft WebSense, and McAfee Web Gateway. |
Web/FTP Proxy | Specify the IP address for the web or FTP proxy. |
Port | Optionally, specify the port for the web or FTP proxy. The default port is 1080. |
Enable Authentication | Optionally, select to require user credentials for use with web or FTP proxy traffic. Specify the following to authenticate the users: • Username - Specify a username. • Password - Specify a password. • Authentication Type - Select an authentication method from the drop-down list: – Basic - Authenticates user credentials by requesting a valid username and password. This is the default setting. – NTLM - Authenticates user credentials based on an authentication challenge and response. – Digest - Provides the same functionality as Basic authentication; however, Digest authentication improves security because the system sends the user credentials across the network as a Message Digest 5 (MD5) hash. |