Configuring SAML
You set up SAML under Administration > Security: SAML.
Security Assertion Markup Language (SAML) 2.0 is an XML-based standard used for authentication between an SCC and an identity provider (IdP). It allows integration with additional authentication methods, such as multi-factor authentication using Common Access Cards (CAC) or Personal Identity Verification (PIV).
When a login request is received, the SCC first checks if local login is available. If it is, the user is authenticated using local credentials. However, if SAML is enabled, local AAA-based authentication is disabled, and the SCC redirects the login request to the IdP. The IdP then authenticates the user, confirms their identity to the SCC, and redirects the user back to the SCC, which then grants access.
SAML authentication process
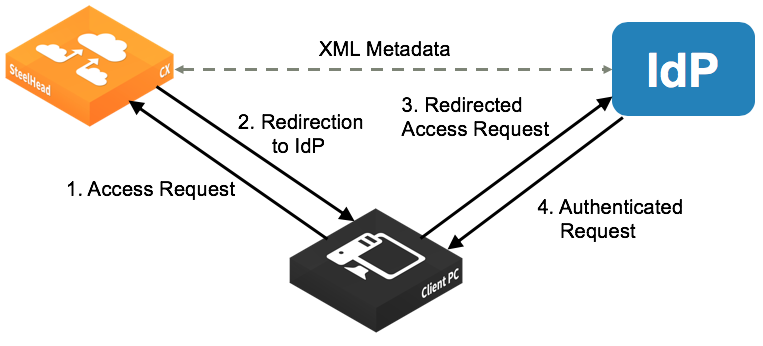
To enable IdP authentication, both the SCC and the identity provider (IdP) must be configured with XML metadata. This metadata identifies each appliance and establishes a trust relationship between the SCC and the IdP.
Administrators must create user accounts on the IdP to allow login access. These users must also match user accounts on the SCC. You can use a one-to-one mapping, where each IdP user has a corresponding SCC account with defined permissions. Alternatively, multiple IdP users can be mapped to a single SCC account, such as the admin account, though this approach reduces individual control.
SAML can be enabled in two ways: directly on a single appliance through its SAML settings page, or by configuring SAML in a policy that is pushed to multiple appliances. For more details on how to configure SAML in a policy, see
Editing policies.Before enabling SAML on any appliance, you must configure the IdP individually for each one, because each appliance requires unique IdP metadata.
You must be logged in as the administrator to enable SAML.
Configuring IdP
Under Download SteelCentral Controller Metadata, select Download XML to download the SCC metadata in XML format. The sp_metadata.xml file downloads to your local machine.
Configure SCC in your IdP. Refer to the documentation for your IdP for specific instructions. In general, you complete these steps:
1. Log in to the IdP website.
2. Upload the metadata from the sp_metadata.xml file and provide any other required details.
3. When the configuration is complete, download the IdP metadata.
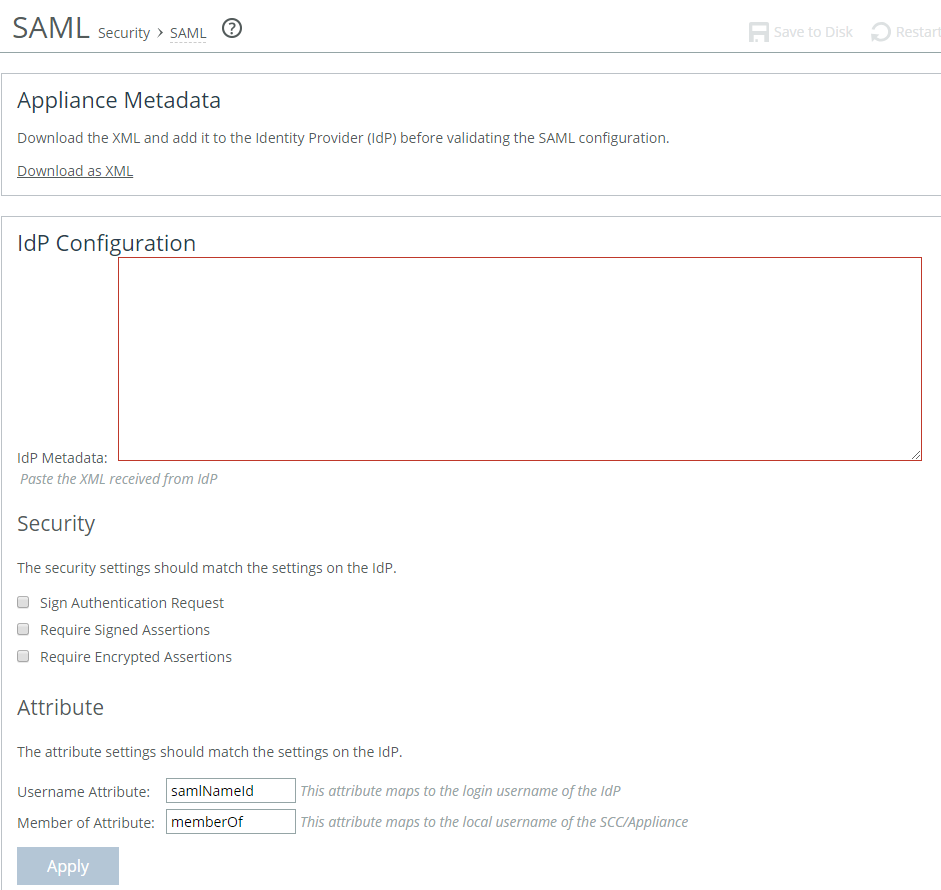
In the SCC Management console, under SAML > IdP Configuration, these SAML request and response settings are available:
IdP Metadata
Where you paste the IdP metadata you copied or received from the IdP website.
Security Settings Sign Authentication Request
Indicates SCC sign the SAML authentication request sent to the identity provider. Signing the initial login request sent by SCC allows the identity provider to verify that all login requests originate from a trusted service provider.
Security Settings Requires Signed Assertions
Indicates the SAML assertions must be signed. Some SAML configurations require signed assertions to improve security.
Security Settings Requires Encrypted Assertions
Indicates to the SAML identity provider that SCC requires encrypted SAML assertion responses. When this option is selected, the identity provider encrypts the assertion section of the SAML responses. Even though all SAML traffic to and from SCC is already encrypted by the use of HTTPS, this option adds another layer of encryption.
Attribute User Name Attribute
Specifies the name of the IdP variable that carries the username of the user. The user name attribute is mandatory and must be sent by your identify provider in the SAML response to align the login with a configured SteelHead account. Default value is samlNameId.
Attribute Member of Attribute
Specifies the name of the IdP variable that carries the role of the user. The default value is memberOf.
After you apply the changes, click Validate under Validate the IdP Configuration. The IdP Validation window appears.
Click Go to IdP. The IdP login page opens. Log in to the IdP website. The page indicates if your IdP configuration was successful.
After successful validation, return to the SAML page in the management console and select the Enable SAML check box and click Apply.
If the validation status on the SCC page does not update after a successful validation, reload the page to refresh the status.
With SAML enabled, all web login requests are redirected to the IdP.
If you make changes to the SAML settings after you validate the IdP configuration, you need to validate again with the new settings and enable SAML again.
Usage Notes
SAML authentications are only available in the Management Console web interface; they are not available through the CLI. Users can log in to a SAML-enabled SCC through the CLI but they are authenticated using the local, RADIUS, or TACACS+ authentication methods. We recommend that you set strong passwords for Riverbed appliances.
Troubleshooting
• If a user who has not been set up in the IdP tries to log in to the SCC, the login fails on the IdP login page. (This failed login is not tracked in the SCC logs.) Log in to SCC through CLI.
• If the user has been set up but their user role has not been defined in the IdP, the login succeeds but the SCC displays an error page (instead of the dashboard). Log in to SCC through CLI.
• If you cannot log in using SAML (for example, if the IdP server is unavailable), you can log in through the CLI and disable SAML using the no aaa saml enable command. Once SAML is disabled, you revert to the previously configured authentication method for the web interface. For command details, see the Riverbed Command-Line Interface Reference Manual.
• If SAML stopped working, in the Administration > Security: SAML page, click Apply. SAML authentication will be disabled for SCC. Then click Validate. The error message displayed can help you identify and fix the problem.