Figure: Virtual Appliances Page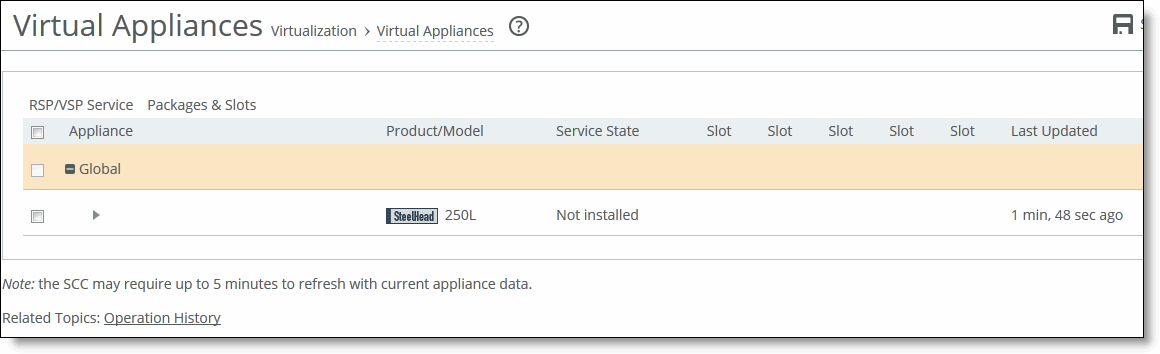
Control | Description |
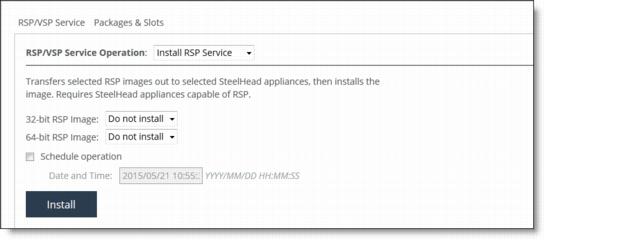
RSP/VSP Service Operation | Select Install RSP Service, Manage RSP Service, (Re)install ESXi, or Restart ESXi from the drop-down list. |
32-bit RSP Image | Select the image from the drop-down list to transfer selected image and then installs it. |
64-bit RSP Image | Select the image from the drop-down list to transfer selected image and then installs it. |
Schedule operation | Select an option to schedule an operation. Date and Time - Use this format: YYYY/MM/DD HH:MM:SS. |
Install | Installs the service. |

Control | Description |
Schedule operation | Select this option to schedule a future transfer. Date and Time - Use this format: YYYY/MM/DD HH:MM:SS. |
Transfer | Transfers the package at the scheduled time. |
Control | Description |
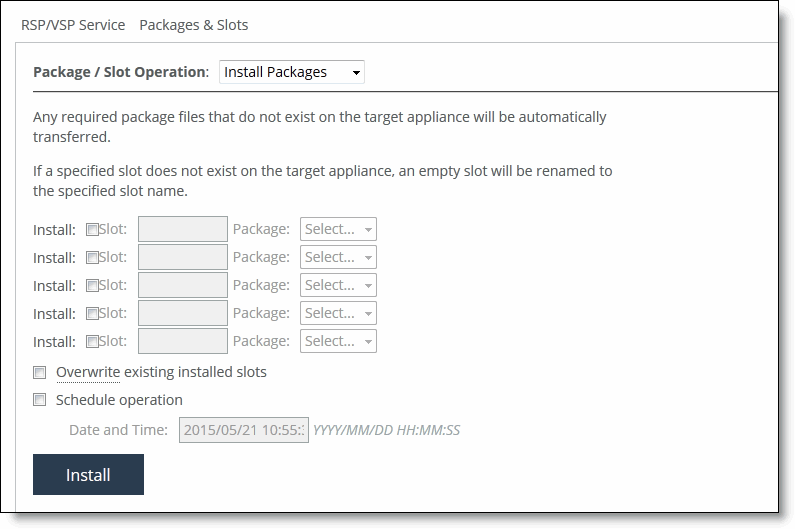
Install | Specify these options for each slot and package. • Slot - Select the slot and specify the slot number • Package - Specify the package from the drop-down list. Any required package files that do not exist on the target appliance will be automatically transferred. If a specified slot does not exist on the target appliance, an empty slot will be renamed to the specified slot name. |
Overwrite existing installed slots | Specify to overwrite existing slot with the specified package. |
Schedule operation | Select this option to schedule a future transfer. • Date and Time - Use this format: YYYY/MM/DD HH:MM:SS. |
Install | Installs the package at the scheduled time. |
Control | Description |
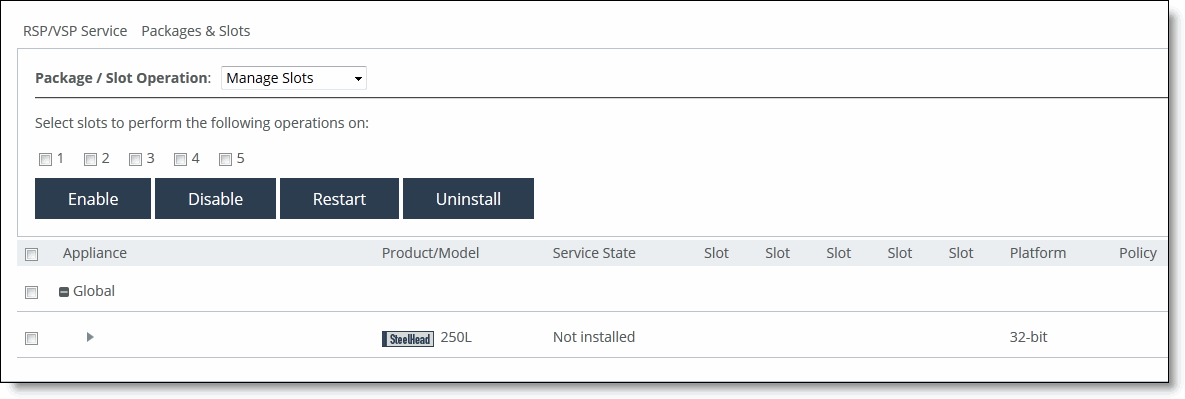
Select slots to perform the following operations | Select the slot number and click one of these options: Enable, Disable, Restart, Uninstall |
Control | Description |
RSP Installed | Displays whether or not RSP is installed. |
RSP Free Space | Displays how much RSP free space is available. |
RSP Free Memory | Displays how much RSP free memory is available. |
RSP Enabled | Displays whether or not RSP is enabled. |
Start/Stop | Starts or stops the service. |
Control | Description |
CPU | Displays how much CPU is used. |
Memory | Displays how much free memory is available. |
Disk Space | Displays how much disk space is used, free, and total. |
ESXi Management IP Address | Displays the ESXi management IP address. |
Control | Description |
Enable Slot | Enables the selected slot. |
Disable Slot | Disables the selected slot. |
Restart Slot | Restarts the selected slot. |
Uninstall Slot | Uninstalls the selected slot. |
Control | Description |
Appliance Slot | Select the appliance slot from the drop-down list. |
Compress backup | Compresses the backup file. This option is enabled by default. In most cases, Riverbed recommends that you compress backups. However, if you are transferring—or expect to transfer—a backup over a slow WAN, you might want to leave it uncompressed. The transfers for an uncompressed files backup faster, assuming there is a corresponding RSP on the other side of the transfer. |
Backup to Appliance RSP Backup Library | Select this option to save the backup file to the local RSP backup library on the appliance file system. |
Backup to Appliance RSP Backup Library | Select this option to save the backup file to the local RSP backup library on the appliance file system. |
Backup to Remote URL | Select this option and specify the remote URL to store the RSP backup file using FTP or SCP. |
Schedule for Later | Select this option to schedule for later. • Date and Time - Specify the date (in YYYY/MM/DD format) on that the RSP backup file is created. Specify the time (in hh:mm:ss format) at that the RSP backup file is created. |
Create | Creates the backup. |
+ Import | Select Import to import an appliance using a URL. |
Backup Name | Specify the name of the backup. |
URL | Specify the URL of the backup file. |
Import | Imports the RSP backup. |
Control | Description |
Accept Incoming HA Transfers | Select the check box to accept incoming HA transfers. |
HA Password | Specify a password for the incoming HA transfer. This password decrypts slot images that are received from HA peers. Remote hosts must supply this password to initiate HA transfers. Do not use your SteelHead appliance account password in this field. |
Confirm HA Password | Confirm the HA password. |
Apply | Click Apply to apply the changes. |
Remote Host | Select the remote host from the drop-down list. |
Slot | Select the check box next to the slot name. The system makes a copy of the slot on the remote host you specify |
Schedule as Future Transfer Job | Select this option to schedule a future transfer. Date and Time - Use this format: YYYY/MM/DD HH:MM:SS. |
Apply | Applies your changes. |