Configuring CRL Management
RiOS 6.5 and later provide a way to configure Certificate Revocation Lists (CRLs) for an automatically discovered CA using the Management Console. CRLs allow CAs to revoke issued certificates (for example, when the private key of the certificate has been compromised). By default, CRLs aren’t used in the SteelHead.
A CRL is a database that contains a list of digital certificates invalidated before their expiration date, including the reasons for the revocation and the names of the issuing certificate signing authorities. The CRL is issued by the CA, which issues the corresponding certificates. All CRLs have a lifetime during which they’re valid (often 24 hours or less).
CRLs are used when a:
• server-side SteelHead appliance verifies the certificate presented by the server in the SSL handshake between the server-side SteelHead appliance and the server.
• server-side SteelHead appliance verifies the certificate presented by the client-side SteelHead appliance in the handshake between the two SteelHead appliances for establishing a secure inner channel over the WAN.
• client-side SteelHead appliance verifies the certificate presented by the server-side SteelHead appliance in the handshake between the two SteelHead appliances for establishing a secure inner channel over the WAN.
The two types of CAs issuing CRLs are:
• Conventional CAs, which are listed in the Certificate Authorities page.
• Peering CAs, which are listed in the Trusted Entities list in the Secure Peering page.
You configure each type of CA separately.
Note: Currently, the SteelHead only supports downloading CRLs from Lightweight Directory Access Protocol (LDAP) servers.
To enable CRL management
1. On the server-side SteelHead, choose Optimization > SSL: CRL Management to display the CRL Management page.
Figure: CRL Management Page
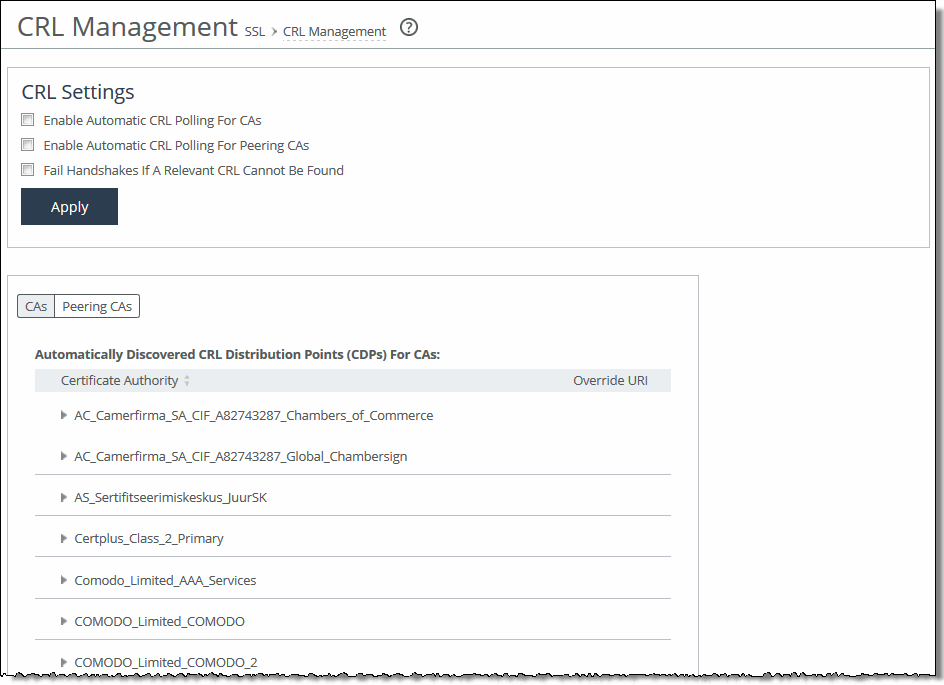
2. Under CRL Settings, complete the configuration as described in this table.
Control | Description |
Enable Automatic CRL Polling for CAs | Enables CRL polling and use of a CRL in handshake verifications of CA certificates. Currently, the SteelHead only supports downloading CRLs from Lightweight Directory Access Protocol (LDAP) servers. |
Enable Automatic CRL Polling for Peering CAs | Configures a CRL for an automatically discovered peering CA. |
Fail Handshakes If A Relevant CRL Cannot Be Found | Configures handshake behavior for a CRL. Fails the handshake verification if a relevant CRL for either a peering or server certificate can’t be found. |
3. Click Apply to save your settings to the running configuration.
4. Click Save to Disk to save your settings permanently.
Managing CRL Distribution Points (CDPs)
You can view, override, or remove CRL distribution points (CDPs) for CAs in the Optimization > CRL Management page.
A CDP is a field within a certificate containing information that describes where to retrieve the CRL for the certificate.
To view a list of CDPs for a CA
1. On the server-side SteelHead, choose Optimization > SSL: CRL Management to display the CRL Management page.
2. Select the CAs tab to view conventional CAs or the Peering CAs tab to view secure CAs.
The Automatically Discovered CRL Distribution Points table displays a list of CAs for which CDPs automatically discovered. Because not all CAs have CDPs, this list is a subset of the main CA list in the Certificate Authorities page or a subset of the CAs in the Peering Trust table in the Optimization > SSL: Secure Peering page.
Figure: CRL Management Page - Automatically Discovered CDPs
3. Select the CA name in the Automatically Discovered CRL Distribution Points table.
If a CDP has been manually overridden for the CA, it appears in the override column.
To view CDP details and access history
1. Click the Expand icon next to the CDP name.
2. To see the CDP access points, select the CDP Details tab.
Use the scroll bar to view the entire address.
3. To see the Certificate Revocation List, select the View CRL tab.
The display includes a CRL Access History list.
4. Click Check for Update to refresh the display.
To override an existing CDP
Perform this task to manually override the existing CDP for a certificate with an LDAP server specification.
1. Click Add Manual Override.
2. Select a CA name from the drop-down list.
3. Specify the CDP Uniform Resource Indicator (URI) for an LDAP server. For example,
http://ca.actalis.it/crl/root/getCRL
4. Click Add.