Configuring Connection Forwarding Features
You configure connection forwarding for a network with multiple paths from the server in the Networking > Network Integration: Connection Forwarding page.

The AWS SteelHead-c doesn’t support connection forwarding; however, the ESX SteelHead-c supports it.
You enable connection forwarding only in asymmetric networks; that is, networks in which a client request traverses a different network path than the server response. The default port for connection forwarding is 7850.
For virtual in-path deployments with multiple SteelHeads, including WCCP clusters and connection forwarding, you must always allow in-path neighbor failure. Allowing in-path neighbor failure is necessary because certain events, such as network failures, and router or SteelHead cluster changes, can cause routers to change the destination SteelHead for TCP connection packets. When this happens, SteelHeads must be able to redirect traffic to each other to ensure that optimization continues.
To optimize connections in asymmetric networks, packets traveling in both directions must pass through the same client-side and server-side SteelHead. If you have one path from the client to the server and a different path from the server to the client, you must enable in-path connection forwarding and configure the SteelHeads to communicate with each other. These SteelHeads are called neighbors and exchange connection information to redirect packets to each other.
When RiOS determines an IPv6 incompatibility between connection-forwarding neighbors, it triggers an alarm indicating that a peer SteelHead is incompatible. For details, see
Configuring Alarm Settings and
Viewing Alarm Status Reports.
You must enable connection forwarding in a WCCP cluster. With connection forwarding enabled, the WCCP load balancing algorithm considers the total number of in-path interfaces of all neighbors in the service group when balancing the load across the interfaces. If you don’t enable connection forwarding, the SteelHead with the lowest IP address assigns all traffic flows to itself. For details, see the SteelHead Deployment Guide.
When using connection forwarding in a WCCP cluster with IPv6, we recommend upgrading all SteelHeads in the cluster to RiOS 8.5 or later. You must also enable multiple interface support.
Figure: Asymmetric Network
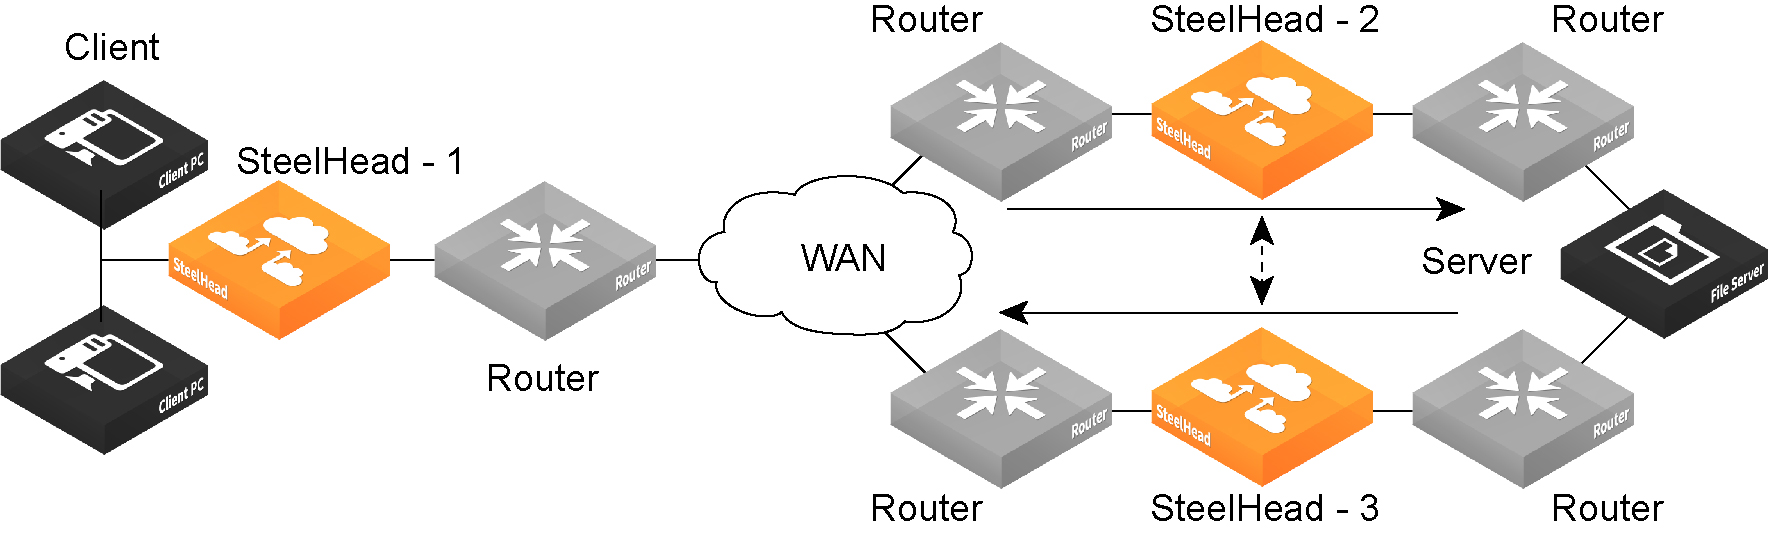
You can place neighbors in the same physical site or in different sites, but the latency between them must be small because the packets traveling between them aren’t optimized.
Note: When you define a neighbor, you specify the SteelHead in-path IP address, not the primary IP address.
If there are more than two possible paths, additional SteelHeads must be installed on each path and configured as neighbors. Neighbors are notified in parallel so that the delay introduced at the connection setup is equal to the time it takes to get an acknowledgment from the furthest neighbor.
For details about connection forwarding, see the SteelHead Deployment Guide.
To enable connection forwarding
1. Choose Networking > Network Integration: Connection Forwarding to display the Connection Forwarding page.
Figure: Connection Forwarding Page
2. Under Connection Forwarding Settings, complete the configuration as described in this table.
Control | Description |
Enable Connection Forwarding | Enables connection forwarding by default on all neighbors added to the peer list. The default value is 7850. |
Port | Specify the port number to use as the default for the neighbor SteelHead in-path port. The default value is 7850. |
Keep-Alive Interval | Specify the number of seconds to use as the default interval for ping commands between neighbor SteelHeads. The default value is 1 second. |
Keep-Alive Count | Specify the number of tries to use as the default number of failed ping attempts before an appliance terminates a connection with a neighbor. The default value is 3. |
In-Path Neighbor Failure | Uses the neighbor appliance to optimize new connections if the appliance fails. For in-path deployments that use connection forwarding with WCCP, enabling this option ensures that if one appliance fails, the neighbor appliance continues to optimize new connections. For in-path deployments that use connection forwarding without WCCP, enabling this option ensures that a SteelHead attempts to optimize new connections that are symmetrically routed, even after all of the neighbor SteelHeads on another network path failed. New asymmetrically routed connections aren’t optimized but passed through. |
Multiple Interface Support | Enables high availability on SteelHeads configured with multiple in-path interfaces and using connection forwarding with another multiport SteelHead. This option makes all neighbor in-path interface IP addresses visible to each peer to ensure proper neighbor communication if the in-path0_0 interface fails. RiOS 6.5 and later require connection forwarding in a WCCP cluster. You must enable multiple interface support for a connection-forwarding neighbor to work with IPv6. |
3. Click Apply to apply your settings.
4. Click Save to Disk to save your settings permanently.
To add a new neighbor
1. Under Neighbor Table, complete the configuration as described in this table.
Control | Description |
Add a New Neighbor | Displays the controls to add a new neighbor. |
Hostname | Specify a hostname. |
In-Path IP Address | Specify the in-path IP address for the neighbor SteelHead. When you define a neighbor, you must specify the appliance in-path IP address, not the primary IP address. To use connection forwarding with IPv6, both SteelHeads must be running RiOS 8.5 or later and you must enable multiple interface support. |
Port | Specify the in-path port for the neighbor SteelHead. The default port is 7850. |
Additional IP Addresses | Adds a neighbor SteelHead to the neighbor list. |
Add | Adds a new neighbor. |
Remove Selected | Select the check box next to the name and click Remove Selected. |
2. Click Apply to apply your settings.
3. Click Save to Disk to save your settings permanently.
Note: To modify the neighbor properties, select the IP address of the neighbor and complete the configuration.
Related Topics