Migrating to SteelCentral NetIM 2.4.0
Product: SteelCentral NetIM
Release Date: September 1, 2021
Version: 2.4.0
1) Contents
2) NetIM 2.x Architectural Changes
3) Seamless Update Support from NetIM 2.3.1 to 2.4.0
4) Migration Support From NetIM 1.5.x
7) Planning your Deployment & Migration From NetIM 1.5.x to NetIM 2.4.0
8) Deploy and License NetIM 2.4.0
9) Migrating Settings from NetIM 1.5.x
10) Migrate Model Data from NetIM 1.5.x
11) Migrate Metric Data from NetIM 1.5.x
12) Migrate Synthetic Test Metric Data from NetIM 1.5.x
13) Migrate/Test Integrations and Customizations
2) NetIM 2.x Architectural Changes
Riverbed® SteelCentral™ NetIM 2.x represents a major architectural change from both a software architecture standpoint and deployment standpoint. NetIM 1.x is provided as a single installer for Microsoft Windows platforms. In contrast, NetIM 2.x is provided as multiple virtual images (virtual appliances) for installation on VMware ESXI 6.5, 6.7, and 7.0 hypervisors and in AWS and Azure. Additionally, NetIM 2.x’s underlying operating system support is Ubuntu 18.04.2, not Windows.
3) Seamless Update Support from NetIM 2.3.1 to 2.4.0
Existing NetIM 2.0.1 or later installations can be seamlessly updated to later 2.x installations using the ISO update files and following the instructions. Detailed update instructions are provided in the SteelCentral™ NetIM Virtual Edition ISO Update Guide on the Riverbed Support Site. If you have an existing NetIM 2.0.1 or later deployment you can stop reading this document now. You should update your deployment using the ISO update path as opposed to migrating your install.
4) Migration Support From NetIM 1.5.x
Because of major architectural and deployment changes, NetIM 1.x cannot be seamlessly updated to NetIM 2.x. However, migration utilities exist to support the migration and preservation of many of your NetIM 1.5.x settings and much of your data to version 2.x.
5) Helpful Utilities
During the process of migration, you will be copying and moving files and directories between systems. We have found that installing and using a secure copy utility, such as WinSCP, on your Windows PC, greatly simplifies the file transfer and migration experience. Installing putty (SSH client allowing X11 forwarding) and Xming (X Server for Windows) on your Windows PC is required for some migration operations requiring GUI-based utilities. Another option is MobaXterm, which combines a SSH client and X Server in a single easy-to-use application.
In NetIM 2.0.1 and later releases, we have included XRDP which allows you to use Remote Desktop applications from your PC or Mac to connect to the Ubuntu VMs. You can start and stop XRDP within NetIM’s netimsh shell using “start xrdp” and “stop xrdp”.
Download, install, and familiarize yourself with WinSCP, putty, Xming, and MobaXterm before you begin migration.
6) Before You Begin
Before you begin your migration, we recommend the following:
· Read the NetIM System Requirements document and the NetIM Installation Guide contained on the NetIM download pages of the Riverbed Support site.
· Review the SteelCentral Interoperability Guide (KBA S27459) for client interoperability.
· If you are migrating from NetIM 1.5.x, plan to maintain your existing NetIM 1.5.x deployment in parallel with your NetIM 2.x deployment for several weeks.
o Do not plan to decommission your existing NetIM 1.5.x until after you have successfully migrated your settings and data to NetIM 2.x
o Do not plan to decommission your existing NetIM 1.5.x until after you have successfully migrated and tested integrations and compatibility with all your existing NetIM clients and customizations including:
§ Riverbed® SteelCentral™ NetPlanner,
§ Riverbed® SteelCentral™ NetAuditor,
§ Riverbed® SteelCentral™ Portal,
§ Riverbed® SteelCentral™ Unified Communications Xpert,
§ Riverbed® SteelCentral™ NetProfiler,
§ Custom REST API or Live Update Service (LUS) API integrations, and
§ Custom Scripts and External Adapters.
7) Planning your Deployment & Migration From NetIM 1.5.x to NetIM 2.4.0
Perform the deployment and migration in the following order.
1) Deploy and License NetIM 2.4.0
2) Migrate Settings from NetIM 1.5.x to NetIM 2.4.0
3) Migrate Model Data from NetIM 1.5.x to NetIM 2.4.0
4) Migrate Metrics Data from NetIM 1.5.x to NetIM 2.4.0
5) Migrate Synthetic Test Metrics Data from NetIM 1.5.x to NetIM 2.4.0
The above migration steps require no downtime of your existing NetIM 1.5.x installation.
Note: Riverbed Professional Services can be engaged to assist in planning and performing deployment and migration.
8) Deploy and License NetIM 2.4.0
Follow the installation instructions contained in the NetIM Installation Guide. At first login, you will be directed to the Licenses page to perform licensing operations. Since NetIM 2.x Core will be installed on a different server than NetIM 1.x, you must perform the token replacement process to obtain new licenses for NetIM 2.x. The token replacement will allow you to continue to run your existing NetIM 1.x while you migrate to NetIM 2.x
The token replacement process is a simple, self-service operation that provides you with a new license token to redeem for new NetIM licenses:
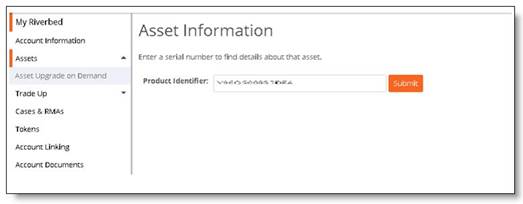
1. Under "Assets" on Riverbed support website, enter the product identifier/serial number and search for the asset:
2. Click "Request Token Replacement" in the "Token Replacement" section.
3. Specify one or more email addresses to forward the replacement token to and then click Submit.
4. After submitting the form, the replacement token will be displayed and an email with the token will be sent to the email addresses specified.
5. Redeem the
token on the Licenses page of NetIM 2.x
NOTE: Replacement tokens for eval licenses cannot be requested using the
self-service process outlined above. Contact your Riverbed account manager to
request a new token for your eval license.
After successfully installing and licensing NetIM 2.x proceed to the “Migrate Settings from NetIM 1.5.x” step. Do not start NetIM 2.x services.
9) Migrating Settings from NetIM 1.5.x
The following settings can be migrated from NetIM 1.5.x to NetIM 2.x:
· Device and Platform Information
· Global Discovery Settings
· Trap Receiver Credentials
· Groups and Sites
· Auto Grouping Rules
· Device Drivers
· IP Detection Service Settings
· Polling Profiles
· Interface filters
· Business Hours Settings
· Alerts and Notification Settings
· User-Defined Metrics Settings
· Synthetic Tests
· NetProfiler Settings
· Custom Attributes
Before proceeding with migration, ensure that the Windows Settings for “Region and language” are set to “United States” and “English (United States)” on the NetIM 1.5 system. The database backup/restore and settings backup/restore will fail if you do not follow this requirement. Migrate settings from an existing NetIM 1.5.x installation to NetIM 2.x by performing the following steps:
1) On your existing installation of NetIM 1.5.x, execute:
a. app.bat SETTINGS_MIG export <directoryToExportZipFile>
Or
b. app.bat SETTINGS_MIG_GUI export
2) After executing the utility, your NetIM 1.5.x settings will be saved, by default, in <NETIM_1.5.x_TEMP_DIR>\configExport\<timestamp>\configExport.zip)
3) Copy the configExport.zip file to the NetIM 2.x Core VM using an SCP utility such as WinSCP. Copy the file to an accessible directory on your NetIM 2.x Core VM, such as /opt/riverbed/NetIM/op_admin/configExport/.
4) On the NetIM 2.x Core VM console or via an SSH session to the NetIM Core VM, login as netimadmin and start the XRDP service
a. usage: start xrdp
5) Use a remote desktop application from your PC or Mac to RDP to the NetIM 2.x Core VM.
6) Using a terminal window in your remote desktop window, ensure that all NetIM 2.x Core services are stopped.
a. usage: app.sh -c stop ALL
7) Enter app.sh SETTINGS_MIG_GUI import in the terminal window of your RDP session. Choose the configExport.zip file you exported from NetIM 1.5.x and click the Import button.
8) After the settings import has completed successfully, migrate the database to the latest schema
a. usage: app.sh PostInstallModifier upgrade
9) Proceed to the “Migrate Model Data from NetIM 1.5.x” section, below.
NOTE: Do Not Start NetIM 2.x Core Services.
10) Migrate Model Data from NetIM 1.5.x
Before proceeding with migration, ensure that the Windows Settings for “Region and language” are set to “United States” and “English (United States)” on the NetIM 1.5 system. The database backup/restore and settings backup/restore will fail if you do not follow this requirement. To migrate model data from an existing NetIM 1.5.x installation to NetIM 2.x:
1) On NetIM 1.5.x: Use the app.bat target DB_UTIL to export all your model data
a. usage: app.bat DB_UTIL exportNoMetrics
2) After executing the utility, the database dump file will be saved, by default, in <install-dir>\database\vnes_db.dmp on your NetIM 1.5.x server.
3) Copy the vnes_db_dmp file to the database directory on your NetIM 2.x install (i.e. /opt/riverbed/NetIM/2.x.x_xxxx/database/)
4) On NetIM 2.x Core, ensure that all services are stopped.
a. usage: app.sh -c stop ALL
5) On NetIM 2.x Core: Use the app.sh target to clean the database and prepare for database import:
a. usage: app.sh CLEANALLDBSILENT
6) On NetIM 2.x Core: Use the app.sh target DB_UTIL to import your model data:
a. usage: app.sh DB_UTIL import
7) On NetIM 2.x Core: Perform a database schema upgrade using the app.sh target PostInstallModifier:
a. usage: app.sh PostInstallModifier upgrade
8) On NetIM 2.x Core: Start NetIM 2.x services
a. usage: app.sh -c start ALL
9) On NetIM 2.x Core: Login to NetIM and review the Home page (site, group, device, interface counts), Device Manager, Polling wizard, Alert wizard, Notification wizard, Synthetic Testing wizard, Global Discovery Settings wizard, Autogrouping Rules, etc. to confirm your settings and model data have been migrated.
10) On NetIM 2.x Core: Login to NetIM and launch the Basic Setup wizard to enable and schedule the master schedule.
11) If migration of settings and model data is successful, proceed to the “Migrate Metric Data from NetIM 1.5.x” section.
11) Migrate Metric Data from NetIM 1.5.x
To migrate metric data from an existing NetIM 1.5.x installation to NetIM 2.x:
1) One NetIM 1.5.x: Use the app.bat target EXPORT_METRICS. Usage:
a. usage: app.bat EXPORT_METRICS
b. usage: app.bat EXPORT_METRICS "-toDir C:\metrics"
2) After executing the utility, data will be saved in several directories and files under <install-dir>\op_admin\tmp\vne\metrics\export.
3) Copy these files to a directory that is accessible to your NetIM 2.x install.
4) On NetIM 2.x: Use Generic Metrics Collector to import the metric data
a. Note: Importing a large quantity of metric data will take a considerable amount of time. You should not attempt to import all metric data in a single batch.
12) Migrate Synthetic Test Metric Data from NetIM 1.5.x
To migrate synthetic test metric data from an existing NetIM 1.5.x installation to NetIM 2.x:
1) On NetIM 1.5.x: Use the app.bat target EXPORT_SYNTHETIC_TEST_METRICS. Usage:
a. usage: app.bat EXPORT_SYNTHETIC_TEST_METRICS
b. usage: app.bat EXPORT_SYNTHETIC_TEST_METRICS "-toDir C:\metrics"
2) After executing the utility, data will be saved, by default, in several directories and files under <install-dir>\op_admin\tmp\vne\metrics\export.
3) Copy these files to a directory that that is accessible to your NetIM 2.x install.
4) On NetIM 2.x: Use REST APIs to import the synthetic test metric data.
a. Note: Importing a large quantity of metric data will take a considerable amount of time.
13) Migrate/Test Integrations and Customizations
After successfully migrating settings and data, test your existing NetIM 1.5.x client integrations and customization scripts with NetIM 2.x. Additional configuration may be required on the clients in order to successfully connect and preserve the client integration. Specific instructions for moving a data source in Portal are provided in (KBA S33164).
©2021 Riverbed Technology. All rights reserved. Riverbed and any Riverbed product or service name or logo used herein are trademarks of Riverbed Technology. All other trademarks used herein belong to their respective owners. The trademarks and logos displayed herein may not be used without the prior written consent of Riverbed Technology or their respective owners.