Administering a Realm
Realm Overview
SCM is multitenant management portal; a deployed instance of SCM running in Amazon AWS, called a realm, hosts a number of organizations.
An organization is a logical unit under a realm, representing an end customer. It contains the customer details, sites, devices, and zones associated with the devices, the uplinks, and so on.
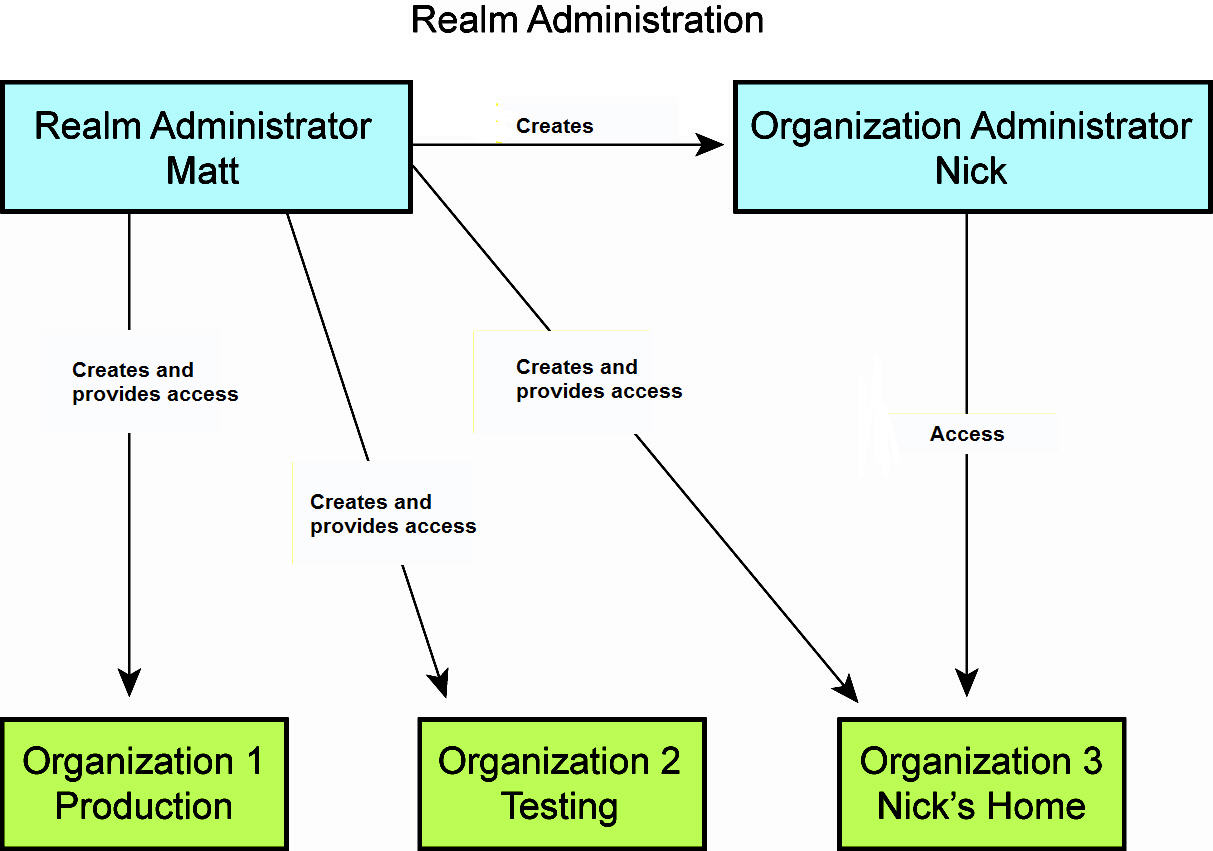
Each realm has realm administrators and organization administrators.
•Realm administrators - Super users that view and manage the entire instance.
•Organization administrators - Users that manage an organization within a realm.
A single Amazon instance could host 50 small organizations in production, whereas a larger organization might have one dedicated Amazon instance.
You can change settings associated with a realm after logging in to SCM with realm administrator credentials and using the tabs on the realm map. The procedures described in this topic require realm administrator credentials.
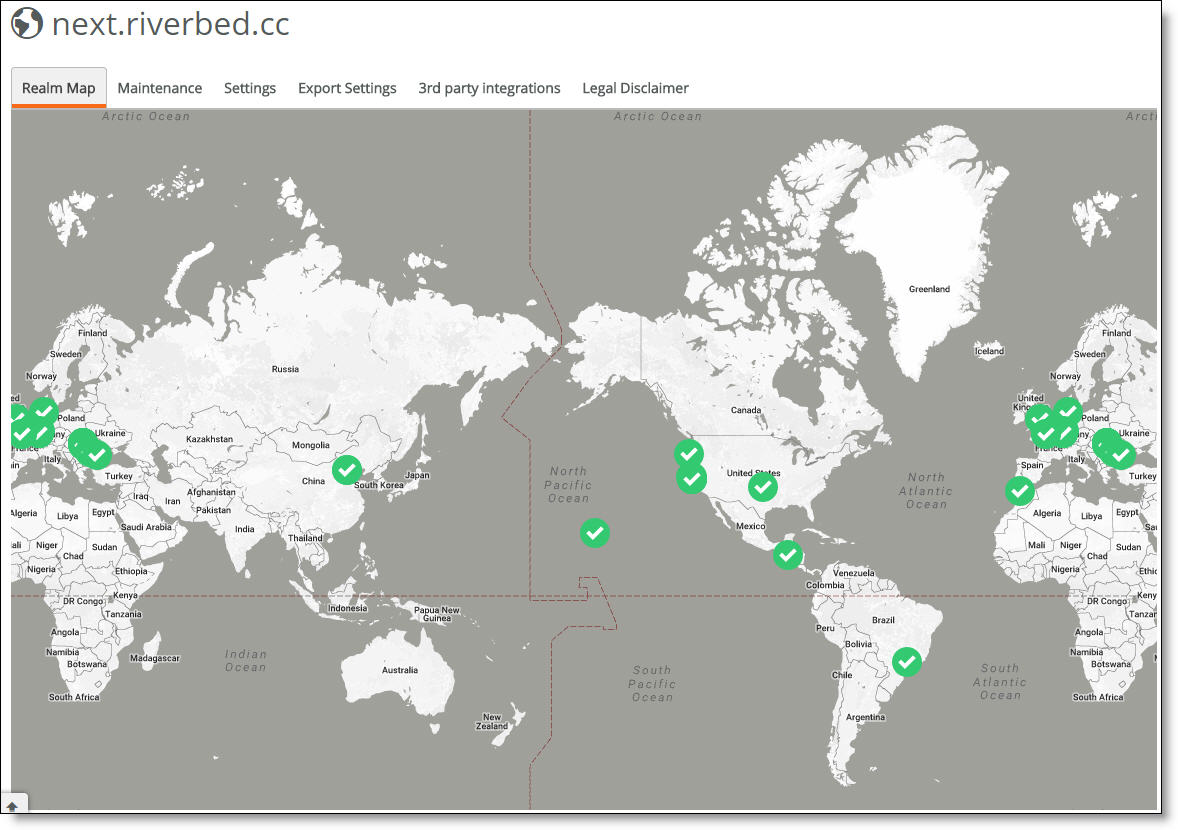
Realm map
Maintenance
This tab controls the centrally managed firmware upgrade process. A Riverbed appliance simply needs to be connected and registered, and the upgrade happens automatically when a new version of the firmware is available (unless you reschedule the upgrade or an upgrade schedule is customized for an organization within the realm). For details, see
Upgrade overview.
An organization’s maintenance policy overrides the realm’s maintenance policy.
Settings
This tab is where you enable loopback authentication, allow access to the Riverbed Support team, enable APIs, and allow an organization administrator to reset their own password.
Enabling support access
A realm administrator can allow Riverbed Support to directly view and troubleshoot issues for an SCM instance.
To enable support access
1. At the realm level, select the Settings tab.
2. Under Riverbed support access, click On.
Enabling REST API
SteelConnect features a powerful REST API for northbound traffic. When you enable REST API, it is enabled for all organizations within the realm. You can use the API to access many features that are also available through the SteelConnect Manager (SCM) graphical user interface (GUI). For details, see
Accessing the API.
To enable REST API
1. At the realm level, select the Settings tab.
2. Under REST API, click On.
Enabling two-factor authentication
When two-factor authentication is enabled for the realm, all access to the realm GUI must be authenticated with a second authentication mechanism. The value of this setting is also the default setting for two-factor authentication when accessing individual organizations. You can override this default setting per organization.
You must specify a mobile phone number for every administrator before enabling loopback authentication through mobile messaging.
To enable two-factor authentication
1. At the realm level, select the Settings tab.
2. Under Two-factor authentication, click On.
Export Settings
This tab is where you configure SNMP server settings and enable SNMP to report events to an SNMP entity.
Exporting SNMP events
Traps are messages sent by an SNMP entity that indicate the occurrence of an event. The traps are sent by SCM from the AWS IP address used for the SCM realm. You must configure a firewall or SNMP proxy to receive the traps. All events that appear in the realm event log will also generate a trap.
The traps can be authenticated and encrypted if you enable SNMPv3.
For a list of SNMP events, see
SNMP traps.
RiOS provides support for these SNMP versions:
•Version 2 (this is the default setting)
•SNMP Version 3 authentication using MD5 and SHA1 privacy
•SNMP Version 3 encryption using AES and DES
To enable SNMPv2
1. At the realm level, select the Export Settings tab.
2. Type SNMP server’s IPv4 address.
3. Type the SNMP port number.
To enable SNMPv3
1. At the realm level, select the Export Settings tab.
2. Click On next to Enable SNMPv3 Authentication and Encryption.
3. Type the username.
4. Select an authentication method from the drop-down list.
•HMAC-MD5-96 - Use the Message-Digest 5 algorithm, a widely used cryptographic hash function with a 128-bit hash value. This is the default value.
•HMAC-SHA1-96 - Use the Secure Hash Algorithm, a set of related cryptographic hash functions. SHA is considered to be the successor to MD5.
5. Specify an authentication password. Click the eye icon to see the password as you type. The view persists until you click the eye icon again to hide the password.
6. Select an encryption method from the drop-down list:
•CBC-DES - Use the cyber block chaining (CBC) data encryption standard (DES). This is the default value.
•CBS-3DES-EDE - Use the triple data encryption standard, which is similar to the CBC-DES method, but it applies the DES operation three times.
•CFB128-AES-128 - Use the advanced encryption standard (AES).
7. Specify an encryption password. Click the eye icon to see the password as you type. The view persists until you click it again to hide the password entry.
8. Click Submit.
3rd party integrations
This tab is where you integrate a third-party email service or alternative SMS provider with the realm.
Integrating a third-party email service or SMS provider
By default, a SteelConnect realm uses the Riverbed hosted Amazon Simple Queue Service (SQS) email server and short message service (SMS) provider. A realm administrator can integrate a third-party email service or SMS relay into a realm for use in place of the Riverbed hosted services. While the Riverbed hosted services are reliable, integrating a third-party provider has the added benefits of easier tracking and improved security because the email addresses and phone numbers never leave the service provider domain, geography, country, or governing region (such as the European Union).
To integrate a third-party email service
1. At the realm level, select the 3rd party integrations tab.
2. Under Email Server Settings, select Custom Setup from the drop-down list.
3. Enter the third-party email server.
4. Enter the port number for the third-party email server.
5. Enter the user name.
6. Enter the password. Click the eye icon to see the password as you type. The view persists until you click it again to hide the password.
7. Click Submit.
To enable a third-party SMS
1. At the realm level, select the 3rd party integrations tab.
2. Under SMS Service Settings, select the alternative service provider MessageBird from the drop-down list.
3. Enter the authorization access key such as AccessKey test_gshuPaZoeEG6ovbc8M79w0QyM.
Legal Disclaimer
This tab provides a place to add a predefined legal disclaimer that appears each time a user logs in to SCM. For example, “This computer system is the private property of its owner, whether individual, corporate, or government. It is for authorized use only.”
Using realm menus
The left menu provides realm administrators with ways to view organizations and administrators for the organizations. In addition, it provides a way to view a list of all appliances in every organization belonging to the realm.
Realm menus
Organizations
Select this menu item to view a list of all organizations belonging to the realm.
Admins
Select this menu item to assign administrative rights to individual administrator accounts per organization. You can also manage appliances and licensing per organization.
We recommend that you keep the number of realm administrators to a minimum and create organization administrators to manage organizations.
Realm and organization administration
Creating an administrator
To create a realm or an organization administrator
1. At the realm level, choose Admins.
2. Click New Admin.
Creating an administrator for a realm or an organization
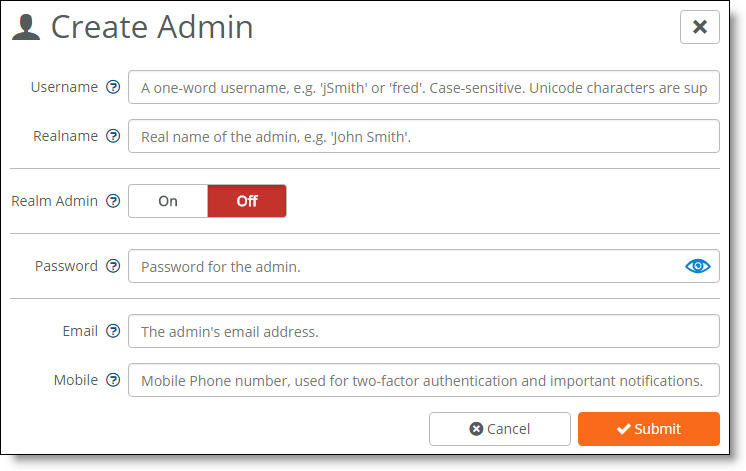
3. Specify a one-word, case-sensitive username for the administrator. You can use unicode characters.
4. Specify the administrator’s real name.
5. To make the administrator a super user who can view and manage the entire instance, click On next to Realm Admin. We recommend that you keep the number of realm administrators to a minimum and create organization administrators to manage organizations.
To make the administrator for an organization, click Off next to Realm Admin. This is the default setting.
6. Specify an administrator password. Click the eye icon to see the password as you type. The view persists until you click it again to hide the password.
7. Specify the administrator’s email address.
8. Specify a mobile phone number for the administrator to use loopback authentication through mobile messaging. The administrator will also receive important text notifications using this number.
9. Click Submit.
If the new administrator will be managing an organization, you need to associate the name with the organization.
10. Choose Organizations.
11. Click the organization name to associate it with the administrator; don’t click the Manage button next to the organization.
12. Select the Admins tab.
13. Click Add assignment.
14. Select the administrator’s name from the drop-down list.
15. Optionally, after Network config write permission and Policy config write permission, you can allow or prevent the administrator’s access to network or policy configuration within the organization:
•Click On to allow the administrator read-write permission for network configuration and policy configuration.
•Click Off to restrict the administrator to read-only permission.
Assign organization
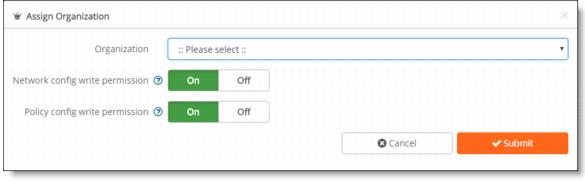
16. Click Submit.
Hardware
Select this menu item to view a list of all appliances in every organization belonging to the realm.