Installing SteelHead Product Family Appliances (English)
This chapter describes how to install SteelHead, SteelCentral Controller for SteelHead (SCC), SteelCentral Controller for SteelHead Mobile (Mobile Controller), and SteelHead Interceptor. For detailed information about installing and configuring each of these appliances, see their respective installation and configuration guides.
Installing the SteelHead
Overview
SteelHeads enable you to consolidate and centralize key IT resources to save money, reduce capital expenditures, simplify key business processes, and improve productivity. With the SteelHead, you can solve a range of problems affecting WANs and application performance, including:
• Insufficient WAN bandwidth
• Inefficient transport protocols in high-latency environments
• Inefficient application protocols in high-latency environments
The Riverbed Optimization System (RiOS) intercepts client-server connections without interfering with normal client-server interactions, file semantics, or protocols. All client requests are passed through to the server normally, while relevant traffic is optimized to improve performance.

This section describes how to install and configure the SteelHead (SteelHead xx50, SteelHead CX, SteelHead DX, SteelHead EX) in an in-path configuration. In an in-path configuration, the SteelHead is in the direct path of the client and server. For details about additional configuration options, see the SteelHead Installation and Configuration Guide.
Getting Started
Read the release notes for the appliance at https://support.riverbed.com. They contain important information about this release.
• Check your packing slip to make sure that you have all the necessary parts.
• Make sure you have adequate space on a two-post or four-post 19-inch rack. (CX255, CX555, CX570, CX755, CX770, 150, 250, and 550 appliances do not need to be installed on a rack.)
• Make sure that the ambient temperature does not exceed 40ºC (104ºF).
• Make sure you have a standard Phillips screwdriver to install the appliance to a rack.
• Gather the necessary information:
– Hostname, domain name, IP address, DNS server, and default gateway
– Primary interface speed and duplex settings
– In-path interface IP address, netmask, and default gateway
– In-path LAN and WAN interface speed and duplex settings
Installing on a Rack
1. If your appliance has a bezel, remove it.
2. If your appliance requires rails, attach the rails to each side of the appliance. For details, see the Rack Installation Guide.
3. Align the screw holes on the flanges with the screw holes on the rack.
4. Insert and tighten the screws on each side of the appliance.
Note: Do not cover the air vents on CX255, CX555, CX570, CX755, CX770, 150, 250, and 550 appliances. Doing so restricts air flow and can damage the unit or reduce performance. CX255, CX555, CX570, CX755, CX770, 150, 250, and 550 appliances are desktop models; they do not need to be mounted to a rack.
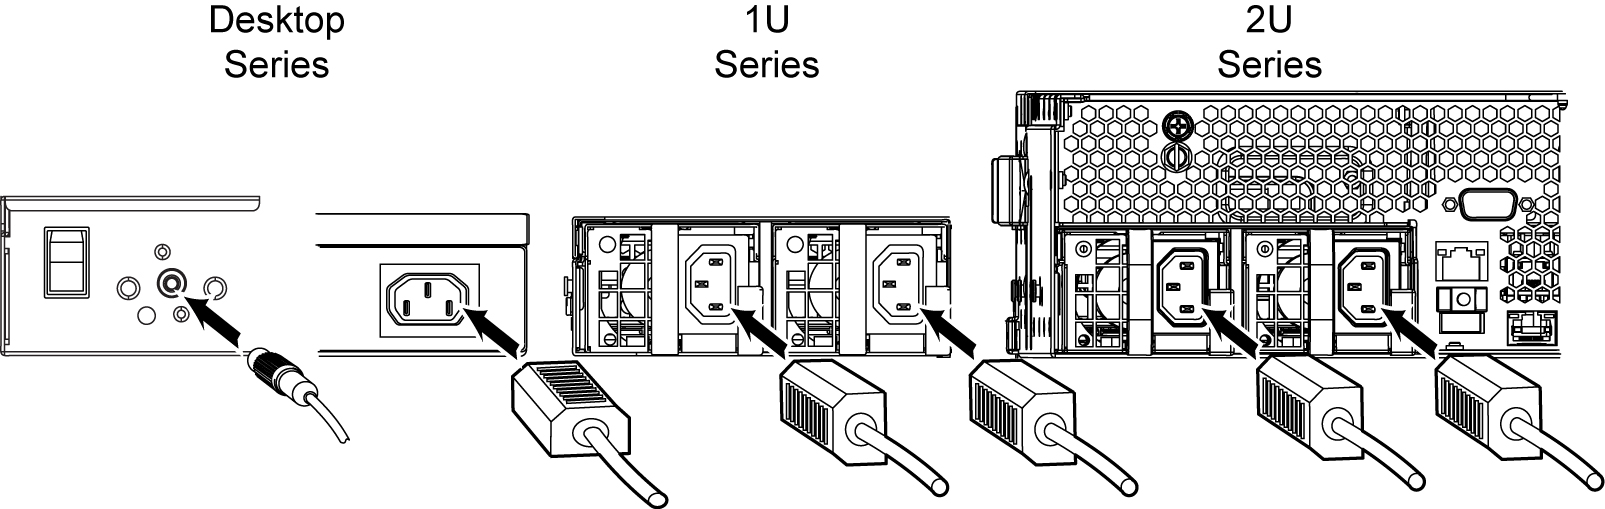
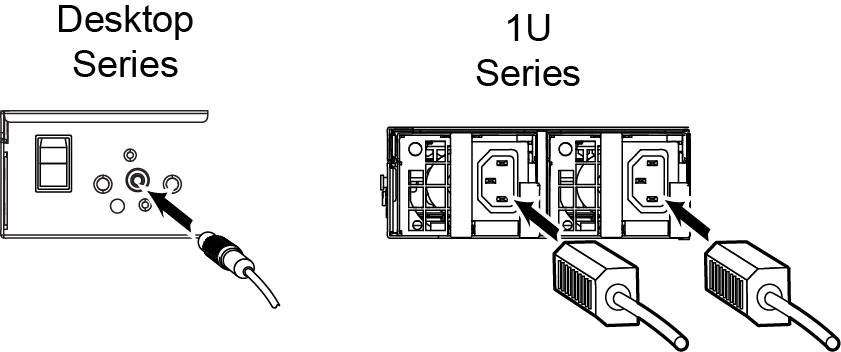
Connecting the Power
1. If your appliance has a master power switch, make sure it is in the off position.
2. Plug the power cord or cords into the appliance and an AC outlet.
3. If your appliance has a master power switch, press the master power switch (ON).
4. Press the system power switch on the front of the appliance.
Caution: In all European electrical environments, you must ground the Green/Yellow tab on the power cord. If you do not ground the Green/Yellow tab, it can cause electrical shock.
Connecting to the SteelHead
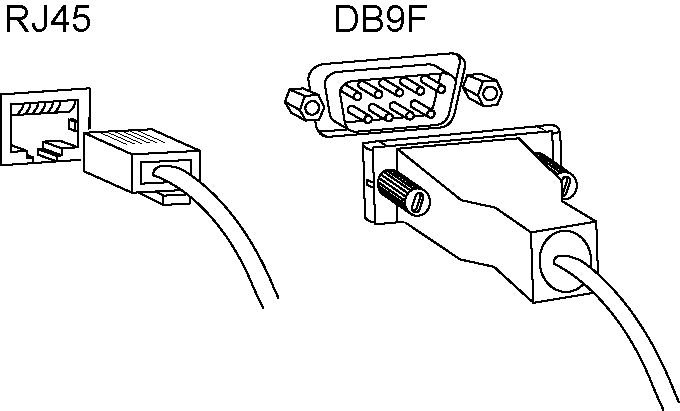
1. Plug the serial cable into the console port and a terminal.
Depending on your appliance, the console port is either a DB9F port or an RJ45 port. (For port details for your appliance model, see the specification appendix in the installation guide for your product.)
The appropriate console cable ships with your appliance.
2. Make sure the console port settings are 9600 baud, 8 data bits, no parity, 1 stop bit, no flow control.
3. Start your terminal emulation program (for example, HyperTerminal or Tera Term Pro).
4. At the login prompt, type admin. The default password is password.
Configuring the SteelHead
The configuration wizard automatically starts when you log in to the SteelHead CLI for the first time.
1. Follow the prompts to configure network and in-path interface settings for the SteelHead.
2. Confirm your settings; then type exit to log out of the appliance.
Connecting the SteelHead to Your Network
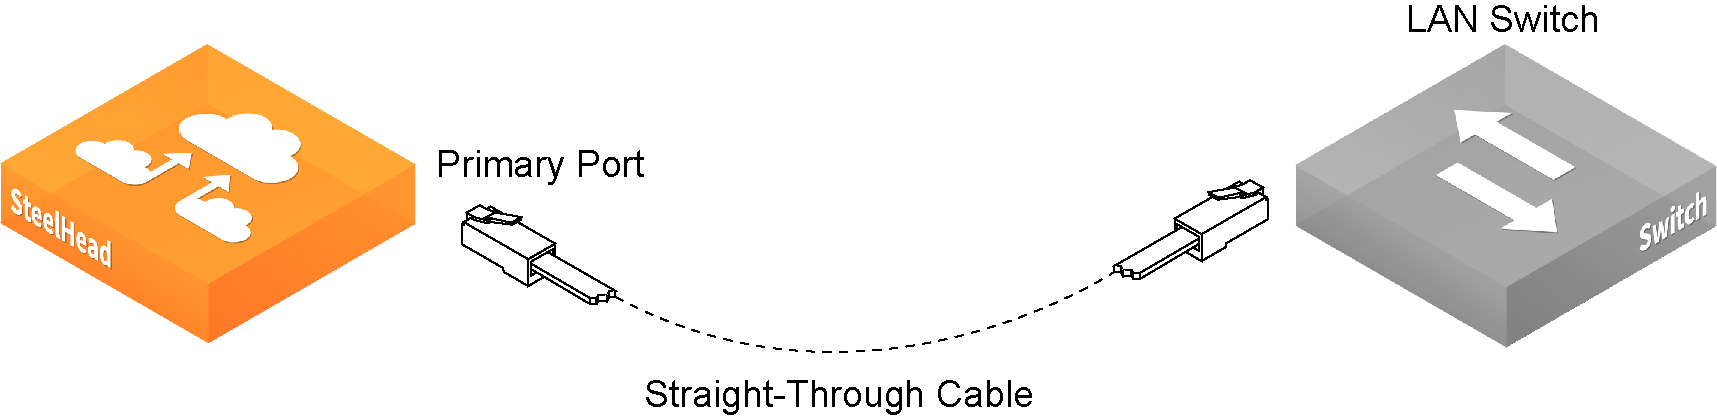
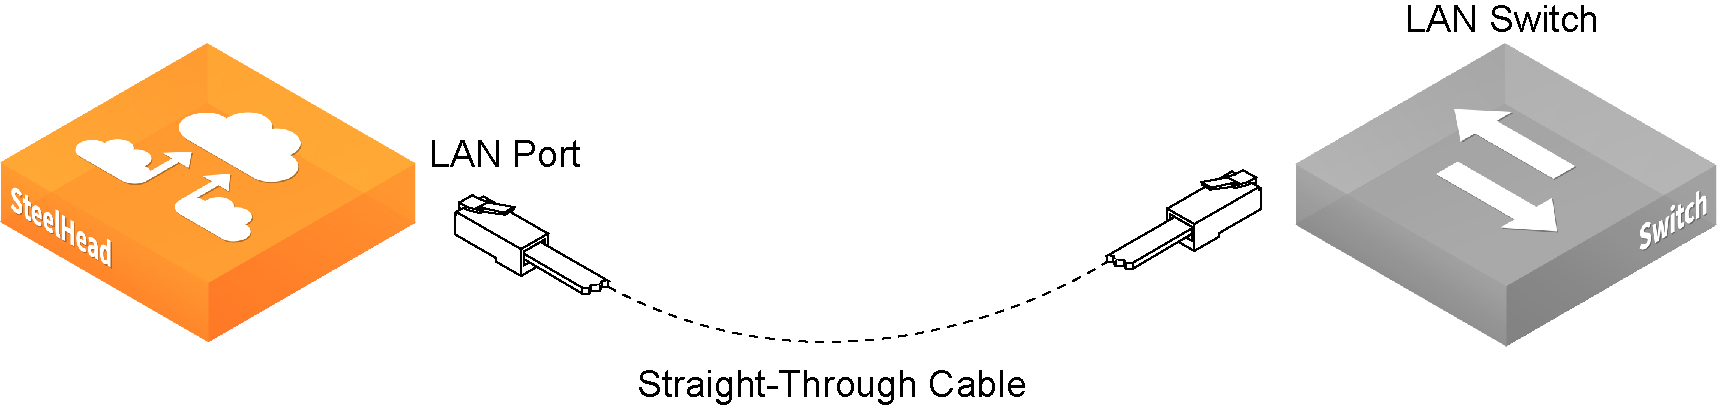
1. Make sure you use the correct cables to connect to your network:
– Straight-through cables: primary and LAN ports to LAN switch.
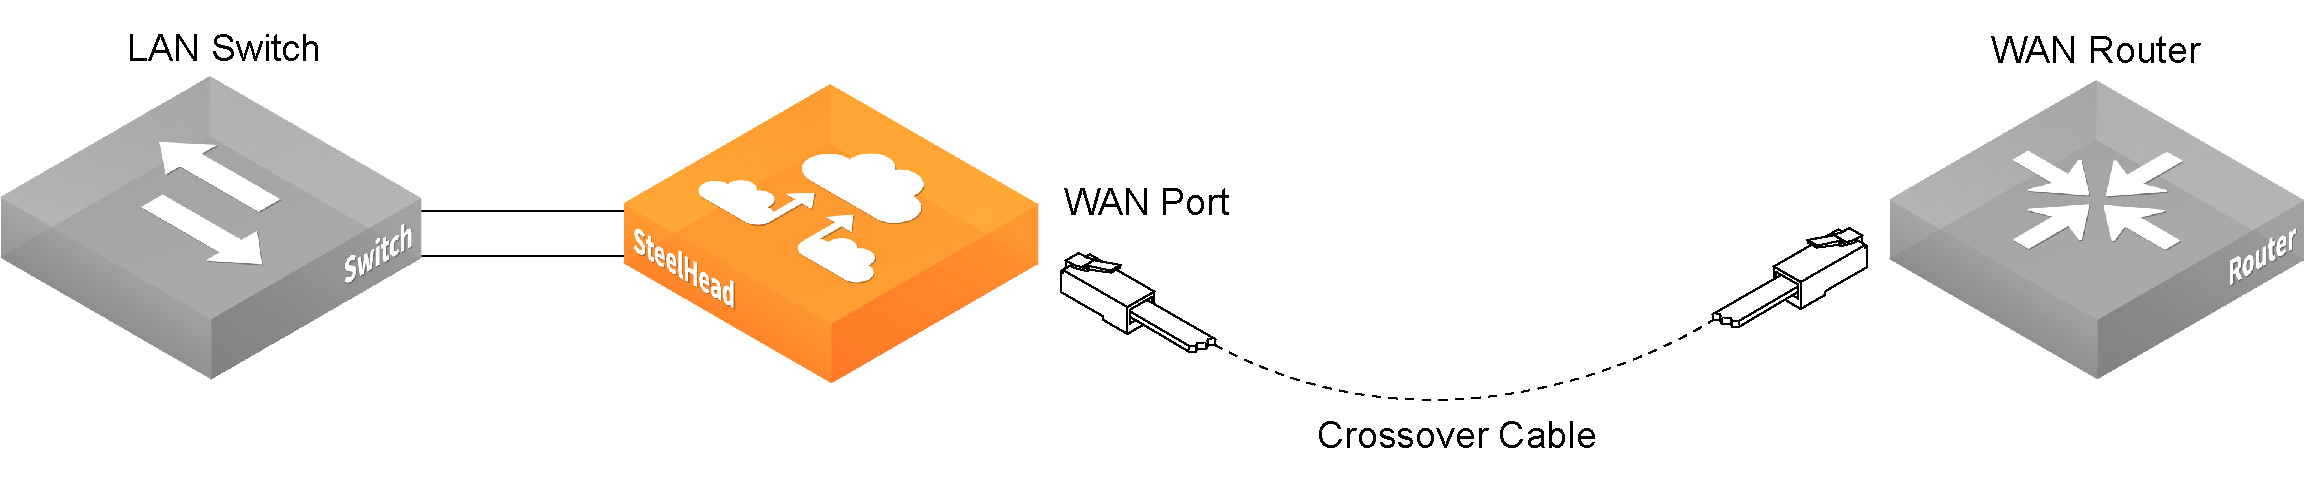
– Crossover cable: WAN port to WAN router.
2. Plug the straight-through cable into the primary port of the SteelHead and the LAN switch. This can be any port on your LAN switch that is configured to connect to a host.
3. Identify the straight-through cable that connects your LAN switch to your WAN router; unplug the end connected to the WAN router.
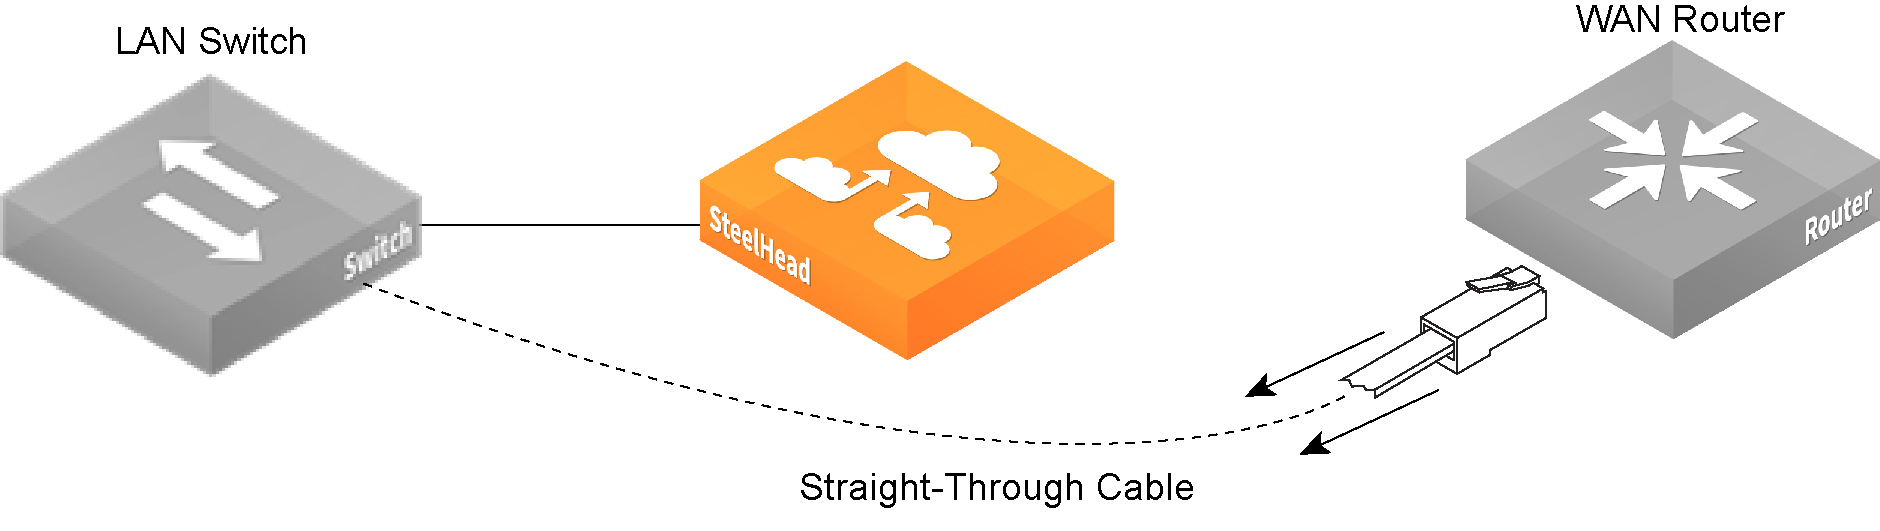
4. Plug the straight-through cable that you disconnected from the WAN router into the LAN port of the SteelHead.
5. Using the provided crossover cable, plug the cable into the WAN port of the SteelHead and the WAN router.
Note: If you have a Four-Port Copper Gigabit-Ethernet PCI-X card, repeat the installation steps. For detailed information about installing additional bypass cards, see the Network Interface Card Installation Guide.
You can now optimize WAN traffic using the SteelHead.
Checking Your Connections
1. Check the LED status lights to verify that the SteelHead is connected properly.
2. Connect to the CLI:
ssh admin@<host>.<domain> or ssh admin@<ip-address>
3. At the system prompt, enter ping commands to verify the connections. For example:
ping -I <primary-ip-address> <primary-default-gateway>
ping -I <in-path-ip-address> <in-path-default-gateway>
Logging In to the Management Console
1. Enter the URL for the Management Console in the location box of your Web browser:
http://<host>.<domain> or https://<host>.<domain>
The Management Console appears, displaying the Welcome page.
2. In the Account text box, type admin.
3. In the Password text box, type the password you assigned.
4. Click Login to display the Home page.
Installing the SCC
Overview
The SteelCentral Controller for SteelHead (SCC) enables you to manage, configure, and monitor Riverbed products using a Web application. The SCC also acts as an enterprise management and reporting tool for Riverbed products enabling greater control for global network deployments.
This section describes how to install and configure the SCC, which in turn lets you configure and manage remote SteelHeads from a central location. For detailed information, see the SteelCentral Controller for SteelHead Installation Guide.
Getting Started
Read the release notes for the appliance at https://support.riverbed.com. They contain important information about this release.
• Check your packing slip to make sure that you have all the necessary parts.
• Make sure you have adequate space on a two-post or four-post, 19-inch rack.
• Make sure that the ambient temperature does not exceed 40ºC (104ºF).
• Make sure you have a standard Phillips screwdriver to install the appliance to a rack.
• Gather the necessary information:
– SCC: hostname and IP address
– Network: netmask, default gateway, DNS IP address, and domain name
– Remote SteelHeads: IP addresses, administrative usernames, administrative passwords
Installing on a Rack
1. If your appliance has a bezel, remove it.
2. Align the screw holes on the flanges with the screw holes on the rack.
3. Insert and tighten the screws on each side of the appliance.
Connecting the Power
1. If your appliance has a master power switch, make sure it is in the off position (on the rear panel).
2. Plug the power cord or cords into the SCC and an AC outlet.
3. If your appliance has a master power switch, press the master power switch (ON).
4. Press the system power switch on the front of the SCC.
Caution: In all European electrical environments, you must ground the Green/Yellow tab on the power cord. If you do not ground the Green/Yellow tab, it can cause electrical shock.
Connecting to the SCC
1. Plug the serial cable into the console port and a terminal.
Depending on your appliance, the console port is either a DB9F port or an RJ45 port. (For port details for your appliance model, see the specification appendix in the installation guide for your appliance.)
The appropriate console cable ships with your appliance.
2. Make sure the console port settings are 9600 baud, 8 data bits, no parity, 1 stop bit, no flow control.
3. Start your terminal emulation program (for example, HyperTerminal or Tera Term Pro).
4. At the login prompt, type admin. The default password is password.
Configuring the SCC
The configuration wizard automatically starts when you log in to the CLI for the first time.
1. Follow the prompts to configure network and in-path interface settings for the SCC.
2. Confirm your settings; then type exit to log out of the appliance.
Connecting the SCC to Your Network
1. Make sure you use the correct cables to connect to your network:
– Straight-through cables: primary and LAN ports to LAN switch.
– Crossover cable: WAN port to WAN router.
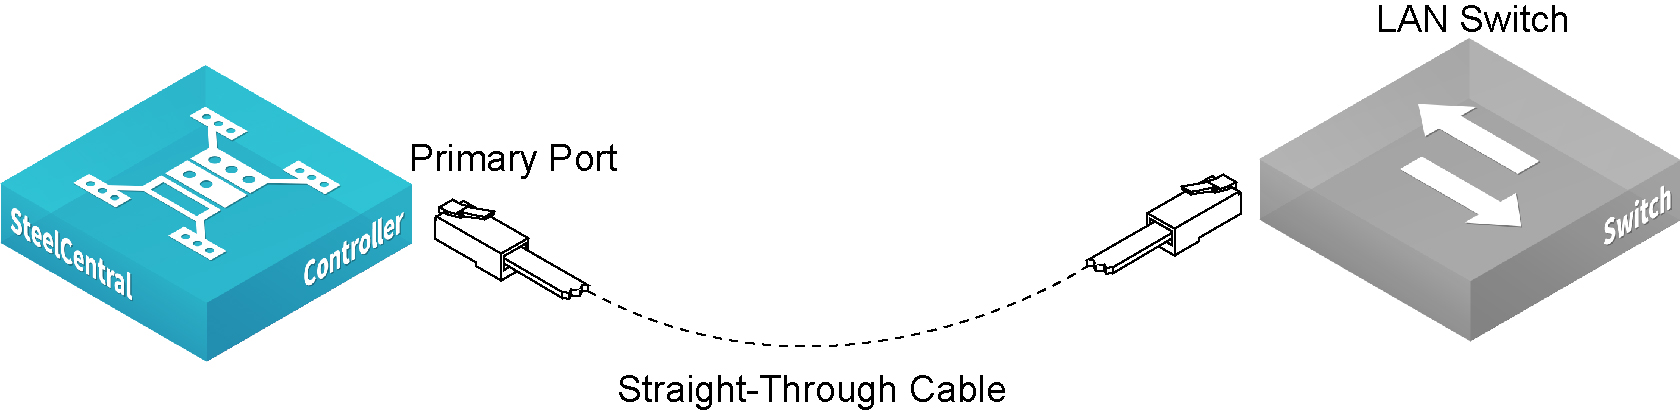
2. Plug the straight-through cable into the primary port of the SCC and the LAN switch. The primary port can be any port on your LAN switch that is configured to connect to a host.
Checking Your Connections
1. Check the LED status lights to verify that the SCC is connected properly.
2. Connect to the CLI:
ssh admin@<host>.<domain> or ssh admin@<ip-address>
3. At the system prompt, enter ping commands to verify the connections. For example:
ping -I <primary-ip-address> <primary-default-gateway>
Logging In to the SCC
1. Enter the URL for the SCC in the location box of your Web browser:
http://<host>.<domain> or https://<host>.<domain>
The SCC appears, displaying the Welcome page.
2. In the Account text box, type admin.
3. In the Password text box, type the password you assigned.
4. Click Login to display the Home page.
Installing and Deploying the Mobile Controller
Overview
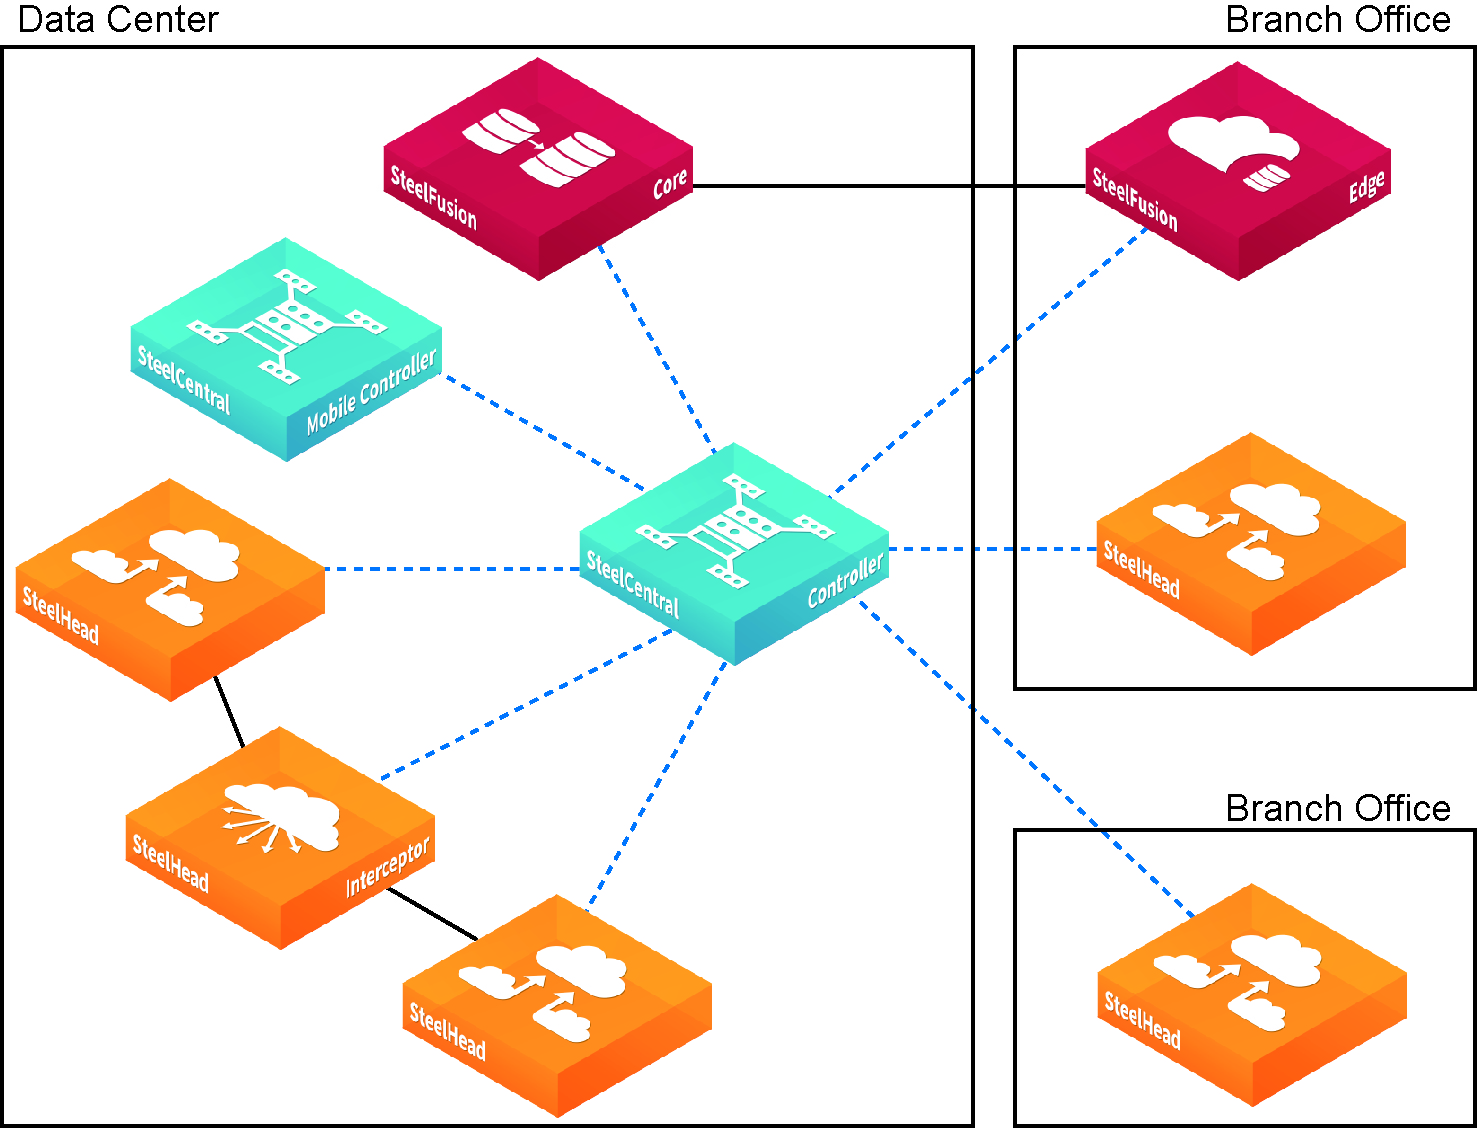
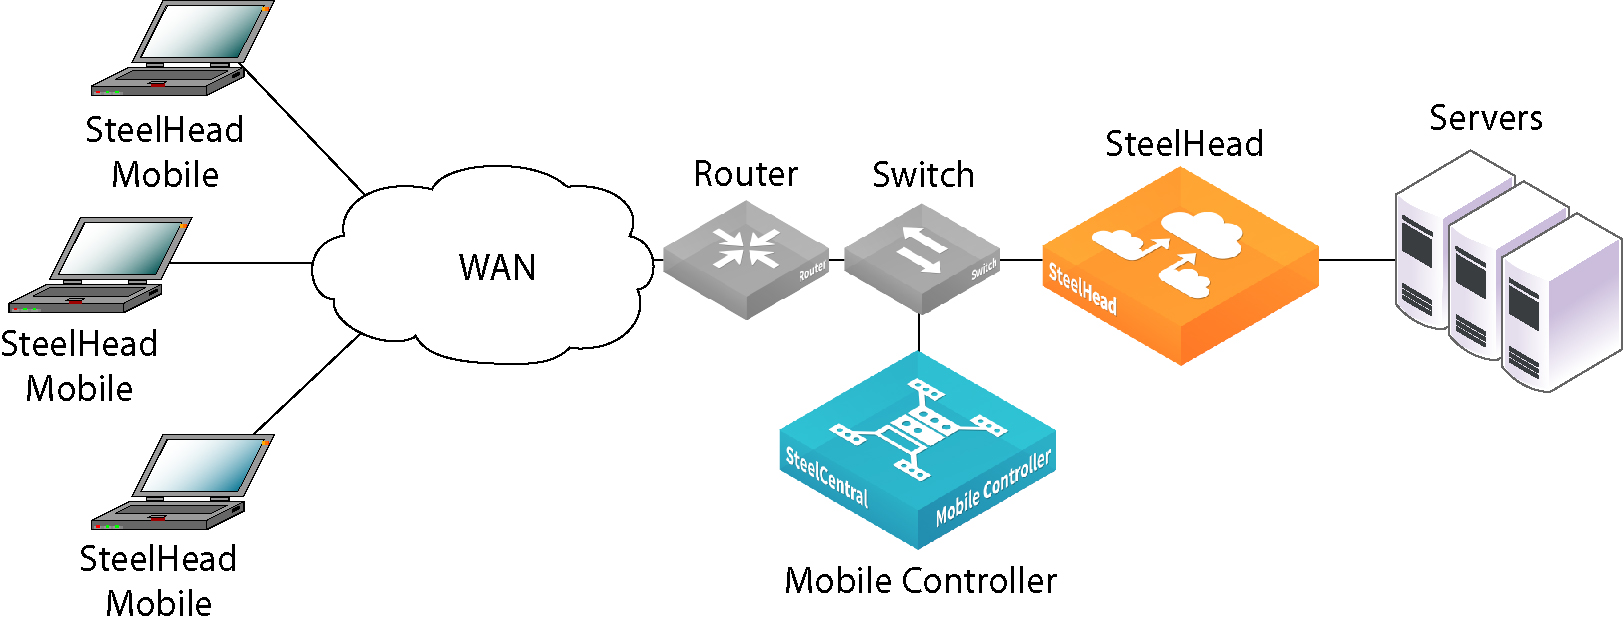
A Mobile Controller lets you optimize TCP traffic to remote users who are accessing your network using any type of remote access (for example, dial-up, broadband, and wireless). A Mobile Controller deployment consists of the following components: Mobile Controller, SteelHead Mobile, and SteelHead.
The following is an example of a typical Mobile Controller installation. The Mobile Controller is located at the main data center. All SteelHead Mobile clients communicate with the Mobile Controller for management and reporting purposes. If you have servers at multiple locations, you install server-side SteelHeads at the data centers or branches.
This section describes how to install, configure, and deploy the Mobile Controller. For detailed information, see the SteelCentral Controller for SteelHead Mobile Installation Guide.
Getting Started
Read the release notes for the appliance at https://support.riverbed.com. They contain important information about this release.
• Check your packing slip to make sure that you have all the necessary parts.
• Make sure you have adequate space on a two-post or four-post, 19-inch rack.
• Make sure that the ambient temperature does not exceed 40ºC (104ºF).
• Make sure you have a standard Phillips screwdriver to install the appliance to a rack.
• Be prepared to have values for the parameters listed in the following checklist.
Note: The default MSI package that ships with the Mobile Controller is designed to be suitable for most network environments. Typically, you can install and deploy the Mobile Controller without modifying the default policies that ship with the appliance. Consider deploying the Mobile Controller to SteelHead Mobile clients using the default policies provided and modifying them only if necessary.
Appliance | Parameter |
Mobile Controller | Hostname |
IP Address |
Net Mask |
Default Gateway (the WAN gateway) |
Primary DNS Server (Domain Name Server IP address) |
Domain Name |
Administrator Password |
SteelHead Mobile | Data Store Size. At least 1 GB of disk space is required for the data store. The default value is 10 MB. Note: You only need this value if you choose not to use the default MSI package (containing default acceleration and endpoint policies) that ships with the Mobile Controller. |
Maximum Log Size. The default value is 5000 KB. Note: You only need this value if you choose not to use the default MSI package (containing default acceleration and endpoint policies) that ships with the Mobile Controller. |
Maximum Number of Log Files. The default value is 2. Note: You only need this value if you choose not to use the default MSI package (containing default acceleration and endpoint policies) that ships with the Mobile Controller. |
VPN Port Number. When you deploy Mobile Controller components, you need to ensure that the VPN tunnel is not optimized. If the VPN tunnel uses TCP for transport, when you configure the acceleration policy, add a pass-through rule for the VPN port number connected to by the client. Depending on your deployment scenario, this rule might be the first rule in the list. For details about acceleration policies, see the SteelCentral Controller for SteelHead Mobile User’s Guide. VPNs that use IPSec as the transport protocol do not need a pass-through rule. This is because IPSec is its own non-TCP/IP protocol and, by default, SteelHeads do not optimize it. For detailed information about pass-through rules, see the SteelCentral Controller for SteelHead Mobile User’s Guide. |
• Make sure you have enough memory on SteelHead Mobile clients to run the Mobile Controller.
Data Store Size (GB) | Memory Usage (MB) |
1 | 81 |
2 | 100 |
5 | 112 |
10 | 161 |
15 | 171 |
20 | 228 |
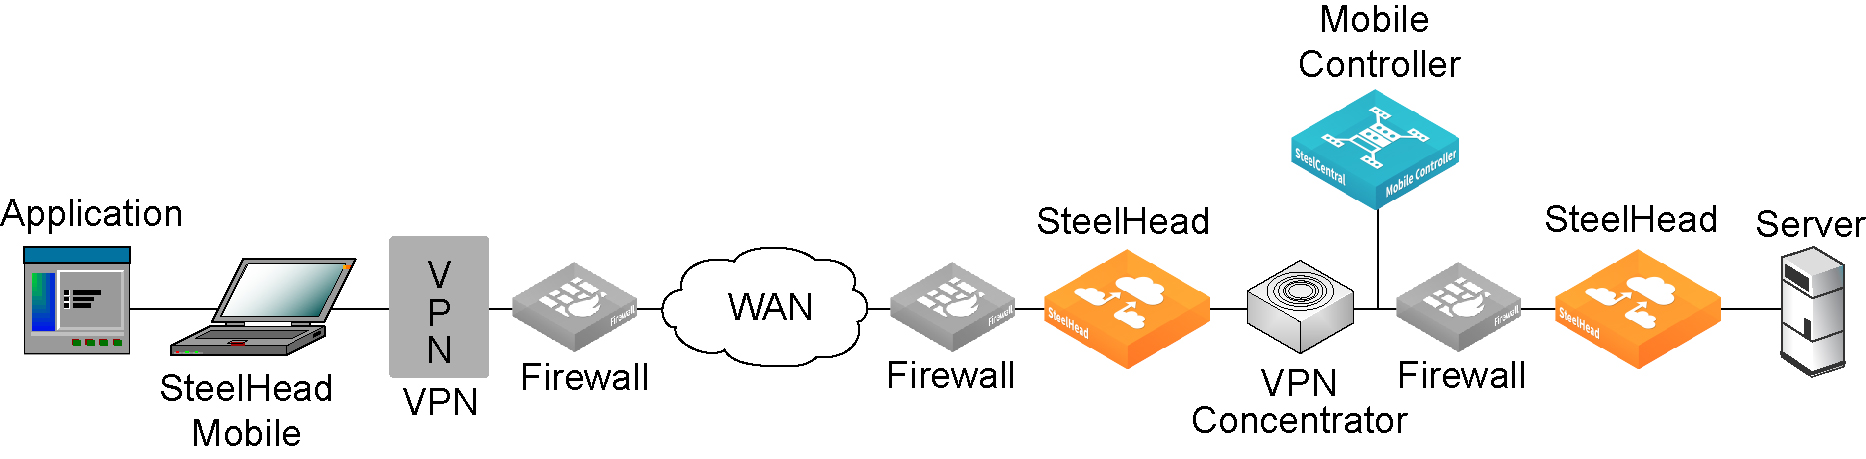
Deploying the Mobile Controller in Environments with Firewalls
If you need a solution for remote access users only, a location for the Mobile Controller might be in the demilitarized zone (DMZ) next to a VPN concentrator with firewalls on each side. Users who need access to the Mobile Controller can connect to it from outside the DMZ. This scenario requires that the client-side network firewall have port 7801 available. The server-side firewall must have ports 22, 80, 443, 7800, and 7870 open.
If you are using application control, you need to allow rbtdebug.exe, rbtmon.exe, rbtsport.exe, and shmobile.exe.
Installing on a Rack
1. If your appliance has a bezel, remove it.
2. Align the screw holes on the flanges with the screw holes on the rack.
3. Insert and tighten the screws on each side of the appliance.
Connecting the Power
1. If your appliance has a master power switch, make sure it is in the off position (on the rear panel).
2. Plug the power cord or cords into the Mobile Controller and an AC outlet.
3. If your appliance has a master power switch, press the master power switch (ON).
4. Press the system power switch on the front of the Mobile Controller.
Caution: In all European electrical environments, you must ground the Green/Yellow tab on the power cord. If you do not ground the Green/Yellow tab, it can cause electrical shock.
Connecting to the Mobile Controller
1. Plug the serial cable into the console port and a terminal.
Depending on your appliance, the console port is either a DB9F port or an RJ45 port. (For port details for your appliance model, see the specification appendix in the installation guide for your appliance.)
The appropriate console cable ships with your appliance.
2. Make sure the console port settings are 9600 baud, 8 data bits, no parity, 1 stop bit, no flow control.
3. Start your terminal emulation program (for example, HyperTerminal or Tera Term Pro).
4. At the login prompt, type admin. The default password is password.
Configuring the Mobile Controller
The configuration wizard automatically starts when you log in to the CLI for the first time.
1. Follow the prompts to configure network and in-path interface settings for the Mobile Controller.
2. Confirm your settings; then type exit to log out of the appliance.
Connecting the Mobile Controller to Your Network
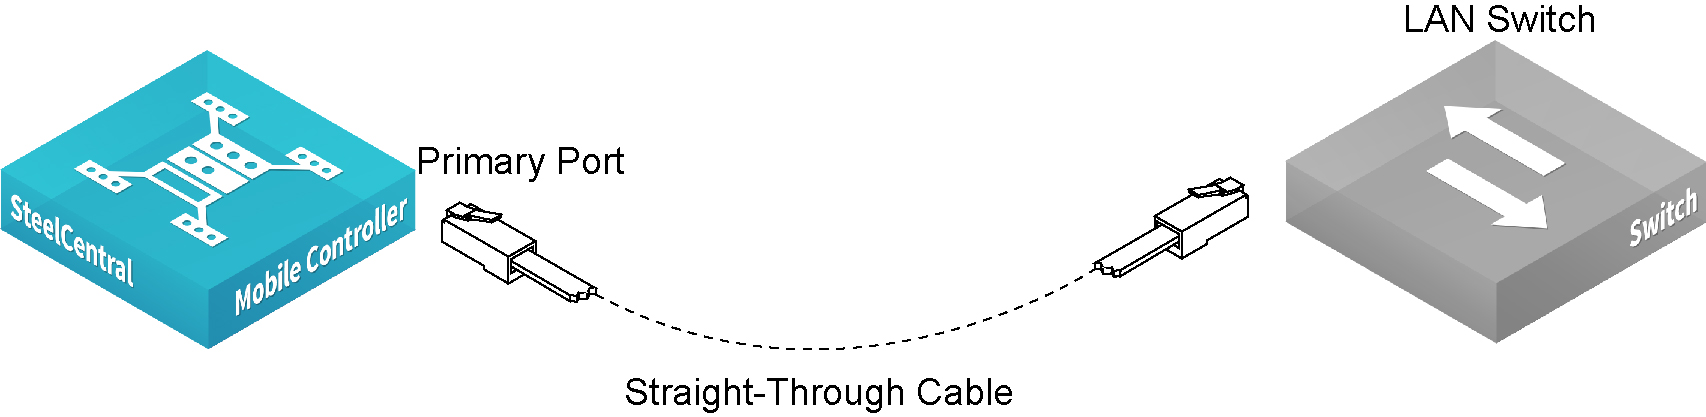
• Plug the straight-through cable into the primary port of the Mobile Controller and the LAN switch. The primary port can be any port on your LAN switch that is configured to connect to a host.
Checking Your Connections
1. Check the status lights to verify that the Mobile Controller is connected properly.
2. Connect to the CLI:
ssh admin@<host>.<domain> or ssh admin@<ip-address>
3. At the system prompt, enter ping commands to verify the connections. For example:
ping -I <primary-ip-address> <primary-default-gateway>
Logging In to the Mobile Controller
1. Enter the URL for the Mobile Controller in the location box of your Web browser:
http://<host>.<domain> or https://<host>.<domain>
The Mobile Controller interface appears, displaying the Welcome page.
2. In the Account text box, type admin.
3. In the Password text box, type the password you assigned.
4. Click Login to display the Home page.
Next Steps
The Mobile Controller is designed to be deployed to SteelHead Mobile clients without additional configuration. It ships with default acceleration and endpoint policies that provide default values for the MSI package, which is deployed to SteelHead Mobile clients in your network.
Typically, you install and deploy a Mobile Controller without modifying the default policies that ship with the appliance. Consider deploying the Mobile Controller to SteelHead Mobile clients using the default policies provided and modifying them only if necessary.
• If you have chosen to use the default MSI package, in the Manage Endpoints - Packages page, click the URL for the Default MSI Package and save it to your local machine.
• Using the deployment tool of your choice (for example, Microsoft SMS), deploy the default MSI package to SteelHead Mobile clients in your network.
• Verify SteelHead Mobile connections and optimization in the Managed Endpoints report of the Mobile Controller.
Note: You can modify the default endpoint policies and acceleration policies that make up the default MSI package. For details about modifying default policies, see the SteelCentral Controller for SteelHead Mobile User’s Guide.
Installing the Interceptor
Overview
Interceptor load balances connections for in-path SteelHeads on the LAN-side of your network. SteelHeads that are monitored by Interceptor are called peer neighbors.
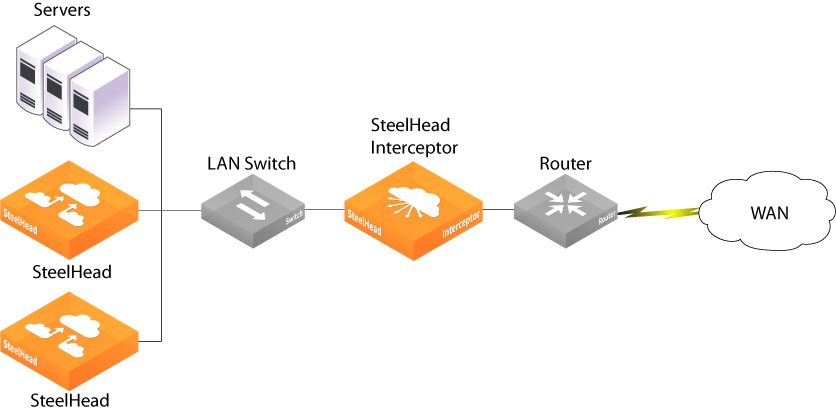
This section describes how to install Interceptor in an in-path configuration behind a WAN router where it distributes connections evenly across a group of local SteelHeads. For details about additional configuration options such as failover and asymmetric, see the SteelHead Interceptor Installation Guide.
Getting Started
Read the release notes for the appliance at https://support.riverbed.com. They contain important information about this release.
• Check your packing slip to make sure that you have all the necessary parts.
• Make sure you have adequate space on a two-post or four-post 19-inch rack. The SteelHead Interceptor requires 3U of rack space.
• Make sure that the ambient temperature does not exceed 40ºC (104ºF) and the relative humidity does not exceed 80 percent (noncondensing).
• Make sure you have a standard Phillips screwdriver to install the appliance to a rack.
• Gather the necessary information:
– Hostname, IP address, netmask, DNS IP address, domain name, and default gateway
Installing on a Rack
1. If your appliance requires rails, attach the rails to each side of the appliance. For details, see the Rack Installation Guide.
2. Align the screw holes on the flanges with the screw holes on the rack.
3. Insert and tighten the screws on each side of the appliance.
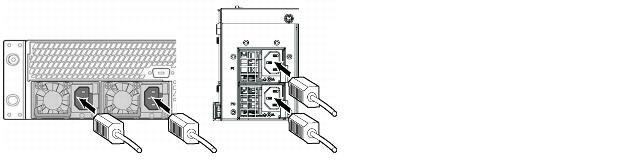
Connecting the Power
1. If your appliance has a master power switch, make sure it is in the off position (on the rear panel).
2. Plug the power cord or cords into the appliance and an AC outlet.
3. If your appliance has a master power switch, press the master power switch (ON).
4. Press the system power switch on the front of the appliance.
Caution: In all European electrical environments, you must ground the Green/Yellow tab on the power cord. If you do not ground the Green/Yellow tab, it can cause electrical shock.
Connecting to the Interceptor
1. Plug the serial cable into the console port and a terminal.
Depending on your appliance, the console port is either a DB9F port or an RJ45 port. (For port details for your appliance model, see the specification appendix in the installation guide for your appliance.)
The appropriate console cable ships with your appliance.
2. Make sure the console port settings are 9600 baud, 8 data bits, no parity, 1 stop bit, no flow control.
3. Start your terminal emulation program (for example, HyperTerminal or Tera Term Pro).
4. At the login prompt, type admin. The default password is password.
Configuring the Interceptor
The configuration wizard automatically starts when you log in to the CLI for the first time.
1. Follow the configuration wizard prompts:
Step 1: Hostname? Interceptor
Step 2: Use DHCP? no
Step 3: Primary IP address? 172.8.1.1
Step 4: Netmask? 255.255.0.0
Step 5: Default gateway? 172.8.1.254
Step 6: Primary DNS server? 172.8.1.10
Step 7: Domain name? domain.com
Step 8: Admin password? xxxyyy
2. After you have performed the initial configuration of the Interceptor, you must configure and enable the in-path IP address. For example, at the system prompt enter the following set of CLI commands:
Interceptor > enable
Interceptor # configure terminal
Interceptor (config) # interface inpath0_0 ip address 10.0.0.10 /24
Interceptor (config) # ip in-path-gateway inpath0_0 10.0.0.1
Interceptor (config) # in-path interface inpath0_0 enable
Interceptor (config) # write memory
Interceptor (config) # service restart
Connecting the Interceptor to Your Network
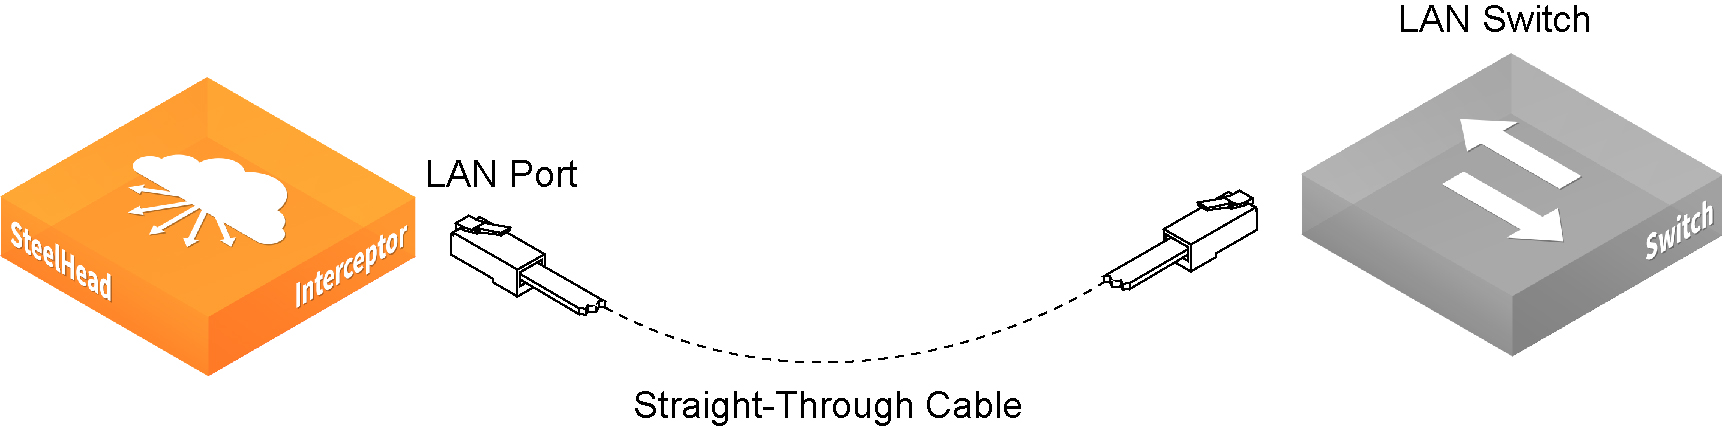
1. Plug a straight-through cable into the primary port of the Interceptor and the LAN switch. The primary port can be any port on your LAN switch that is configured to connect to a host.

2. Plug a straight-through cable into the LAN port of the Interceptor and the LAN switch. The LAN port can be any port on your LAN switch that is configured to connect to a host.
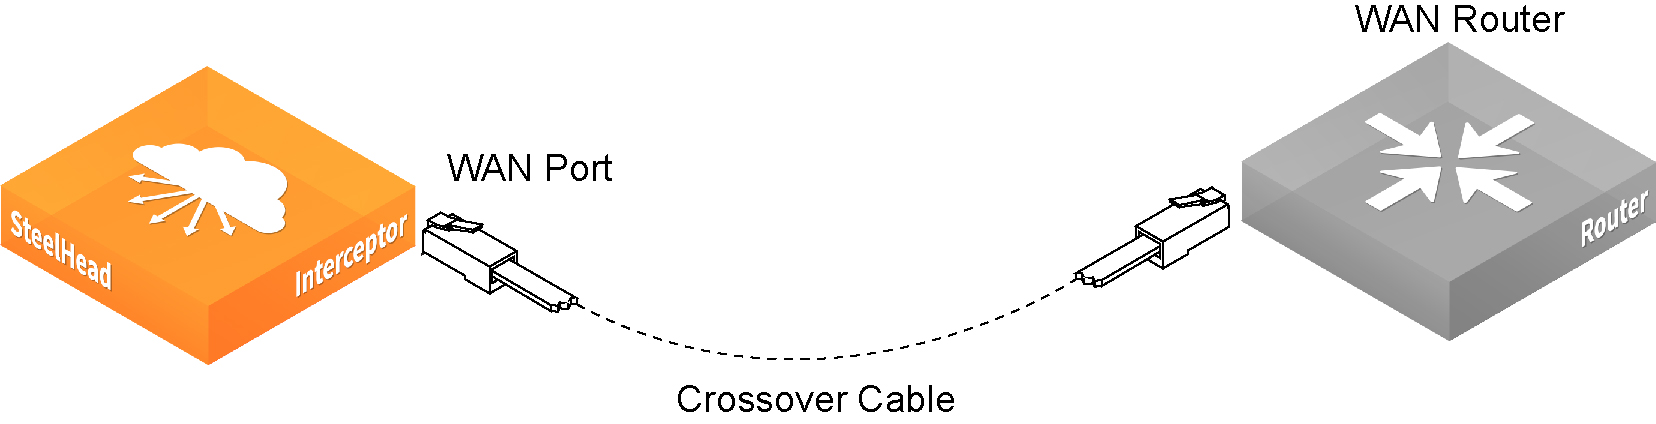
3. Plug the crossover cable into the WAN port of the Interceptor and the WAN router.
Checking Your Connections
1. Check the status lights to verify that the Interceptor is connected properly.
2. Connect to the CLI:
ssh admin@<host>.<domain> or ssh admin@<ip-address>
3. At the system prompt, enter ping commands to verify the connections. For example:
ping -I <primary-ip-address> <primary-default-gateway>
ping -I <inpath-ip-address> <address-on-lan-side>
ping -I <inpath-ip-address> <address-on-wan-side>
Configuring Routing
1. To connect to the Management Console, enter the URL for the Management Console in the location box of your Web browser:
http://<host>.<domain> or https://<host>.<domain>
2. Create in-path routing rules for every subnet on the LAN-side of the SteelHead Interceptor in the
In-Path Rules page.
3. Create peer neighbors for each LAN-side SteelHead in Peer Neighbors page.
4. Verify that the SteelHeads are connected in the Neighbor Peers Report.
Logging In to the Interceptor
1. Enter the URL for the Interceptor in the location box of your Web browser:
http://<host>.<domain> or https://<host>.<domain>
The Interceptor interface appears, displaying the Welcome page.
2. In the Account text box, type admin.
3. In the Password text box, type the password you assigned.
4. Click Login to display the Home page.