SteelCentral AppResponse Cloud Deployment and Configuration Guide For Azure
This document describes the deployment and configuration of a SteelCentral AppResponse Cloud instance in Microsoft Azure. AppResponse Cloud furnishes the functionality of SteelCentral AppResponse 11 as a cloud-based virtual appliance. AppResponse Cloud Version 11.12.0 provides support for the base SPA (Shark Packet Analysis) functionality, and optional add-on ASA (Application Stream Analysis) feature module. The CXA (Citrix Analysis), DBA (Database Analysis), UCA (Unified Communications Analysis), and WTA (Web Transaction Analysis) feature modules are not supported in Version 11.12.0.
Introduction
Deploying AppResponse Cloud involves two processes:
1. Installing and configuring AppResponse Cloud in your Azure environment.
2. Installing and configuring one of the supported mechanisms to deliver packets from your VNet to your AppResponse Cloud virtual appliance.
This document describes the steps in process 1. Some guidance about process 2 follows in the next section.
Connecting to Packet Sources
AppResponse Cloud supports several methods of packet delivery.
◼ Send packets to AppResponse Cloud via a VxLAN tunnel.
◼ Send packets to AppResponse Cloud via Azure’s Virtual Network TAP feature.
◼ Virtual Network TAP currently is provided by Azure in Preview mode. As such, AppResponse Cloud offers its support in Preview mode, as well, and this feature is not supported, currently, by Riverbed Support. Refer to the Microsoft Azure user documentation for information about using Virtual Network TAP.
All the supported remote packet sources will send copies of packets to AppResponse Cloud's management IP address.
Verifying Packet Traffic
Once you have your AppResponse Cloud instance up and running with the right license keys, and you have configured one or more remote packet sources to send packets to it, you should verify that AppResponse Cloud is receiving packets successfully from those remote packet sources
◼ If you are using only the Shark Packet Analysis (SPA) feature module license, you can do this by configuring one or more capture jobs to store the packets that AppResponse Cloud is seeing (refer to the
AppResponse 11 User’s Guide), and using Packet Analyzer Plus to verify the capture jobs are working as expected. A good way to do this is to apply the Bandwidth Over Time view in Packet Analyzer Plus to monitor the flow of packets in each capture job.
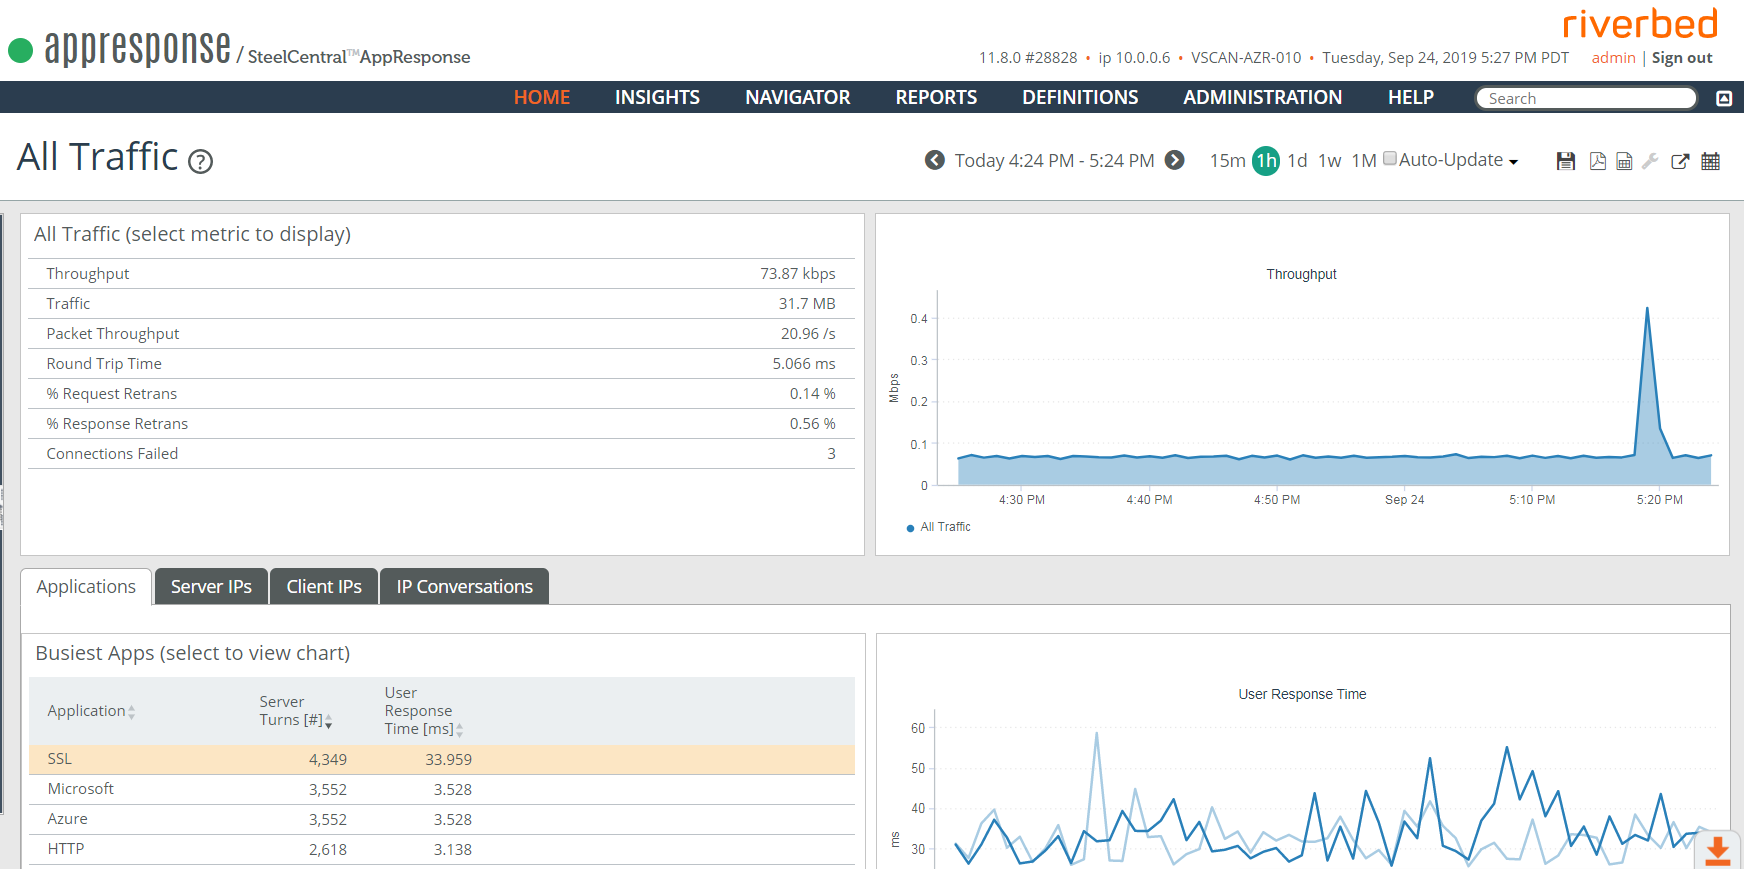
◼ If your deployment includes the optional Application Stream Analysis (ASA) feature module, you can launch the Summary: All Traffic Insight in the AppResponse Cloud web UI to see the overall volume and type of traffic that the appliance is seeing.
After you have verified successful packet reception and processing:
◼ You can configure AppResponse Cloud to send SteelFlow Net (enhanced NetFlow) to NetProfiler as described in the AppResponse 11 User’s Guide, in the section, “Configuring Flow Export.” Note: This version of AppResponse Cloud is compatible only with NetProfiler version 10.14 or later releases.
◼ You can configure the optional ASA feature module to track and monitor the performance of key applications, servers, and IP addresses in your AWS environment by defining your own General Applications, URL Applications, and Host Groups as described in the AppResponse 11 User’s Guide.
Preparing Microsoft Azure For AppResponse Cloud
In summary, AppResponse Cloud installation in Azure works as follows, using the Azure web portal:
1. Create a storage area to which to copy the AppResponse 11 disk image, if one doesn’t exist, already.
2. Copy the source image into this storage container.
3. Create a virtual hard drive from the image with the copied image set as the data source, so that the created disk contains the same content as the source image.
4. Create a VM from the virtual hard drive (as the OS disk).
Accessing Microsoft Azure Documentation For Detailed Instructions
A number of tasks must be executed in Microsoft Azure in order to prepare your Azure environment for the installation of AppResponse Cloud. Each task is mentioned here, with a link provided for accessing the Microsoft Azure documentation that describes the task in detail. The link URLs and the content to which they provide access are owned and controlled by Microsoft. The links are valid as of the publication of this Riverbed document, but, at any time, if the links provided here are broken or
otherwise don’t work, go to https://docs.microsoft.com/en-us/azure/ and browse or search to find the specific information you need.
Create a Storage Area
Using the Azure web portal:
1. Create a resource group.
Refer to https://docs.microsoft.com/en-us/azure/azure-resource-manager/resource-group-template-deploy-portal#create-a-resource-group Copy the Source Image
Obtain from Riverbed the URI of the source image. It is not necessary for you to download the source image locally and subsequently upload it to your Azure account. This procedure describes how to transfer the image from Riverbed directly, within Azure, using the Azure CLI.
2. Transfer the source disk image by executing this command. Note that, once you execute the command, the operation is likely to take an hour or longer:
az storage blob copy start --destination-blob $destinationVHDFileName --destination-container $storageContainerName --account-name $storageAccountName --account-key $storageAccountKey --source-uri $sourceURI
where:
◼ $destinationVHDFileName is the name of the VHD file you will create from the source image. Make sure to include the .vhd extension, or Azure will not allow you to choose this file later as a source for creating a disk.
◼ $storageContainerName is the storage container you created previously.
◼ $storageAccountName is the storage account you created previously.
◼ $storageAccountKey is the storage container key, found on the Access Keys page of the Storage Account page.
◼ $sourceURI is the source image URI provided by Riverbed.
For example:
az storage blob copy start --destination-blob "VSCAN-AZURE-010-install-vhd-12439.vhd" --destination-container "test-container" --account-name "testgroup" --account-key "fakekey0123456789abcdef" --source-uri "https://distrarea.blob.core.windows.net/testblob/VSCAN-AZURE-010-install-vhd-12439?st=2019-08-27T17%3A36%3A18Z&se=2019-09-01T05%3A36%3A00Z&sp=rl&sv=2018-03-28&sr=b&sig=MIH54sM4sMiNyYWrbpziLt7NQfDhupfd1Z%2BG6UTTecY%3D"
A successful operation will output the copy status as “Pending”. The operation is likely to take an hour or longer. Once the copy is complete, the image property will indicate that.
You can use the storage explorer module in the Azure portal to check the copy status. Navigate your storage area to where the file resides, then check the properties and verify that the copy status is successful.
Create a VHD From the Source Image
Create a managed virtual hard disk from the source image. The managed virtual disk then is attached to a VM to create an appliance instance.
Using the Azure web portal:
1. Navigate to the Disks module in the Azure web portal and create a new disk by clicking Add. Alternatively, you can click the Add Resource button on the top of the left menu bar, search for Managed Disks, and click Create.
2. Ensure the region is the same as that of the storage container you created.
3. Choose Storage Blob as the source.
4. Browse to the storage container with the source image, and select the image for the AR11 software.
5. Set the OS type to Linux and the size to 2048GiB, and create the disk.
Create a VM From the VHD
Using the Azure web portal:
1. Click Go to Resource.
2. Click the Create VM button at the top. Make sure to type a unique name in the Virtual Machine Name field.
3. Configure the size to be Standard B8MS and the region to be the same as for the VHD you created. You can first move the VHD to a different region, if needed. The B8MS instance type is the only one supported. You may need to clear all the filters to be able to navigate to B8MS.
4. Optional: Add a secondary data disk for packet storage of size 16GB or larger.
5. Configure Inbound Port rules for the VM. Click Allow Selected Ports and choose HTTPS (443) and SSH (22) from the pulldown menu. Note the warning that these ports are exposed to the Internet.
You will need to finish some additional steps, like networking (for security groups), and click Next to accept defaults on other pages. At the end, you will see a "Validation passed" message at the top of the page. Click Create at the bottom of the page.
When you see the message, "Your deployment is complete", click Go to resource to display the VM's overview page, which includes the Public IP Address and Private IP Address.
Configure Additional Network Security Inbound Port Settings
AppResponse Cloud for Azure receives traffic over VxLAN. To support this, you need to create an inbound port rule that allows VxLAN traffic.
After the VM has been created, open the VM's properties and click Networking. The VM’s inbound port rules will be displayed.
1. Click the Add inbound port rule button.
2. Create a rule to allow VXLAN (UDP port 4789).
Note that you can add source IP rules here, also, to restrict incoming traffic to your own IP ranges instead of Any.
Log In to the AppResponse Cloud Appliance
In a browser, specify the URL to the VM as https://<IP address>, specifying either the public IP address or the private IP address, as your individual network requires. The VM’s public and private IP addresses are shown on the VM’s Settings page. Note that it may take several minutes or more for AppResponse to initialize before you can access the AR11 login web page.
Log in the AppResponse when the Login page appears. The default user name is “admin”, and the default password is the Azure vmID. You can find the Azure vmID by going to
http://resources.azure.com/, searching for the VM, and finding the value for “vmID” that is displayed.
Licensing the AppResponse Cloud Appliance
◼ Allow the AppResponse Cloud appliance to operate.
◼ Enable the licensed capabilities and capacities.
A product key can be used on the Licenses page of the Riverbed Support site (https://licensing.riverbed.com) to view and manage your licenses. For more information on licenses, see Licensing in the AppResponse 11 User’s Guide or the AppResponse 11 web UI Help.
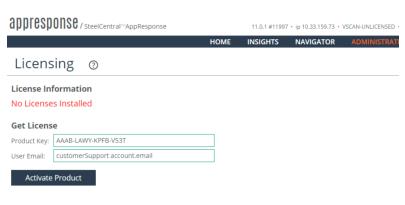
Licensing AppResponse Cloud With An Internet Connection
The header line at the top of each AppResponse Cloud web UI page shows the AppResponse model and license. If no license is installed, “UNLICENSED” is displayed after the model.
1. In the AppResponse Cloud web UI, go to Administration > Other: Licensing.
2. Enter the Product Key.
3. Enter the Email address of the user activating the license.
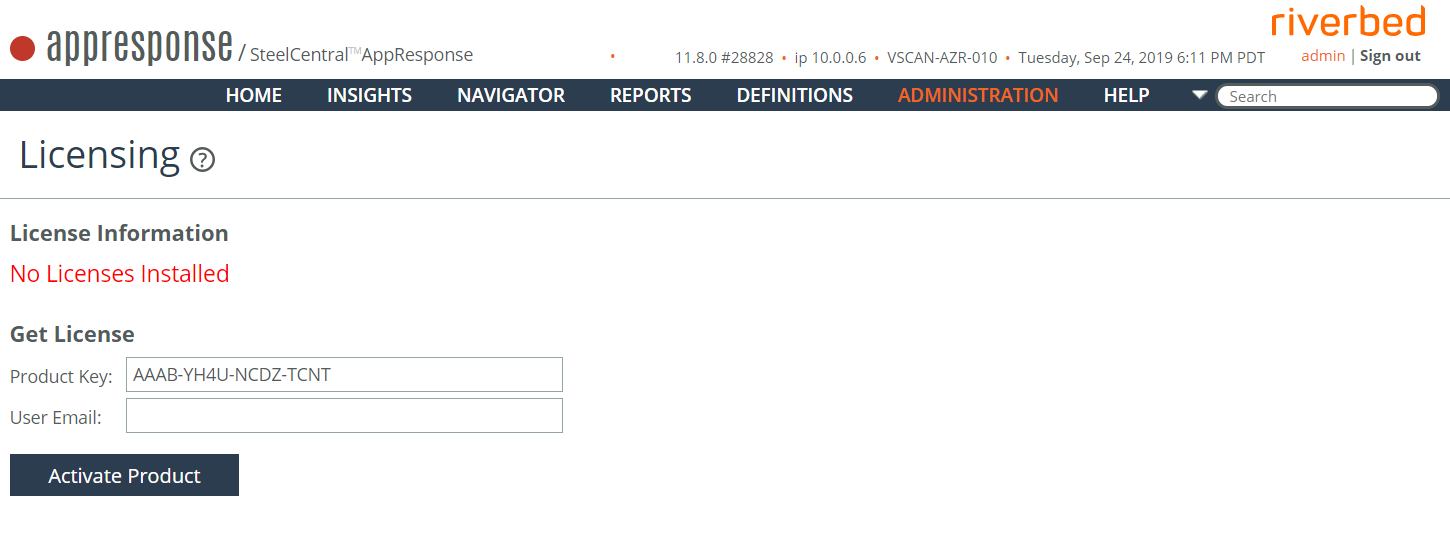
4. Click
Activate Product. No further action is required. AppResponse Cloud automatically opens a connection over the Internet to the Riverbed Licensing site. A valid license is activated and the Feature Keys are installed automatically.
Deactivating An Active AppResponse Cloud License
An AppResponse Cloud license can be deactivated and used again. When deactivating a license:
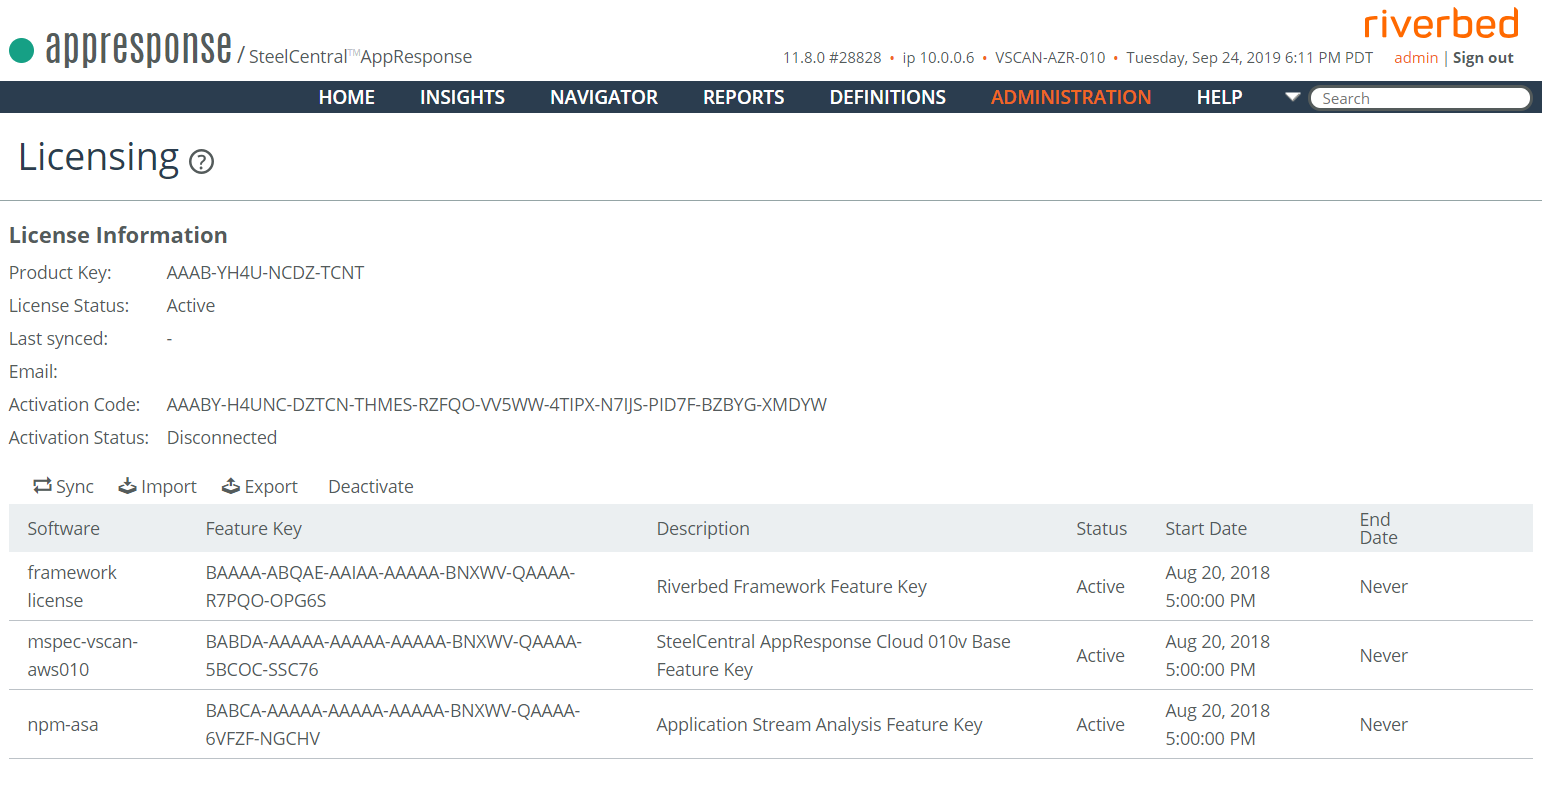
◼ Only a license with an Active License Status on the License Information page can be deactivated.
◼ Copy the Deactivation Code that is displayed during the process on the web UI page.
◼ This code is used to deactivate the license and allow reactivation.
◼ You must delete the existing license after successfully deactivating the license.
1. In the AppResponse Cloud web UI, go to Administration > Other: Licensing.
2. On the License Information page, confirm that the License Status is Active
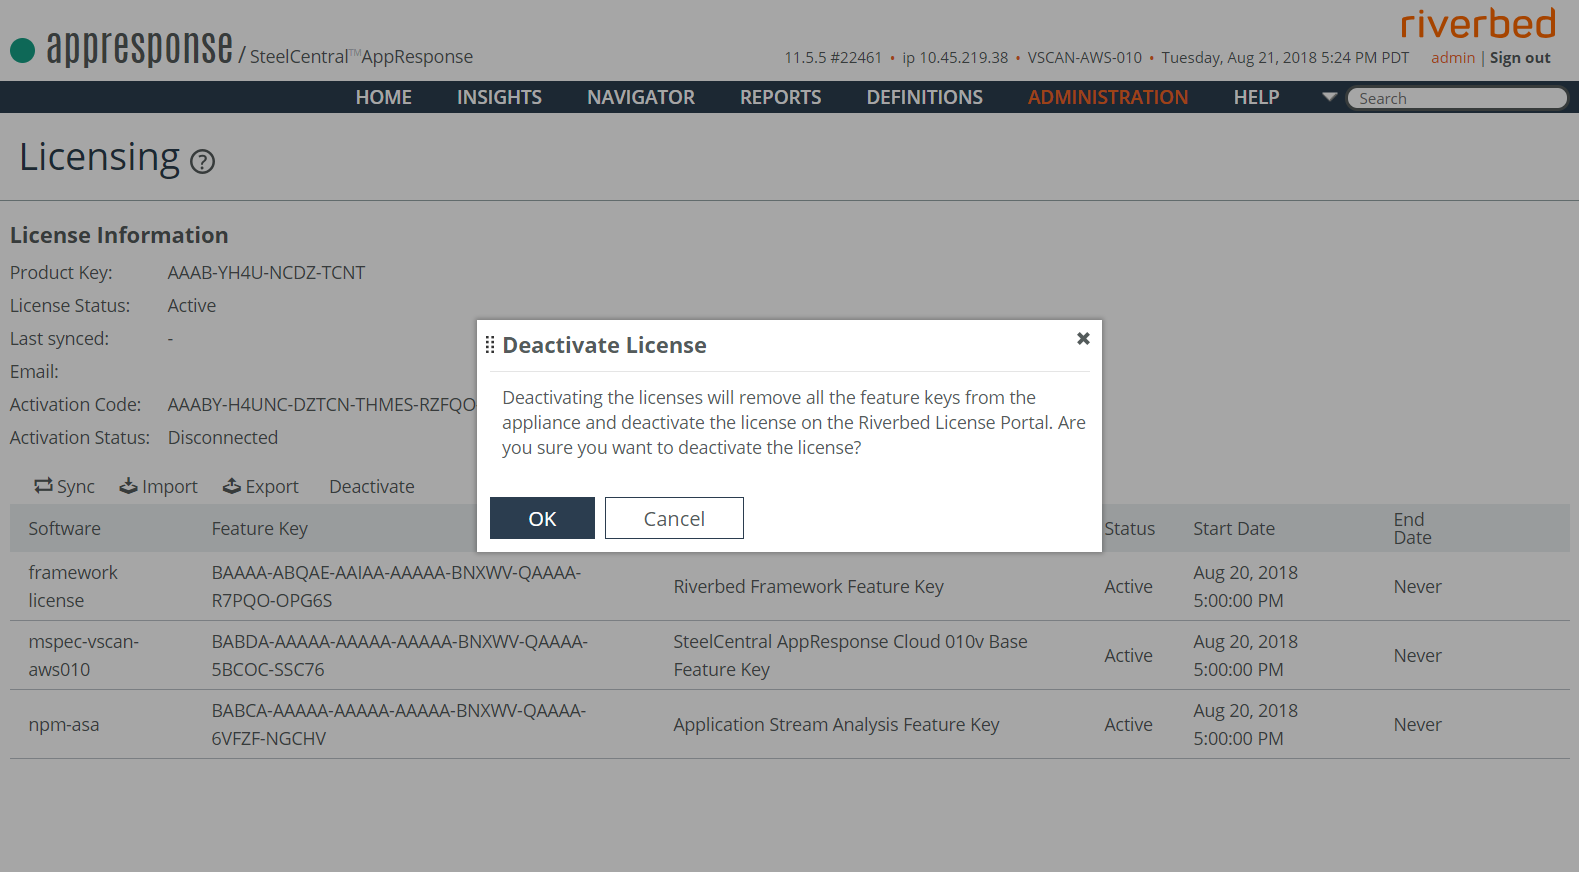
. 3. In the toolbar over the Feature keys table, click Deactivate.
4. The Deactivate License window opens and asks for deactivation confirmation. Click OK.
5. The Deactivate Product screen appears (the License Information page with a Delete License button may appear first; ignore it for the moment). The Deactivate Product screen displays a deactivation code, used on the Riverbed Licensing site to deactivate the license and allow reactivation.
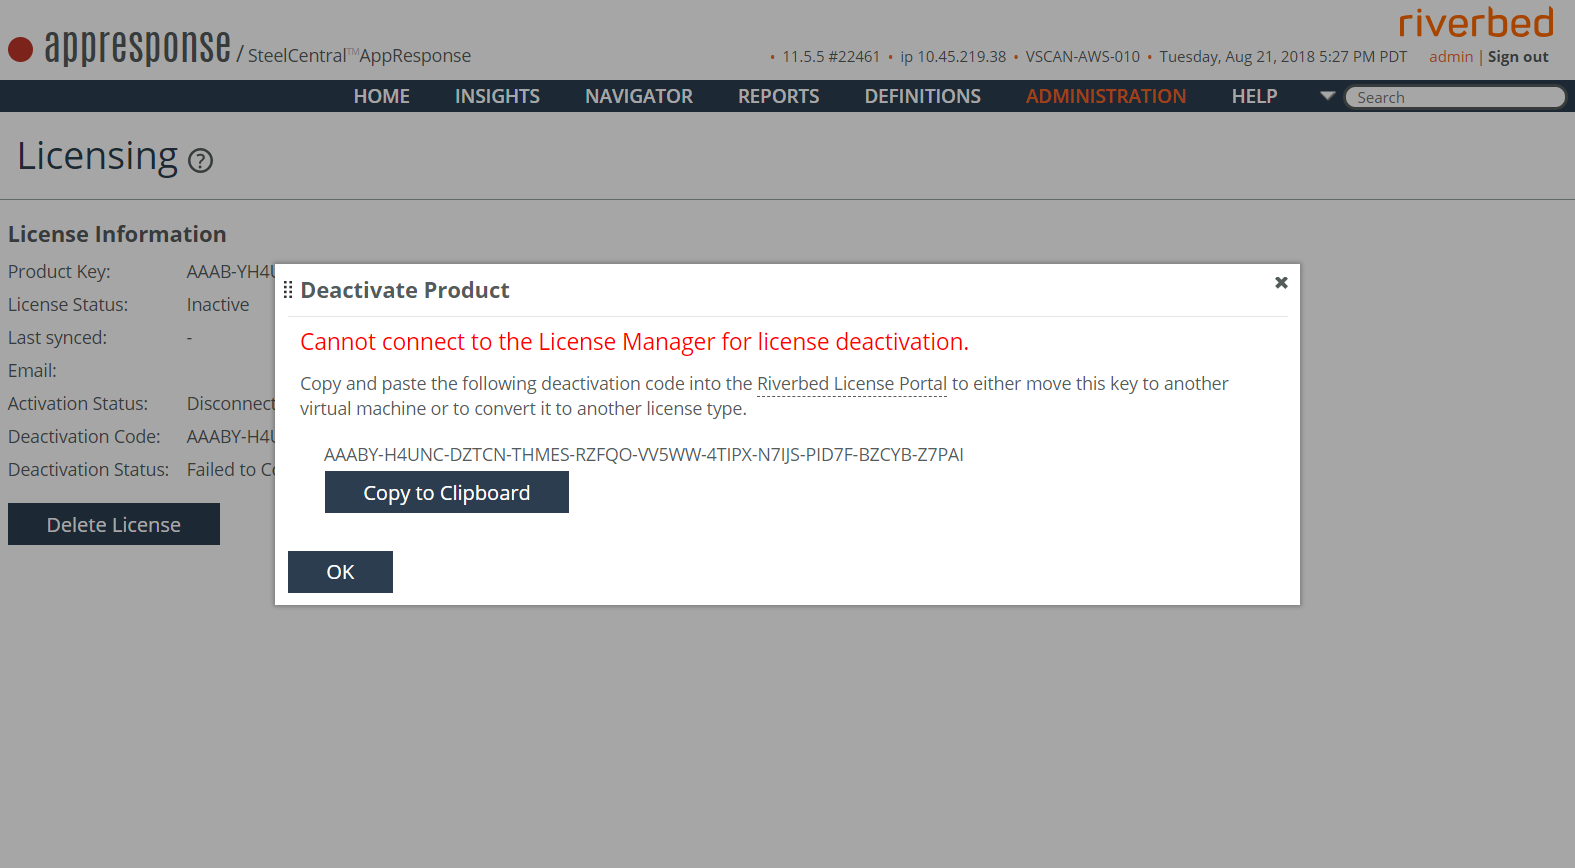
6. Click Copy to Clipboard to save the deactivation key.
7. Click OK.
8. Inform the license provider that the Product Key was deactivated. When completed, the Product Key is again available for installing AppResponse Cloud. The license deactivation occurs automatically.
9. Click Delete License.
Licensing AppResponse Cloud With No Internet Connection
1. In the AppResponse Cloud web UI, go to Administration > Other: Licensing.
2. Enter the Product Key.
3. Enter the Email address of the user activating the license.
4. Click Activate Product. The Activate Product window opens.
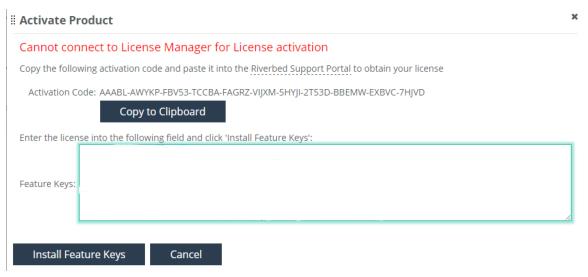
5. Click Copy to Clipboard. The Activation Code is used to access the Feature Keys on the Riverbed Licensing site.
6. On a computer with an Internet connection, go to the Licenses page of the Riverbed Licensing web site (https://licensing.riverbed.com) and paste the Activation Code in the Enter Unique Product Identifier box.
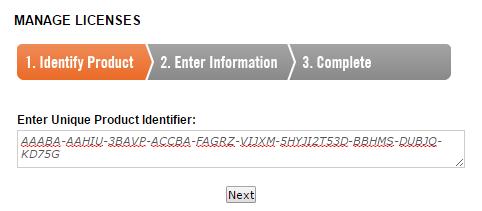
7. Click Next. The Product Key is activated and the Product Key Details are displayed. The License Status is assigned and the Available Feature Set table shows each license Feature Key.
8. Return to the Activate Product screen in the web UI and copy the Feature Keys, one per line, in the Features Keys text box.

9. The first key must be the CLMF-FRAMEWORK feature key.
10. Click Install Feature Keys to finish the installation.
Adding a Storage Volume Post-Deployment (optional)
If you did not create a secondary data disk at the time you created the VM, it is possible to add one later:
1. In Azure, open the VM overview and click Disks. Go to the Data disks section, and click Add data disk.
2. Click the Name dropdown menu and click Create Disk to show the Create Managed Disk page. Specify a name and a size for the disk, then click Create.
3. Click Save on the Disks page when you’ve been notified that the disk was created successfully.
4. Reboot the AppResponse system, and, after the reboot, you should see the new disk listed in the Web UI Hardware/Storage page’s Hardware Status tab. Change to the Storage Configuration tab and check the RAID Configuration. It will show the Secondary Data Volume as Uninitialized, with a size of 0, requiring replacement or reinitialization.
5. Click Reinitialize in the Mode dropdown, then click Commit Changes. Following the commit, the Secondary Data Volume will have a mode of N/A. Verify that the volume is of the expected size, taking unit conversions into account, if necessary.
6. Click Reset to Packet Priority, then click Commit Changes. Go to Data /Space Allocation, Data Section, and check that the Secondary Data Volume shows as having its space reserved for Capture Jobs.
7. Go to Administration > General Traffic Settings:Capture Jobs/Interfaces and check that the default capture job is shown as Running.