About connecting to managed appliances through a firewall
The SCC provides you with the ability to configure an SSL authentication port for SteelHeads when the SCC is behind a firewall with restricted access to ports 443 and 80. This feature enables SteelHeads to communicate with SCC. You configure the SSL authentication port using the SCC CLI.
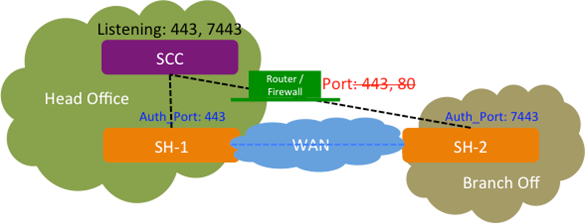
This diagram shows a SteelHead (SH-1) connected to the SCC that’s listening on port 443 without a firewall. The second SteelHead (SH-2) is connected to the SCC through a firewall that has restricted access to ports 443 and 80. On the SCC for SH-2, you can configure an SSL authentication port (for example, 7443) using a CLI command enabling you to communicate with SH-2.
SCC with custom authorized port 7443
You can configure one additional authentication port in addition to the existing port 443.
The SSL authentication port feature is only available via the CLI; it isn’t available in the SCC Management Console.
For detailed information about connecting and using the Riverbed CLI, see the Riverbed Command-Line Interface Reference Manual.
Troubleshooting the connection
On the SCC:
• The port number should have an appropriate entry when you run the netstat command. On the SCC, via the shell, at the system prompt enter:
netstat -an |grep <port-number>
• The port number should be listed in the Apache /etc/httpd/http.conf file:
Listen <port-number>
If the port number doesn’t appear, restart the HTTP service on the SCC:
pm process httpd restart
On the managed appliances:
• Enter the show ocd connections command. It should list the port number as Auth Port and Status “Connected.”
• To ensure registration is successful, enter these commands:
amnesiac # show scc
amnesiac # show cmc
Connecting to the SCC Management Console
To connect to the Management Console, you must know the host, domain, and administrator password that you assigned in the configuration wizard.
Cookies and JavaScript must be enabled in your web browser. Before you begin, clear your browser cache and cookies to ensure the user interface displays correctly.
1. Enter the URL for the SCC in the location box of your browser:
<protocol>://<host>.<domain>
<protocol> is http or https. The secure HTTPS uses the SSL protocol to ensure a secure environment. When you connect using HTTPS, you’re prompted to inspect and verify the SSL certificate. This is a self-signed certificate used to provide encrypted web connections to the SCC.
<host> is the IP address or hostname you assigned the SCC during initial configuration. If your DNS server maps the IP address to a name, you can specify the DNS name.
<domain> is the full domain name for the SCC.
The SCC Sign In page appears.
2. In the text box, specify the user login: admin, monitor, a login from a RADIUS or a TACACS+ database, or a previously configured role-based management (RBM) account.
The default login is admin. Users with administrator privileges can configure and administer the SCC. Users with monitor privileges can view SCC reports but they can’t configure the system.
3. In the Password text box, specify the password you assigned in the configuration wizard of the SCC.
The SCC is shipped with password as the default password.
4. Click Log In to log in to display the dashboard.