Creating a backup policy
In the Backup Policies panel, you can create a backup policy protecting an entire Edge, all servers/all VMs on that Edge, or a specific server. Once you create a policy, it is displayed in the Backup Policies panel. Expand a policy to view its details.
Note: If your data centers are configured for replication, you must schedule snapshots on the current primary data center. Keep in mind that snapshots taken on one data center are only present on that particular data center, and snapshots will not work after failover if the snapshot configuration is not present on the failover data center. If a failover does occur, re-enter the username and password for Edge servers on the new primary site (previously the secondary site). For details on replication, see
“Configuring replication” on page 51.
If you are backing up a VM that uses two datastores, be aware of the following limitations:
• If the OS datastore is missing when you trigger a server-level backup, the backup will fail because the VMX files are missing.
• If the DATA datastore is missing when you trigger a server-level backup, the backup will succeed without any errors. However, the proxy mounted VM will not have access to its data on the DATA datastore.
To create a new backup policy
1. Choose Configure > Data Protection: Backups to display the Backups page.
If you haven’t configured snapshots, a warning appears at the top of the page indicating that some VMs are not available for backup. Click the link in the warning to display the LUNs page and configure the snapshots.
Figure: Backups page
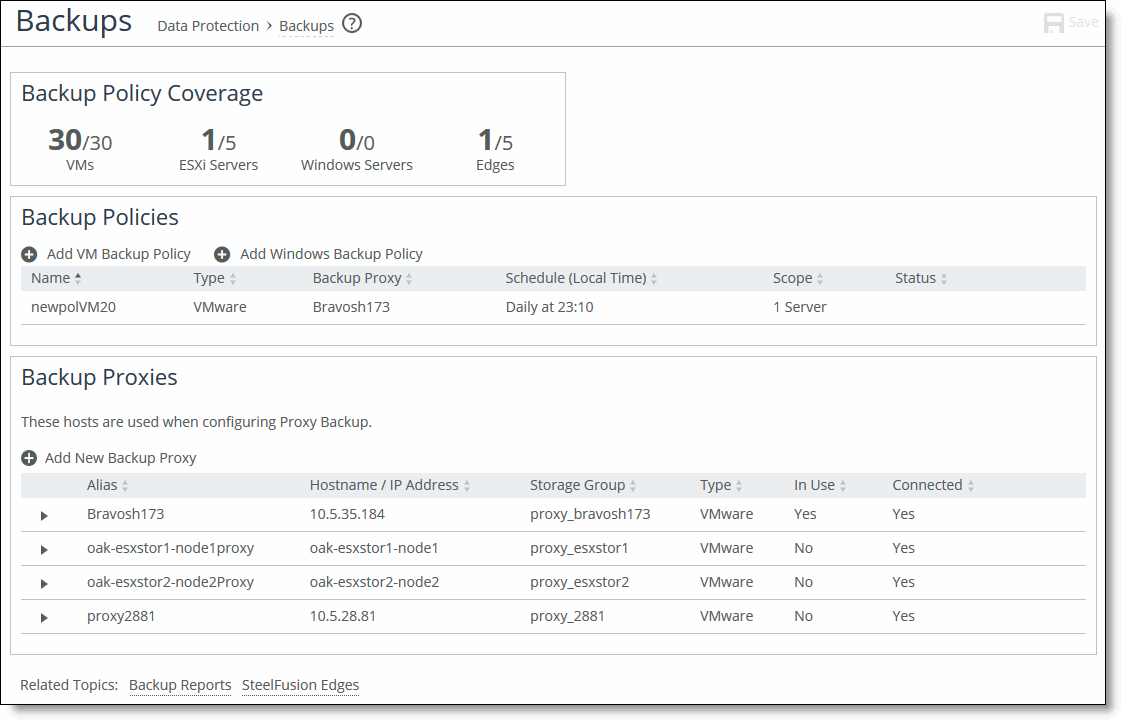
2. Click Add VM Backup Policy or Add Windows Backup Policy to display the wizard.
If all servers are already currently protected, or if there are no servers added or discovered by Core, a message displays indicating that there are no servers available for protection.
Figure: Create New Backup Policy Wizard - Scope page
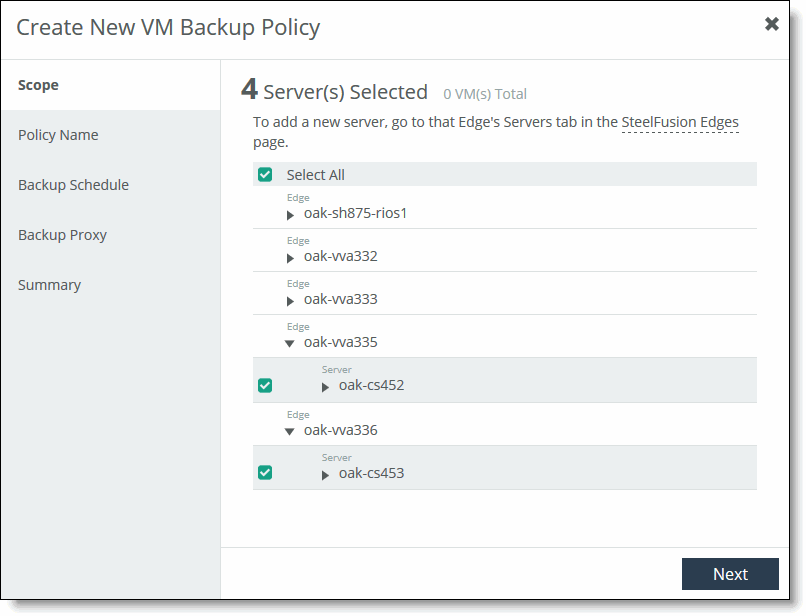
In this wizard, you will specify the backup policy’s scope, name, schedule, and proxy server.
Note: If you exit the wizard before completion, you will lose all changed settings. Changes are not committed until the wizard finishes. You can cancel and restart the wizard at any time during the process to redo any steps.
3. In the Scope page, select the Edges to include in the new backup policy.
The Scope page displays a hierarchy of Edges and servers available for backup. By default, the Select All option is enabled to back up all Edges and servers. Click the right arrow next to each Edge to view and select its associated servers and VMs. If a server is already protected using another policy, it is dimmed. Mouse over the tooltip icon to view the name of the policy protecting the server. When a server is protected, all of its VMs are included.
If you have multiple Edges connected to the Core, Core will perform the backup at the time you specify in the Edge’s local time zone.
Note: When you add a new Edge or server in the SteelFusion Edges page, it is not automatically protected under a backup policy. You must add it to the policy by clicking the policy name in the Configure > Data Protection: Backups page. When you add a new VM, or add a new LUN to a Windows server, it is automatically protected.
4. Click Next to display the Policy Name page. Click Back to return to the previous page.
Figure: Create New Backup Policy Wizard - Policy Name page
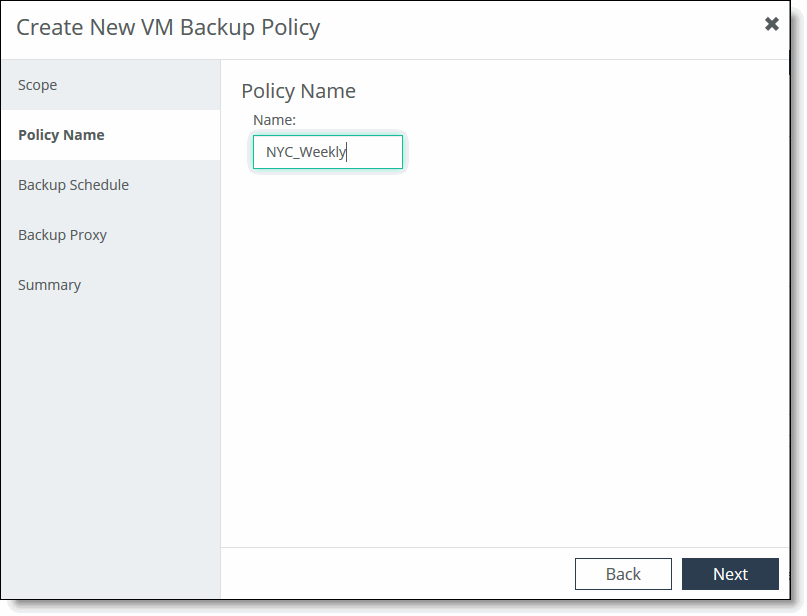
5. In the Policy Name page, specify a name for the backup policy.
6. Click Next. Click Back to return to the previous page.
Figure: Create New Backup Policy Wizard - Backup Schedule page
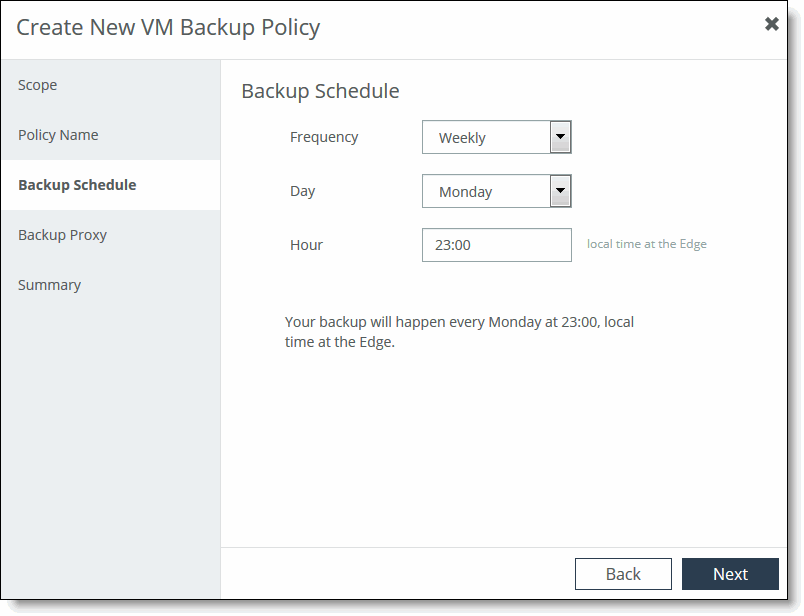
7. From the drop-down menu in the Backup Schedule page, select the type of schedule you’d like to create.
You can create an hourly, daily, or weekly backup schedule.
8. If you selected Hourly, specify the number of minutes after the hour to start the backup. If you selected Daily, specify a time (the local time at the Edge) to start the backup. If you selected Weekly, select the day of the week and time (the local time at the Edge).
9. Click Next to display the Backup Proxy page. Click Back to return to the previous page.
Figure: Create New Backup Policy Wizard - Backup Proxy page
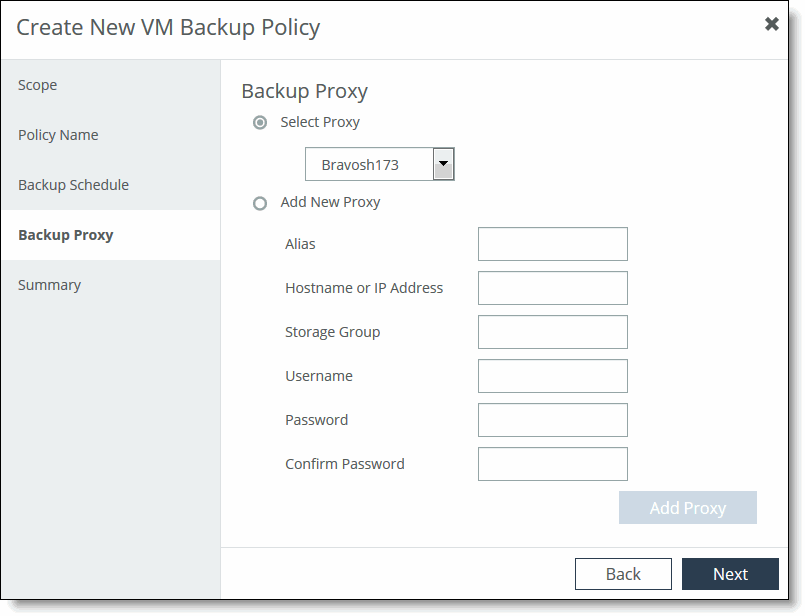
10. In the Backup Proxy page, select an existing backup proxy from the Select Proxy drop-down list or select Add New Proxy to add a new host.
11. To add the new host at the branch or proxy at the data center, use the controls described in this table.
Control | Description |
Alias | Specify an alias for the server. |
Hostname or IP Address | Specify the hostname or IP address for the backup proxy. If the formatting is correct, the field is highlighted in green. If there is an error, the field is highlighted in red. |
Username | Specify a username for host access. |
Password/Confirm Password | Specify and confirm a password for host access. |
Storage Group | Specify the storage or initiator group for the backup host. |
Add Proxy | Validates and adds the specified host configuration to the running configuration. If the connection is successful, the proxy appears in the Backup Proxies panel at the bottom of the Backups page. If there is an error validating the proxy, an error message appears. |
12. Click Next to display the Summary page. Click Back to return to the previous page.
A summary of your backup policy settings appears.
Figure: Create New Backup Policy Wizard - Summary page

13. Review the settings and click Done if you have no further changes.
Verifying a new backup policy
After you have created a new backup policy, we recommend that you verify that the policy is working correctly in the Reports > Data Protection: Backups page. You can drill down by Edge, then server, then policy. By default, the last five completed backups are displayed.
For details on the Backups report, see
“Viewing the Backups Report” on page 137.